How to Give Someone Access to Your Digital Marketing Accounts

doors open

Outsourcing your digital marketing, or parts of it, to someone is the norm today. As a business owner, you can’t possibly know everything about digital marketing, nor have time to learn them to the level that takes years of practice. You have limited time. And that time is best spent on managing and growing your business.

So, what’s your option? Outsource your digital marketing.

Why You Should Quantify Your Outsourced Digital Marketing Projects

If this is the first time you’re outsourcing your digital marketing, I strongly recommended that you start small but project that’s easily quantifiable. That way, you’d know if they did a great job or not.

A website redesign might seem like a subjective project. But in the eyes of any digital marketing expert, this can be quantified easily. A website can’t just be pretty and nice to look at. It has to help you in any of the following:

  • Increase your traffic
  • Get your more leads
  • Have more paying customers
  • More revenues

A website redesign project should not be measured by how fast it was completed, nor if it was according to your specifications. It has to contribute to something tangible.

I discussed more about this in a white paper I put together— 9 Things Business Owners Need to Know Before Hiring a Digital Marketing Agency or Consultant. Feel free to check it out!

Biggest Mistake Business Owners Make When Outsourcing Their Digital Marketing

Once you have chosen the agency or individual who will handle your digital marketing, the first thing they will need to get started with their work is access to your online marketing assets.

These are accounts to whatever tools you are currently using, or plan to use in order to accomplish your business objectives.

From my experience working with dozens of businesses across the globe, this is the biggest mistake I often see owners do— they give their usernames and passwords to the people working on their accounts.

While it’s a great idea to trust them, it doesn’t mean that you have to give them full control of your online assets.

Just imagine the repercussions of this:

  • They can steal your data and use that for themselves
    • This is different depending on what data you have, but if you handle customer information like emails, credit card numbers, etc. This is a huge risk. How do you think your customer would feel if the received an email or a call pitching for services from your agency?
  • Or even use the tools for themselves that you paid for yourself
  • An even bigger risk, they can easily change the passwords and you will immediately lose access to them yourself.
    • Or someone from the agency’s staff will do that
    • This is especially true if you ended the relationship on negative terms

The solution? Give them (limited) access to your accounts.

How to Give Someone Access to Your Digital Marketing Tools

I’ll go over the most basic digital marketing tools here first and how you can give an outsourced agency or individual the proper access to your accounts.

Table of Contents
Click on any of these to jump straight to that topic
  1. Google Analytics
  2. Google Search Console
  3. Google Tag Manager
  4. WordPress

I’ll be adding more to this list in the future.

The goal of granting access to your accounts is to allow other people to view the data, configure it properly, and create reports. Obviously, you don’t want them to have the ability to run away with the entire account where you end up losing access to everything. So, that’s what this article is all about—teaching you the step-by-step process on how you can give someone access to your online marketing tools and reducing the risk that you lose access to them yourself.

How to Give Access to Google Analytics to an Outsourced Agency or Consultant

The first tool that you need to to give your chosen outsourced digital marketing firm is Google Analytics. If you haven’t already created one, do so now. Here’s a step-by-step instruction on how you can create an account and install Google Analytics.

Step 1: Log in to Google Analytics

First, head on over to analytics.google.com and log in. Once you’re there, you will see your default account.

Step 2: Go to the Admin Section

Next, click on the admin section on the left-hand menu.
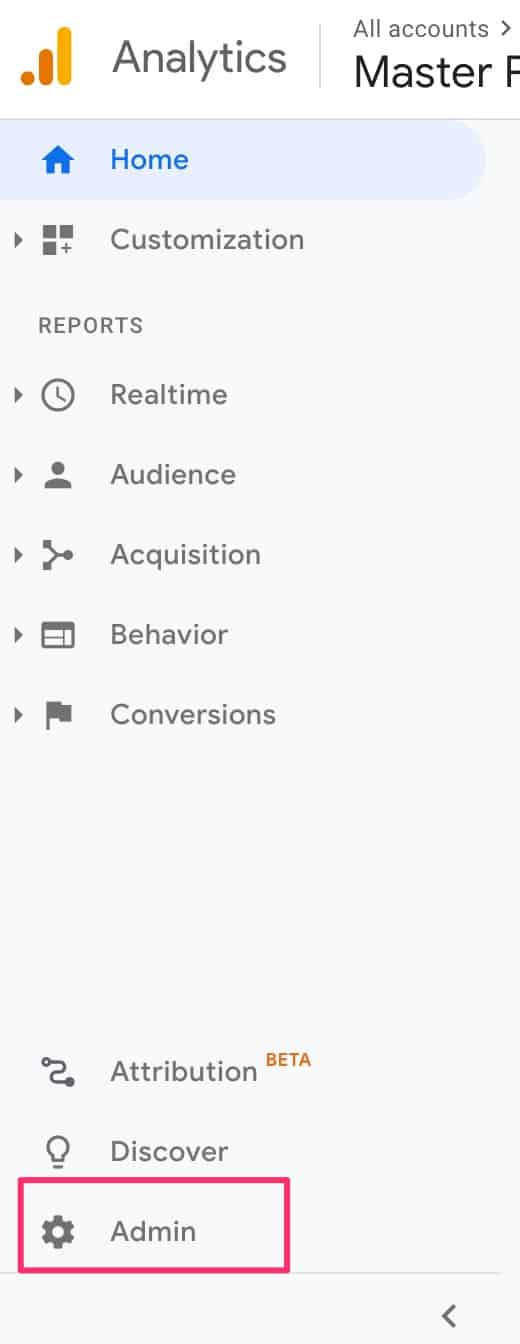
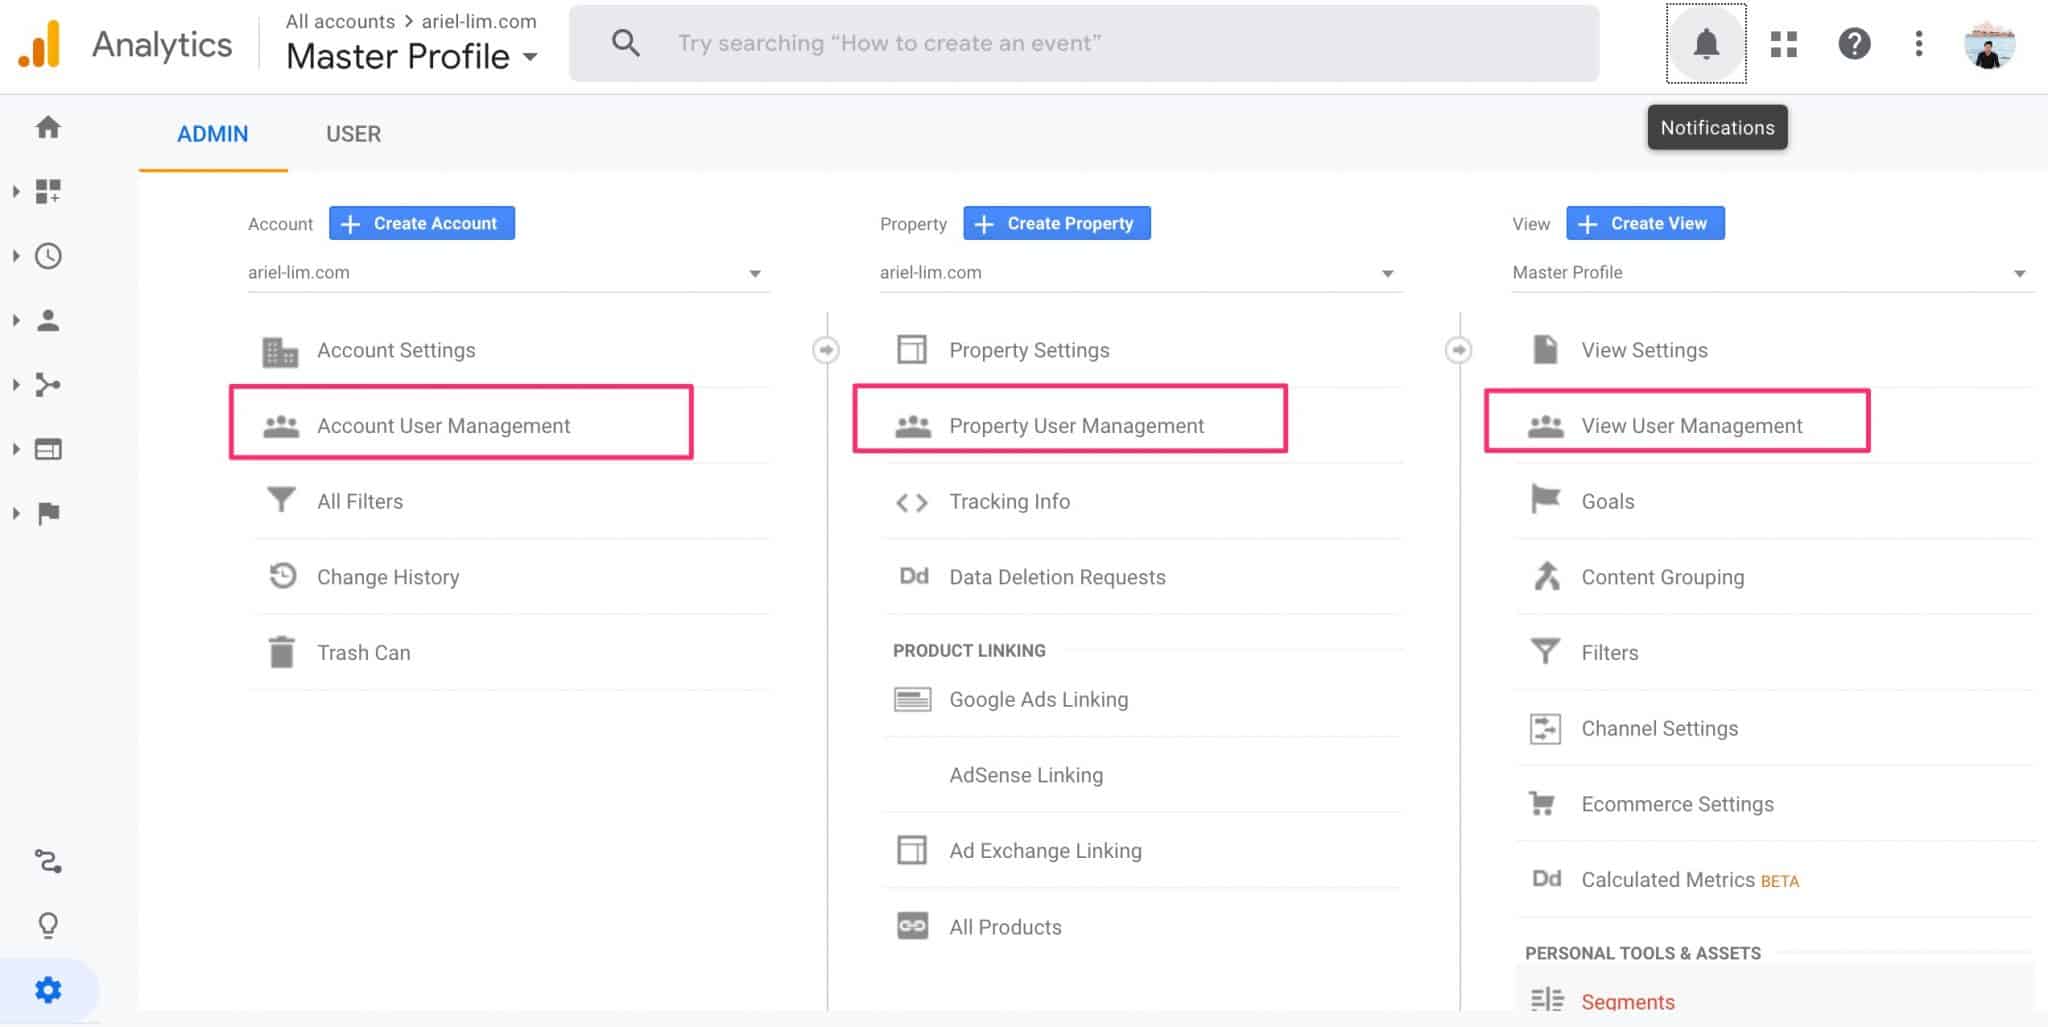
Admin section of Google Analytics

Step 3: Determine the Level of User Access Needed

Google Analytics provides 3 levels of access:

  1. Account
  2. Property
  3. View
Different user management settings in Google Analytics

I’m not going to dive in and discuss each of those three. But oftentimes, you would not want to give someone else access to your Google Analytics in the account level. In most cases, you would choose the property or view level and give access to those.

I typically request access at the property level because (1) most Google Analytics accounts aren’t setup properly, so I would need to gain access to info that’s only available at that level; and (2) you can create multiple views in one property. And it’s a best practice to have at least three different views for different purposes. I’ll discuss this more in some other post.

Step 4: Give the Appropriate User Permission

Once you’ve selected which level to grant your outsourced help the credentials, you would need to enter an email and determine which permissions they actually have.
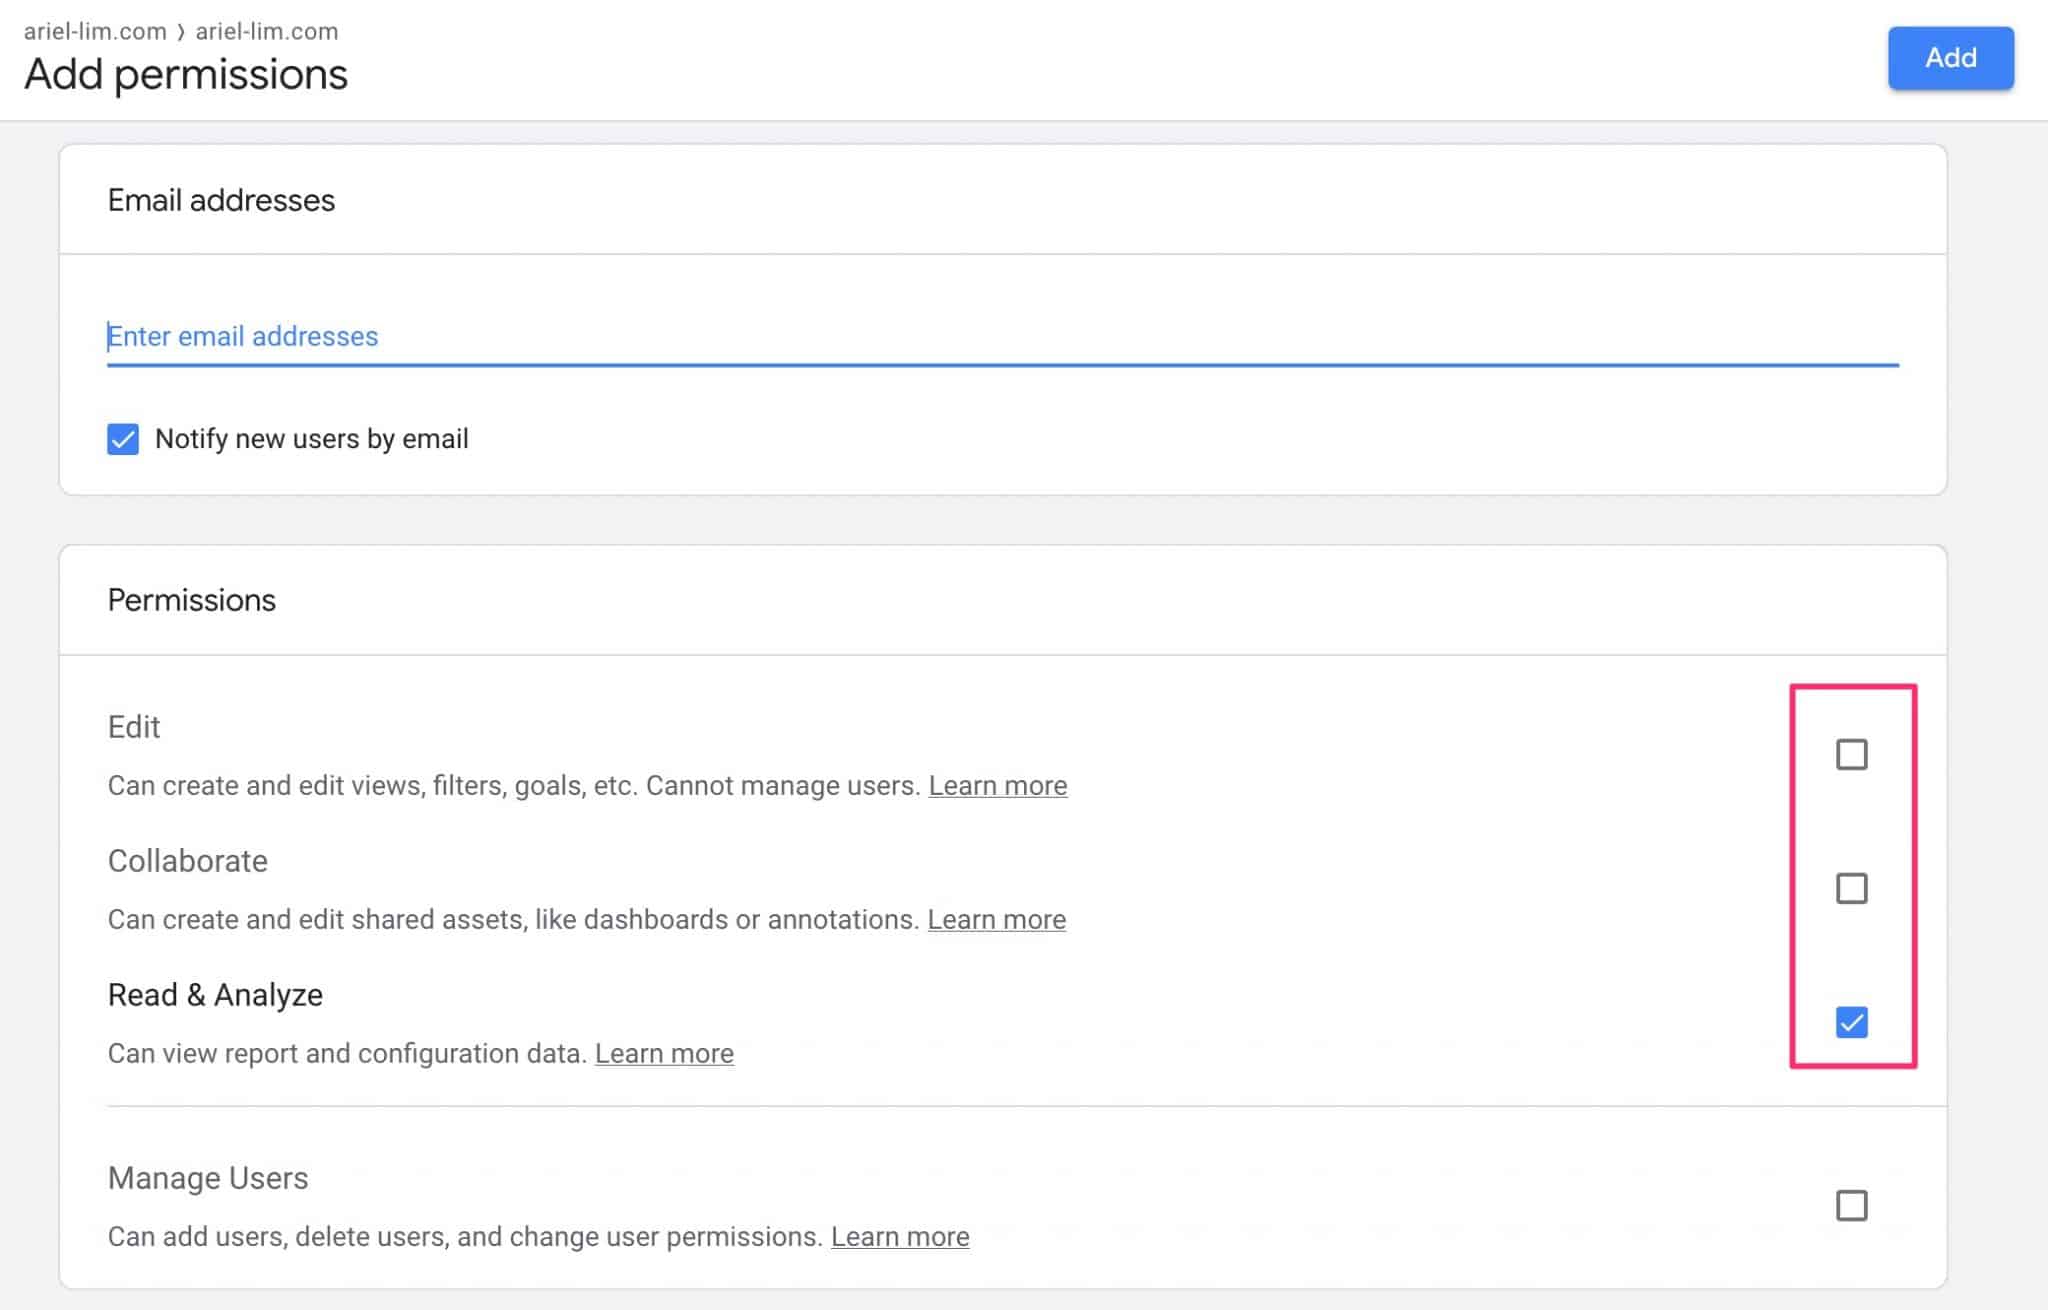
Add permissions to user in Google Analytics

In most cases, you would check the three boxes I highlighted:

  • Edit
  • Collaborate
  • Read & Analyze

This will give them the ability to create separate views, add filters, and goals. They will also be able to create custom reports and be able to help link Google Ads or Google Search Console.

If you only give them the Read & Analyze permission, most of the time, they will ask you to do a couple of things for them because their account is so limited that they can’t do anything.

If they have multiple people working, you can also allow them to manage other users. Going back to lowering your risks, this will only allow them to modify stuff related to your property and views, but not your account.

You can learn more about user permission in Google Analytics here.

The next tool you should be using is Google Search Console. If you are not using this, you’re missing out on a lot of analytics and data. To add a new user to your account, follow these steps.

Step 1: Go to Settings

Of course, you have to make sure you are in the right account. Then, once you’re in, head to the lower-left section an click on settings.
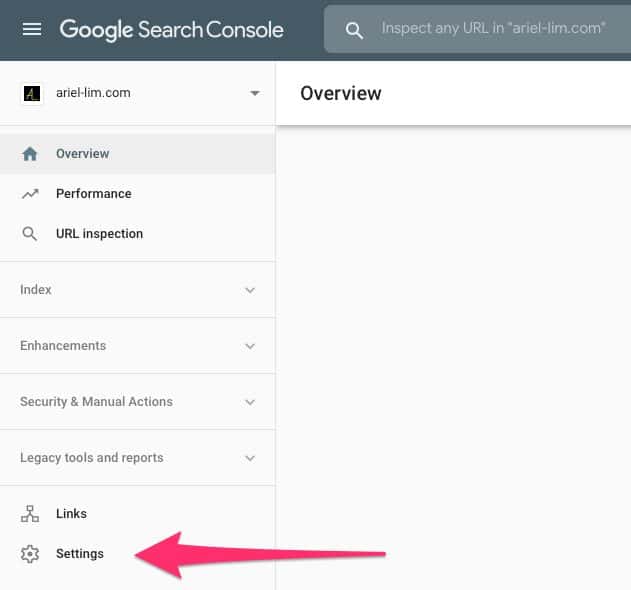
google search console add user step 1

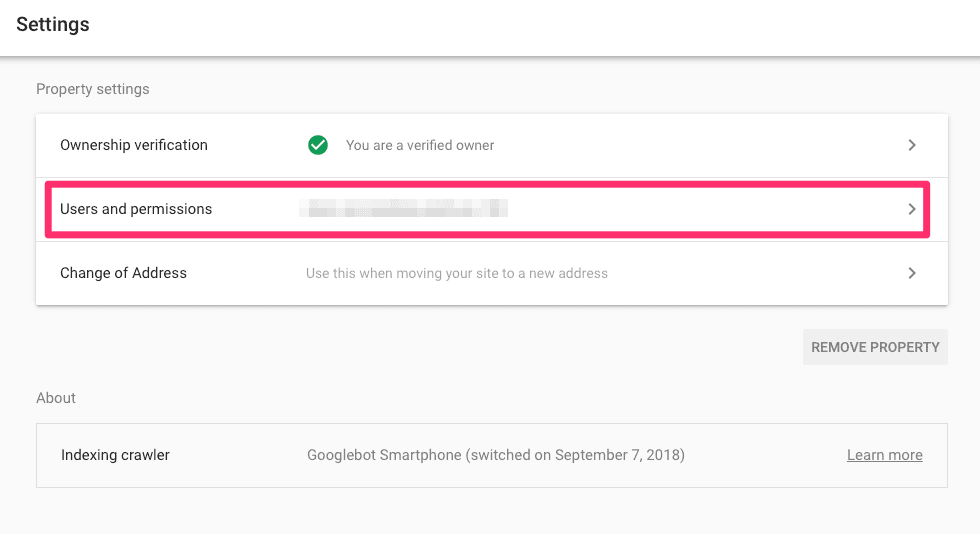
Step 2: Click on User Permissions

How to Add a User to Google Search Console Step 2

Step 3: Click on Add User

Here, you should see all accounts who have access to your Google Search Console. I couldn’t stress this enough, but you should never share your email credentials. Instead, add new users like the examples in this article.
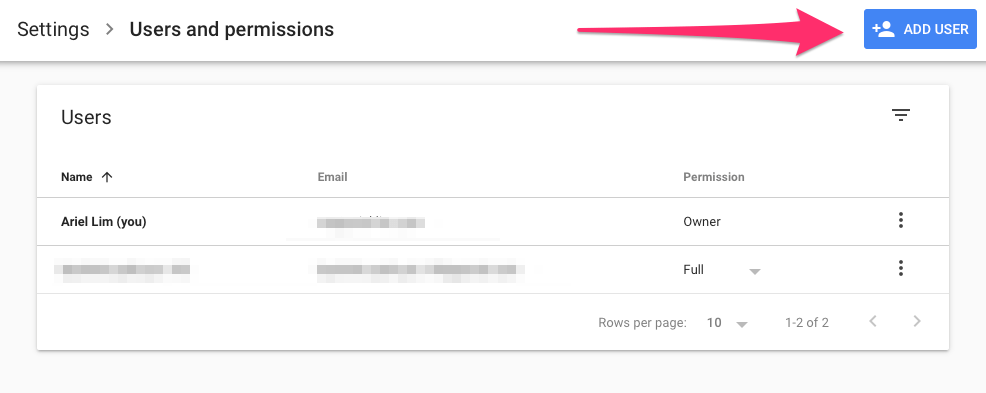
How to Add a User to Google Search Console Step 3

Step 4: Complete the Form

Simply enter the email address and the permission type.

Here’s a quick and dirty difference between the two:

  • Full user: Has view rights to all data and can take some actions.
  • Restricted user: Has simple view rights on most data.
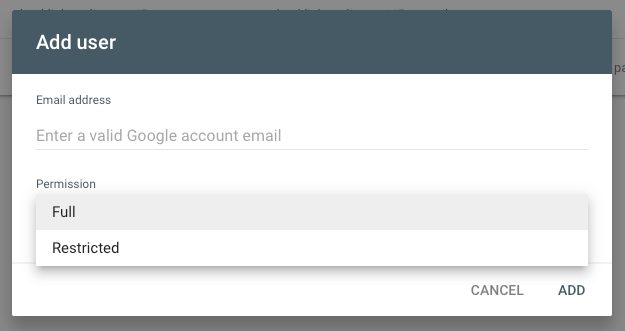
How to Add a User to Google Search Console Step 4

How to Give Access to Google Tag Manager to an Outsourced Agency or Consultant

This process is similar to Google Analytics. Of course, the only way this works is if you already have a Google Tag Manager account and installed properly on your website.

Step 1: Log in to Google Tag Manager

Head on over to tagmanager.google.com and log in to your account. You should see something like this (if you have multiple accounts in your account).
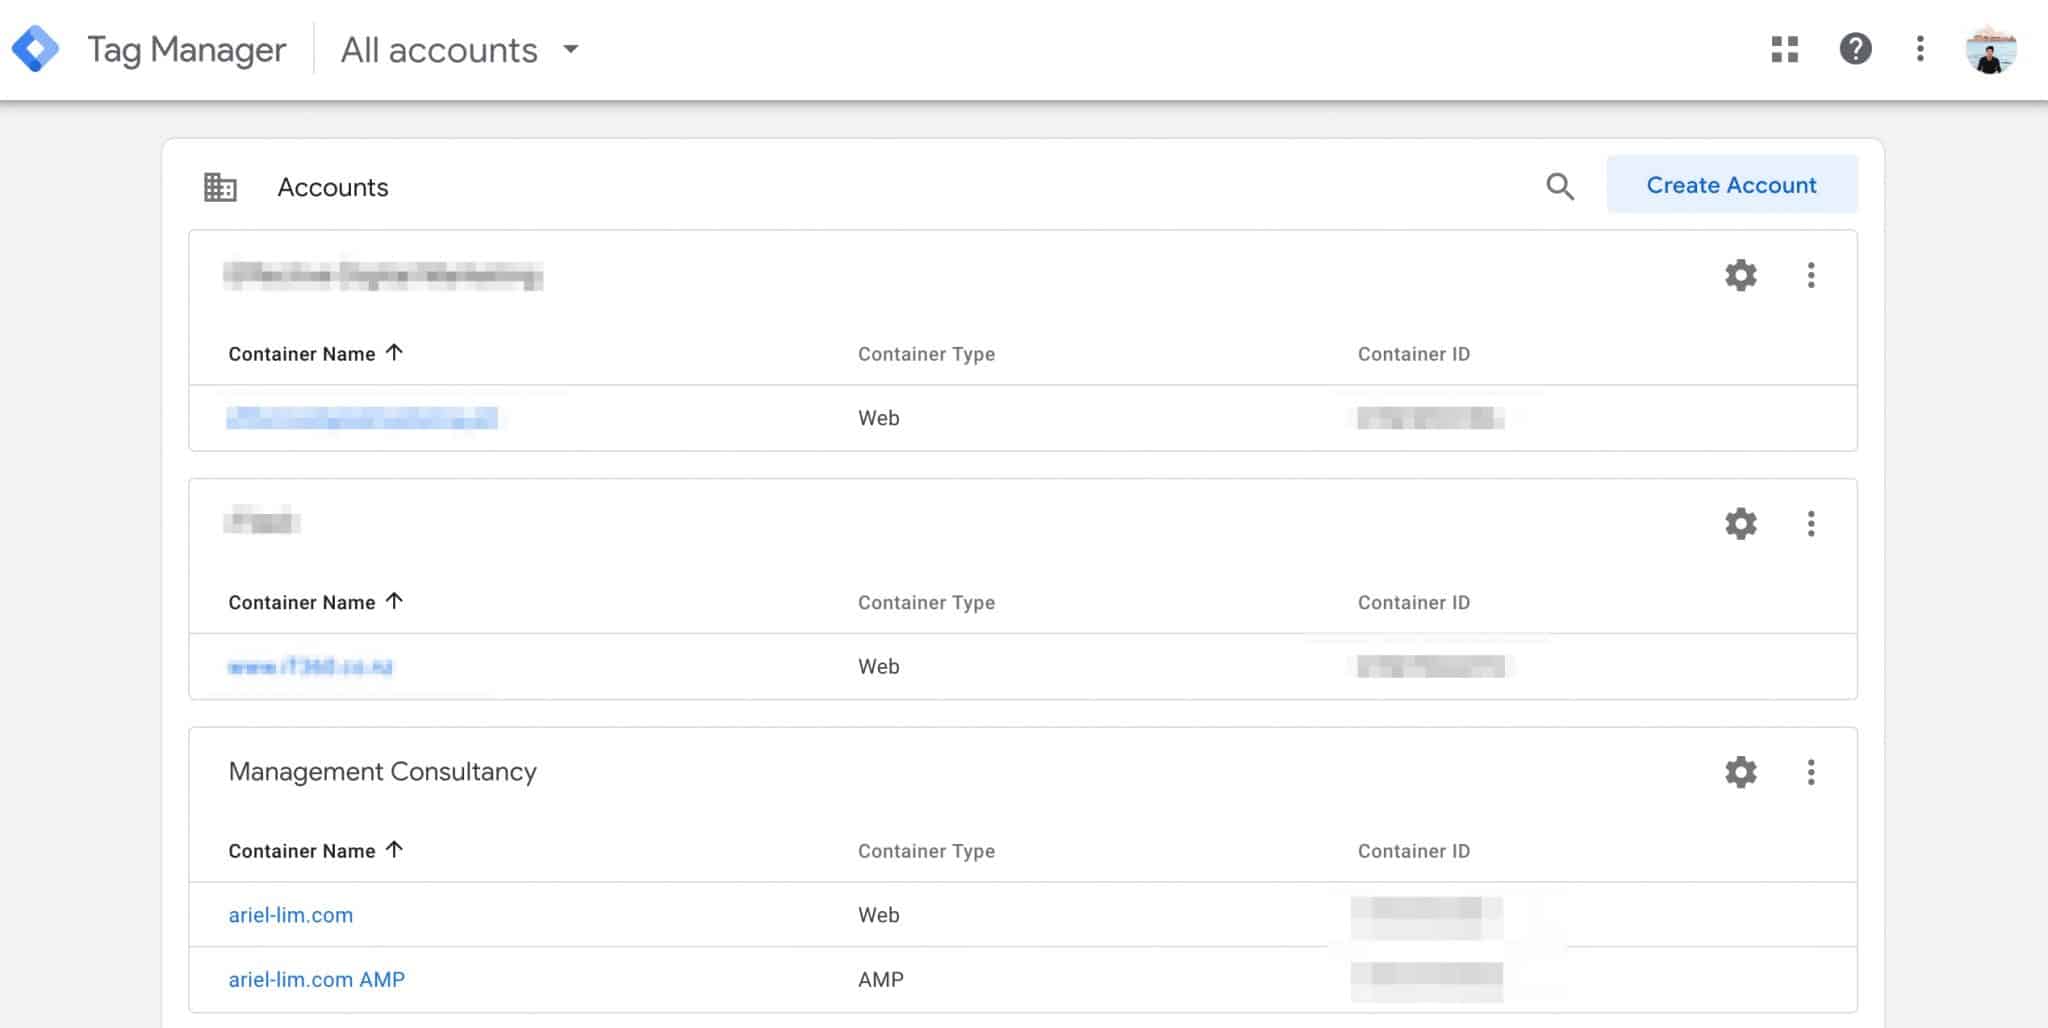
Choose account in Google Tag Manager

Choose the one you want to give permissions to.

Step 2: Go to the Admin Section

Next, click on the admin tab at the top.
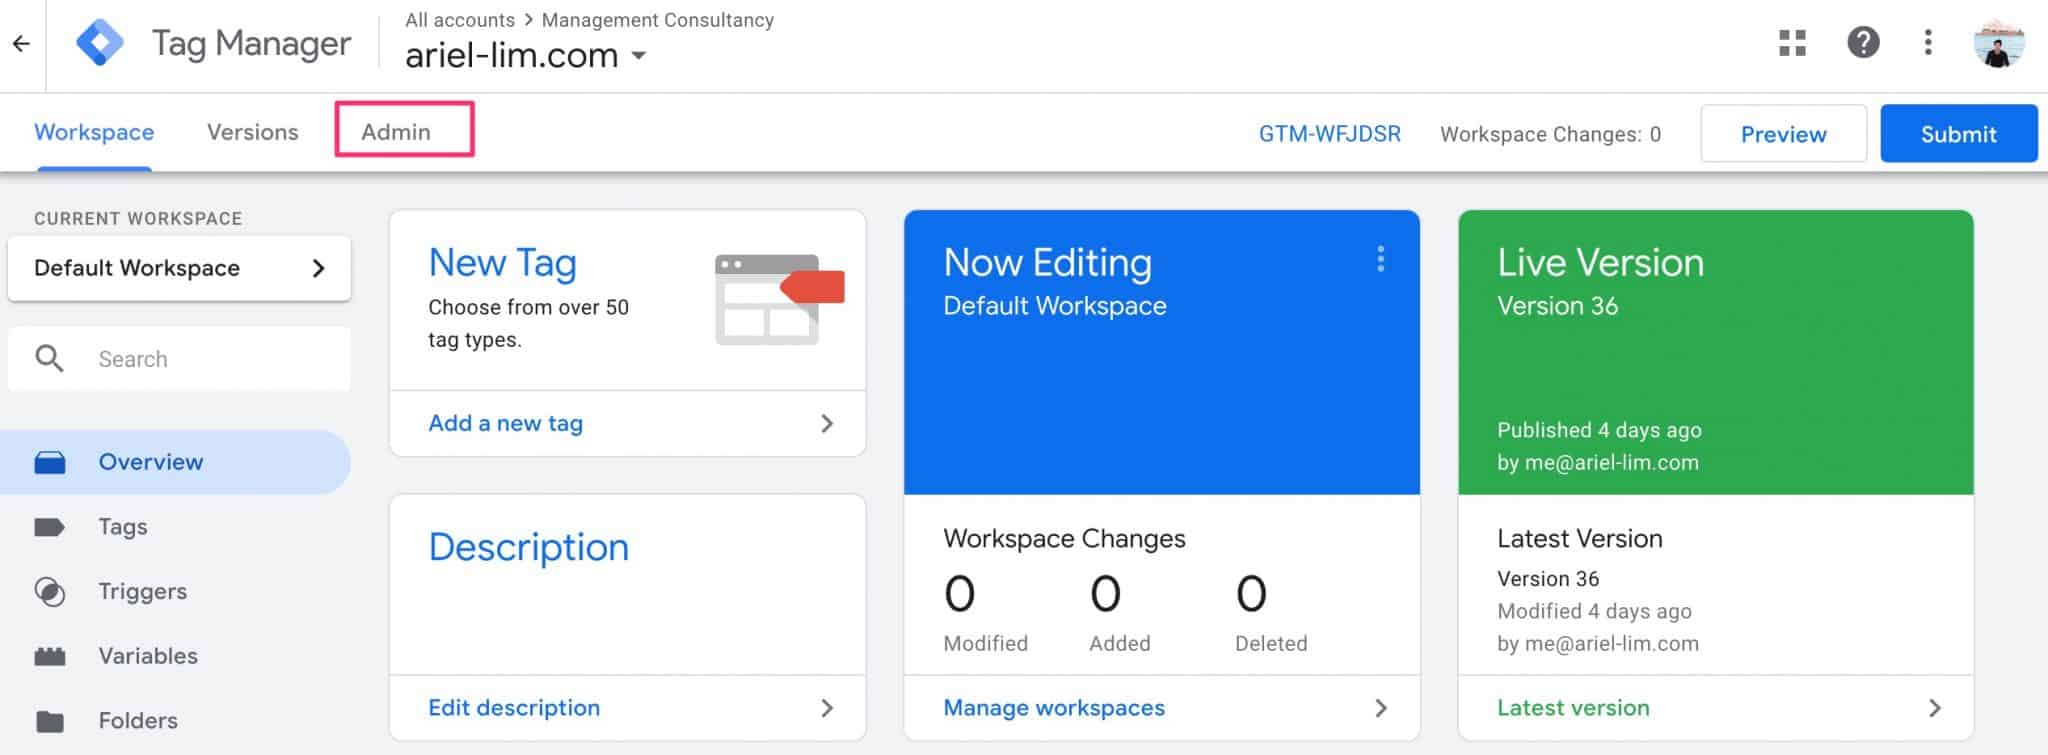
Go to admin section of Google Tag Manager

Step 3: Determine the Level of User Access Needed

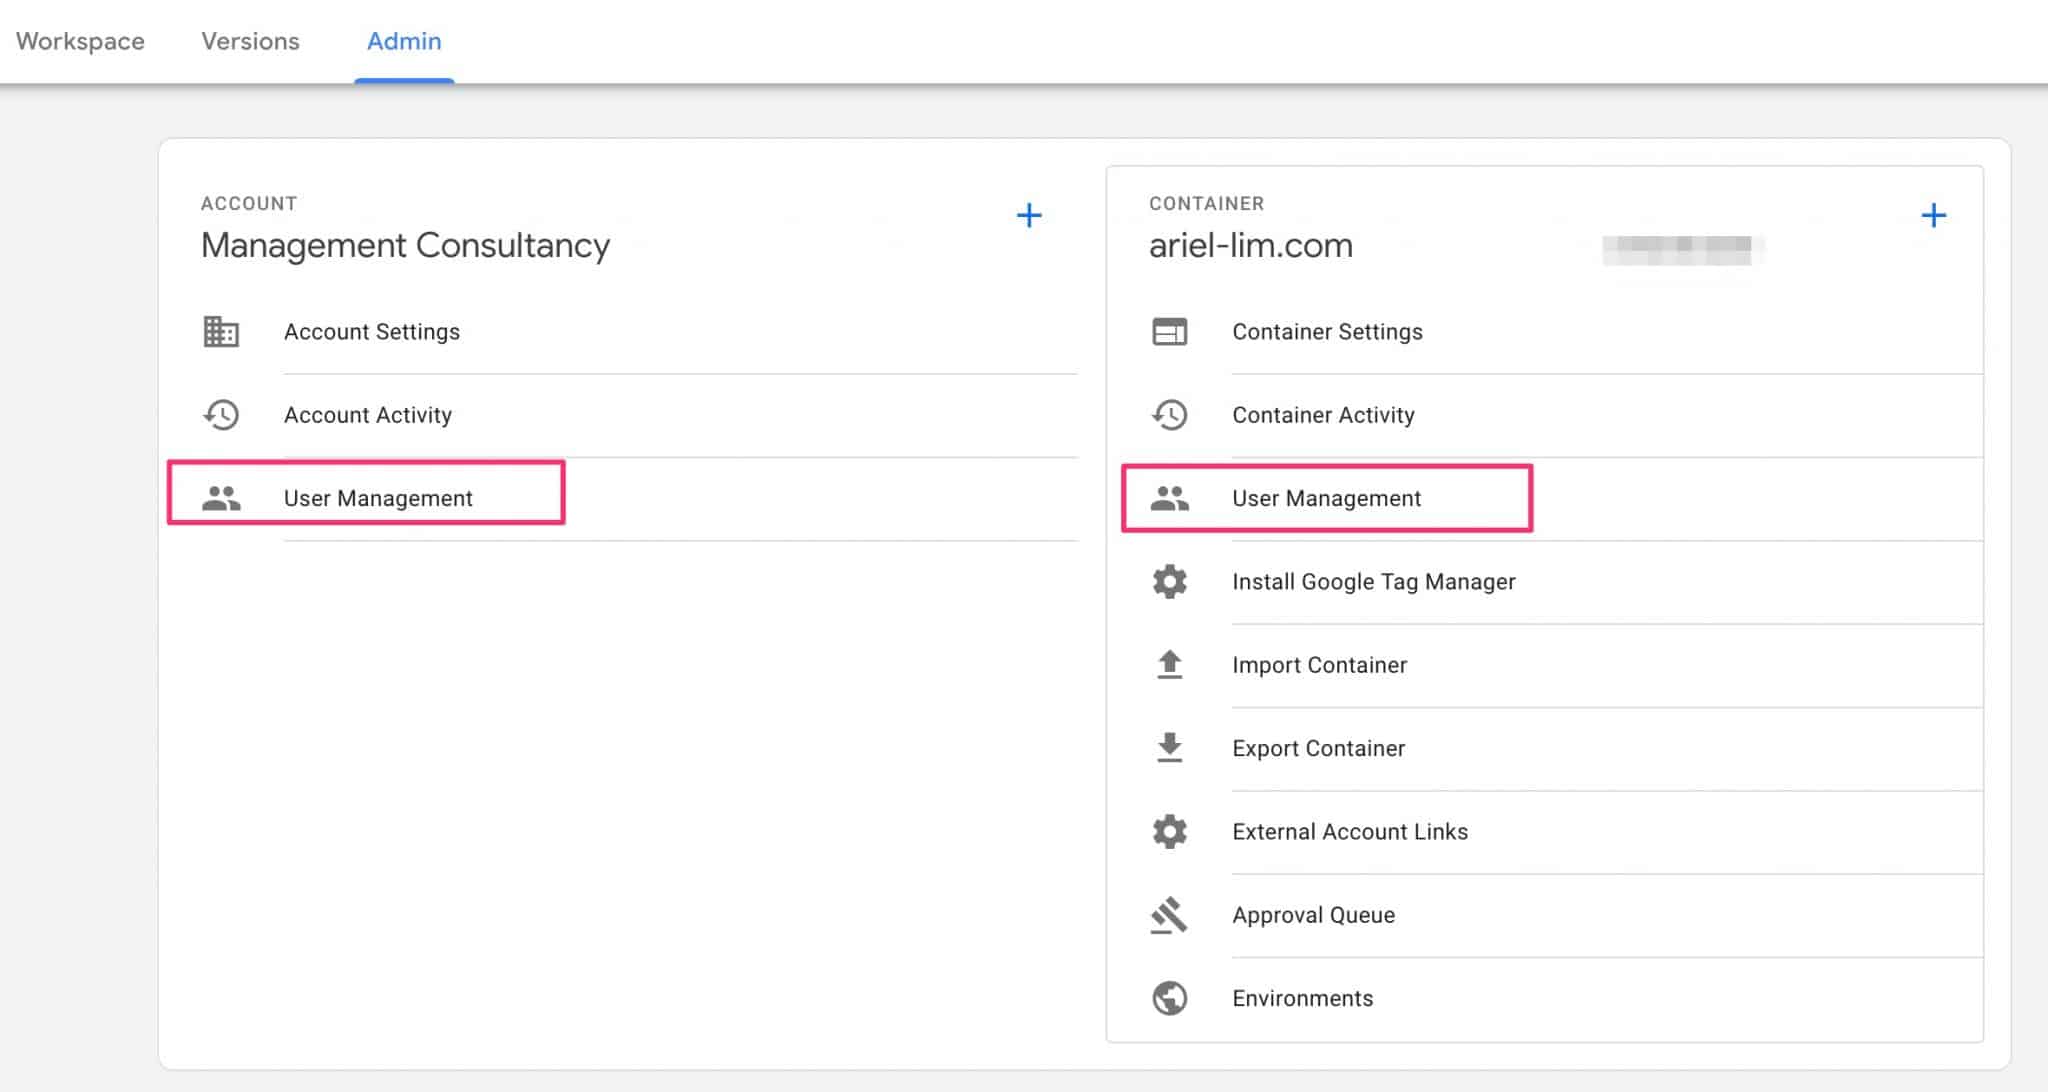
This part is similar to Google Analytics, but GTM only has two levels:

  1. Account
  2. Container
User management settings in Google Tag Manager

Just like in GA, you’d most likely not give access to someone else at the account level. So, in this case, click on the User Management under the container section.

Step 4: Give the Appropriate User Permission

Next, you’ll see the current users with access to your container.

Add a user to your GTM account

Click on the plus (+) sign to add a new user.
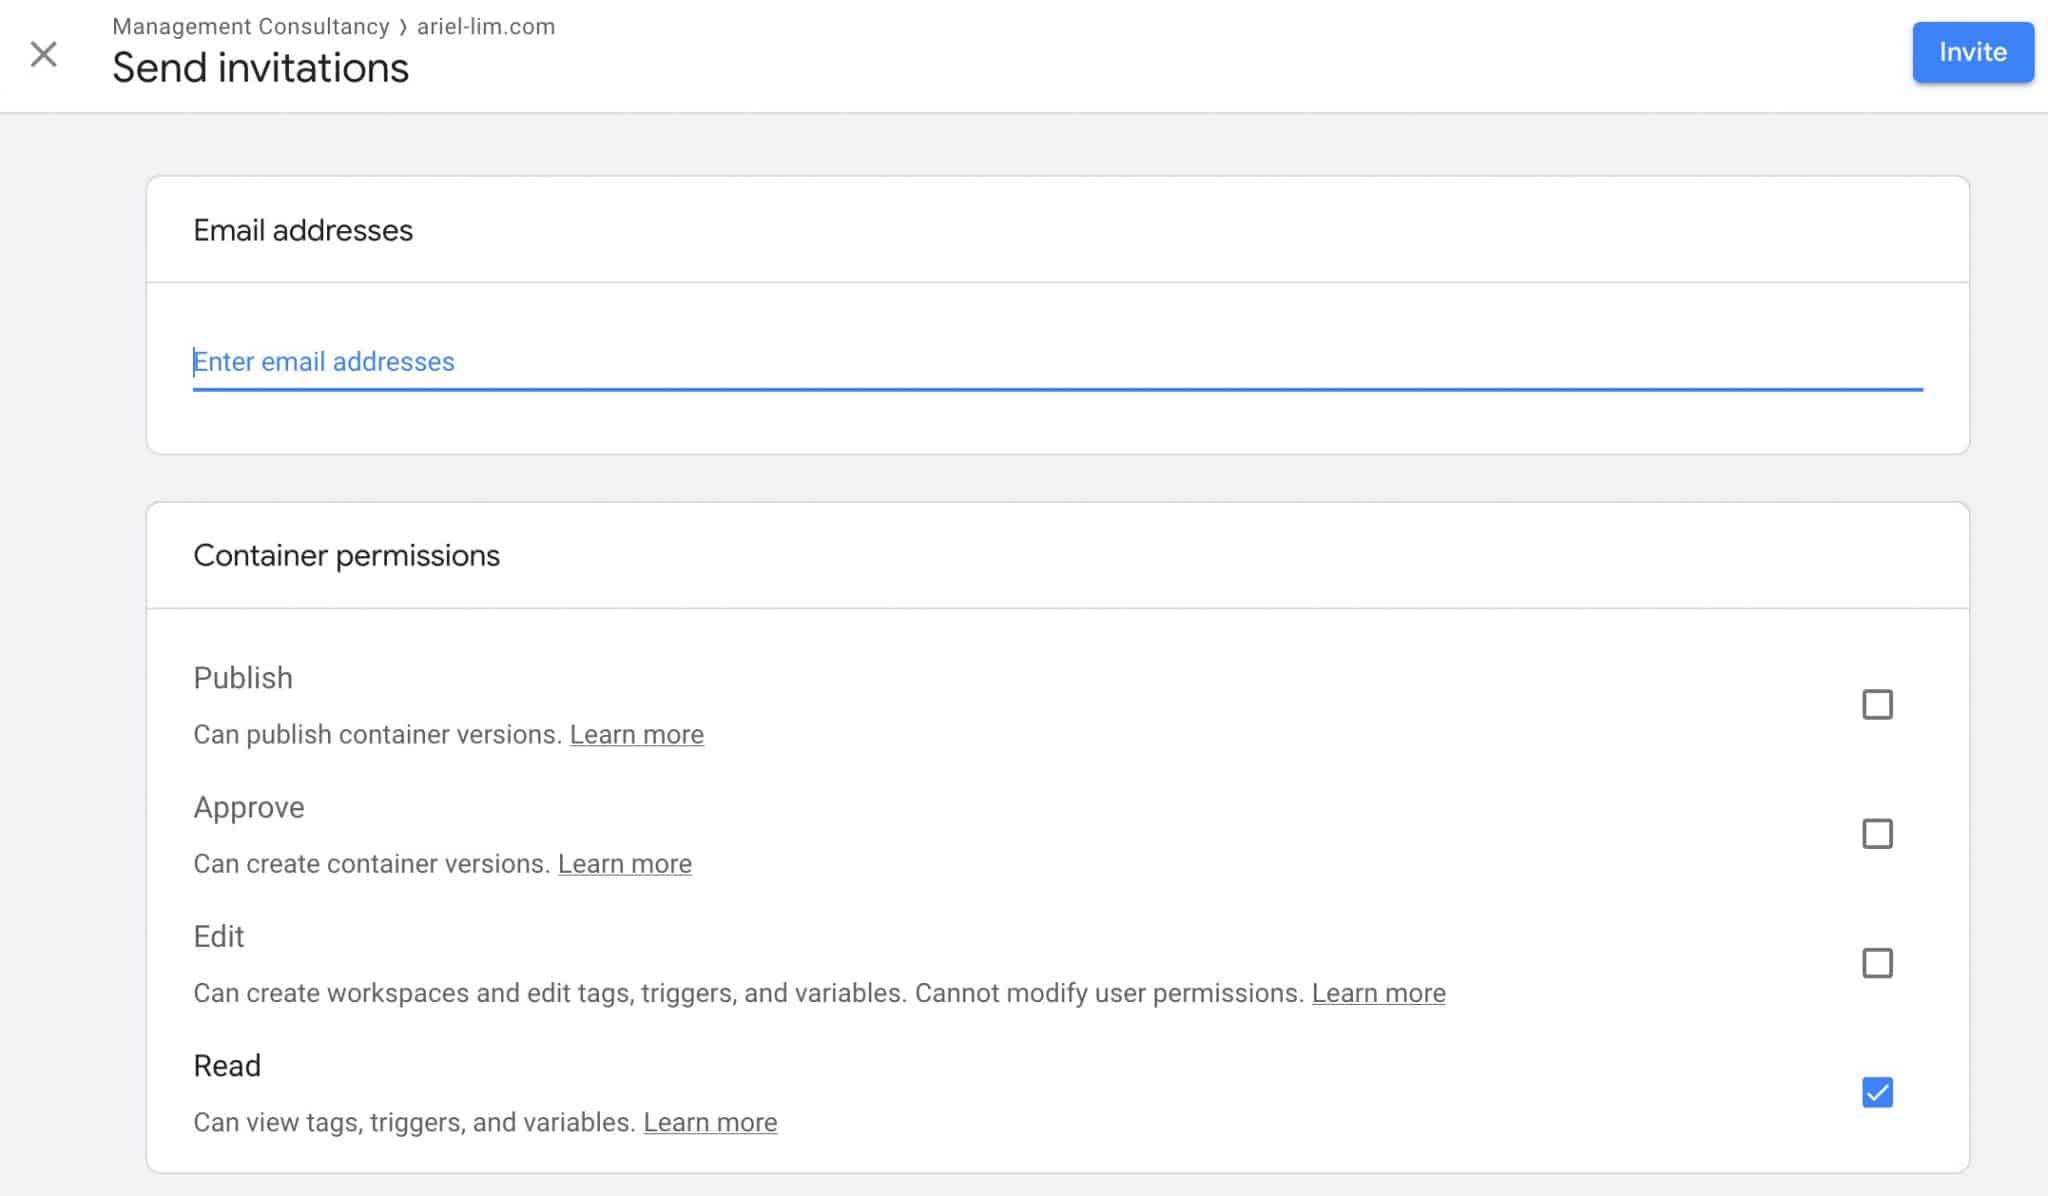
Container permissions inside Google Tag Manager

Now, selecting the permissions here will differ depending on a lot of factors and how you want to be involved.

Remember, Google Tag Manager allows you to deploy and install code directly to your website. For example, you want to try a messenger bot, you install the code via GTM by adding a tag, then publish the container. That messenger bot is now live on your website.

Take those factors into consideration when giving user access.

For me, I always request publish permission at the container level. The reason for this is I often implement new tech for my clients. For example, I configured Facebook Pixel, Google Ads, LinkedIn Ads for this one client. I also installed some heat mapping and A/B testing software. So, imagine how much time this would take if I can only set it up but can’t get them live (approve or edit).

If you want to be hands-on and only give them edit access, you would have to be the one to review and approve the changes yourself. This means you need to spend time and understand what the changes are all about. Otherwise, you will just end up causing more delays in getting your projects implemented.

Consider what your needs are and make sure you also stay on top of this because everything that you publish is automatically live on your website.

How to Give Access to Your WordPress Website to an Outsourced Agency or Consultant

The next thing you should learn is to give someone access to your website. Here are the steps you need to take.

Step 1: Login to WordPress and Click on Users
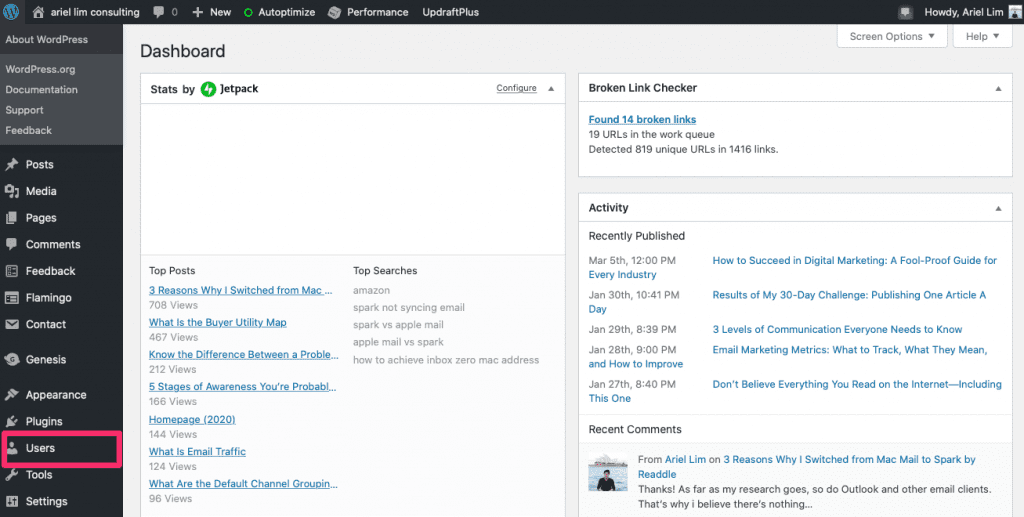
How to Add a User to Your WordPress Website Step 1

Step 2: Click on Add New

How to Add a User to Your WordPress Website Step 2

Step 3: Enter the Details

At this stage, all you need to do is enter the required information and you’re all set.

The most important detail I’d like to highlight here is the role settings.
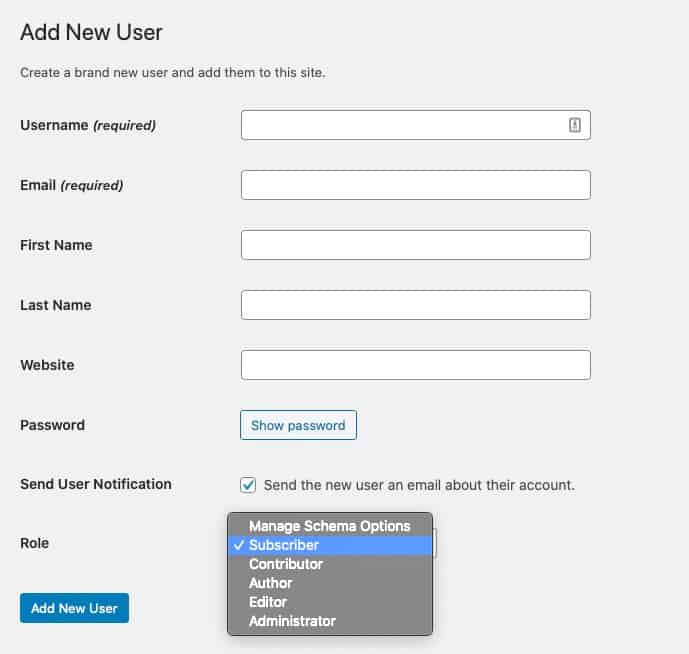
How to Add a User to Your WordPress Website Step 3

I always request for an administrator role. That way, I can make modifications and edits easily. But that is not always the best practice.

Before you give someone admin access, make sure you trust the person because with that type of access, they can steal data or shut down your website. They can even remove you from the list of admins in some cases.

So, limit the number of administrators on your WordPress website. The other roles here are for different uses. For example, you have several writers. You can give them author or contributor access. You won’t have to worry about them messing up with your site. In most cases, they can only access the posts section. To learn more about the different roles, feel free to read WordPress’ documentation.

Over to You

Giving access to a 3rd party doesn’t have to be difficult. You just need to know what you are giving them access to.

Giving them your username and password is a terrible idea and can be used against you. If you give them your email address and password, which you use on all your accounts, people with malicious intent can easily change that password and extort you for money.

The same thing can happen when you grant outsourced digital marketing agencies and consultants with access to your account. The best way to prevent this is to give them limited access but doesn’t hinder them in their work. Just like what I discussed above.

I’ll be adding more to this list as time goes by. Do you have any tools that you want me to cover here? Let me know in the comments below.

Ready to Grow Your Business with Digital Marketing? Use These 3 Free Tools

Free Digital Marketing Tools You Need to Use

Digital marketing is essential if you want your business to grow. It gives you more reach than you could ever have. It also removes the guesswork from the equation, that way, you don’t have to waste any of your limited resources.

If you want to grow your business, you have to use digital marketing. Period.

Sadly, a lot of businesses just create a Facebook account, sometimes a website, start posting pictures of their products, then call it a day. To the more tech-savvy ones, they have a nice-looking website that has a signup form that collects emails for them. Some dabble in advertising like Google Ads or Facebook. But that’s pretty much it. That’s what they call digital marketing.

While all these things fall under the realm of digital marketing, I’m sure you know that that approach is not effective. This is the biggest reason why they typically do not see any return on their investment nor see their business grow sustainably. And they blame digital marketing for this.

And that’s why they say, “Digital marketing won’t work for my business.”

Over the years, I’ve learned not to respond to this emotionally. I’ve learned that I can’t force people to believe in something they don’t want to believe in. As the saying goes, “when the student is ready, the teacher appears.”

If you’re serious about digital marketing and how it can help you grow your business sustainably, you have got to use these three FREE tools. And all you need is a Gmail account.

3 Digital Marketing Tools to Help You Grow Your Business

Google Analytics

You’ve no doubt have heard of Google Analytics (GA). It’s one of the most-used analytics/tracking software all around the world.

If you don’t have this installed on your website, you are wasting a lot of opportunities.

One of the most common excuses I hear from business owners on why they don’t have Google Analytics installed on their website is they just created a website. They don’t have much traffic anyway.

Well, how would you know you don’t have traffic in the first place?

Why Other Free Tools Don’t Match Up

Other software will give you basic analytics. But they are not as comprehensive as the one provided by GA. In fact, if you’re on the WordPress platform, you might have used or considered using JetPack. It offers site analytics plus some other cool features.

Unfortunately, it doesn’t give you an accurate report in terms of traffic.

I noticed this last month when I was optimizing my website for speed. I noticed that there are certain days where my traffic in JetPack spiked but remained low in Google Analytics.

JetPack statistics

When I asked WordPress support on this, they verified that they don’t block, nor have a way to block bots and crawlers.

To give you some background, what happened was every time I checked my speed on Google PageSpeed Insights or Pingdom, that traffic was counted by JetPack.

Using Bad Data Can Lead to Bad Results

Inaccurate data is misleading. If I use the data in JetPack to guide my plans and campaigns, that would have been disastrous. Granted, my current traffic isn’t that high, so it might not have an effect.

But imagine if you are getting 30k visits or more and when you dig in, more than half of that is coming from your own visits to your website. That’s definitely not something you want.

Google Analytics with 30k Pageviews

Regardless if your website is new or old, installing Google Analytics will only benefit you. Plus, if you install GA today and you only do very little digital marketing, in a year’s time, you would have gained a lot of data already from people visiting your website.

That data is priceless.

You can’t backtrack your data, meaning, if you only installed GA a year from now, you would only be able to capture data moving forward. All the data for the past year would have been lost. And that’s just an opportunity wasted.

Google Tag Manager

Google Tag Manager (GTM) is another free tool that allows you to implement new technologies on your website (or app). What I mean by that is you can easily add, remove, and modify code or tags without the need to learn how to code.

Allow me to explain.

If you want to add a chatbot on your website, you would only need to install a piece of code. Then, it will be live on your website. Or, let’s say you want to add a tracking software like Google Analytics…

<! – Global site tag (gtag.js) - Google Analytics -->
<script async src="https://www.googletagmanager.com/gtag/js?id=UA-12345678-9"></script>
<script>
  window.dataLayer = window.dataLayer || [];
  function gtag(){dataLayer.push(arguments);}
  gtag('js', new Date());

  gtag('config', 'UA-12345678-9');
</script>

You’d need to add that tracking tag on all your pages.

Why You Need to Use Google Tag Manager

Without GTM, the only way to add tags is to add them manually, or through plugins.

This presents a couple of issues I discussed in another article:

  1. You’ll have to add them one-by-one to your website; or,
  2. Have someone else (developer/programmer) add it for you
  3. Which will take some time, especially, if you don’t have one in-house; so,
  4. You’d have to coordinate with multiple people, instead of doing the work; and
  5. That will inevitably lead to delays

But, if you’re using GTM, you only have to deal with that process once. Heck, you can even do it yourself. I’ve provided a step-by-step tutorial on how to add GTM to your website.

Once you added Google Tag Manager, you can now add/implement new and cool stuff on your website without the need to rely on other people. It’s faster and simpler. You get to test if something is working or not right away.

Assuming you have someone who can tweak and add the codes for you, it’s still better to add them via GTM because it automatically loads them asynchronously—which is very important if you want to make your website load faster.

Google Search Console

The last tool in your digital marketing arsenal should be Google Search Console (GSC), formerly called Google Webmaster Tools. It’s also one of the least known and, consequently, the least-used tool.

Google Search Console

But it offers a lot that Google Analytics can’t provide:

  1. It tells you which pages are the most popular (which you can find in GA), but
  2. It also tells you the exact keywords/phrases that people used to find you
  3. Which among these keywords they clicked on; and
  4. Its position on Google

When you combine this with Google Analytics, you get a very powerful combination at your disposal.

How to Use Google Search Console with Google Analytics

Let’s use this example of an eCommerce client. Obviously, they want to earn more revenues. But they don’t want to just keep selling. They want to provide educational materials for their customers.

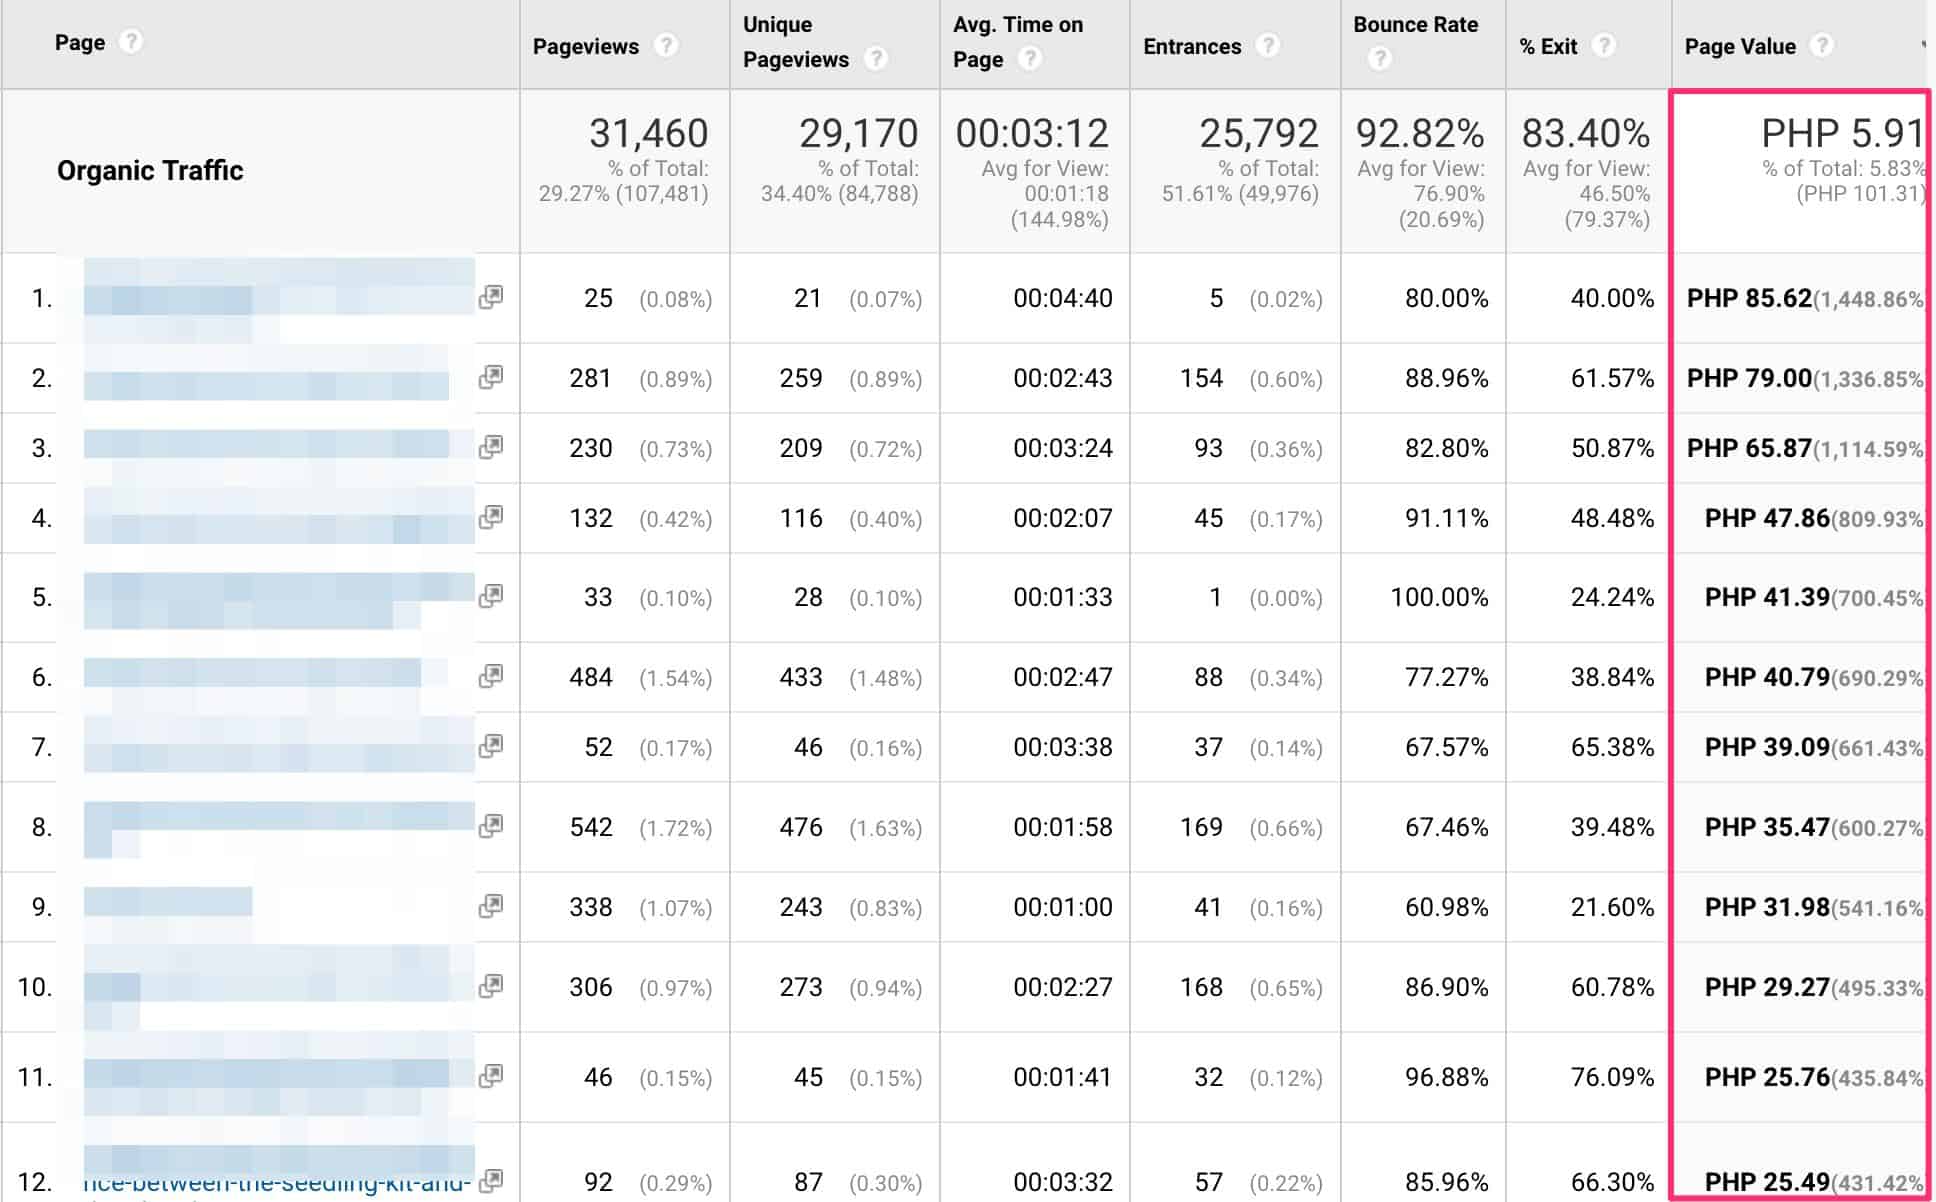
So, the first thing I did (which I won’t cover here in detail) is to setup goals in Google Analytics. These goals have a corresponding value. What happens is when people convert on those goals you set up, the pages the contributed to that conversion gets some value. Since this is an eCommerce client, the goal is an actual conversion or purchase.

Here’s what the reports looks like in Google Analytics that shows the page values—how much each page is worth.

Google Analytics Top Pages Report with Page Values


You can then filter which pages contributed more to the conversion then optimize that further so you can get more conversions.

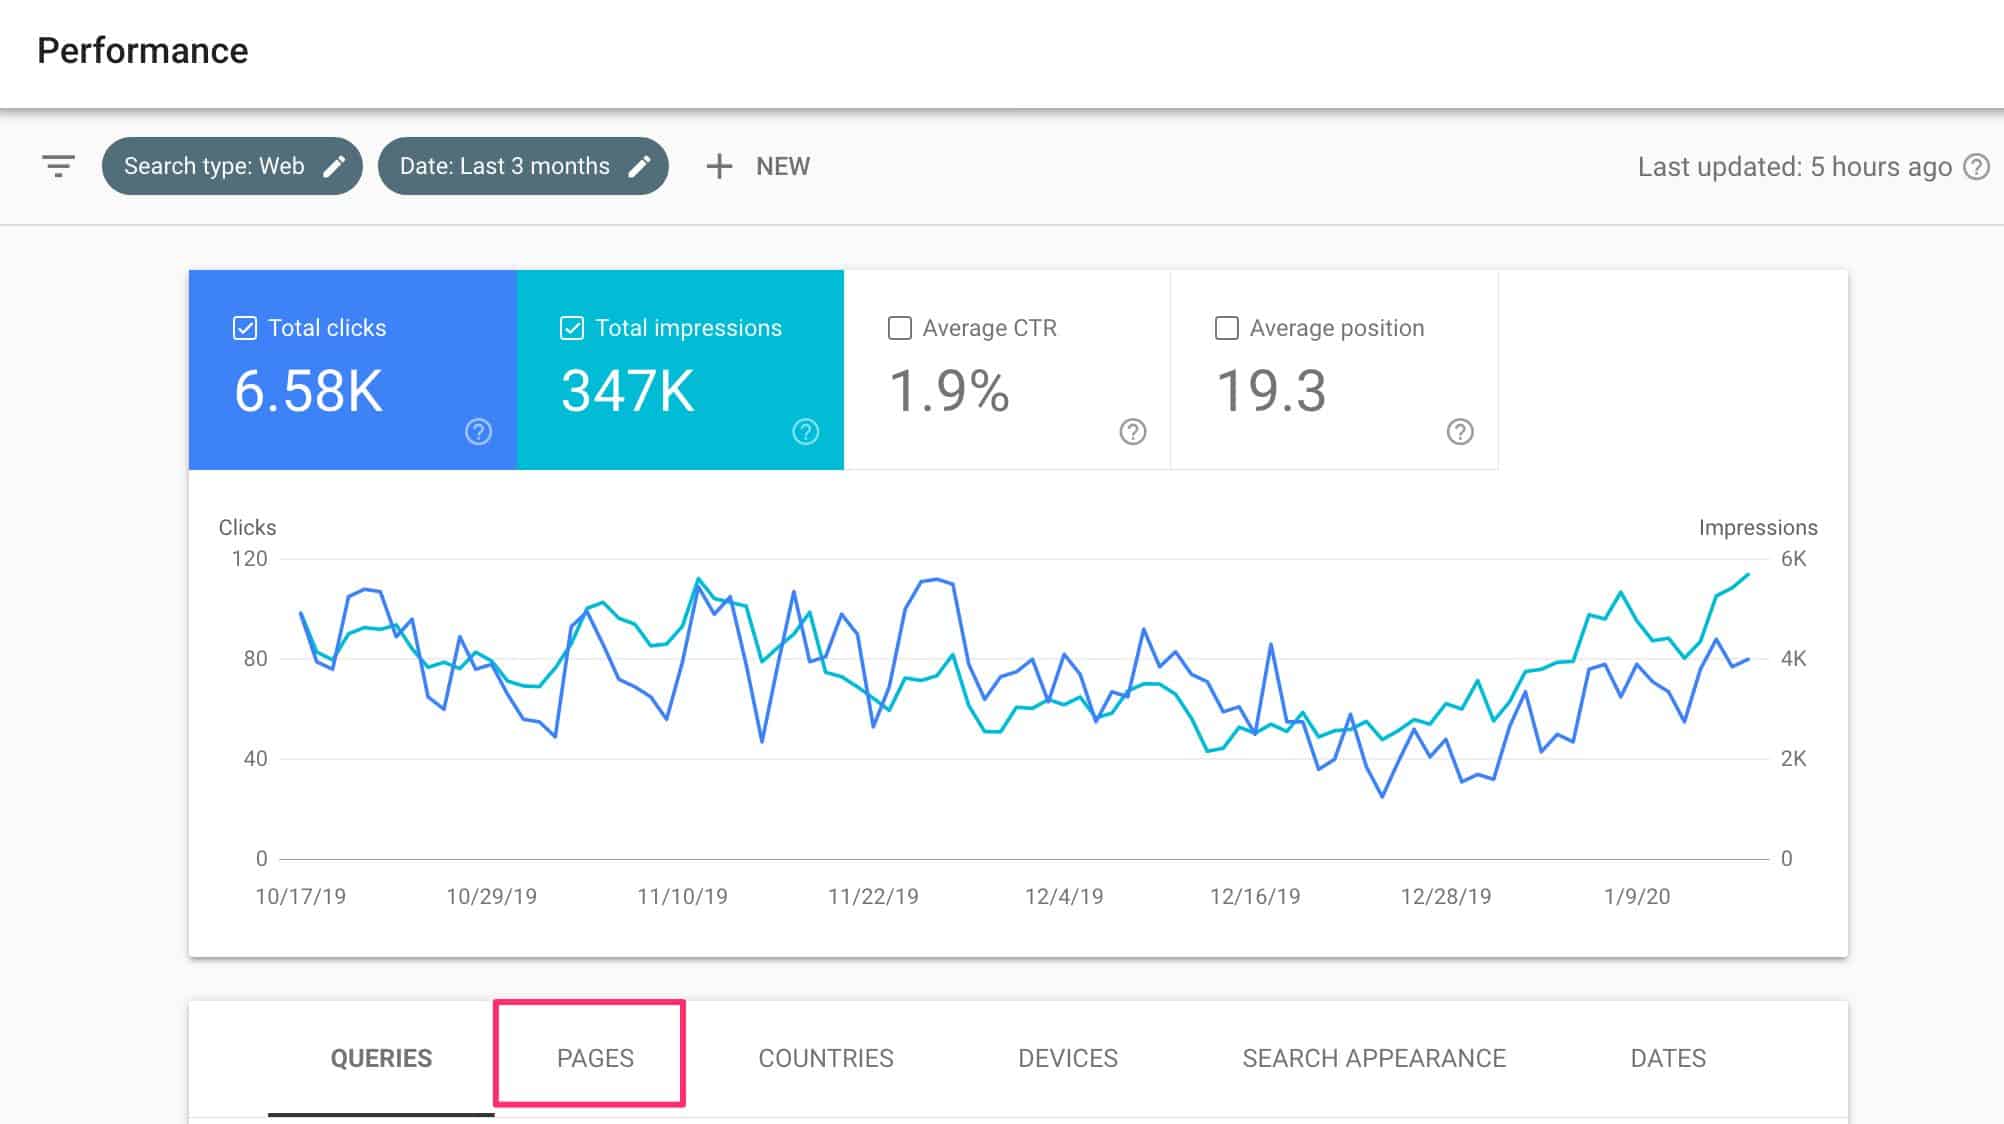
So, what I can do is take the highest converting page and look for that in Google Search Console. You can do that by logging in your account, then head over to the pages tab.

Google Search Console Pages

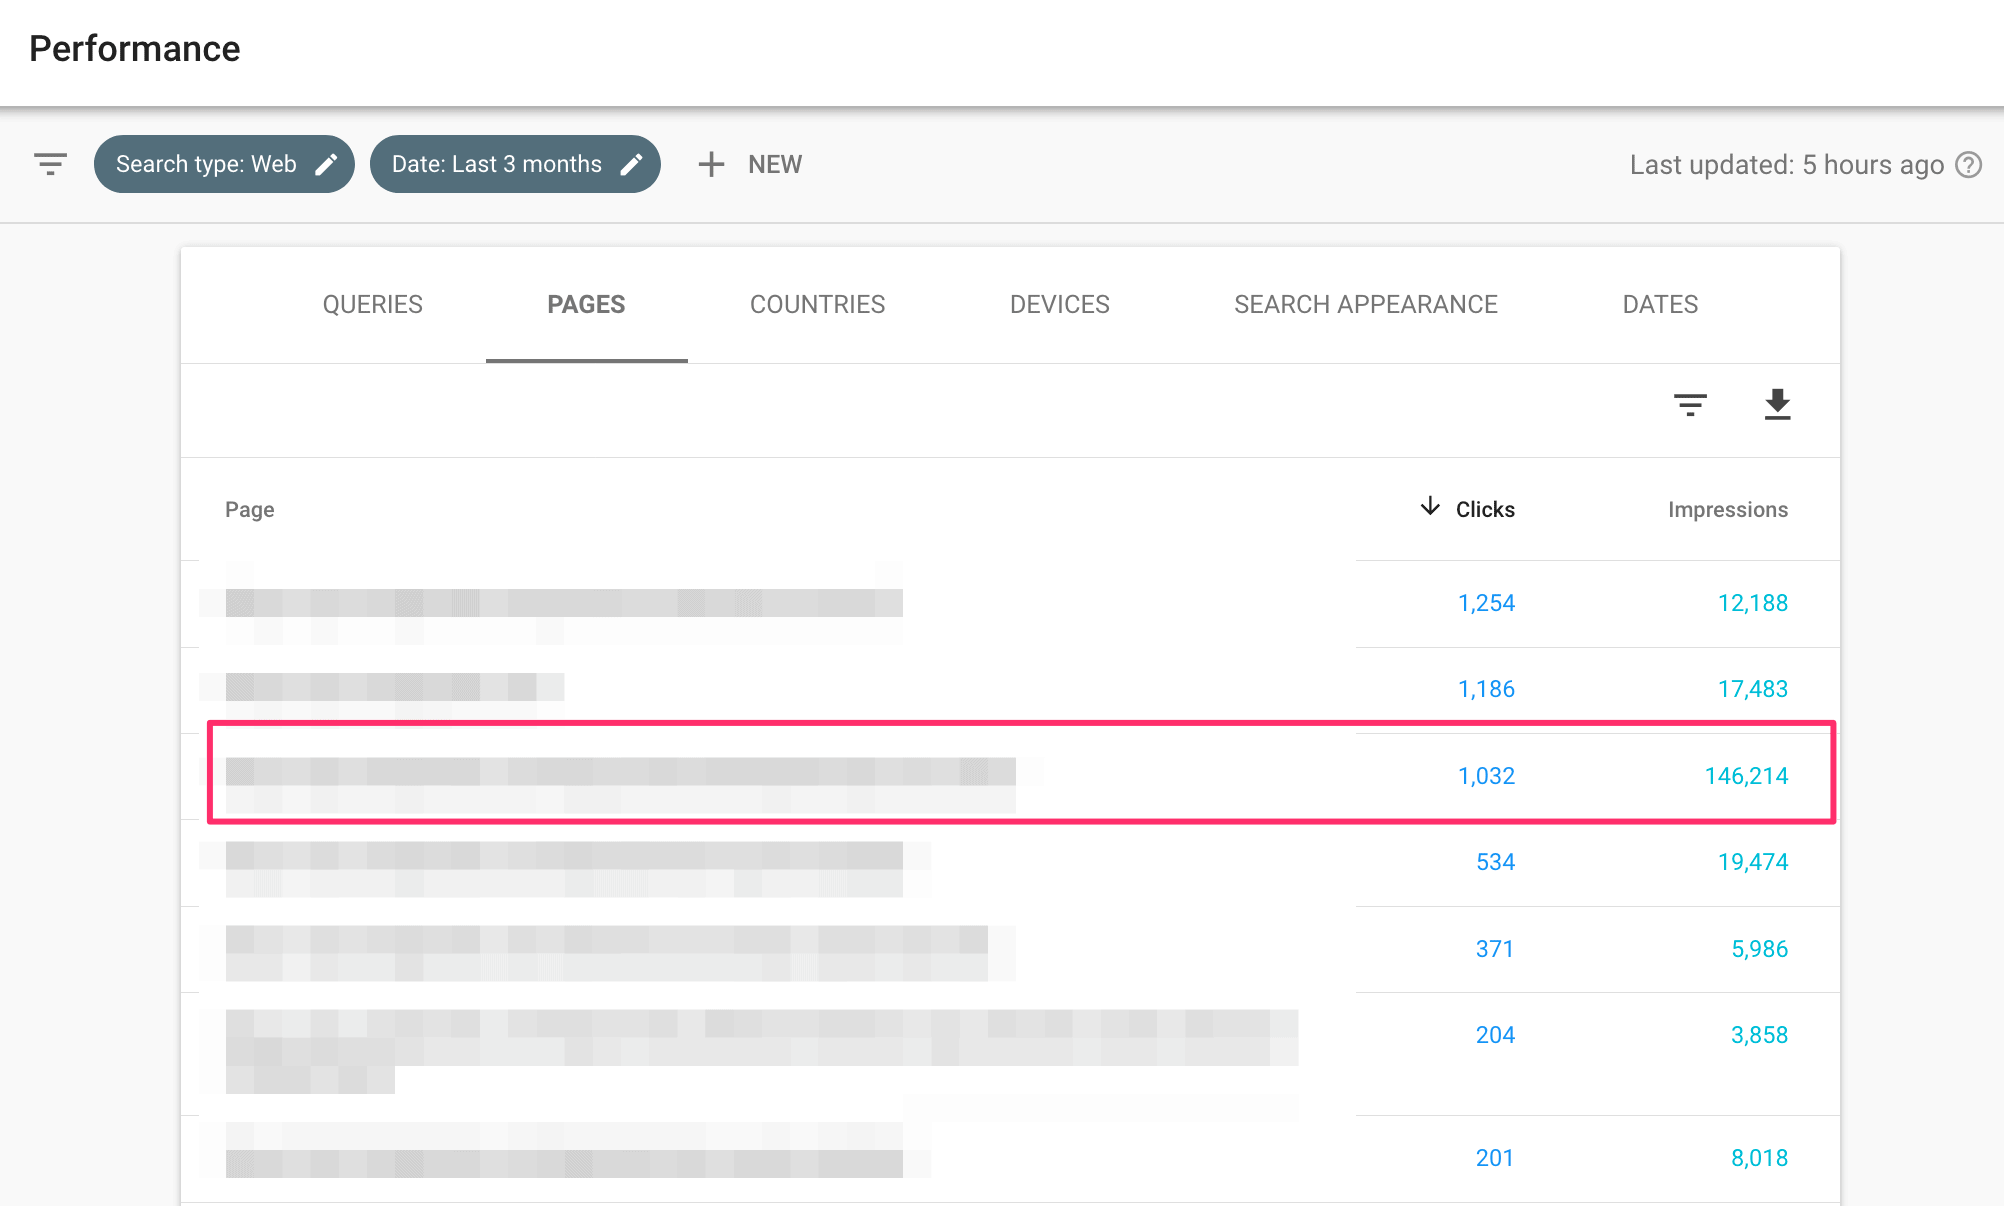
Then, you’ll see all the pages on your site. What you’ll want to do is look for that top-performing page (or any other page you’d like to optimize) and click on it.

Top Pages in Google Search Console

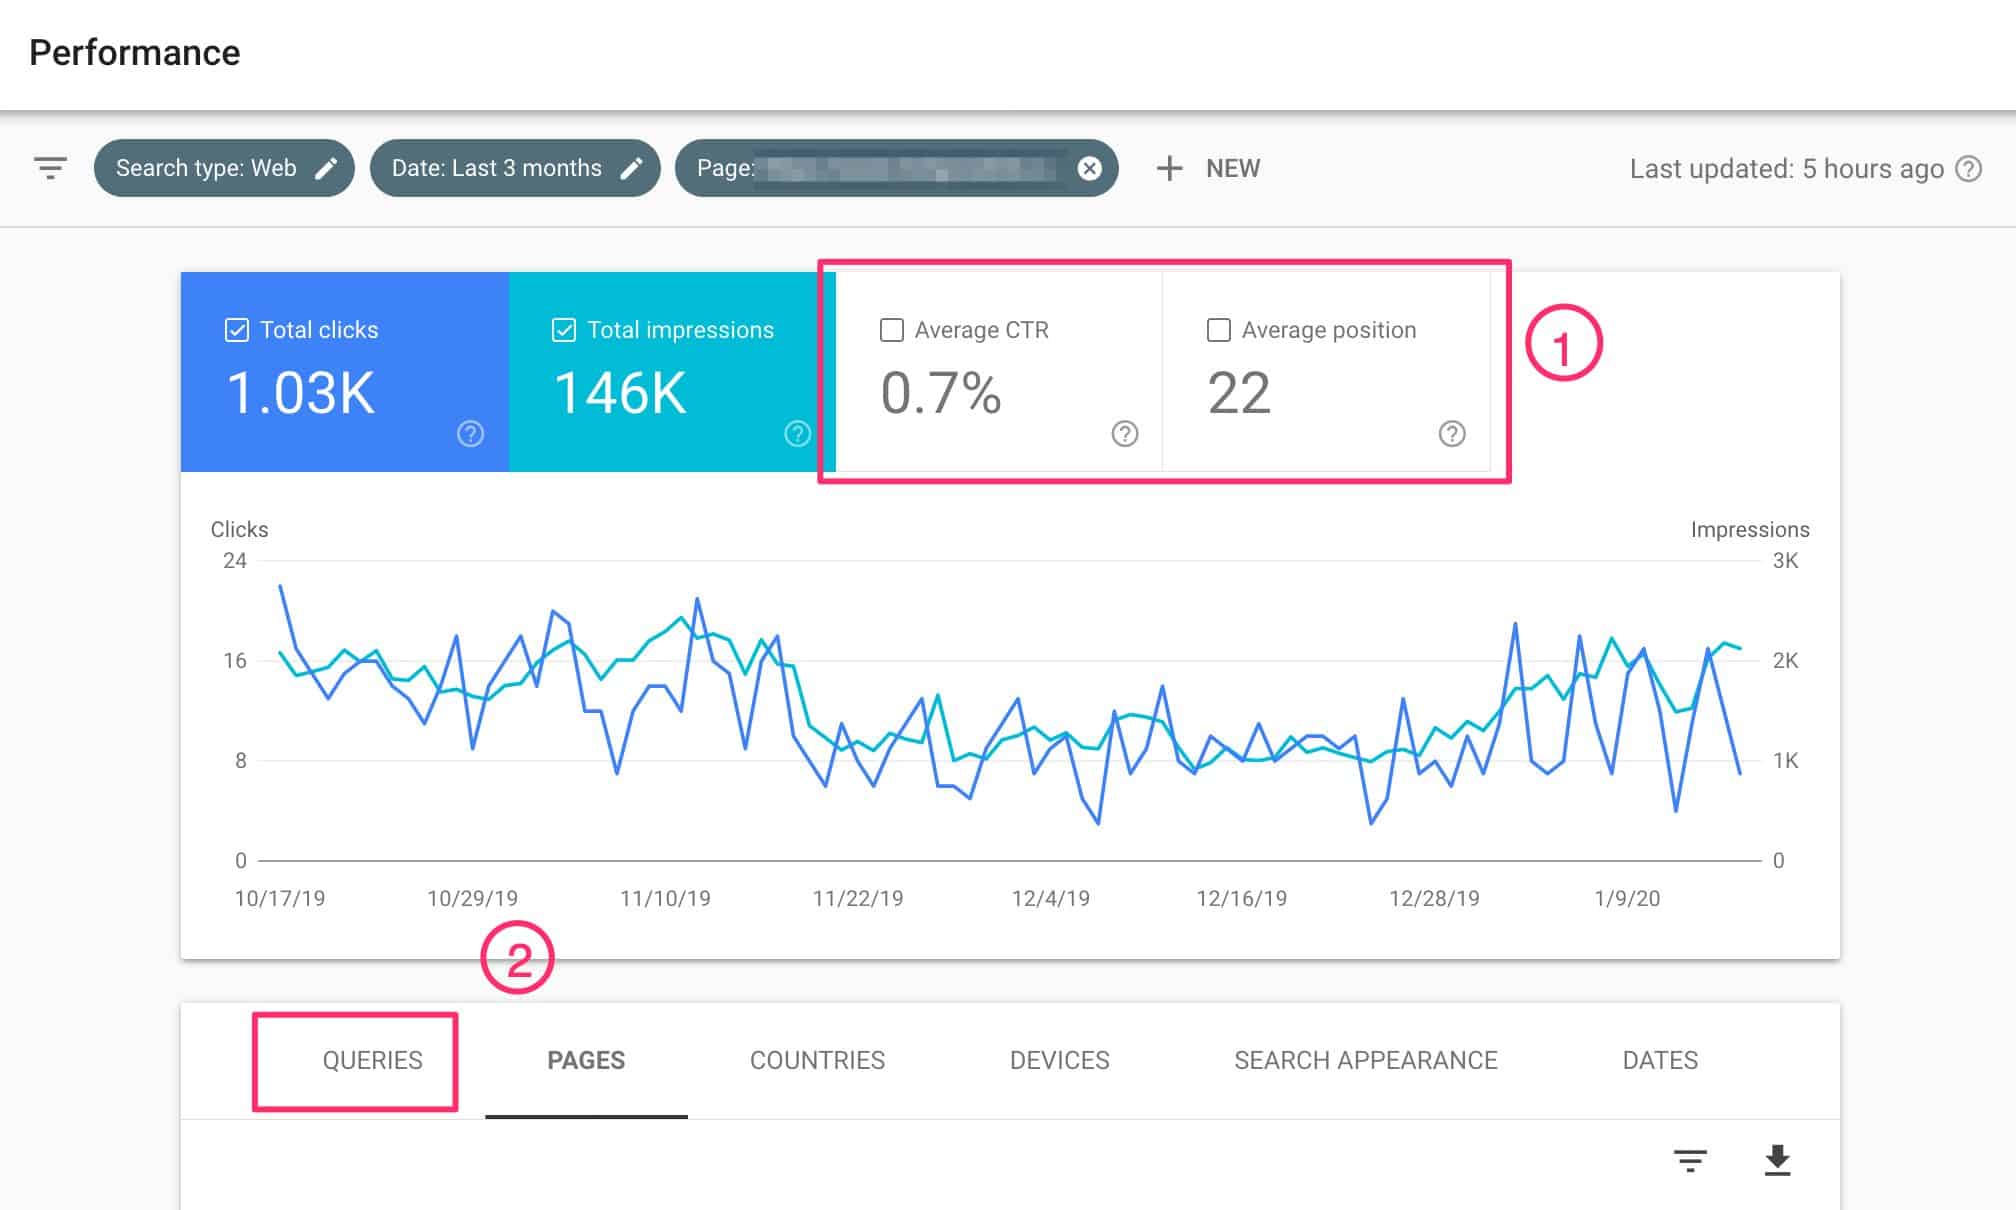
Once you selected that particular page, GSC will refresh to only show data for that particular page.

Look for Queries/Keywords in Google Search Console

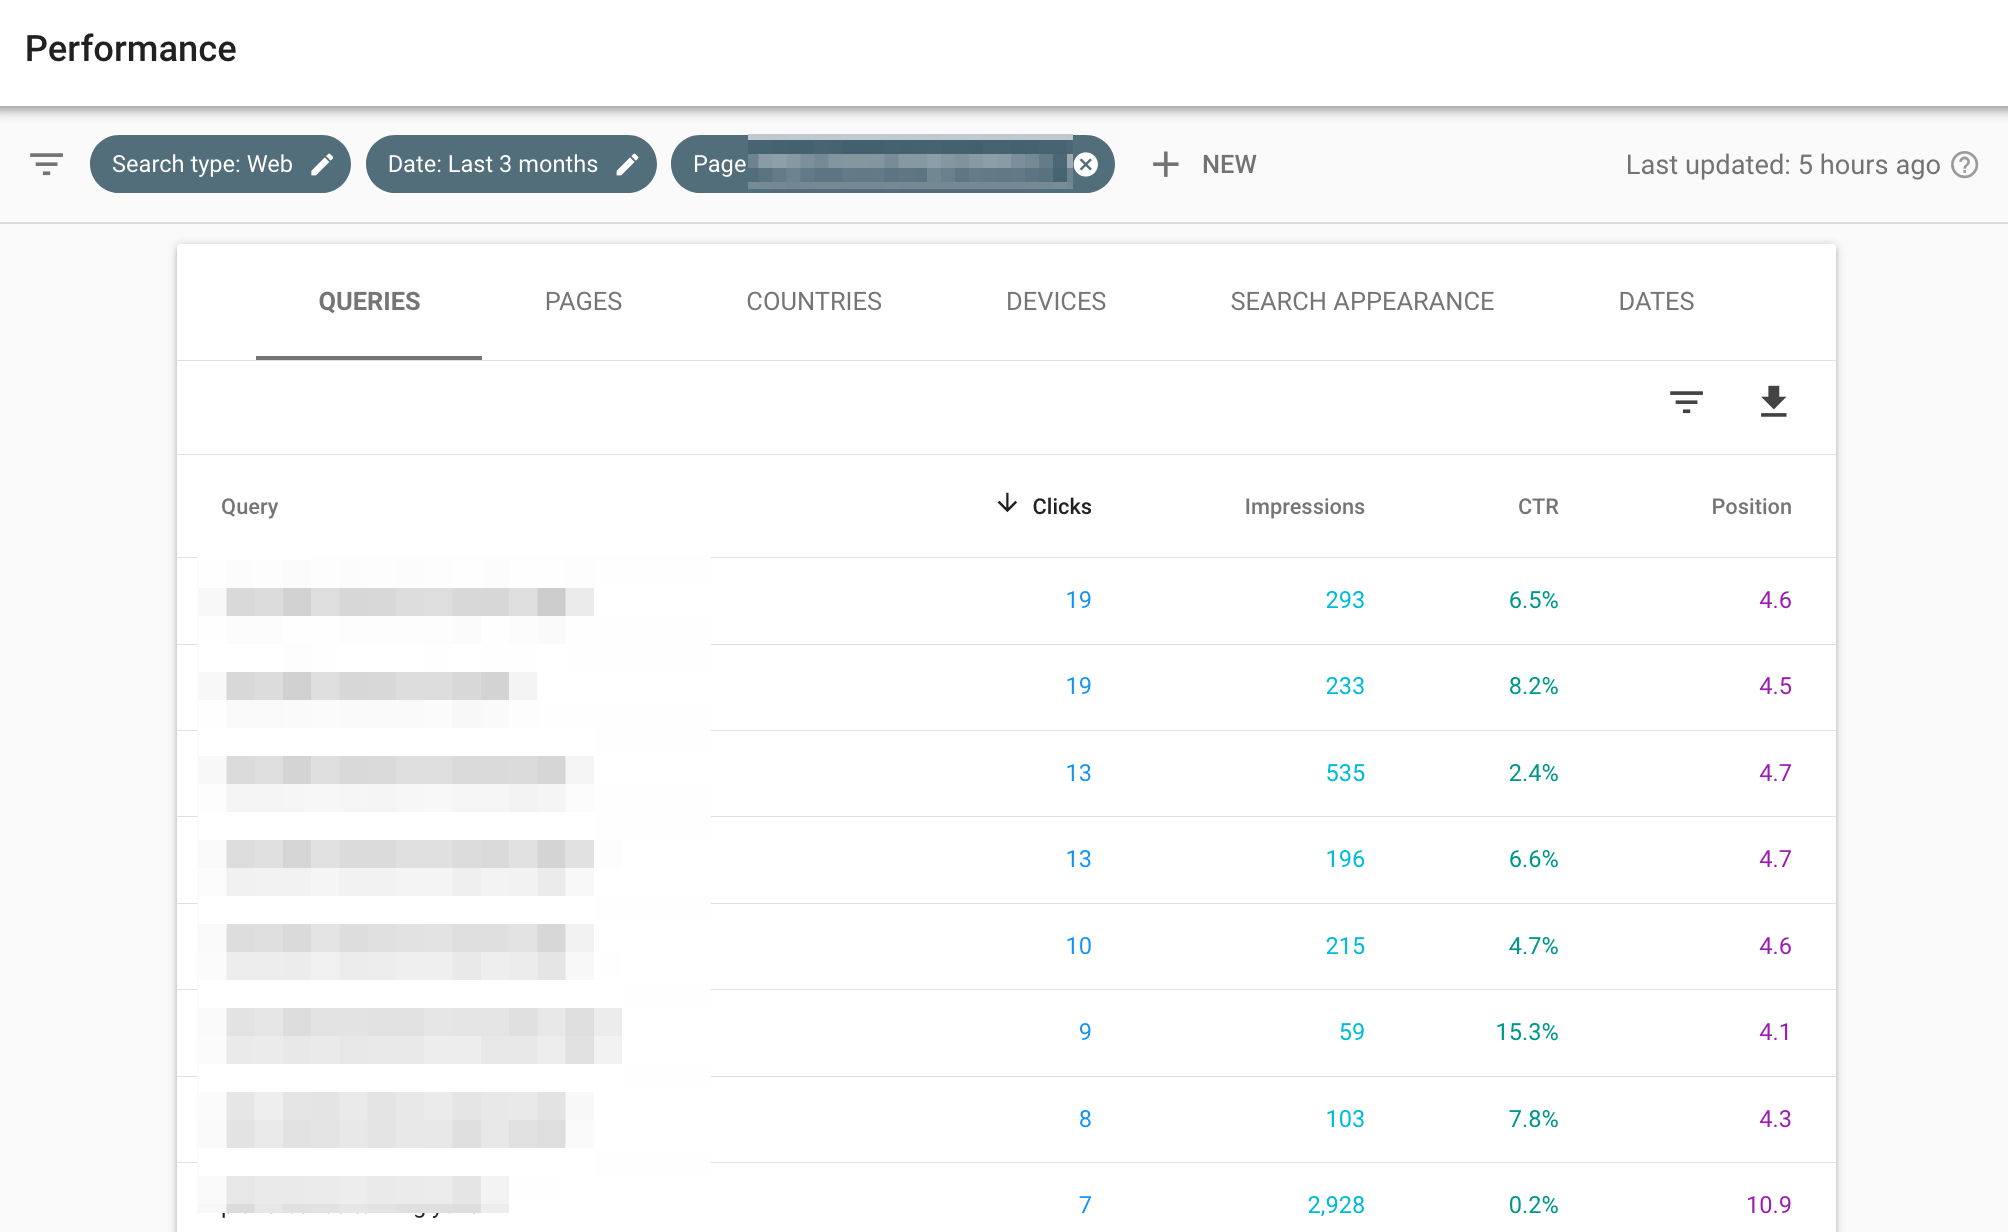
Next, you’ll want to click on the CTR and average position at the top, then click on the queries to find out exactly which keywords people used to search for you and which ones they clicked on. You’d find something that looks like this…

Use Data on Google Search Console to Optimize Your Website Pages

With that, you now know exactly which keywords and phrases people used to find your site. One thing you can do with this data is to find the keywords that have high impressions but low click-through rates (CTR). What that means is people are finding your content, but they aren’t clicking on them.

That might mean they don’t find it relevant or it’s not comprehensive enough. So, what you do is add these keywords and phrases to your page’s headers and content. You also add it to your title and meta description.

Do this for your top-performing pages and they will continue to rise, get more traffic, and perform better.

Over to You

These three tools are all free. So, it doesn’t make sense that you don’t take advantage of them. You don’t need to be an expert in everything, nor have to spend so much just to compete in the digital marketing arena.

In order to succeed and grow your business, you only need to have the right tools to guide you in your decision-making process. That way, you won’t make the wrong assumptions, nor use inaccurate data in your plans.

If you need help setting up these tools on your website, feel free to reach out in the comments below.

How to Add Google Tag Manager to a WordPress Website Using the Genesis Framework

Man reading from a tablet

There are various ways to use Google Tag Manager (GTM) on your WordPress website. The easiest and most popular way is to use a plugin. But, as I mentioned before, it’s generally better to not rely on plugins.

So, the other way to do it is by adding some code to your website. And that’s what I’m going to share in this article.

Why You Should Use Google Tag Manager on Your Website

There are various reasons for using Google Tag Manager on your website. Here are the three most important ones.

1. Faster Implementation of New Technologies

The biggest benefit of using GTM on your website is it allows you to implement new technologies faster.

As I’m sure you already know, the tools and apps available today that allow you to do awesome things on your website is done by adding some code on your website. Let’s say you want to track your website visits and performance, you would have to install Google Analytics.

If you want to track your Facebook ads performance properly, you would have to install the Facebook Pixel. This goes the same for Google Ads. You also do this for your live chat software, email marketing, CRM, and the list goes on.

As you can imagine, that is a lot of code to be added on your website. If you are not technically-savvy, you wouldn’t want to keep editing your website’s code and hope nothing will get messed up.

By using Google Tag Manager to manage your code implementation, it will be easier to implement and test new technologies for your business.

2. Eliminate Down Time

The traditional way to add code to your website is by sending it over to programmers/developers. That would mean you would send them the code and the instructions.

This usually takes a couple of days to a couple of weeks, depending on how they do their work. Unless you have someone on standby, that would mean you won’t be able to move forward with your testing or implementation until this part is done.

And as you already know, the ability to move fast in today’s markets is important. If you use GTM, you can add new code to your website in just 5 minutes.

3. Potentially Avoid Slowing Down Your Website

The other solution for implementing new technology or functionality on your website is through the use of a plugin. While there’s nothing wrong with using them, it’s generally advisable to avoid using too much plugins.

Also, all tags/code added via Google Tag Manager loads asynchronously. In simpler terms, it means load at the same time. This is very important because when you do website speed tests, you will often see a portion called eliminate render-blocking resources. The way to overcome that is to remove what is causing it. If you can’t, load it later or load it asynchronously. 

Poorly coded plugins are usually the main culprit. They make your website load slowly and affects user experience. This is something you don’t want to happen. That’s why it’s important to speed up your website.

Preparatory Points

This is for you if you meet the following criteria:

  1. You want to speed up your website
  2. You are running on WordPress
  3. And using the Genesis Framework

How to Install Google Tag Manager on Your Website

Adding GTM to your Genesis theme involves three steps:

Step 1: Prepare Your WordPress Account

The first thing you need to do is log in to your WordPress dashboard. Then, go to your theme editor.

Appearance > Theme Editor

On the right-hand side, click on the Theme Functions (functions.php). Scroll to the bottom and paste this code.

// Add Google Tag Manager code in <head>
add_action( 'wp_head', 'google_tag_manager_head' );
function google_tag_manager_head() { ?>
	
//Replace this entire line with the first part of the code <head>

<?php }


// Add Google Tag Manager code immediately below opening <body> tag
add_action( 'genesis_before', 'google_tag_manager_body' );
function google_tag_manager_body() { ?>
	
//Replace this entire line with the second part of the code <body>

<?php }

Step 2: Get Your Google Tag Manager Installation Code

Next, head on over to Google Tag Manager and get the installation code. If you haven’t created an account, it’s easy to do so. All you need is a Gmail account.

Once you’re in, go to the admin section.

Admin Section of Google Tag Manager

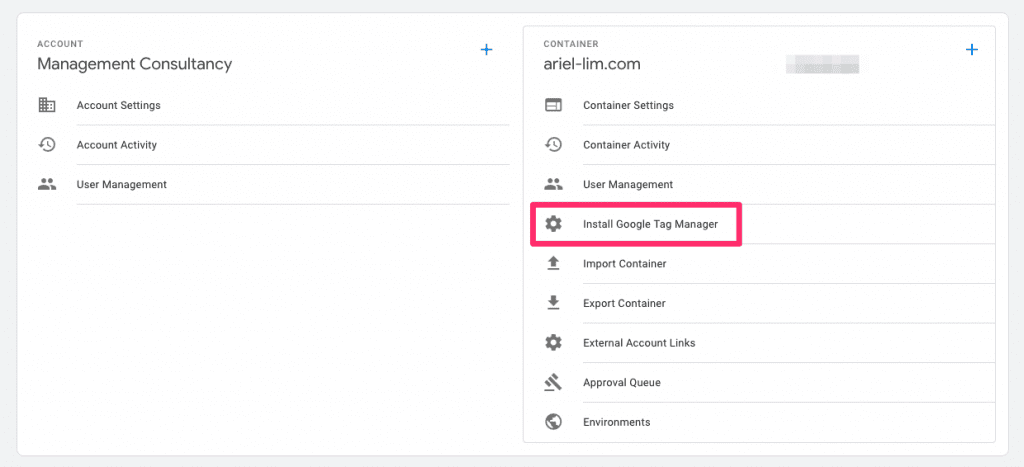
Next, click on install google tag manager.

Install Google Tag Manager - Get the Code

You should see two sets of code. One to include at the <head> section, while the other at the <body> section. Copy the first part, then move to the next step.

Step 3: Add the GTM Code to WordPress

Now, go back to WordPress and replace the line where it says to replace it. 

You should now end up with something that looks like this.

// Add Google Tag Manager code in <head>
add_action( 'wp_head', 'google_tag_manager_head' );
function google_tag_manager_head() { ?>
	
    <! – Google Tag Manager -->
<script>(function(w,d,s,l,i){w[l]=w[l]||[];w[l].push({'gtm.start':
new Date().getTime(),event:'gtm.js'});var f=d.getElementsByTagName(s)[0],
j=d.createElement(s),dl=l!='dataLayer'?'&l='+l:'';j.async=true;j.src=
'https://www.googletagmanager.com/gtm.js?id='+i+dl;f.parentNode.insertBefore(j,f);
})(window,document,'script','dataLayer','GTM-ABCDEF');</script>
<! – End Google Tag Manager -->

<?php }


// Add Google Tag Manager code immediately below opening <body> tag
add_action( 'genesis_before', 'google_tag_manager_body' );
function google_tag_manager_body() { ?>
	
<! – Google Tag Manager (noscript) -->
<noscript><iframe src="https://www.googletagmanager.com/ns.html?id=GTM-ABCDEF"
height="0" width="0" style="display:none;visibility:hidden"></iframe></noscript>
<! – End Google Tag Manager (noscript) -->

<?php }

Over to You

Now, whenever you need to add, test, or implement new technology, you only have to do that within Google Tag Manager. I’ll write more about this in the future.

Hope you found this helpful. If you want to speed up your website, find out how you can achieve 90+ scores on Google PageSpeed Insights for both mobile and desktop here.

What Is Google Tag Manager

What is google tag manager

Google Tag Manager (GTM) is a tag management software — a tool that allows you to add/delete/modify code on your website (or app) without the need for programming knowledge.

The current trend in digital marketing is to install a piece of code (or snippets of code or tracking pixels) from the different software that you use. For example, if you want to track your website’s traffic and user’s behaviors, you can install Google Analytics.

To do so, you need to install a code that looks like this:

<! – Global site tag (gtag.js) - Google Analytics -->
<script async src="https://www.googletagmanager.com/gtag/js?id=UA-12345678-9"></script>
<script>
  window.dataLayer = window.dataLayer || [];
  function gtag(){dataLayer.push(arguments);}
  gtag('js', new Date());

  gtag('config', 'UA-12345678-9');
</script>

This comes with an instruction to add it to all pages on your site at the start of the <head> section of your website. But most often, a business will want to use several of these tools.

Problems of Not Using Google Tag Manager

Let’s say you want to capture visits and target those audiences on Facebook, you install the Facebook Pixel. Then you heard about the new feature in your CRM software that allows you to track your contacts’ website visits as well. That way, you know which pages interest them. What about your email marketing software? Or that shiny new live caht or chat bot software

You need to install several lines of code for each of these tools to make them work.

Traditionally, these sets of code is added by programmers/developers manually.

Marketers give the code to be added and where to add it. Then, the programmer/developer comes back to you in 1-3 weeks to say that they’ve added it.

Using GTM to manage all these code implementation/changes makes it simple.

Main Benefit of Using Google Tag Manager

Using Google Tag Manager eliminates all these unnecessary steps.

Instead of going through a lot of time and effort coordinating with 3rd parties, you can easily implement and manage the changes on your website quickly. You can also test whether the app or software is working properly without going back and forth.

To get started, all you need to do is give them the GTM code to install. Once that is installed, you can use GTM to handle all additions/deletions/changes of code inside it.

How to Add a Tag in Google Tag Manager

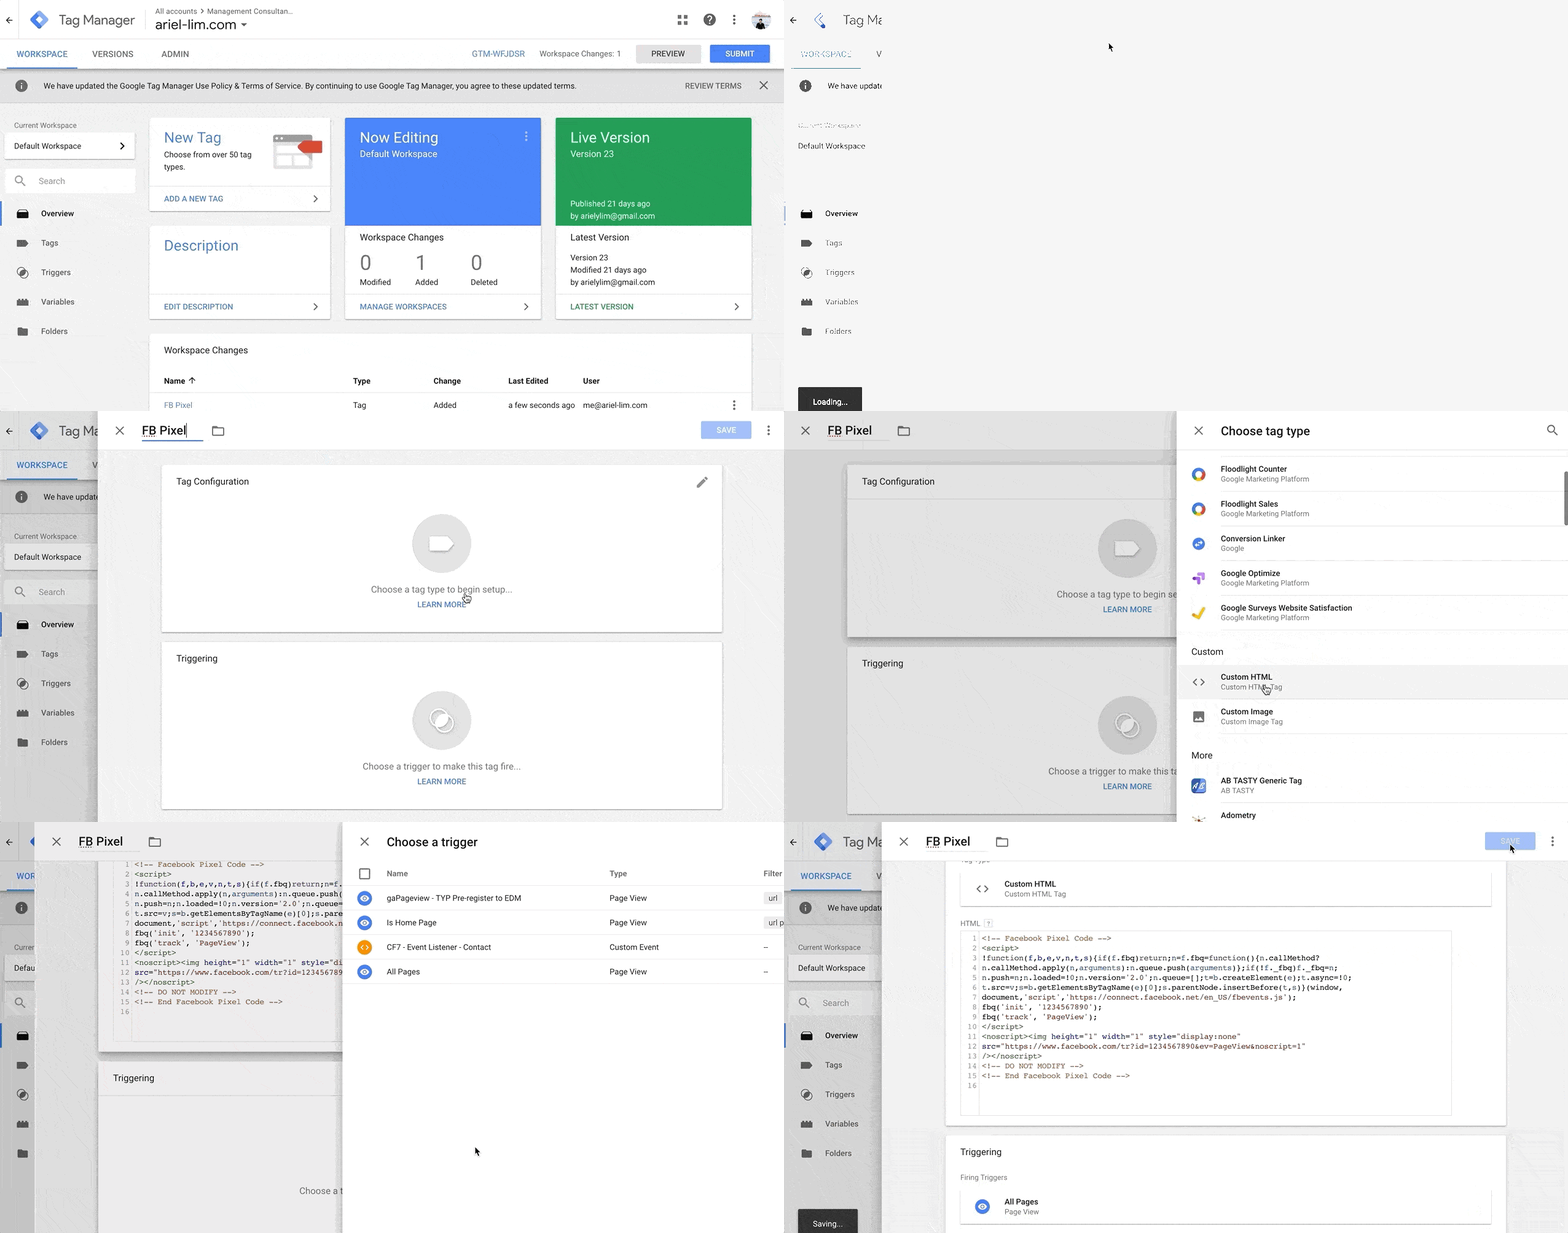
Let’s say you want to install the Facebook Pixel on your website. Once you have Google Tag Manager installed on your WordPress site already, here’s a quick overview for adding a new tag on GTM:

  1. Add a New Tag
  2. Change the Name
  3. Choose Custom HTML
  4. Paste the code
  5. Use All Pages as the Trigger
  6. Save
Create New Tag in Google Tag Manager

You can set the code to be added on the page by a simple copy-paste from your tool or software you want to implement. In our example above, that’s the Facebook Pixel.

You can easily apply the rules or firing conditions in which they appear.

If you need to create edits or modifications, you simply choose the tag and edit it directly.

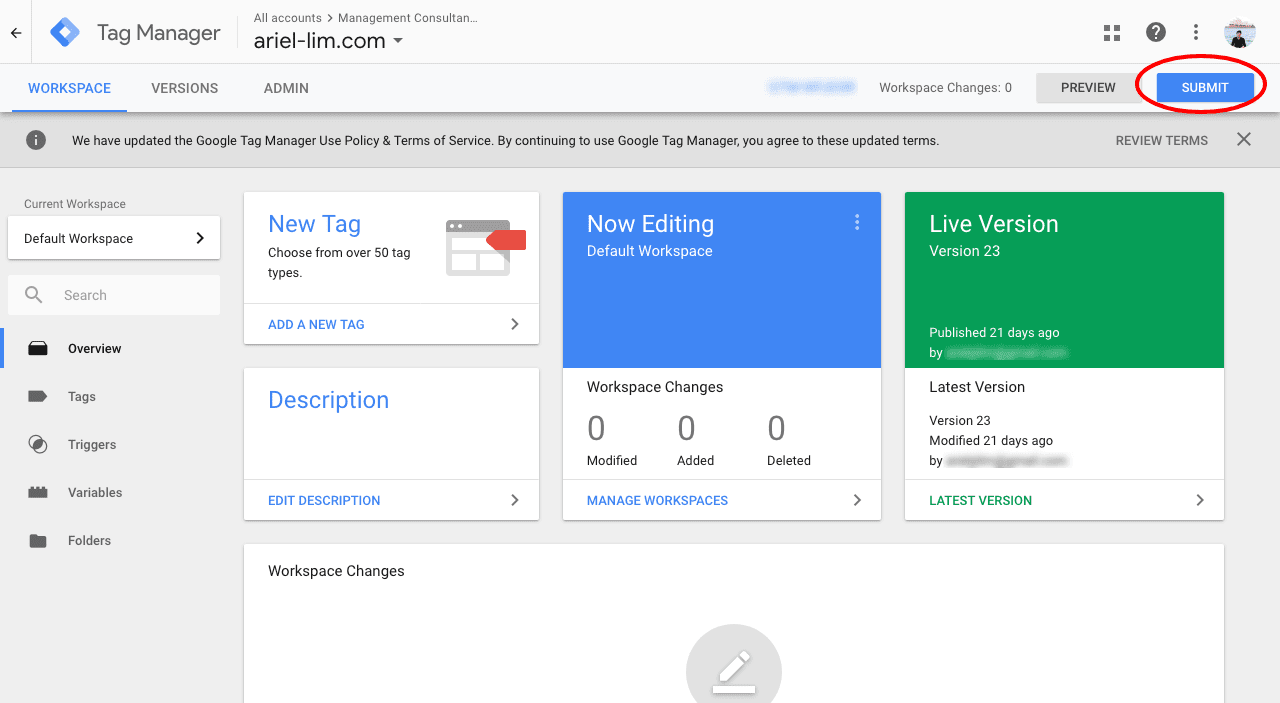
Once you hit submit, all the changes will be live. You will be asked to add some details so you can remember what the changes are about.

Google Tag Manager Publish Container

No need to send it off to your programmers/developers. No need to wait for weeks for a single change or implementation.

I also shared that this is the ideal way to install Google Analytics as well.

Of course, there are a lot more you can do with GTM like using it to create events that you push to Google Analytics, or use the Data Layer to gather more information to your reports. But that’s for another time.

Are you using GTM on your website? Does implementing new software take you so long because your developers and programmers take a while to get back to you?

Let me know in the comments below!

Google Analytics Basics: How to Set it up Properly

img 0915

Google Analytics is the most well-known analytics program for digital marketing. The best part? It is absolutely FREE!

Digital marketing without using analytics is like driving a car in the night without any lights and your dashboard is not working. You do not know where you are going. You do not know how fast you are going. You do not know if you are heading in the right direction or not.

It is not any better than traditional marketing. Think of billboard ads and tv commercials. You invest a lot in producing them in terms of money and time. Then, you do not have a direct way of measuring their impact to your business.

It does not have to be that way. Google Analytics is fairly simple to setup (and use for that matter).

There are three phases in setting up Google Analytics properly. Each phase is also broken into two parts.

How to Setup Google Analytics

Setting up Google Analytics can be divided into three (3) phases:

  1. Creation of the necessary accounts
  2. Installing the code to your website
  3. Checking (and troubleshooting, if necessary) the data

Phase 1: Creation of Accounts

Creating the necessary accounts is the first step.

You will need to create (or login to) a Gmail account. From there, head on over to the Google Analytics (GA) and Google Tag Manager (GTM) websites.

You need both GA and GTM accounts because the former allows you to analyze your website while the latter allows you to make changes to your website without having to learn code; thus, future-proofing your website.

Step 1: Create a Google Analytics Account

  1. Go to analytics.google.com
  2. Login to your Gmail account
  3. Sign up for a Google Analytics account
  4. Choose Website
  5. Input Basic Information About Your Company and Website
  6. Scroll Down and Get Tracking ID
  7. Accept Terms of Service
  8. Take note of your Tracking ID.

Step 2: Create a Google Tag Manager Account

  1. Go to tagmanager.google.com
  2. Login to your Gmail account
  3. Enter your company name (account)
  4. Enter your website’s domain (container)
  5. Choose Web
  6. Accept Terms of Service
  7. Copy the two sets of code given

Phase 2: Installing the Code

Before editing or making any changes — whether that’s adding or updating a plugin, or editing the code directly— it’s best practice to create a backup of your website first.

Installing the code involves two parts as well.

First, you setup Google Analytics inside Google Tag Manager. Next, you install the GTM code on your website.

Again, the primary reason why you should setup your analytics this way is because GTM allows you to change settings or add other code in your website without having to tinker with code. You just install the GTM code and add/edit/delete codes inside GTM. To learn more about how you can do this, check out my article on Google Tag Manager.

Step 1: Install Google Analytics code in Google Tag Manager

  1. Get your Google Analytics Tracking ID
  2. Login to Google Tag Manager
  3. Choose the container name you just created
  4. Add a new tag
  5. Name the tag as “GA Pageview”
  6. Choose Google Analytics
  7. Choose Universal Analytics as a tag type
  8. Create a new variable
  9. Name the variable as “gaProperty”
  10. Choose constant
  11. Enter your GA Tracking ID (Phase 1, Step 1)
  12. Click continue
  13. Choose to fire tag on “All Pages”
  14. Create Tag

Step 2: Install the Google Tag Manager code on your WordPress website

This part assumes you are using a WordPress-hosted website. Earlier, there are two sets of code you have to install.

I have provided here two separate options for you to take:

Option 1: Install via header.php file
  1. Login to Google Tag Manager
  2. Choose the container name you want to use
  3. Go to Admin
  4. Choose Install Google Tag Manager
  5. Copy the code
  6. Login your WordPress dashboard
  7. Go to Appearance, then Editor
  8. Search for the header.php file
  9. Paste the code immediately after the opening body tag
  10. Update the File
Option 2: Install via the functions.php file (Genesis Framework)

Before editing or making any changes — whether that’s adding or updating a plugin, or editing the code directly— it’s best practice to create a backup of your website first.

This second option is what I recommend, especially if you are using the Genesis Framework.

  1. Go to your theme’s editor and add it to the functions.php file.
  2. Login to your WordPress account.
  3. Go to Appearance > Editor.
  4. At the right-hand portion, click on the functions.php.
  5. Scroll down until you see the end of the lines of code there. Remember to not touch anything else. A single mistake there can break your entire site.
  6. Add your code
  7. Hit save

Copy this entire code and paste it there, then replace the GTM-ABCDEF section with your own container ID.

// Add Google Tag Manager code in <head>
add_action( 'wp_head', 'google_tag_manager_head' );
function google_tag_manager_head() { ?>
	
//Replace this entire line with the first part of the code <head>

<?php }


// Add Google Tag Manager code immediately below opening <body> tag
add_action( 'genesis_before', 'google_tag_manager_body' );
function google_tag_manager_body() { ?>
	
//Replace this entire line with the second part of the code <body>

<?php }

You’ll then have something that looks like this…

// Add Google Tag Manager code in <head>
add_action( 'wp_head', 'google_tag_manager_head' );
function google_tag_manager_head() { ?>
	
    <! – Google Tag Manager – >
<script>(function(w,d,s,l,i){w[l]=w[l]||[];w[l].push({'gtm.start':
new Date().getTime(),event:'gtm.js'});var f=d.getElementsByTagName(s)[0],
j=d.createElement(s),dl=l!='dataLayer'?'&l='+l:'';j.async=true;j.src=
'https://www.googletagmanager.com/gtm.js?id='+i+dl;f.parentNode.insertBefore(j,f);
})(window,document,'script','dataLayer','GTM-ABCDEF');</script>
<! – End Google Tag Manager – >

<?php }


// Add Google Tag Manager code immediately below opening <body> tag
add_action( 'genesis_before', 'google_tag_manager_body' );
function google_tag_manager_body() { ?>
	
<! – Google Tag Manager (noscript) – >
<noscript><iframe src="https://www.googletagmanager.com/ns.html?id=GTM-ABCDEF"
height="0" width="0" style="display:none;visibility:hidden"></iframe></noscript>
<! – End Google Tag Manager (noscript) – >

<?php }

Phase 3: Checking the Data

Just like the rest of this post, this is divided into two parts as well:

  1. Click on preview inside Google Tag Manager.
  2. Check real-time data in Google Analytics
  3. If it’s working, then hit publish

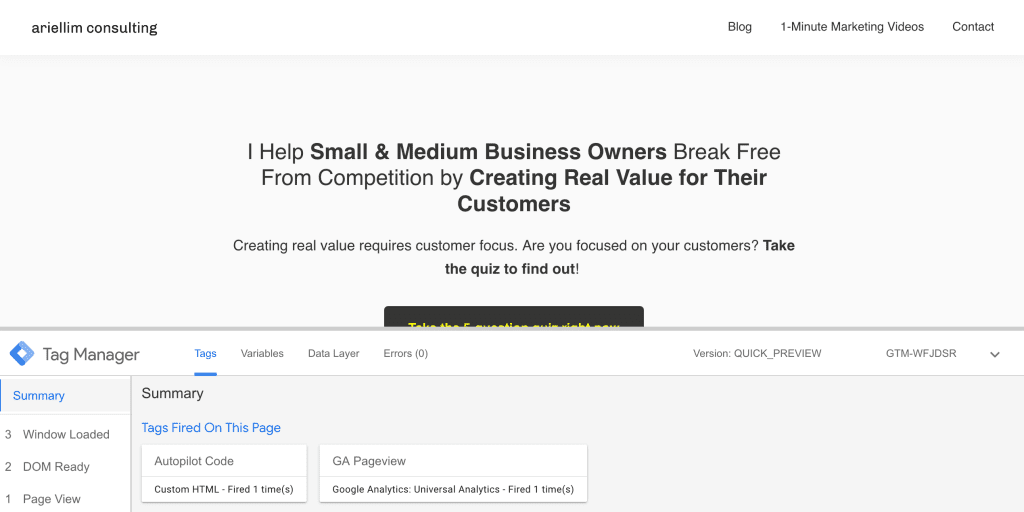
Step 1: Preview Your Container in GTM

  1. Go to your GTM account
  2. Click on preview at the top-right portion. The page will reload.
  3. Open a new tab and open your website.
  4. You should see the “tags” firing at the bottom of the screen
  5. If the tag is present, it’s working properly.
Google Tag Manager - Preview Tags Firing on Your Website

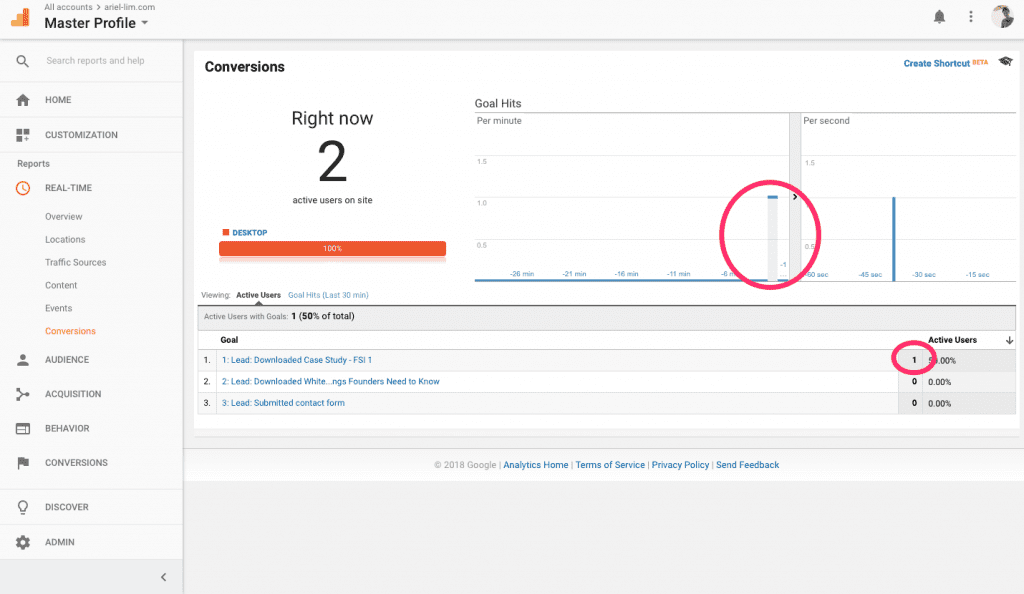
Step 2: Look at Real-Time Data in GA

  1. Go to your Google Analytics account
  2. Make sure you are in the Reports tab
  3. Click Real-Time
  4. Click Overview
  5. Open another tab in your browser and load any page on your website
  6. Go back to GA to see if it is working
    1. If it’s working, go back to GTM and click on “leave preview mode”
    2. If it’s not, it’s either you configured it wrong, or a plugin is preventing it from loading. Usually, ad blockers from your browser are the culprit.
Google Analytics Real-Time

Step 3: Publish Your Container

After verifying the data is coming in correctly, head back to Google Tag Manager and click on the submit button at the right-hand side.

You’ll be asked a few details to help you remember the changes you did. Once you’re done, click on Publish.

And that’s it.

You have now installed Google Analytics properly on your website using Google Tag Manager. Again, this is the ideal setup for adding code and apps to your website. That way, you don’t have to go through this setup again.

The next time you want to add code to your website, like the Facebook Pixel or your email marketing tracking code, or an A/B optimization software, you only have to add it via Google Tag Manager.