I counted my browsing history just now. Yesterday, I visited 598 pages in my Chrome browser. This includes various sites such as this one, Google Analytics, Facebook, and a whole lot more. And this one doesn’t include my browsing history in Safari and on my phone.
Why is this significant? Because despite the rise of social media and home speakers, I still visit a lot of websites. And I don’t think of myself differently. My guess is you do the same thing too. That means, we’re all relying on various websites to get through the day—whether that’s working, checking email, finding information, and doing what needs to be done.
In a business context, a website is a prerequisite.
According to Wikipedia, a website or web site is a collection of related network web resources, such as web pages, multimedia content, which are typically identified with a common domain name, and published on at least one web server.
I’m not going to discuss the technical aspects of having a website. There are already tons of resources out there explaining that. What I’ll write about is the only reason you need why you need a business website.
THE Real Reason Your Business Needs a Website
I spoke with a lot of business owners over the last 5 years. One thing they have in common is they hesitate on creating a website for their business.
They argue that they don’t need it because their business is doing okay. They have a following on social media and is continuously growing. They don’t really have customers online.
Well, that’s short-sighted thinking.
The problem with this kind of thinking is you assume that other people are different from you. Which, if you think about it, simply isn’t true. We all use the internet. We check different websites to get the information we need. We google questions to find answers.
What makes you think that your customers don’t do the same thing?
Unless you’re market is in the most remote parts of the world where there is no internet access, then sure, you don’t need one.
If You’re Not on Google, You Don’t Exist
The biggest reason why your business need a website is if you aren’t found online, then your customers can’t find you. Most business owners argue that having a social media account is enough.
But that can’t be farther than the truth.
Let me ask you a question.
When was the last time you were searching for information and did not use Google or other search engine to look for answers?
If you’re in a country with access to the internet, the answer is probably never in the last 5 years. Sure, you might have asked a question on Facebook or Twitter, but it’s mainly because you want to create some sort of engagement around your brand. Not to really find an answer.
Now, do you think your (potential) customers are that different from you?
If you answer yes, then you’re out of touch with reality.
Yeah, people browse continuously scroll through their Instagram feeds, but that’s not how people find you.
Other Reasons Come Second
I’m not going to list a bunch of other reasons and statistics why you need a website, because really, it boils down to whether or not you can be found by people.
Focusing on your customers is the best way to differentiate yourself in the market. If you don’t have a website, that means you are losing for the battle for attention.
And in case you didn’t know, attention is limited. It’s a zero-sum game. That means you don’t just compete with direct competitors in your industry. You compete for everything else —Netflix, Spotify, YouTube. Everything that competes for the attention of your potential customers are your competition.
Without a website to act as the hub of all your online activities, everything will look fragmented.
Relying on social media limits you to what you can do—from branding to reach.
That’s why the phrase “pay to play” is used to describe sites like Facebook since the algorithm limits your reach to ~5%. With a website, it’s fair game. All you need is follow these three principles to succeed in online marketing.
Over to You
Everyday, people use the internet. If you are not present in that process—by not having a website or a proper hub for your online presence—you’re already fighting a losing battle.
No matter what your business or industry is, a website helps you generate business, promote goodwill among customers and prospects, and deliver strong marketing messages.
Digital marketing is one of the most competitive and fastest-changing industry out there. If you don’t keep up with the changes, you could end up getting left behind. That’s why it’s important for people in the industry, including me, to continuously learn new things and keep up-to-date on whatever is happening.
In this article, you’ll learn the three aspects that you need to focus on if you want succeed in digital marketing.
For anyone who has some basic understanding of digital marketing, you would have noticed that it is a very broad field. There are different areas that you need to address:
That’s just some that comes to mind right now. Then, if you dive in deeper in each of those, you’ll find a whole other world. For example, in social media alone you’d have different platforms like Facebook, Instagram, and Pinterest. For advertising, you have the traditional PPC from Google or Bing Ads, but you also have social advertising — which is advertising in social media sites. But I digress.
As you will find out below, these different other areas of digital marketing won’t matter if you don’t have the main building blocks set up properly. Let’s dive right in.
3 Digital Marketing Fundamentals You Need to Get Right First
1. Your Website Needs to Have a Great User Experience
The first thing you need to get right is to have a website with a great user experience.
No, I’m not talking about fancy animations or images or even design.
I’m talking about your website speed.
When people visit your website, the first thing that they experience is how fast — or slow — your website loads.
Don’t know if your website is fast or slow? Here’s a simple way to find out:
Why should you fix website speed before anything else
Your website is the hub of all your online activities. It’s the place where people search for information about you, learn more about the business, and if you sell something, the place where people buy.
Sure, you can do all those in other channels like social media. But your website is the only online property where you have complete control over —from the layout, design, the copy, and everything else.
We don’t need a website. We’re awesome.
And if you think you can still get a way without a website, think again.
30% of consumers won’t consider a business without a website. Ouch!
97% of consumers go online to find and research local businesses.
75% of people have judged a company’s credibility based on its website design
Creating a website for your business — no matter how small — is important if you want to even be considered relevant.
Look at it this way.
Imagine you are running a marathon. To even participate in the marathon, you need to have registered and bought a race kit. That’s the same thing with a website. To even be qualified to join the race, you need a website.
A fast website puts you in front. Now, a marathon is typically an endurance race, so whether you start at the front or at the back doesn’t matter that much. But all things being equal, if you are in the front, you have higher chances of winning that being at the back.
Suggested reading
Don’t know where to start? Here are some basic resources that you can read:
2. You Should Have High-Quality Content That People Love to Read
The next thing you need to address if you want to succeed in digital marketing is to create high-quality content.
What do I mean by high-quality content?
There’s really not much of a consensus open this topic since it’s very subjective. But here’s a quick and dirty:
rank high on Google and other search engines
You get a good amount of traffic from it
People engage via comments and re-share them
As you can see, that’s not much to go on. Google this topic and you’d be amazed at how much content is dedicated to writing high-quality content but doesn’t really give you a definition.
The reason for that is content is very subjective.
So here’s a simplistic answer: if your users/target audience are reading your content, that’s high quality. If they don’t, or you find that people only linger at your 2,500-word posts for 10 seconds, that is a sign of poor content.
Why should you create content before anything else
Your website will have many pages. Depending on the industry, your website will generally have the following types of pages:
General website pages — these are your homepage, about us, etc. It lists basic information about you and the business, your value proposition, etc.
Product pages — if you’re selling, these are your products, its variants, and categories. Each page typically includes information about the item, stock availability, buy buttons, etc.
Resources — these are resources your users will find valuable. They can be white papers or eBooks, videos, knowledge bases, etc.
Blog pages — these are the posts you create where you can show your thought leadership and demonstrate that you know what you’re doing. Generally speaking, these types of content tend to rank higher on Google.
Landing Pages — these pages are where people give their contact information in exchange for something valuable to them. It can be as simple as a contact us page, or a dedicated landing page for events or webinars.
As mentioned above, most content that you see on search engines fall under the blog pages. Unless, of course, you are searching for specific products or brands.
The 5 Stages of Awareness tells us that the brand-related/company-related searches are smaller compared to generic queries. For example, searching for “royal canin dog food” is much smaller than “dog food.” That’s the same thing with you and your brand.
If you don’t create content that adds value to the lives of your customers, you will only appear online for brand-related searches. That means you are limiting your potential.
The last thing you need to work on is making sure that other people find you.
There are other technical aspects that you need to consider here, but that’s for another time.
What I mean by this is simply distributing your content on every channel you have as a business/brand. That includes your social media accounts, email list, etc.
Remember what I said above? If no one is reading your content, that means it’s low quality. But you won’t really know if people don’t read your content unless you share it to the public.
If you don’t take the time to distribute your content, then no one will find it. With over a 1.5 billion other websites, you have got to make sure you distribute the content you created.
Why should you fix this before anything else
The underlying reason why you should distribute your content is to get found. If you look at the technical aspect of SEO and how websites rank, it’s generally because of backlinks — links from other websites pointing to yours.
There are a lot of factors to consider there and will probably take hours to explain them all. That’s why I started with sharing your content to as many channels as you can.
Because all things being equal…
if you have a fast website, and
you have great content
…people will be willing to read and share your content.
That just exponentially increases your reach. Now, imagine if hundreds of people re-share your content on their social media accounts? What if they get picked up by other websites and referenced your website/content in their own content?
That’s the power of distribution.
So don’t stop at speeding up your website.
Don’t stop at writing content.
Take the time to distribute it well.
Suggested reading
Here are some resources you can read to get started with distribution:
Think of digital marketing as the human body. It’s made up of different systems that are interconnected to one another. If one part is hurting, it’s “easy” to focus on relieving that pain with a short-term fix. But to prevent it from happening again, you have to consider a lot of other factors. That’s why with health, you should focus on overall wellness, not just one part.
That’s the same thing with digital marketing. You can fix your sales and traffic problem by throwing in some money for ads. But once you stop, everything will drop again. And you’re back to where you started.
If you want to succeed in digital marketing, focus on building a great foundation first. Make sure you have a fast website, create exceptional content, and continuously distribute your content so others can find it. Do these three things and you’ll start seeing results.
Want to audit your website for free? Let me know in the comments below and I’ll give you a report on what you should fix in order to make it blazingly fast.
One of the primary functions of search engines like Google is to provide answers to users’ questions and problems. That’s why it’s important to create content that is helpful and valuable to them, rather than promote your products and services. And frankly, that’s the best way to future proof your business — by focusing on creating value for other people.
This is also the reason why Google loves fresh content. Fresh content doesn’t necessarily have to be new content. Rather, it can be and “old” content, but updated to reflect certain changes; therefore, making it relevant and useful.
And that’s what we’re going to be talking about in this article.
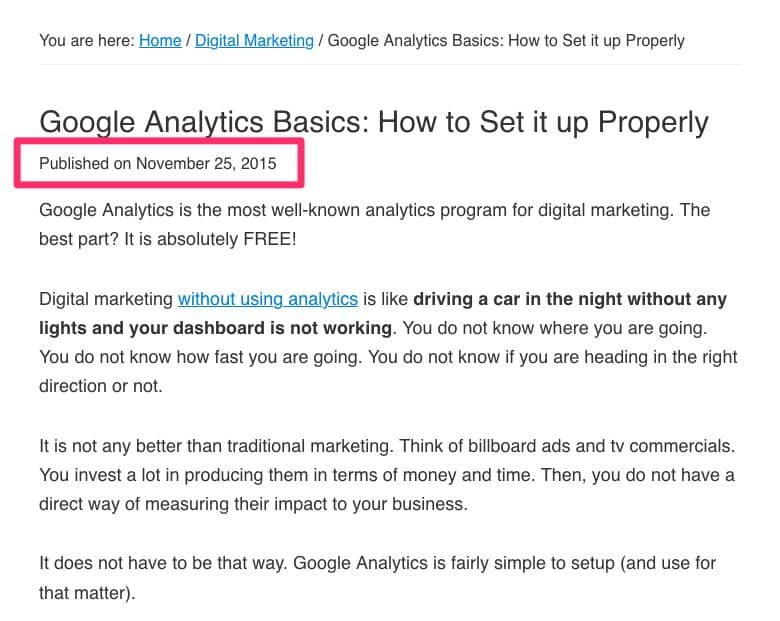
Let me ask you a question.
If you were looking for some resources about how you can install Google Analytics to your website and you came across this one I wrote. What comes to mind?
If I saw that, I’d probably take a look, but I’ll search for a more updated one. Because the contents of that page might not be relevant anymore. Depending on the topic, my leeway would probably be between six months to a year. If it’s older than that, unless it’s the only resource out there, I will probably not take it seriously.
And I believe it goes the same for you. You want something relevant and updated. You don’t want to spend your time reading and following some instructions only to find out later that it’s no longer applicable.
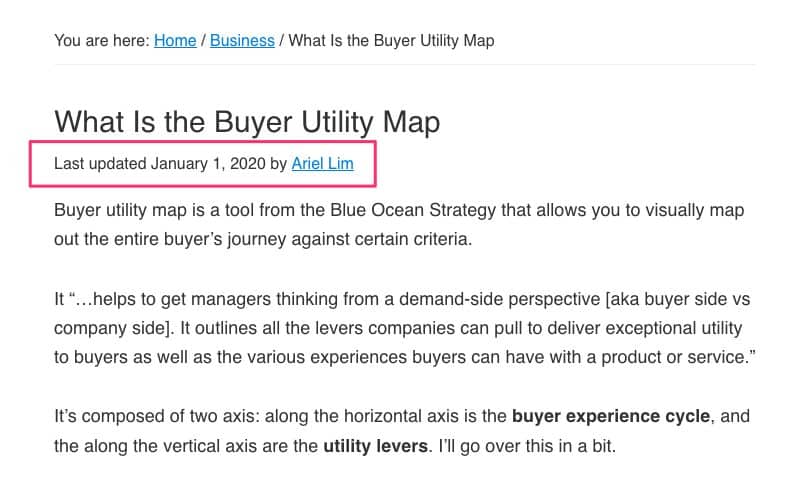
Now, what if you saw the same article and it looks like this…
Now, we’re talking.
Despite it being published a couple of years ago, you see that the date was recently updated.
If you’re using a WordPress website, whether you’re running on the Genesis Framework or another theme, then you can easily make this change yourself. You can do this using a plugin, but I’m biased towards not relying on them, especially if you want to speed up your website and get high 90s score on Google PageSpeed Insights for both mobile and desktop.
Preparatory Points
But before getting into it, I’d like to go through a couple of things.
First, you can simply remove the published date and only show the modified date. In fact, that’s what’s most of the resources out there. They simply tell you how to replace the published date with the modified date. If that’s what you want, there’s absolutely nothing wrong with that approach.
But that’s not what I’m going to here.
As you noticed in the examples above, the dates will be displayed depending on whether or not you actually updated the article. I also included a time element to it.
For example, I published an article on January 1, 2020. The article will display “Published on January 1, 2020.”
A year goes by and I haven’t updated the same article. It will still show the same thing. But if I edited it 6 months after, it will display both dates (or only the modified date which I’ll share below).
But there’s another problem here. Let’s say I noticed a typographical error the day after. I went in and edited the article. The modified date has changed. So, if I don’t include the time element, it will display it both. Again, there’s nothing wrong with that. It’s just weird.
Published on January 1, 2020 • Last Updated January 2, 20120.
Personally, I’d only want to display the modified date only if 30 days or so have passed.
Finally, make sure you make a backup of your site first. While this is relatively simple, a single mistake can make your site inaccessible.
Now that that’s out of the way, let’s dive right in.
How to Show Modified Date Instead of Published Date
There are two variations of this that I will show you.
First, as you saw in the example above, the published date and the modified/last updated date is displayed together.
The other option is to only show the modified/last updated date. Just like this one.
This is actually how it looks like on my website right now. This is option two below.
I’ll show you the code you need to add to your functions.php file for each, then I’ll explain parts of the code in case you want to modify it yourself.
First, login to your WordPress website. Go to Appearance then Theme Editor. Click on the functions.php file then scroll all the way down.
Where to Find the functions.php File on Your WordPress Website
Option 1: Display BOTH Original Published Date and Modified Date
Add this code at the bottom of your functions.php file if you want both the published date and modified date to appear on your posts.
You can edit the text you want by changing the “published on” and “last updated” to whichever you want. Hit save. Then check a post you recently updated but have been originally published a month ago.
Option 2: Display ONLY Modified Date
Add this code at the bottom of your functions.php file if you want only the modified date to appear on your posts.
Same as above, you can edit the text you want by changing the “published on” and “last updated” to whichever you want. Hit save. Then check a post you recently updated but have been originally published a month ago.
How the Code Works
The code is pretty simple to understand.
For option 1 — display both dates — here’s how to read the code:
Show original published date
If the updated date is greater than the original published date + 30, show last updated date.
For option 2 — display only modified date:
If the updated date is greater than the original published date + 30, show last updated date.
Else, show original published date
It’s that simple.
Over to You
By displaying the last modified date instead or together with the original published date, you show to your visitors (and Google) that you value them.
You avoid giving them a poor experience by showing them outdated content.
Did you find this helpful? Let me know in the comments below!
There are various ways to use Google Tag Manager (GTM) on your WordPress website. The easiest and most popular way is to use a plugin. But, as I mentioned before, it’s generally better to not rely on plugins.
So, the other way to do it is by adding some code to your website. And that’s what I’m going to share in this article.
Table of Contents Click on any of these to jump straight to that topic
Why You Should Use Google Tag Manager on Your Website
There are various reasons for using Google Tag Manager on your website. Here are the three most important ones.
1. Faster Implementation of New Technologies
The biggest benefit of using GTM on your website is it allows you to implement new technologies faster.
As I’m sure you already know, the tools and apps available today that allow you to do awesome things on your website is done by adding some code on your website. Let’s say you want to track your website visits and performance, you would have to install Google Analytics.
If you want to track your Facebook ads performance properly, you would have to install the Facebook Pixel. This goes the same for Google Ads. You also do this for your live chat software, email marketing, CRM, and the list goes on.
As you can imagine, that is a lot of code to be added on your website. If you are not technically-savvy, you wouldn’t want to keep editing your website’s code and hope nothing will get messed up.
By using Google Tag Manager to manage your code implementation, it will be easier to implement and test new technologies for your business.
2. Eliminate Down Time
The traditional way to add code to your website is by sending it over to programmers/developers. That would mean you would send them the code and the instructions.
This usually takes a couple of days to a couple of weeks, depending on how they do their work. Unless you have someone on standby, that would mean you won’t be able to move forward with your testing or implementation until this part is done.
And as you already know, the ability to move fast in today’s markets is important. If you use GTM, you can add new code to your website in just 5 minutes.
3. Potentially Avoid Slowing Down Your Website
The other solution for implementing new technology or functionality on your website is through the use of a plugin. While there’s nothing wrong with using them, it’s generally advisable to avoid using too much plugins.
Also, all tags/code added via Google Tag Manager loads asynchronously. In simpler terms, it means load at the same time. This is very important because when you do website speed tests, you will often see a portion called eliminate render-blocking resources. The way to overcome that is to remove what is causing it. If you can’t, load it later or load it asynchronously.
Poorly coded plugins are usually the main culprit. They make your website load slowly and affects user experience. This is something you don’t want to happen. That’s why it’s important to speed up your website.
Preparatory Points
This is for you if you meet the following criteria:
You want to speed up your website
You are running on WordPress
And using the Genesis Framework
How to Install Google Tag Manager on Your Website
Adding GTM to your Genesis theme involves three steps:
Step 1: Prepare Your WordPress Account
The first thing you need to do is log in to your WordPress dashboard. Then, go to your theme editor.
Appearance > Theme Editor
On the right-hand side, click on the Theme Functions (functions.php). Scroll to the bottom and paste this code.
// Add Google Tag Manager code in <head>
add_action( 'wp_head', 'google_tag_manager_head' );
function google_tag_manager_head() { ?>

//Replace this entire line with the first part of the code <head>

<?php }


// Add Google Tag Manager code immediately below opening <body> tag
add_action( 'genesis_before', 'google_tag_manager_body' );
function google_tag_manager_body() { ?>

//Replace this entire line with the second part of the code <body>

<?php }
Step 2: Get Your Google Tag Manager Installation Code
Next, head on over to Google Tag Manager and get the installation code. If you haven’t created an account, it’s easy to do so. All you need is a Gmail account.
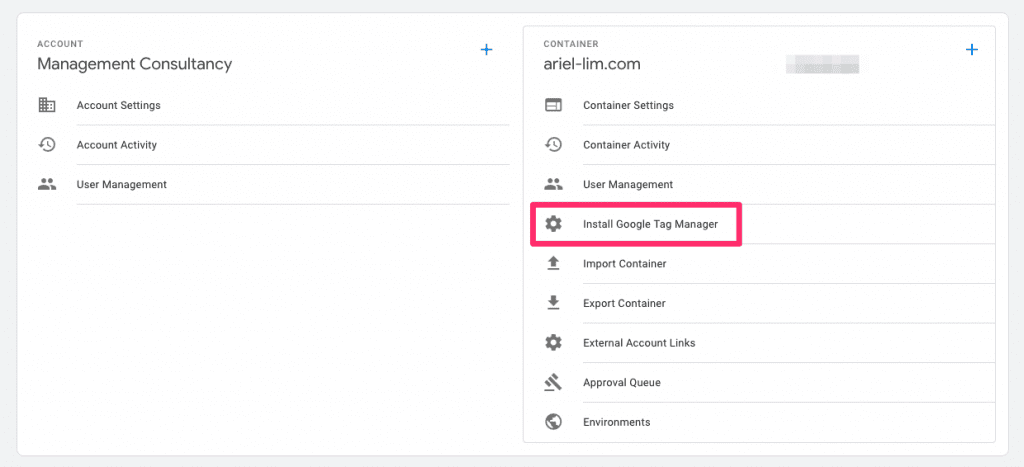
Once you’re in, go to the admin section.
Next, click on install google tag manager.
You should see two sets of code. One to include at the <head> section, while the other at the <body> section. Copy the first part, then move to the next step.
Step 3: Add the GTM Code to WordPress
Now, go back to WordPress and replace the line where it says to replace it.
You should now end up with something that looks like this.
// Add Google Tag Manager code in <head>
add_action( 'wp_head', 'google_tag_manager_head' );
function google_tag_manager_head() { ?>

    <! – Google Tag Manager -->
<script>(function(w,d,s,l,i){w[l]=w[l]||[];w[l].push({'gtm.start':
new Date().getTime(),event:'gtm.js'});var f=d.getElementsByTagName(s)[0],
j=d.createElement(s),dl=l!='dataLayer'?'&l='+l:'';j.async=true;j.src=
'https://www.googletagmanager.com/gtm.js?id='+i+dl;f.parentNode.insertBefore(j,f);
})(window,document,'script','dataLayer','GTM-ABCDEF');</script>
<! – End Google Tag Manager -->

<?php }


// Add Google Tag Manager code immediately below opening <body> tag
add_action( 'genesis_before', 'google_tag_manager_body' );
function google_tag_manager_body() { ?>

<! – Google Tag Manager (noscript) -->
<noscript><iframe src="https://www.googletagmanager.com/ns.html?id=GTM-ABCDEF"
height="0" width="0" style="display:none;visibility:hidden"></iframe></noscript>
<! – End Google Tag Manager (noscript) -->

<?php }
Over to You
Now, whenever you need to add, test, or implement new technology, you only have to do that within Google Tag Manager. I’ll write more about this in the future.
Your website is the most valuable asset when it comes to your business. It’s one of the first places people will check to determine if they will trust you and buy from you.
I’ve said it once and I’ll say it again, if you’re not found online, you do not exist.
If you’ve been following digital marketing best practices, the first thing that is often recommended is to speed up your website. That comes first before spending your time on search engine optimization (SEO). Why?
Because SEO can only do so much.
Take a look at this research from Google regarding page speed on mobile.
Once people get to your website, if your site doesn’t load in 3 seconds or less, more than half of your mobile site visits will leave the page. Put another way, for every second of impatient agony you’re causing visitors with slow load times, you’re losing conversions and profit.
Now, obviously you don’t want people to just abandon your site without it ever loading first. You don’t even get a chance to make an impression.
That is why website speed — both desktop and mobile — is very important to fix first before you do any optimization for search engines.
Is This for You?
I’m not going to talk about the technical details of making websites faster. And frankly, you don’t need to learn about html, css, javascript, and all those mumbo jumbo.
The only thing you want is fast website speed. And we’ll define what fast means later on and how you can do that without going crazy nor spending a lot of money.
Table of Contents Click on any of these to jump straight to that topic
For now, if you meet these criteria, keep on reading:
Using a custom WordPress site (wordpress.org instead of wordpress.com)
That means you have a web host provider
Struggling to get a high score on Google PageSpeed Insights
Want to provide the best experience for your customers
Planning to create a WordPress website that’s fast
Don’t want to hire developers or pay for expensive tools
8 Steps to Speed Up Your Website
1. Check your website speed to establish a benchmark
The first step is to get an objective view of your website’s speed. There are a bunch of free tools to test your website speed. Here’s a list of the most popular ones:
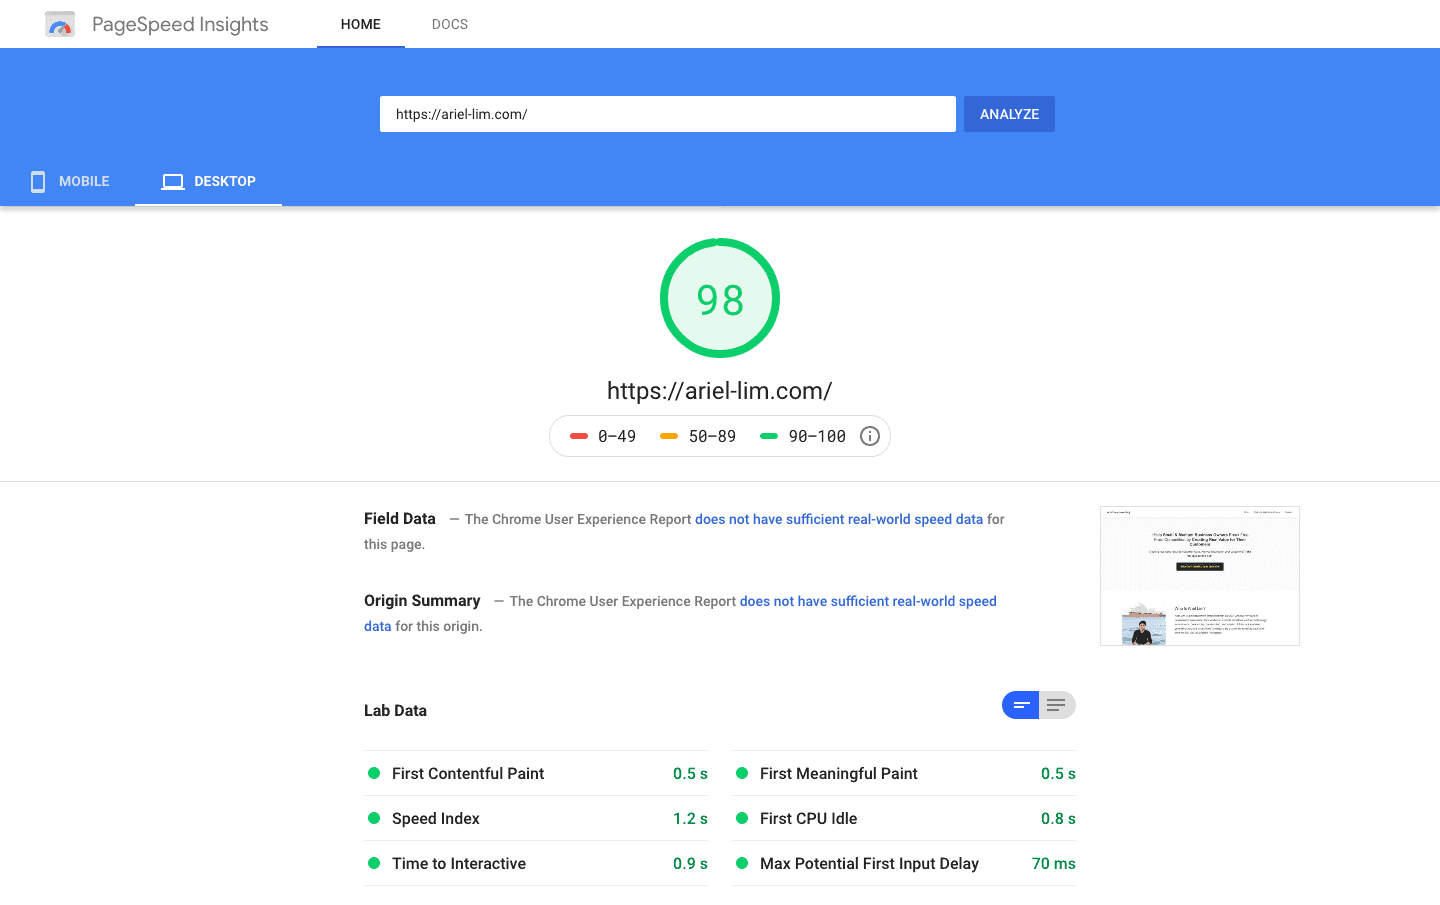
Just type in your homepage URL first to get started. Here’s what it looks on Google PageSpeed Insights.
You can toggle between desktop and mobile tests there as well. Towards the bottom, you will see the actual results and recommendations.
If your website is like most website, you will see the following areas to improve on:
Eliminate render-blocking resources
Remove unused CSS
Properly size images
Defer offscreen images
Serve images in next-gen formats
And a whole lot more. But like I said earlier, you don’t need to know every detail about this because I will show you how to get rid of them — making your website faster — without going crazy.
For now, save your results. I use Firefox as my main browser. There is a built-in screenshot option that allows you to take the entire page, that way have a copy of the entire test.
2. Choose a fast theme and web host provider
The next step is to take account of your theme and web hosting provider. The two questions to ask yourself are the following:
Are you using a fast and light-weight theme?
Is your website hosted on a reputable web host?
Now, I won’t get into the details of which themes or web hosts are better than the other. There are already tons of resources out there about those topics. For example, this article describes different WordPress frameworks. They also have this graphic that shows you the breakdown of WordPress sites using different themes.
Oftentimes, you’ll hear great recommendations for the Genesis framework. Then, for web hosts, the most popular and reputable ones are WP Engine and SiteGround. But those may not be for you, so you have to do a bit of research here.
I’ll leave you with this.
Generally, drag-and-drop builders (ThriveThemes, Elementor, Divi, OptimizePress, etc) load a webpage slower because of all the stuff they add to the page. But, if you know what you’re doing, this won’t be an issue. In fact, some websites built on these page builders might even be faster than yours if done right.
3. Determine what functionality you need
The next step you need to figure out to make your website speed super fast is to determine which core functionality you need on your website. Separate the must-have’s from the nice-to-have’s.
I discussed the 4 key capabilities or features every website must have before (plus a bonus one). If you have other features that you want to add to your website, this is a great time to question whether or not you really need it.
For a quick recap, here are the key features you need on your website — the rest are just fluff and you can safely discard them:
Information about you and your business
Ability to generate leads
Analytics and performance tracking
Communication or a way to send messages
Revenue generation (bonus item)
Now, since I don’t sell anything online, I don’t need the revenue generation feature. For 90% of businesses, the first 4 items are all you need. But if your entire business is eCommerce, then generating revenues from the site is a necessity.
If your current website has more than what I listed above, like fancy graphics and animation, then most likely your website has terrible speed. Take them out and your site will speed up immediately.
4. Limit your plugin usage
Now comes the actual changes you can do to speed up your WordPress website.
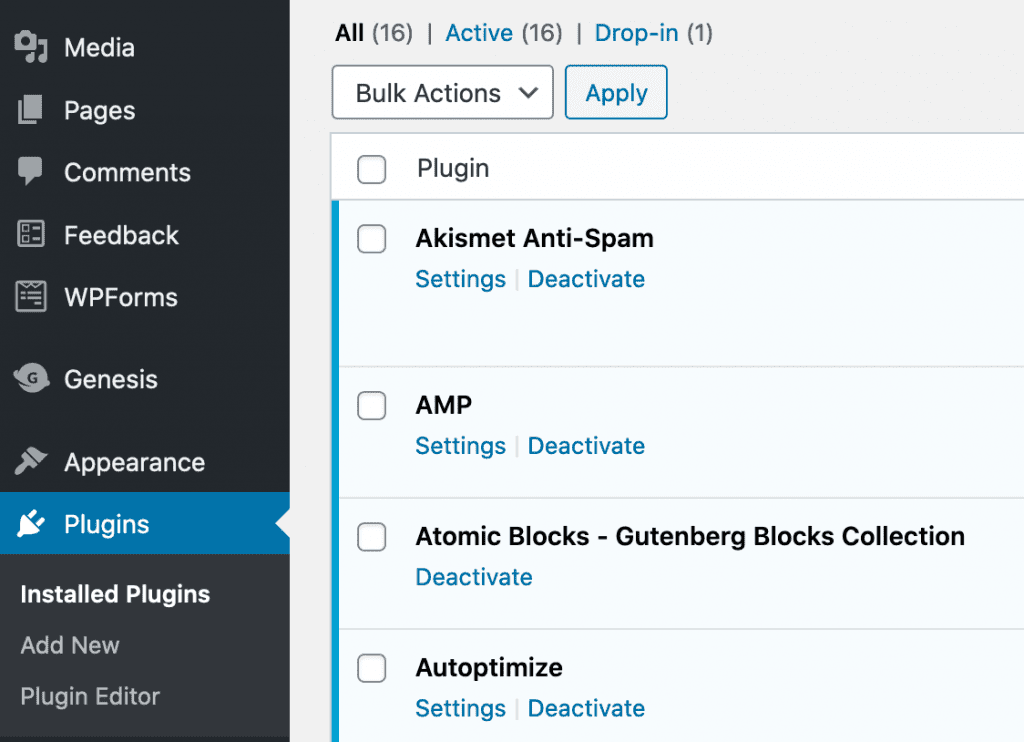
First, if you have plugins that don’t fall into the items above, then you don’t need them. Deactivate and delete the plugins.
Login to your WordPress CMS, then under Plugins, click on Installed Plugins. Then deactivate and delete those that you don’t need.
Once you’re done pruning your plugin list, update the plugins that need to be updated.
5. Install Autoptimize and ShortPixel Adaptive Images plugins
The next step is to install two plugins that will drastically speed up your website:
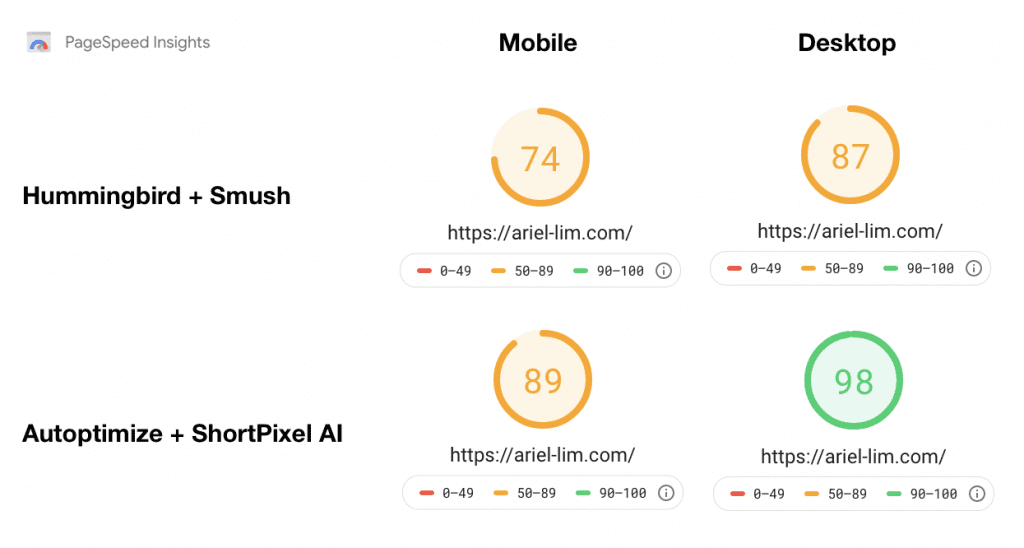
Now, there are other plugins that allow you to speed up your website. The most popular is the Hummingbird + Smush combination. But after spending hours testing multiple configurations, I ended up with Autoptimize + ShortPixel.
Why?
Because it made my numbers go up on all the three website speed testing tools I share earlier.
Google PageSpeed Insights
As you can see, by simply changing some of my plugins, I was able to jump a few points for both my mobile and desktop versions in Google PageSpeed Insights.
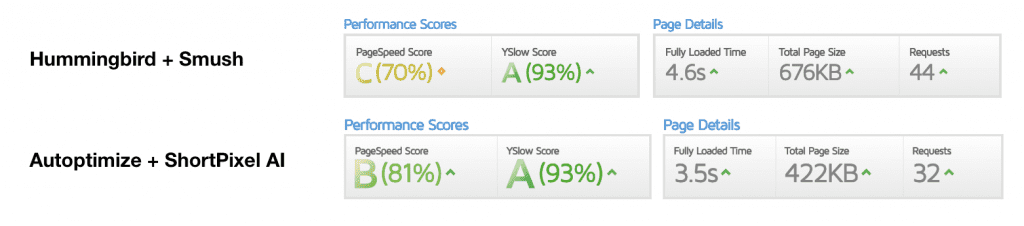
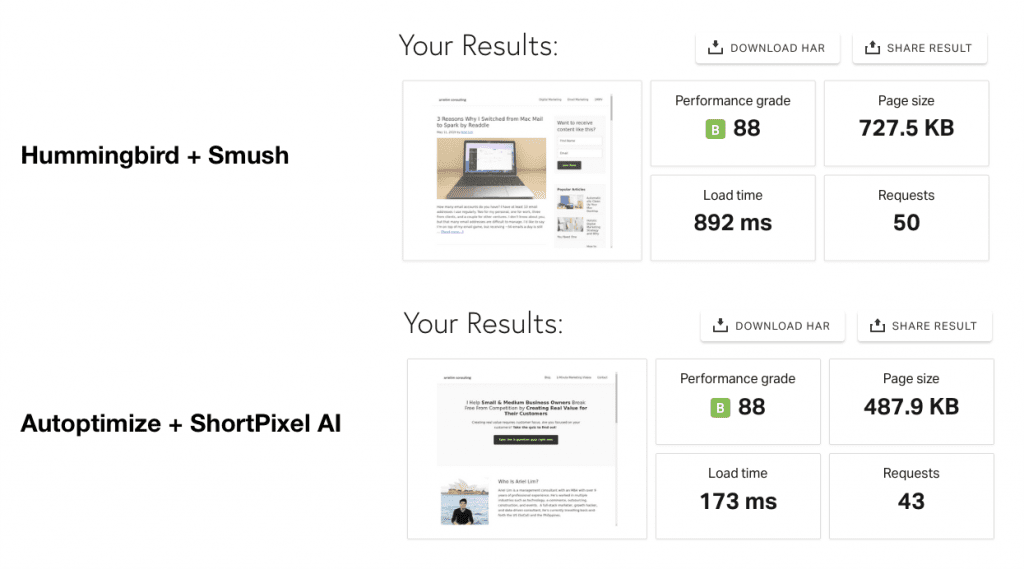
GTMetrix
This goes the same for my scores in GTMetrix and Pingdom. Apart from the score, take note of the fully-loaded time and the number of requests.
Pingdom
If you already have other optimization plugins on your site, it’s best that you only use one. That means you have to deactivate the others.
Caveats
As additional background, the tests aren’t completely 100% controlled. Towards the end of my optimization project, I revamped my homepage. Originally, my homepage displays my blog posts. So, this may have an effect.
I was using the free version of Hummingbird and Smush as well. They have a premium (paid) version that helps with further optimizations. But since my comparison with Autoptimize and ShortPixel is also free, this is still a good comparison.
Lastly, I’m using the free version of ShortPixel which only allows for optimizing 100 images per month. You can opt to pay for a plan, or for a specific number of images, or you can refer people to signup to get more images. Or, if you’re like me, just wait out the month until the counter resets. It will optimize the images remaining in your website. That’s where I’m currently at. I just implemented this a couple of days ago, so not all my images have been optimized. After a few more weeks, without me doing anything, I’m pretty sure my scores will go up especially on mobile. I’ll update this again once that happens.
6. Configure Autoptimize and ShortPixel
Again, I won’t go into details here because really, you don’t have to do anything else.
I’ll just highlight a couple of things here:
Autoptimize
Under the Images tab, check the box for Optimize Images if you aren’t using a CDN (Content Delivery Network). If this is the first time you’re hearing this, then you’re probably not using it. So, enable this setting.
Personally, I’m using Cloudflare. My settings are configured differently and the reason why I don’t have this turned on.
The other setting I want you to make sure that’s turned off is the Lazy-load images. The ShortPixel Adaptive Images will handle this automatically for you.
After making the changes, hit save.
Feel free to create an account on ShortPixel. Use this link so you can get an extra 100 images that you can use to optimize your website. The free account only gives you credits for 100 images/month.
ShortPixel Adaptive Images
Under the General tab, you can select the type of compression level for your images. I’m using Lossy because it results in a smaller file size. I don’t need better quality photos. Most of the images I have are screenshots or demos. Plus, to my eyes, the lossy setting doesn’t differ from the original one.
The best way is to make a few tests yourself and determine which setting is for you.
Then, just follow the rest of my settings here. Make sure you turn on the following:
WebP Support
Fade-in effect
Now, depending on the type of your business, you might want to crop your images by yourself (e.g. products with a background, you want to make sure your product stays in the middle), so don’t turn on smart crop.
Also, the Remove EXIF information is something you also have to consider. I’m wary of my privacy. So in case I forget to remove it myself, this guarantees that I don’t accidentally share my information.
Wondering what EXIF info is? Take out your phone and look at your photos album. I’m using an iPhone. I just took a photo of my dog. When I swipe up, all the EXIF info shows up. So, if I don’t remove that, people could see my address along with other details like time, date, camera model, etc.
I obviously don’t want to publicly share my address. But, that’s me. I value my privacy highly.
But if your business is photography and you want to showcase your location, the aperture, ISO, and other settings, then you might not want to remove those.
7. Optionally Install W3 Total Cache
This step is optional but recommended as well. You can move on to the next and final step, or spend a few more minutes downloading W3 Total Cache and setting it up.
Caching, in a nutshell, “really means is that your web server has to do less work and can, therefore, serve up your content faster.”1
And that’s something that you want, because that’s what Google wants.
The best part is that it’s also free. It can shave off a few more milliseconds on your site speed. And those matter greatly to reaching a high score in the tests.
I followed the instructions for configuring W3 Total Cache here. Of course, some settings are different for me, so take that into consideration.
I estimate around 90% of the settings are the same.
8. Test Your Website Speed Again
Once you’re done with everything, the next step is for you to save all your settings, clear your cache, then run the tests again for the three tools.
If you did everything correctly and your website didn’t break (LOL), you should see a drastic improvement in your website speed.
Over to You
After spending hours reading how to speed up my website and playing around with the settings, I decided to write this article so you avoid going through the rabbit hole as I did.
Of course, it wouldn’t hurt if you do your own research and understand the technicality of what goes into website speeds. But the easiest is to just follow the steps I shared. To recap:
Benchmark your current website speed
Consider switching to a faster theme and web host
Determine what functionality you need on your website
Keep the plugins that support those functionalities and cut the rest
Install these two plugins: Autoptimize and ShortPixel Adaptive Images
Configure them properly
(Optional) Install W3 Total Cache plugin and set it up
Re-test your website speed scores
If you noticed, I don’t have the perfect scores on all the tools. And I don’t have to. Remember, I’m not paying for anything here. I didn’t pay any of the tools nor hired a premium developer to speed up my website. I did all those stuff by myself and achieved these results.
My mobile version is only faster than approximately 25% of the web.
And that’s okay for the time being.
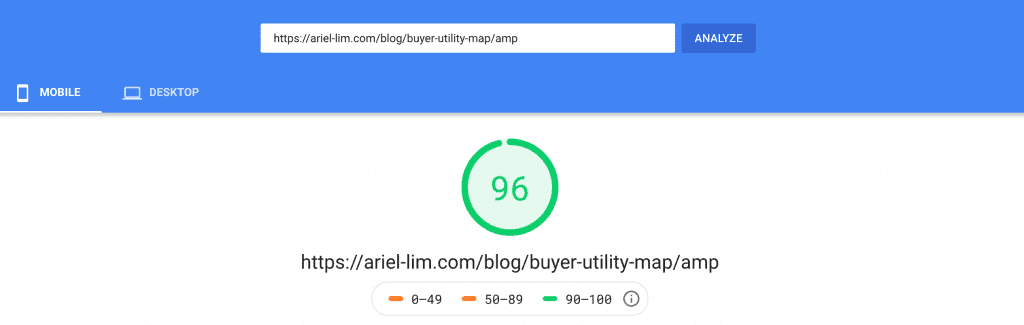
Why? Because I post content regularly. And the ones that get visited often are my blog pages. My blog pages are AMP-optimized — which is another topic by itself. And AMP pages load super fast right out of the box…
Website speed is important if you want to rank on search engines. But before you do any SEO stuff, make sure you have a strong foundation — and that is your website speed.
Have you been trying to improve your site speed? Did you improve your website speed after following these steps? How long did that take? If you have questions, feel free to ask them in the comments below.
A website is necessary if you want to compete in today’s business environment. It gets you to the starting line. Without it, you don’t even get to be in the race.
Without it, you don’t exist.
But another problem with websites is a lot of people tend to focus on fluff — the pretty things. Instead of focusing on the core functionality and the must-haves, they focus on shiny things.
That’s why in this article, I’ll list down the essential functionalities of a website. This post is not an SEO article. Rather, it’s focused on the needs of your business.
4 Essential Elements of a Business Website
1. Information About You or Your Business
The first quality a business website needs is basic information about you and your business. It’s important that you communicate your unique value proposition so that your visitors will:
Understand what you offer
Differentiate you from your competitors
Find a reason to trust you (and eventually do business with you)
Your website should also contain the most basic information about the business like the following:
Your name (especially if it’s different from the “brand” and domain you are using)
Address
Contact information
It’s also recommended that you include details about key people (or everyone) in your organization. This is one of the trends in modern websites that makes the business more human.
2. Ability to Generate Leads
As a business, you need leads. Otherwise, you will not have anyone to sell to (customers). And if you don’t have customers who are willing to pay for what you offer, you’ll eventually go out of business.
There are two common ways businesses generate leads from their websites:
Contact Us Page
Newsletter Subscription
Both have variations of forms that allow visitors to enter their information. This information then goes to whomever is in-charge (usually marketing or sales). Ideally, it should go directly to a CRM or an email marketing software.
The second lead generation source most websites have is a newsletter subscription form. For example, my own website a form like this on every article — which you’d also notice at the side if you’re reading this from a computer.
Bottom line: you need to have the ability to generate leads in your website.
Together, these criteria will help you determine what really matters. Take a look at Facebook Page likes or Twitter followers.
While they may be available and valid, they are not reachable. Meaning, you can’t contact them in a proper way. That’s why you keep hearing that these numbers are vanity metrics. They don’t add value to your business.
More offers equal more leads
One concept I’d like to highlight is that the more landing pages you have on your website, the more leads you can generate.
The contact us page is an example of a landing page. At its essence, a landing page is a page on your site that allows you to generate leads. In other words, it’s a page on your website with a form that visitors can fill-out.
According to a survey of more than 7,000 businesses, companies see a 55% increase in leads when their landing pages increase from 10 to 15. The same report also found that those with over 40 landing pages increase conversions by 500%.
Ask yourself this question, how many landing pages does your website have?
One contact us form? One newsletter subscription form?
Quick calculation
Here’s another interesting statistic to consider: the conversion rates for landing pages is between 1-3%.
If you only have one contact us page as your landing page, how many visits to that page do you need to generate 50 leads?
The answer is 1,667 visits at a 3% conversion. Or 5,000 visits at 1% conversion rate.
How many visits does your contact us page get on a monthly basis? Is it even that close?
The next key capability of your business website is performance tracking. After all, if you don’t measure what you do, you can’t improve.
It’s already 2020 and I still see websites without tracking installed.
Google Analytics is one of the most well-known analytics software for your website. I’ve written a couple of articles about it already, so I won’t repeat it here again. If your website still doesn’t have Google Analytics, here’s how you can install Google Analytics properly.
Oh, and did I mention it’s also free? All you need is a Google account (Gmail).
4. Communication/Messaging
Another key component your website needs is the ability to communicate or send messages to your leads. Technically, this isn’t part of the website itself. Rather, it’s often another system like an email marketing software.
Nonetheless, it is vital that you have the ability to communicate to your leads and customers. Without it, it’s as if you are a business without humans.
One thing to note, though, is that your communication has to be helpful.
And no, your sales and promos and discounts aren’t helpful. They may be helpful for you to increase your revenues, but not for the recipient.
Because not all businesses “sell” online. But if you do, having the ability to generate revenues is definitely something you need to have.
There are tons of ways you can add this functionality. The simplest one is to add a PayPal buy now button, or use some other provider like Stripe.
If you sell products, you’d more likely have a complete eCommerce website where you can add products, set prices, different SKUs, manage inventory and order fulfilment.
Frequently Asked Questions
Over to You
Like I said at the beginning, this article isn’t meant for SEO. This shows the basic requirements any business should have on their website.
If you’re more advanced in this area, you might notice I didn’t talk about chatbots, or videos, or social media. That’s intentional. Because most often, people tend to focus on those shiny, new things instead of the fundamentals.
Your website is the most basic requirement for any business today. Without it, it’s as if you don’t exist.
If you’re missing some key capabilities listed here, go talk to your IT guy, or outsourced provider, or shop around. It’s essential that you have all these if you want to compete in the same arena as your competitors.
What do you think? Did I miss any must-have functionality of websites? Let me know in the comments below.