Google Analytics is the most well-known analytics program for digital marketing. The best part? It is absolutely FREE!
Digital marketing without using analytics is like driving a car in the night without any lights and your dashboard is not working. You do not know where you are going. You do not know how fast you are going. You do not know if you are heading in the right direction or not.
It is not any better than traditional marketing. Think of billboard ads and tv commercials. You invest a lot in producing them in terms of money and time. Then, you do not have a direct way of measuring their impact to your business.
It does not have to be that way. Google Analytics is fairly simple to setup (and use for that matter).
There are three phases in setting up Google Analytics properly. Each phase is also broken into two parts.
Click on any of these to jump straight to that topic
How to Setup Google Analytics
Setting up Google Analytics can be divided into three (3) phases:
- Creation of the necessary accounts
- Installing the code to your website
- Checking (and troubleshooting, if necessary) the data
Phase 1: Creation of Accounts
Creating the necessary accounts is the first step.
You will need to create (or login to) a Gmail account. From there, head on over to the Google Analytics (GA) and Google Tag Manager (GTM) websites.
You need both GA and GTM accounts because the former allows you to analyze your website while the latter allows you to make changes to your website without having to learn code; thus, future-proofing your website.
Step 1: Create a Google Analytics Account
- Go to analytics.google.com
- Login to your Gmail account
- Sign up for a Google Analytics account
- Choose Website
- Input Basic Information About Your Company and Website
- Scroll Down and Get Tracking ID
- Accept Terms of Service
- Take note of your Tracking ID.
Step 2: Create a Google Tag Manager Account
- Go to tagmanager.google.com
- Login to your Gmail account
- Enter your company name (account)
- Enter your website’s domain (container)
- Choose Web
- Accept Terms of Service
- Copy the two sets of code given
Phase 2: Installing the Code
Before editing or making any changes — whether that’s adding or updating a plugin, or editing the code directly— it’s best practice to create a backup of your website first.
Installing the code involves two parts as well.
First, you setup Google Analytics inside Google Tag Manager. Next, you install the GTM code on your website.
Again, the primary reason why you should setup your analytics this way is because GTM allows you to change settings or add other code in your website without having to tinker with code. You just install the GTM code and add/edit/delete codes inside GTM. To learn more about how you can do this, check out my article on Google Tag Manager.
Step 1: Install Google Analytics code in Google Tag Manager
- Get your Google Analytics Tracking ID
- Login to Google Tag Manager
- Choose the container name you just created
- Add a new tag
- Name the tag as “GA Pageview”
- Choose Google Analytics
- Choose Universal Analytics as a tag type
- Create a new variable
- Name the variable as “gaProperty”
- Choose constant
- Enter your GA Tracking ID (Phase 1, Step 1)
- Click continue
- Choose to fire tag on “All Pages”
- Create Tag
Step 2: Install the Google Tag Manager code on your WordPress website
This part assumes you are using a WordPress-hosted website. Earlier, there are two sets of code you have to install.
I have provided here two separate options for you to take:
Option 1: Install via header.php file
- Login to Google Tag Manager
- Choose the container name you want to use
- Go to Admin
- Choose Install Google Tag Manager
- Copy the code
- Login your WordPress dashboard
- Go to Appearance, then Editor
- Search for the header.php file
- Paste the code immediately after the opening body tag
- Update the File
Option 2: Install via the functions.php file (Genesis Framework)
Before editing or making any changes — whether that’s adding or updating a plugin, or editing the code directly— it’s best practice to create a backup of your website first.
This second option is what I recommend, especially if you are using the Genesis Framework.
- Go to your theme’s editor and add it to the functions.php file.
- Login to your WordPress account.
- Go to Appearance > Editor.
- At the right-hand portion, click on the functions.php.
- Scroll down until you see the end of the lines of code there. Remember to not touch anything else. A single mistake there can break your entire site.
- Add your code
- Hit save
Copy this entire code and paste it there, then replace the GTM-ABCDEF section with your own container ID.
// Add Google Tag Manager code in <head>
add_action( 'wp_head', 'google_tag_manager_head' );
function google_tag_manager_head() { ?>

//Replace this entire line with the first part of the code <head>

<?php }


// Add Google Tag Manager code immediately below opening <body> tag
add_action( 'genesis_before', 'google_tag_manager_body' );
function google_tag_manager_body() { ?>

//Replace this entire line with the second part of the code <body>

<?php }
You’ll then have something that looks like this…
// Add Google Tag Manager code in <head>
add_action( 'wp_head', 'google_tag_manager_head' );
function google_tag_manager_head() { ?>

    <! – Google Tag Manager – >
<script>(function(w,d,s,l,i){w[l]=w[l]||[];w[l].push({'gtm.start':
new Date().getTime(),event:'gtm.js'});var f=d.getElementsByTagName(s)[0],
j=d.createElement(s),dl=l!='dataLayer'?'&l='+l:'';j.async=true;j.src=
'https://www.googletagmanager.com/gtm.js?id='+i+dl;f.parentNode.insertBefore(j,f);
})(window,document,'script','dataLayer','GTM-ABCDEF');</script>
<! – End Google Tag Manager – >

<?php }


// Add Google Tag Manager code immediately below opening <body> tag
add_action( 'genesis_before', 'google_tag_manager_body' );
function google_tag_manager_body() { ?>

<! – Google Tag Manager (noscript) – >
<noscript><iframe src="https://www.googletagmanager.com/ns.html?id=GTM-ABCDEF"
height="0" width="0" style="display:none;visibility:hidden"></iframe></noscript>
<! – End Google Tag Manager (noscript) – >

<?php }
Phase 3: Checking the Data
Just like the rest of this post, this is divided into two parts as well:
- Click on preview inside Google Tag Manager.
- Check real-time data in Google Analytics
- If it’s working, then hit publish
Step 1: Preview Your Container in GTM
- Go to your GTM account
- Click on preview at the top-right portion. The page will reload.
- Open a new tab and open your website.
- You should see the “tags” firing at the bottom of the screen
- If the tag is present, it’s working properly.

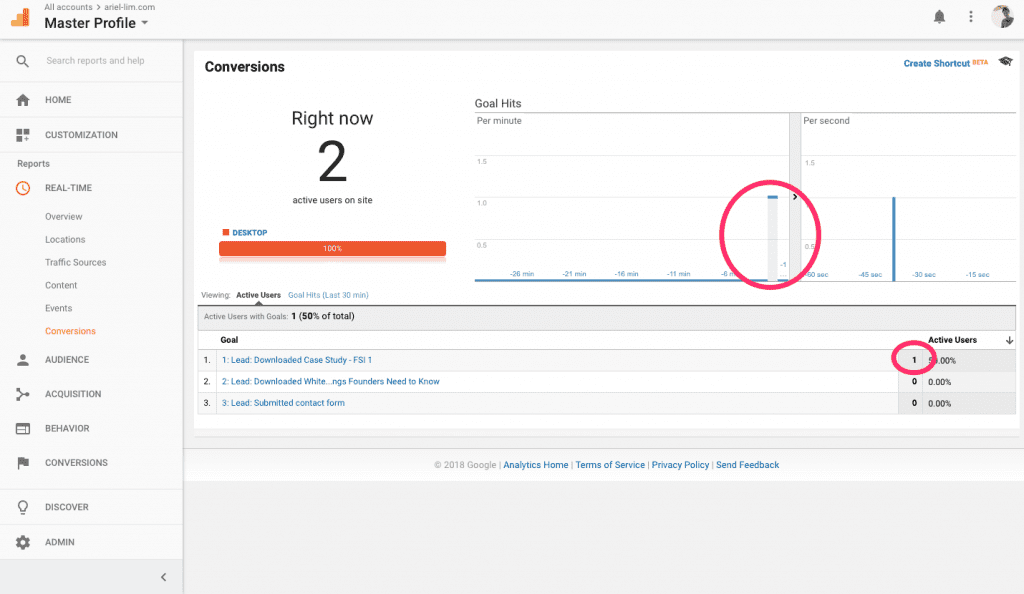
Step 2: Look at Real-Time Data in GA
- Go to your Google Analytics account
- Make sure you are in the Reports tab
- Click Real-Time
- Click Overview
- Open another tab in your browser and load any page on your website
- Go back to GA to see if it is working
- If it’s working, go back to GTM and click on “leave preview mode”
- If it’s not, it’s either you configured it wrong, or a plugin is preventing it from loading. Usually, ad blockers from your browser are the culprit.
Step 3: Publish Your Container
After verifying the data is coming in correctly, head back to Google Tag Manager and click on the submit button at the right-hand side.
You’ll be asked a few details to help you remember the changes you did. Once you’re done, click on Publish.
And that’s it.
You have now installed Google Analytics properly on your website using Google Tag Manager. Again, this is the ideal setup for adding code and apps to your website. That way, you don’t have to go through this setup again.
The next time you want to add code to your website, like the Facebook Pixel or your email marketing tracking code, or an A/B optimization software, you only have to add it via Google Tag Manager.
