Your website is the most valuable asset when it comes to your business. It’s one of the first places people will check to determine if they will trust you and buy from you.
I’ve said it once and I’ll say it again, if you’re not found online, you do not exist.
If you’ve been following digital marketing best practices, the first thing that is often recommended is to speed up your website. That comes first before spending your time on search engine optimization (SEO). Why?
Because SEO can only do so much.
Take a look at this research from Google regarding page speed on mobile.

Once people get to your website, if your site doesn’t load in 3 seconds or less, more than half of your mobile site visits will leave the page. Put another way, for every second of impatient agony you’re causing visitors with slow load times, you’re losing conversions and profit.
Now, obviously you don’t want people to just abandon your site without it ever loading first. You don’t even get a chance to make an impression.
That is why website speed — both desktop and mobile — is very important to fix first before you do any optimization for search engines.
Is This for You?
I’m not going to talk about the technical details of making websites faster. And frankly, you don’t need to learn about html, css, javascript, and all those mumbo jumbo.
The only thing you want is fast website speed. And we’ll define what fast means later on and how you can do that without going crazy nor spending a lot of money.
Click on any of these to jump straight to that topic
For now, if you meet these criteria, keep on reading:
- Using a custom WordPress site (wordpress.org instead of wordpress.com)
- That means you have a web host provider
- Struggling to get a high score on Google PageSpeed Insights
- Want to provide the best experience for your customers
- Planning to create a WordPress website that’s fast
- Don’t want to hire developers or pay for expensive tools
8 Steps to Speed Up Your Website
1. Check your website speed to establish a benchmark
The first step is to get an objective view of your website’s speed. There are a bunch of free tools to test your website speed. Here’s a list of the most popular ones:
Just type in your homepage URL first to get started. Here’s what it looks on Google PageSpeed Insights.
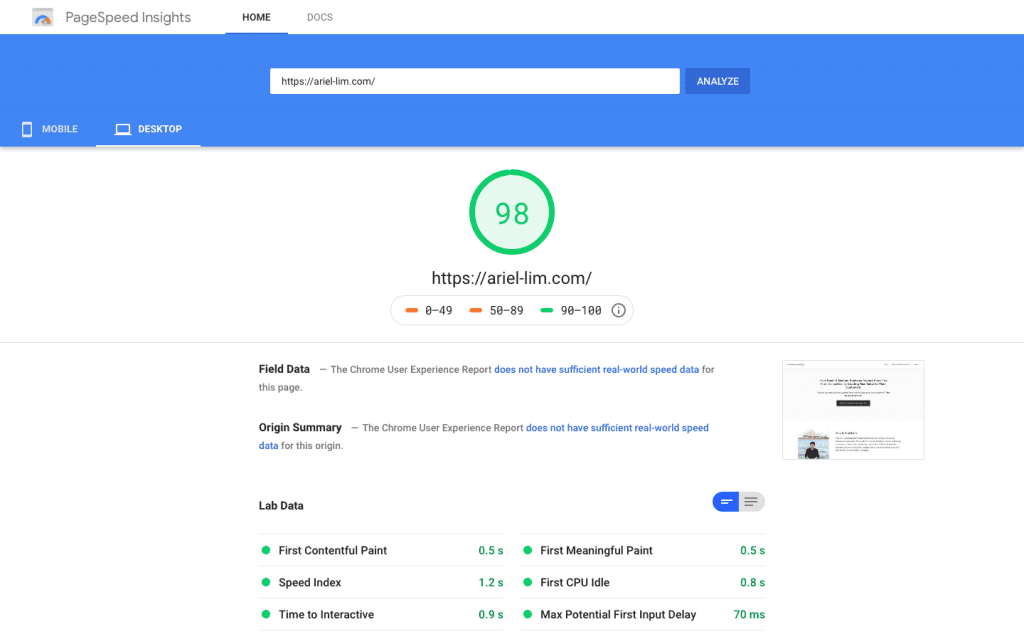
You can toggle between desktop and mobile tests there as well. Towards the bottom, you will see the actual results and recommendations.
If your website is like most website, you will see the following areas to improve on:
- Eliminate render-blocking resources
- Remove unused CSS
- Properly size images
- Defer offscreen images
- Serve images in next-gen formats
And a whole lot more. But like I said earlier, you don’t need to know every detail about this because I will show you how to get rid of them — making your website faster — without going crazy.
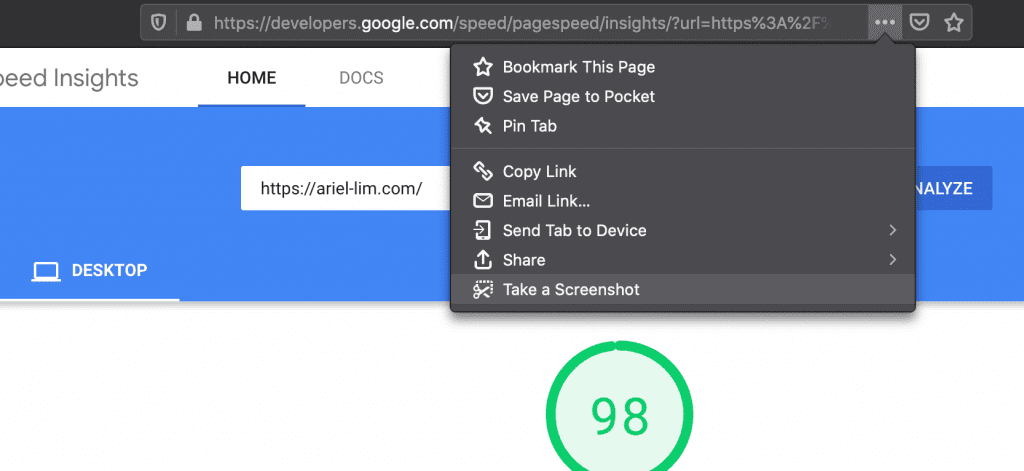
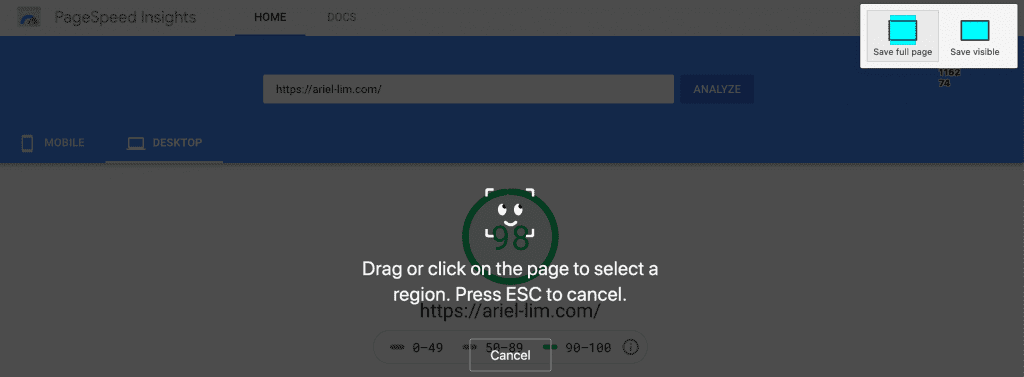
For now, save your results. I use Firefox as my main browser. There is a built-in screenshot option that allows you to take the entire page, that way have a copy of the entire test.
2. Choose a fast theme and web host provider
The next step is to take account of your theme and web hosting provider. The two questions to ask yourself are the following:
- Are you using a fast and light-weight theme?
- Is your website hosted on a reputable web host?
Now, I won’t get into the details of which themes or web hosts are better than the other. There are already tons of resources out there about those topics. For example, this article describes different WordPress frameworks. They also have this graphic that shows you the breakdown of WordPress sites using different themes.

My experience with website speed optimization
I was previously using ThriveThemes but recently switched to the Genesis framework. My web hosting provider is InMotion Hosting from day one.
Oftentimes, you’ll hear great recommendations for the Genesis framework. Then, for web hosts, the most popular and reputable ones are WP Engine and SiteGround. But those may not be for you, so you have to do a bit of research here.
I’ll leave you with this.
Generally, drag-and-drop builders (ThriveThemes, Elementor, Divi, OptimizePress, etc) load a webpage slower because of all the stuff they add to the page. But, if you know what you’re doing, this won’t be an issue. In fact, some websites built on these page builders might even be faster than yours if done right.
3. Determine what functionality you need
The next step you need to figure out to make your website speed super fast is to determine which core functionality you need on your website. Separate the must-have’s from the nice-to-have’s.
I discussed the 4 key capabilities or features every website must have before (plus a bonus one). If you have other features that you want to add to your website, this is a great time to question whether or not you really need it.
For a quick recap, here are the key features you need on your website — the rest are just fluff and you can safely discard them:
- Information about you and your business
- Ability to generate leads
- Analytics and performance tracking
- Communication or a way to send messages
- Revenue generation (bonus item)
Now, since I don’t sell anything online, I don’t need the revenue generation feature. For 90% of businesses, the first 4 items are all you need. But if your entire business is eCommerce, then generating revenues from the site is a necessity.
If your current website has more than what I listed above, like fancy graphics and animation, then most likely your website has terrible speed. Take them out and your site will speed up immediately.
4. Limit your plugin usage
Now comes the actual changes you can do to speed up your WordPress website.
First, if you have plugins that don’t fall into the items above, then you don’t need them. Deactivate and delete the plugins.
Login to your WordPress CMS, then under Plugins, click on Installed Plugins. Then deactivate and delete those that you don’t need.
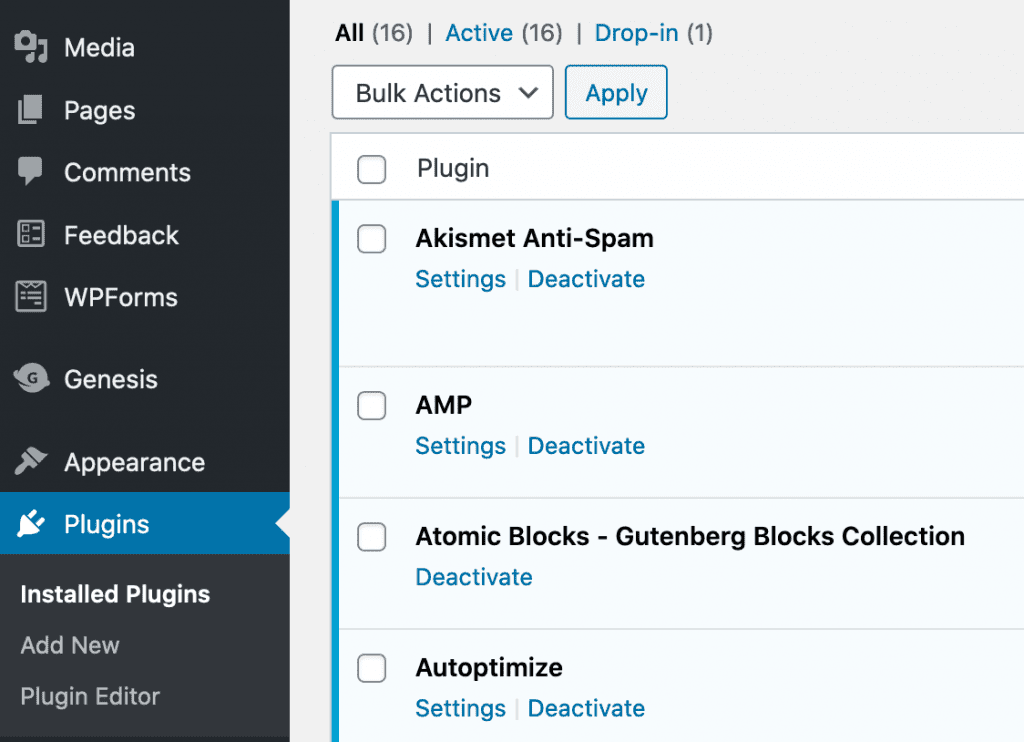
Once you’re done pruning your plugin list, update the plugins that need to be updated.
5. Install Autoptimize and ShortPixel Adaptive Images plugins
The next step is to install two plugins that will drastically speed up your website:
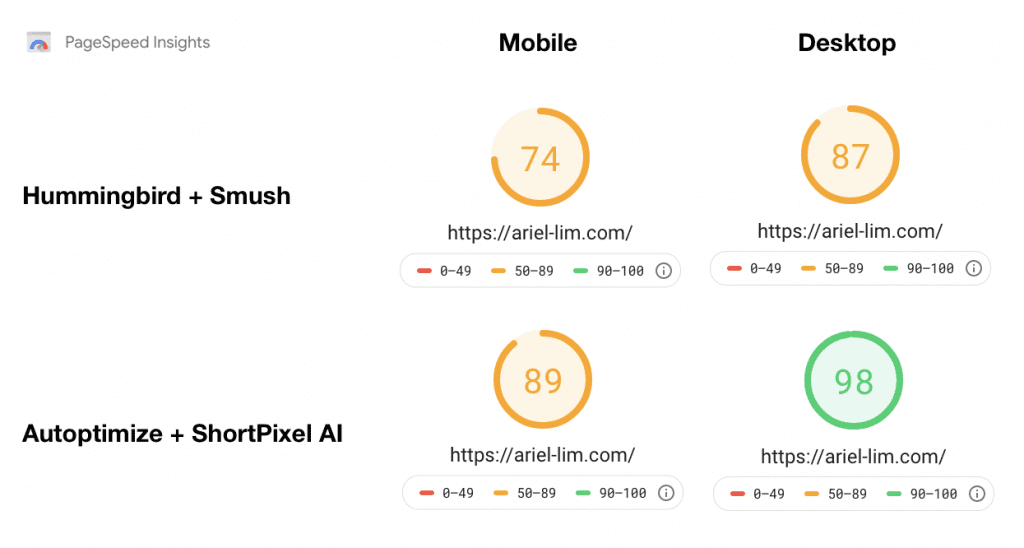
Now, there are other plugins that allow you to speed up your website. The most popular is the Hummingbird + Smush combination. But after spending hours testing multiple configurations, I ended up with Autoptimize + ShortPixel.
Why?
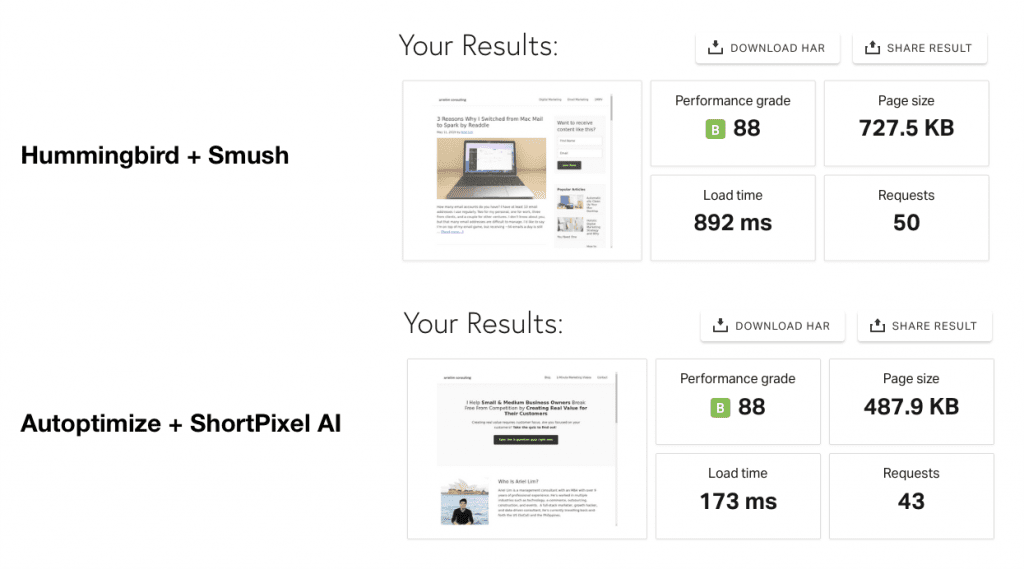
Because it made my numbers go up on all the three website speed testing tools I share earlier.
Google PageSpeed Insights
As you can see, by simply changing some of my plugins, I was able to jump a few points for both my mobile and desktop versions in Google PageSpeed Insights.
GTMetrix
This goes the same for my scores in GTMetrix and Pingdom. Apart from the score, take note of the fully-loaded time and the number of requests.

Pingdom
If you already have other optimization plugins on your site, it’s best that you only use one. That means you have to deactivate the others.
Caveats
- As additional background, the tests aren’t completely 100% controlled. Towards the end of my optimization project, I revamped my homepage. Originally, my homepage displays my blog posts. So, this may have an effect.
- I was using the free version of Hummingbird and Smush as well. They have a premium (paid) version that helps with further optimizations. But since my comparison with Autoptimize and ShortPixel is also free, this is still a good comparison.
- Lastly, I’m using the free version of ShortPixel which only allows for optimizing 100 images per month. You can opt to pay for a plan, or for a specific number of images, or you can refer people to signup to get more images. Or, if you’re like me, just wait out the month until the counter resets. It will optimize the images remaining in your website. That’s where I’m currently at. I just implemented this a couple of days ago, so not all my images have been optimized. After a few more weeks, without me doing anything, I’m pretty sure my scores will go up especially on mobile. I’ll update this again once that happens.
6. Configure Autoptimize and ShortPixel
Again, I won’t go into details here because really, you don’t have to do anything else.
I’ll just highlight a couple of things here:
Autoptimize
Under the Images tab, check the box for Optimize Images if you aren’t using a CDN (Content Delivery Network). If this is the first time you’re hearing this, then you’re probably not using it. So, enable this setting.
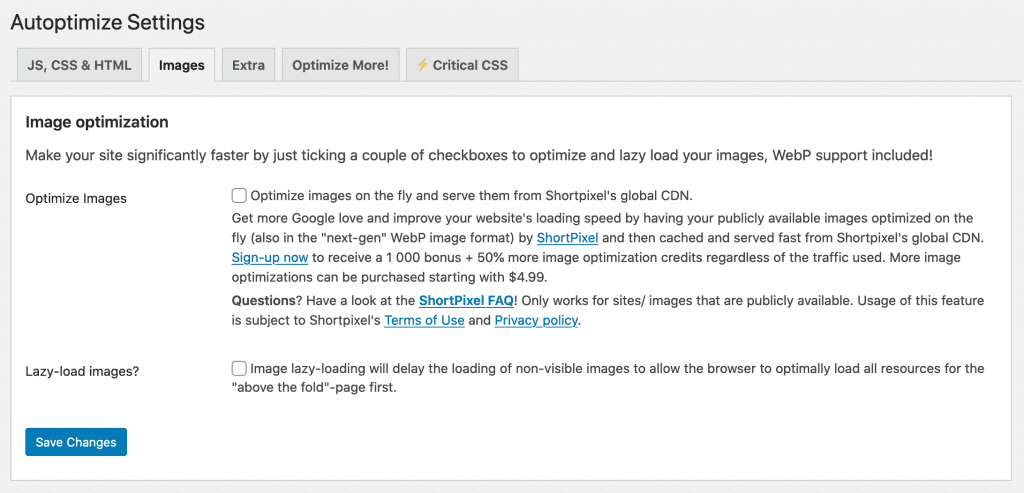
Personally, I’m using Cloudflare. My settings are configured differently and the reason why I don’t have this turned on.
The other setting I want you to make sure that’s turned off is the Lazy-load images. The ShortPixel Adaptive Images will handle this automatically for you.
After making the changes, hit save.
Feel free to create an account on ShortPixel. Use this link so you can get an extra 100 images that you can use to optimize your website. The free account only gives you credits for 100 images/month.
ShortPixel Adaptive Images
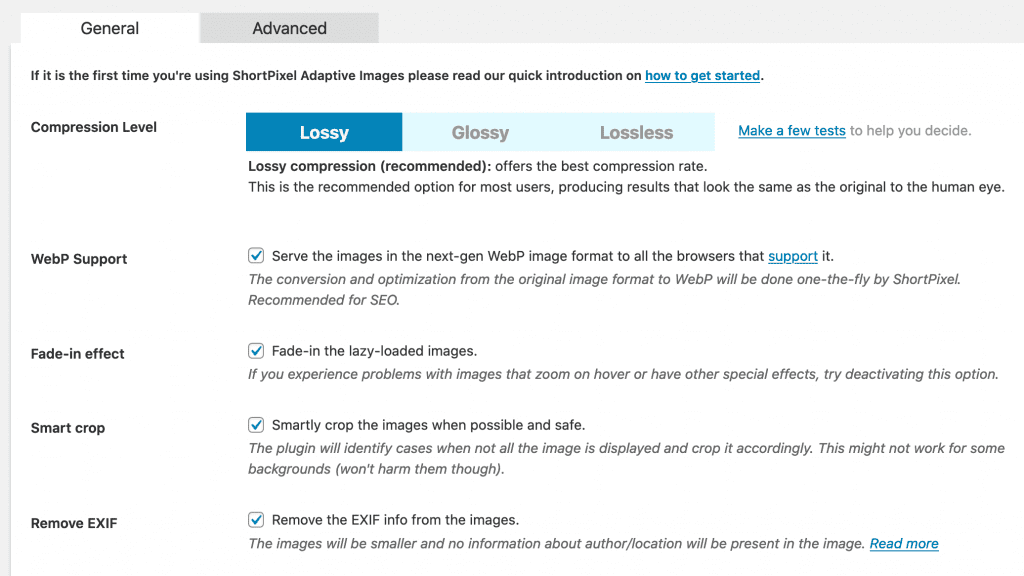
Under the General tab, you can select the type of compression level for your images. I’m using Lossy because it results in a smaller file size. I don’t need better quality photos. Most of the images I have are screenshots or demos. Plus, to my eyes, the lossy setting doesn’t differ from the original one.
The best way is to make a few tests yourself and determine which setting is for you.
Then, just follow the rest of my settings here. Make sure you turn on the following:
- WebP Support
- Fade-in effect
Now, depending on the type of your business, you might want to crop your images by yourself (e.g. products with a background, you want to make sure your product stays in the middle), so don’t turn on smart crop.
Also, the Remove EXIF information is something you also have to consider. I’m wary of my privacy. So in case I forget to remove it myself, this guarantees that I don’t accidentally share my information.
Wondering what EXIF info is? Take out your phone and look at your photos album. I’m using an iPhone. I just took a photo of my dog. When I swipe up, all the EXIF info shows up. So, if I don’t remove that, people could see my address along with other details like time, date, camera model, etc.
I obviously don’t want to publicly share my address. But, that’s me. I value my privacy highly.
But if your business is photography and you want to showcase your location, the aperture, ISO, and other settings, then you might not want to remove those.
7. Optionally Install W3 Total Cache
This step is optional but recommended as well. You can move on to the next and final step, or spend a few more minutes downloading W3 Total Cache and setting it up.
Caching, in a nutshell, “really means is that your web server has to do less work and can, therefore, serve up your content faster.”1
And that’s something that you want, because that’s what Google wants.
The best part is that it’s also free. It can shave off a few more milliseconds on your site speed. And those matter greatly to reaching a high score in the tests.
I followed the instructions for configuring W3 Total Cache here. Of course, some settings are different for me, so take that into consideration.
I estimate around 90% of the settings are the same.
8. Test Your Website Speed Again
Once you’re done with everything, the next step is for you to save all your settings, clear your cache, then run the tests again for the three tools.
If you did everything correctly and your website didn’t break (LOL), you should see a drastic improvement in your website speed.
Over to You
After spending hours reading how to speed up my website and playing around with the settings, I decided to write this article so you avoid going through the rabbit hole as I did.
Of course, it wouldn’t hurt if you do your own research and understand the technicality of what goes into website speeds. But the easiest is to just follow the steps I shared. To recap:
- Benchmark your current website speed
- Consider switching to a faster theme and web host
- Determine what functionality you need on your website
- Keep the plugins that support those functionalities and cut the rest
- Install these two plugins: Autoptimize and ShortPixel Adaptive Images
- Configure them properly
- (Optional) Install W3 Total Cache plugin and set it up
- Re-test your website speed scores
If you noticed, I don’t have the perfect scores on all the tools. And I don’t have to. Remember, I’m not paying for anything here. I didn’t pay any of the tools nor hired a premium developer to speed up my website. I did all those stuff by myself and achieved these results.
But with those scores, my website is already faster than 75% of the web — at least on the desktop version.
My mobile version is only faster than approximately 25% of the web.
And that’s okay for the time being.
Why? Because I post content regularly. And the ones that get visited often are my blog pages. My blog pages are AMP-optimized — which is another topic by itself. And AMP pages load super fast right out of the box…

Website speed is important if you want to rank on search engines. But before you do any SEO stuff, make sure you have a strong foundation — and that is your website speed.
Have you been trying to improve your site speed? Did you improve your website speed after following these steps? How long did that take? If you have questions, feel free to ask them in the comments below.