If you don’t know how to create goals for your website, you are not being effective. Creating goals in Google Analytics is one of the basics every marketer should know and implement.
Google Analytics is a free tool that allows you to track visits and behaviors people do on your website.
If you haven’t installed Google Analytics on your website, you can check out my previous post on how to do that exactly.
Preparatory Points
- Google Analytics is installed on your site
- You know what you want to track
Before we get to the actual guide, there are two preparatory points I’d like to go over.
First, this would only work if you have Google Analytics installed on your website. It’s worth noting this because I’ve encountered a lot of people who still don’t have Google Analytics installed on their websites, especially small and medium enterprises (SMEs).
I also noticed that organizations using Shopify and SquareSpace don’t have this configured as well — despite it being a one-step process.
The second and a very important one that needs to be discussed is you should know beforehand what you want to track.
Step-by-Step Guide on How to Create Goals in Google Analytics
As a quick overview, Google Analytics allows you to track 4 types of goals:
- URL
- Event
- Time
- Visit / Page
Among these, the most commonly used are the URL and event goals.
A great activity I strongly recommend you go through to determine this is the Digital Marketing and Measurement Model.
After this exercise, you can easily identify everything you need to focus on your implementation and measurement.
Now, on to the step-by-step guide…
1. Go to the Google Analytics Admin Panel
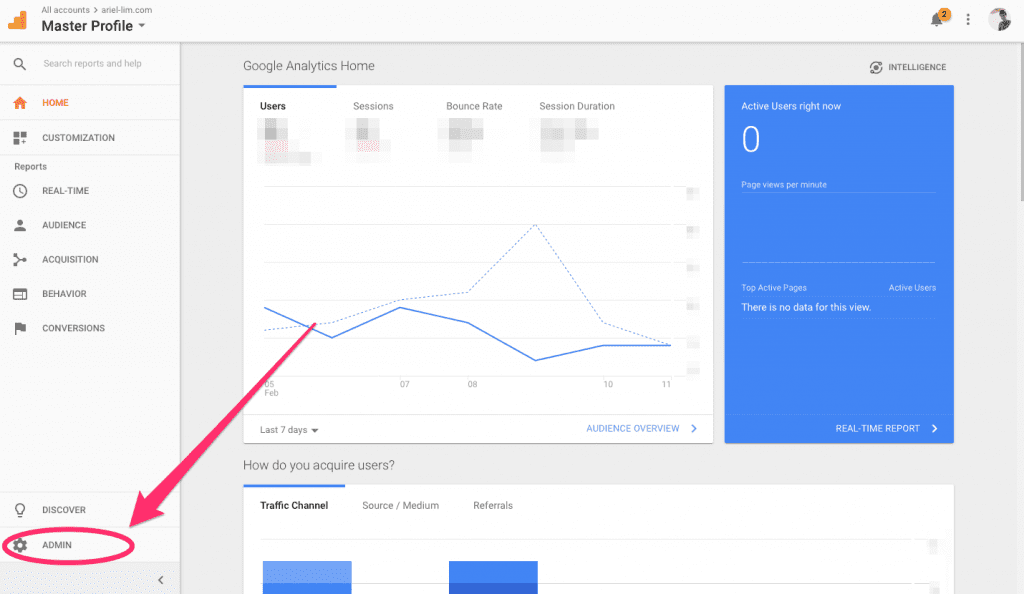
This part is easy. Simply login to Google Analytics and go to the admin panel by clicking the gear icon at the lower-left portion of the screen.
Then, navigate towards the Goals section.
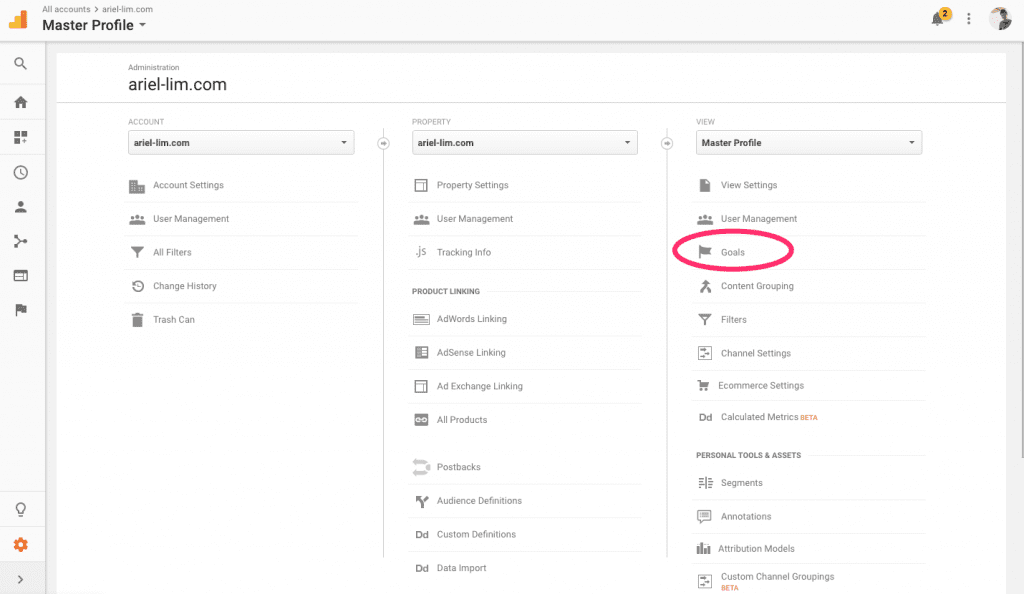
Also, make sure you are creating goals for the right account. You don’t have to worry about this if you only have one, but in my case, I have access to multiple Google Analytics accounts.
2. Create a Goal
For the purpose of this article, we’ll use the most common goal type used — the URL destination goal.
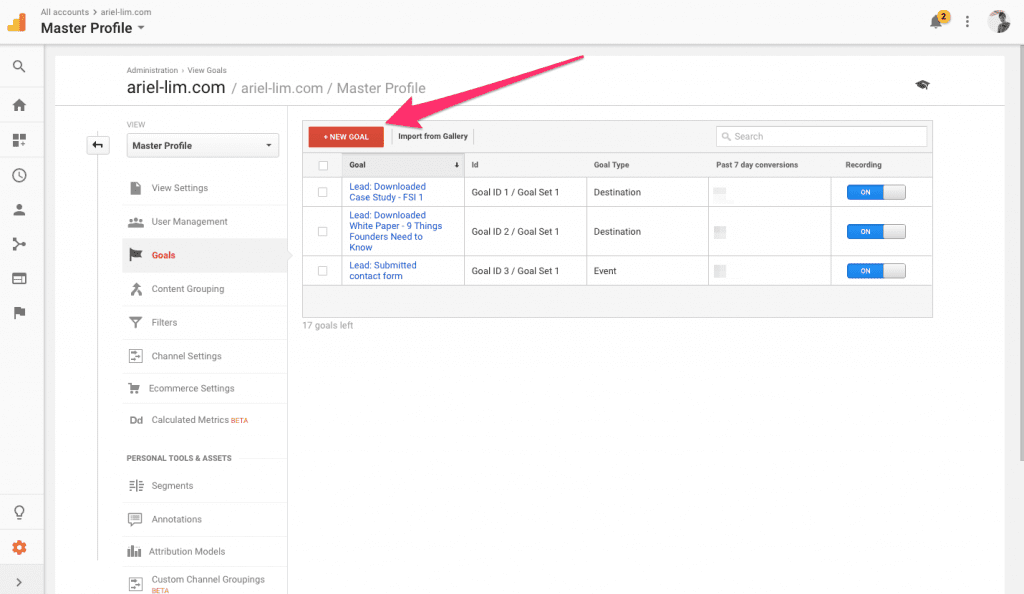
Start by clicking on that big red button…
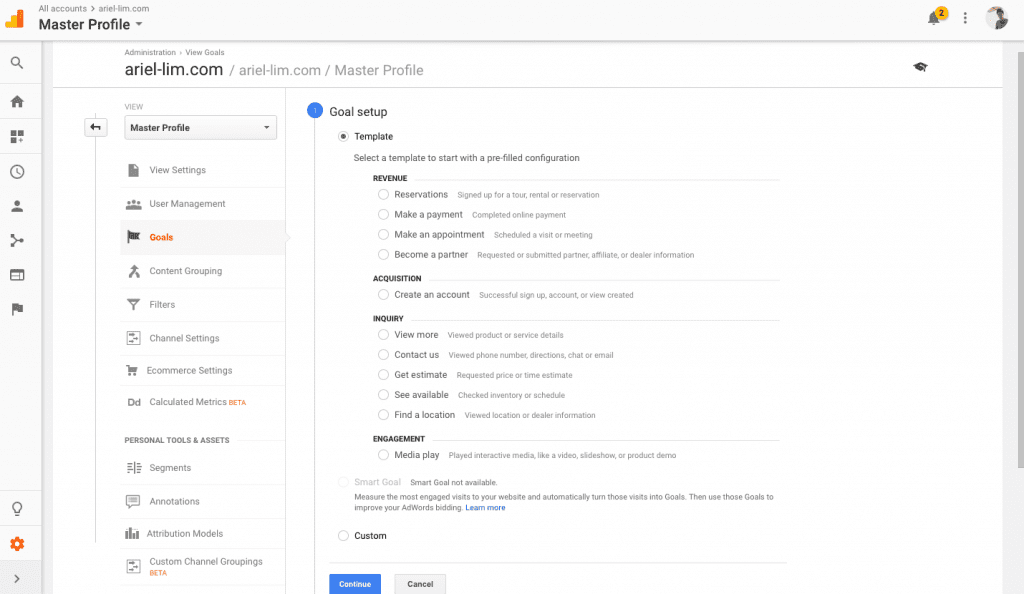
Then, you’ll have to complete 3 steps:
- Goal setup. This is where you can choose from one of the templates or custom. I used the custom setup.
- Goal description. This is where you include the name of the goal and the type of goal.
- Goal Details. This is where you enter the criteria for the goal you chose. Options here differ depending on the goal type chosen in the previous step.
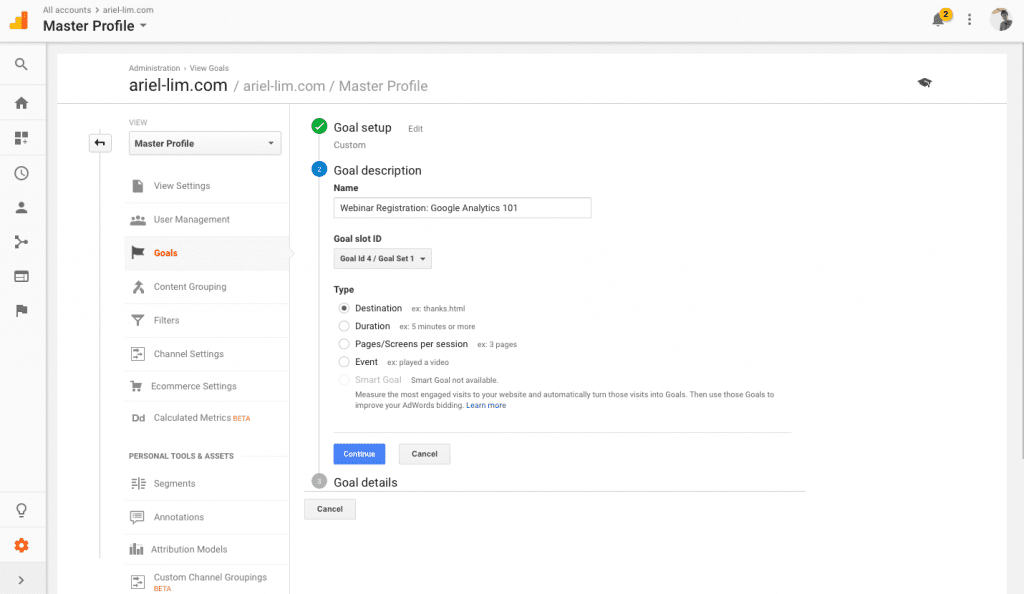
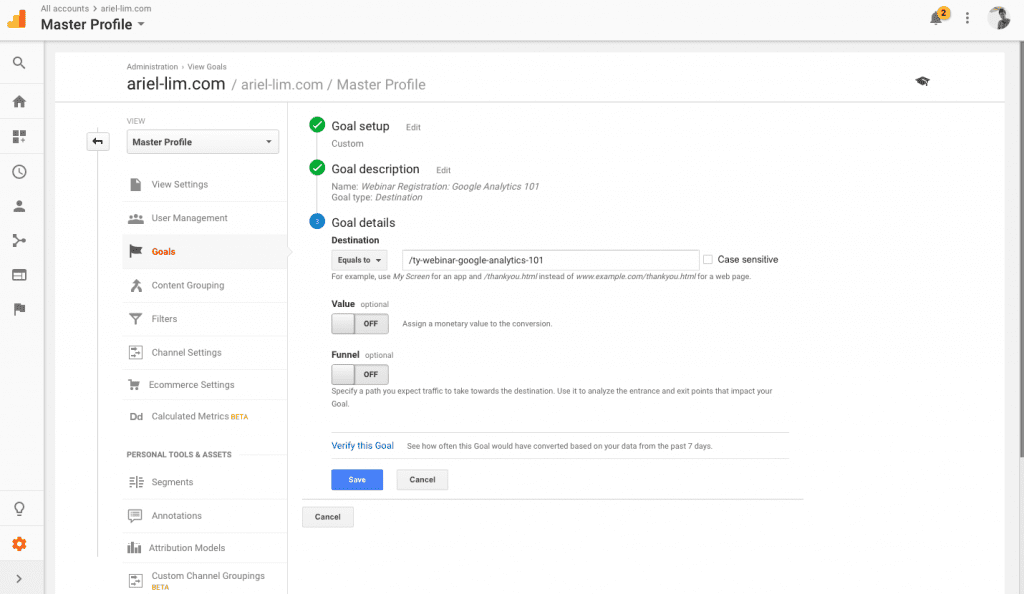
As a refresher, this goal type uses a URL as a goal. What that means is when that URL “loads,” the goal is achieved. Let’s call this a thank you page. In this example, I made up a fake URL. Just replace this with the URL of your thank you page.
There are 3 fields you can tinker here. Only 1 of them is required, and that is the URL itself. The others simply add more data for analysis later on. We’ll tackle this in another post, but for now, just enter the URL then hit Save.
Now, you may be thinking, “what if someone opens the page or URL, won’t that mess my reports later on?”
That is a valid concern. That is why there are four best practices for using this type of goal:
- Use a unique page/URL for every thank you page
- Add a noindex tag on the thank you page
- Don’t link to this thank you page anywhere; except
- Have a unique form that redirects to this page after successful submission
Once these 4 conditions are met, it is almost impossible to get to the thank you page (our URL destination goal).
I explained this in detail in another article called the typical online conversion path. With this checks in place, you are almost guaranteed that the only way people get to your thank you page is after a successful form submission. Then, your goal will only trigger after successful form submission.
3. Check if the Goal Is Working Properly
This step is very important. If you do not test your goal/s, don’t complain if it’s not working later on.
Testing your goal is also very easy.
- Just open the URL in another tab, then
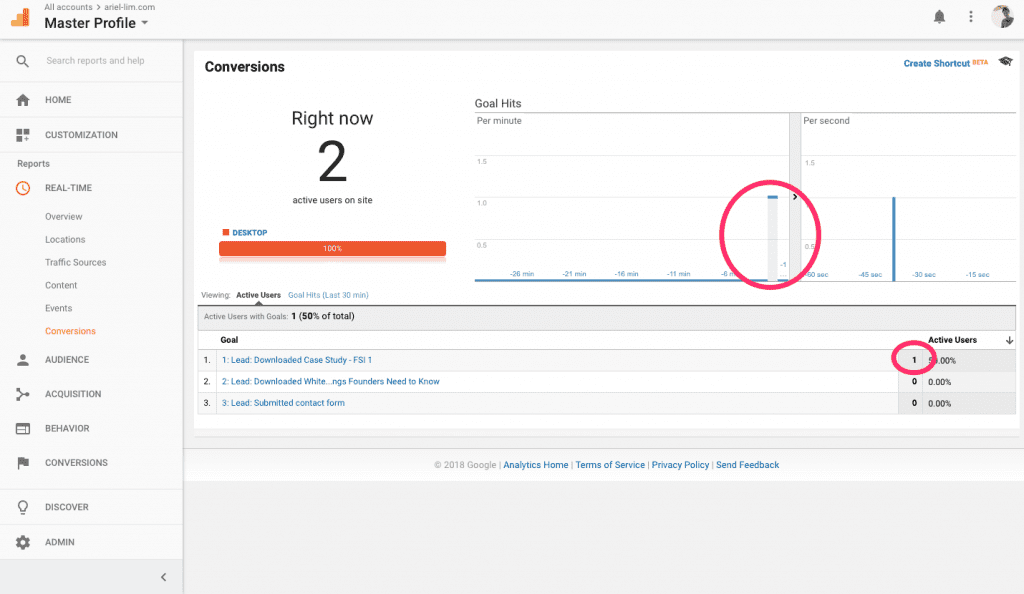
- Check the real-time analytics portion in Google Analytics to see if it triggered the goal you just set up.
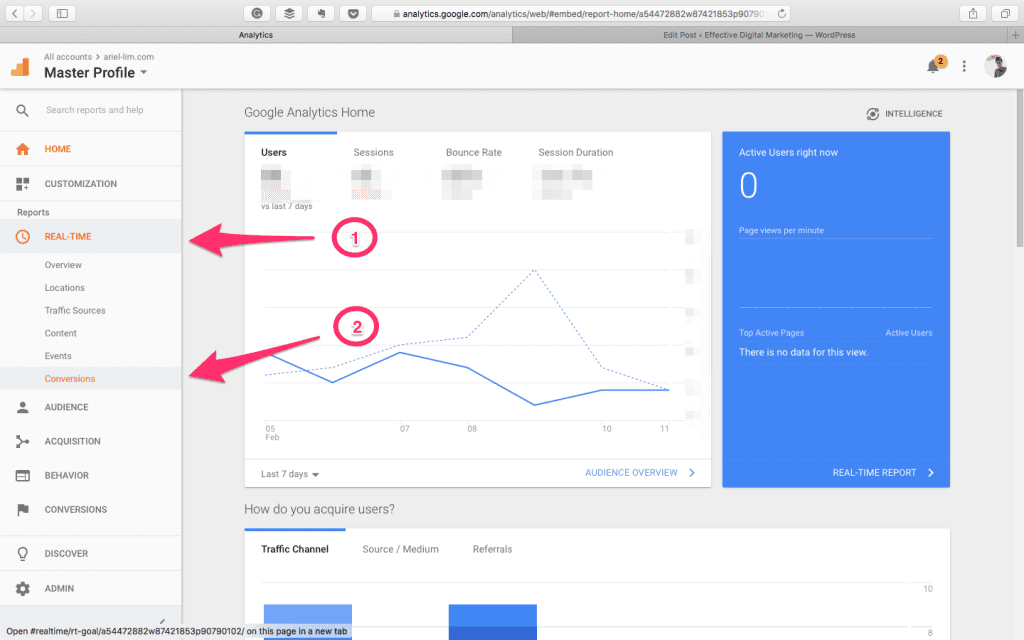
If it did, it should look something like this. You should see numbers pop up here.
If not, then there’s something wrong.
The usual culprits are these four:
- Plug-ins blocking traffic (for example if you’re using Chrome and have the GA output plugin, you can use an incognito mode to test this or use another)
- Typo errors in the URLs (/thankyou vs /thank-you vs /thank_you)
- URLs not matching (contains /thank-you vs exact /thankyou)
- Included the domain/subdomains (ariel-lim.com/thank-you vs just /thank-you)
So it’s really important to test and make sure the goals you set up ate working properly.
So, What Are You Going to Do Now
The last step after you create goals for your website, which should be a given but worth noting, is you have to execute your strategies.
That means creating campaigns with awesome content and making sure you’re targeting the right audience.
One those numbers start coming in, you’ll be able to analyze and improve on it using the goals you just created.
As a word of caution, don’t get stuck in creating the “perfect” content or, in this case, the “perfect” goals.
It is always — I repeat, ALWAYS — better to implement/execute than to spend all your time planning. You get real customer feedback instead of assumptions. You learn what the market actually want and don’t want.