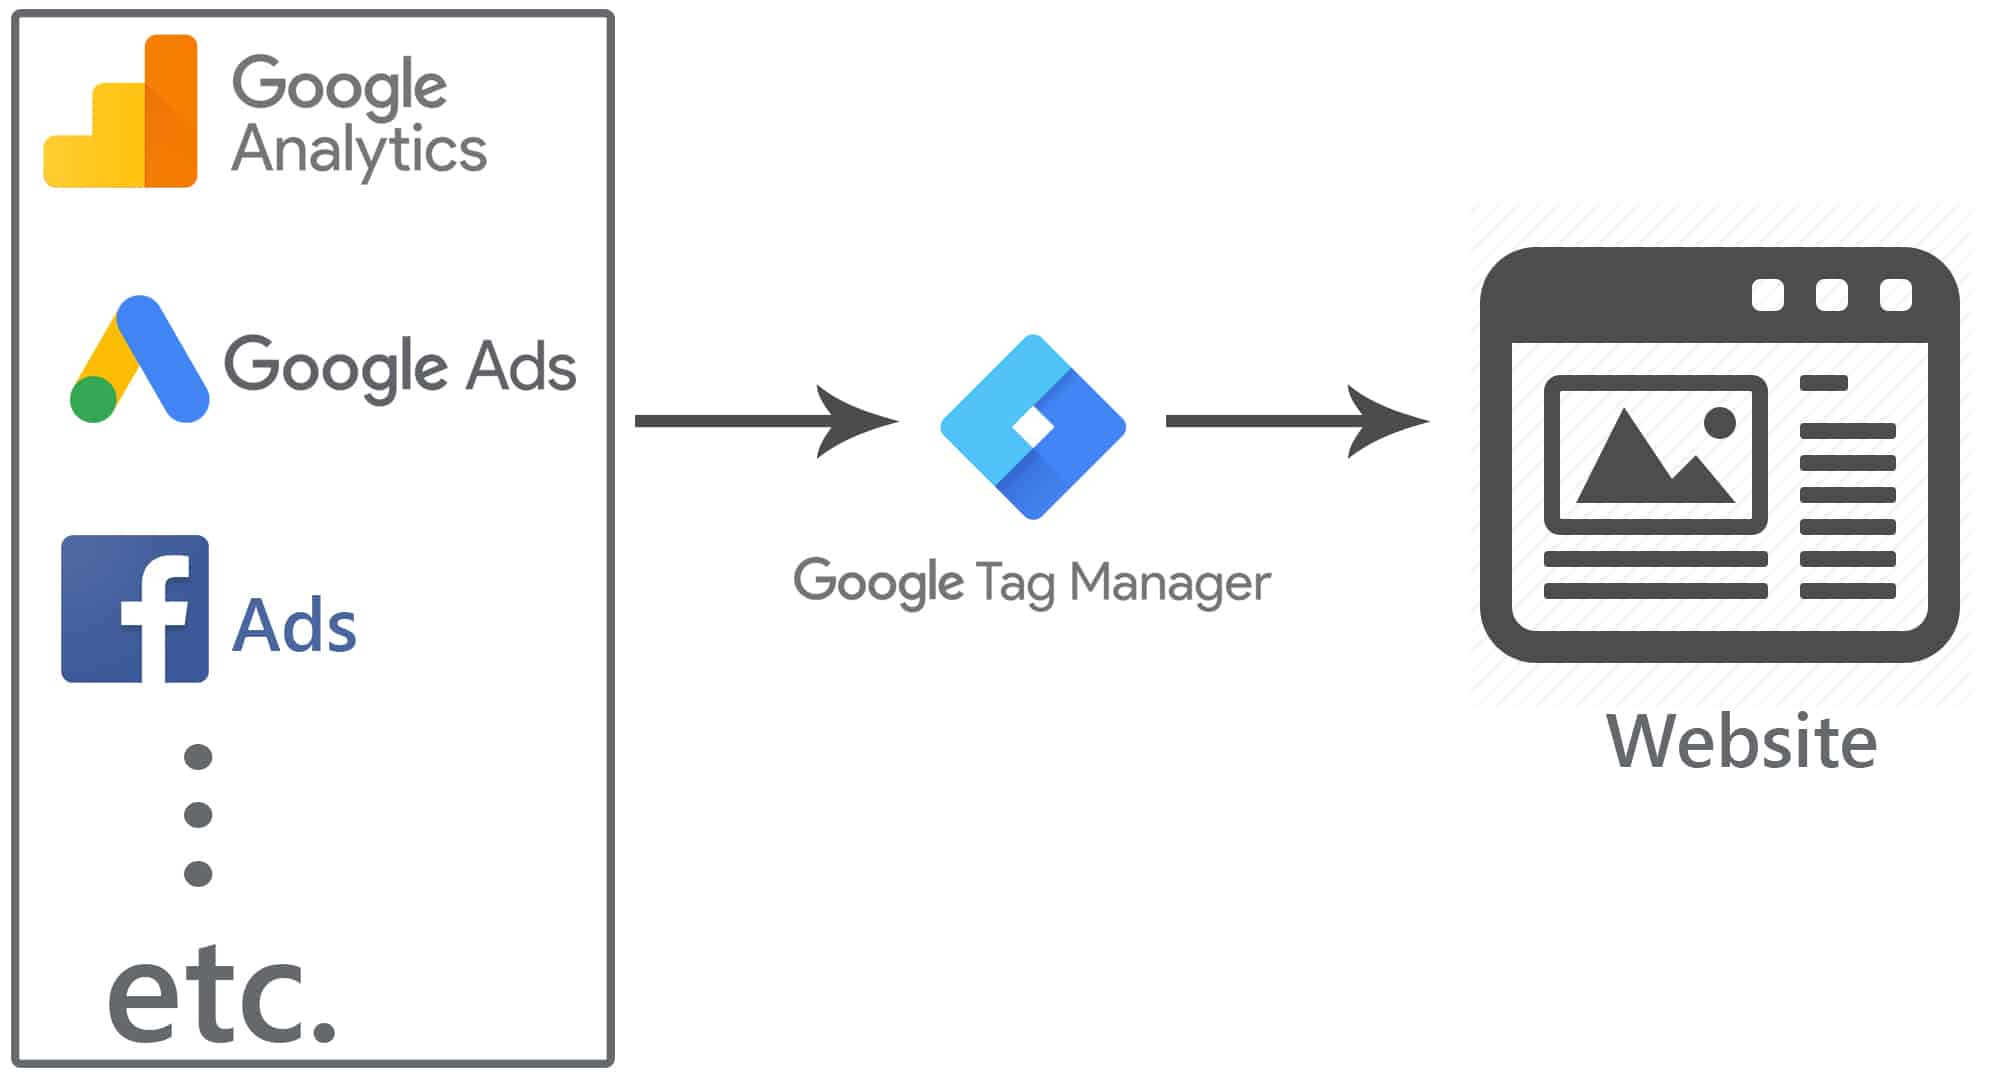
Google Analytics is a great analytical tool if used properly. Unfortunately, you need to configure it to get the most of it.
You need to install it on all pages, add filters, and set up goals. The first one is easy. The second one is a bit more technical, but still easy to do. The third one is where it gets tricky.
In this post, I’ll walk you through a step-by-step process for tracking events and using them as goals in your Google Analytics account. You’ll learn how to set them up without touching any code.
I’ll provide three use cases at each step. If you want to track your form submissions, affiliate link clicks, and video engagement, this guide is perfect for you. I’ll also share why you should stop using destination goals.
To create an event goal, you need to do two things:
- Track the event
- Create a goal for the event
The first one lets you see everything that happens on your site. But some interactions are more valuable than others. Creating a goal out of these valuable interactions will help you make business decisions quickly.
Click on any of these to jump straight to that topic
What Are Events in Google Analytics
Events in Google Analytics are actions that happen on your website that a user takes. Here are some examples of events:
- Link clicks — internal and external
- Form submissions
- Scroll
- Clicks on tabs, accordions, and other elements
- Video plays/pause/stop
Out-of-the-box, Google Analytics doesn’t track what visitors do on your website. The only thing it does is track page views. If they watched a video or filled out a form and does not lead to a new page (or reload), Google Analytics will not know.
This leaves you clueless about what users do on your site as well. That’s why it’s important to set up event tracking.
Tracking Events in Google Analytics
There are two main ways to track events in Google Analytics:
- Add the event code on the action you want to track; or,
- Use Google Tag Manager to handle this for you
I’ll focus on the second method because it’s easier and more flexible. Using Google Tag Manager (GTM) allows you to create events without the need to learn how to code.
If you’re not new to events, you can skip to the next section. But if you need a refresher, here are the basic things you need to know.
- Events are only tracked on pages you have your Google Analytics code installed, i.e. your website
- They are triggered only if you configured them either by adding a code manually or using Google Tag Manager to handle the implementation
- There are four fields you can set up. The first two are required:
- Category—Typically the object that was interacted with (e.g. ‘Video’)
- Action—The type of interaction (e.g. ‘play’)
- Label—Useful for categorizing events (e.g. ‘Fall Campaign’)
- Value—A numeric value associated with the event (e.g. 42)
Events are flexible. You can use it to track what users are really doing on your site. When you install Google Analytics on your site, it’s out-of-the-box configuration works when a page loads. It gives you some data on where the traffic came from or the page they are viewing. But it doesn’t track what people do on the page itself. That’s where events come in.
Google Analytics Events vs Event Goals
Events are user interactions with content that can be measured independently from a web-page or a screen load. Downloads, link clicks, form submissions, and video plays are all examples of actions you might want to analyze as Events.
Event goals are Google Analytics goals that you define as a conversion. These are specific events that are more valuable than other events and should be linked directly to your business goals.
Simply put: All event goals are events. Not all events are (nor should be) event goals.
How to Create an Event Goal in Google Analytics
You probably know how to create a destination goal. But that goal is only triggered when a page loads. If you want to track user behavior on a page that doesn’t involve a new page loading, you’ll have to use events.
The process to creating event goals is similar to destination goals. Here’s a quick overview of the process:
- Login to your Google Analytics account
- Go to Admin
- Under the View, click on Goals
- Click on New Goal
From there, you’ll see the goal setup page. Choose Custom and click Continue.
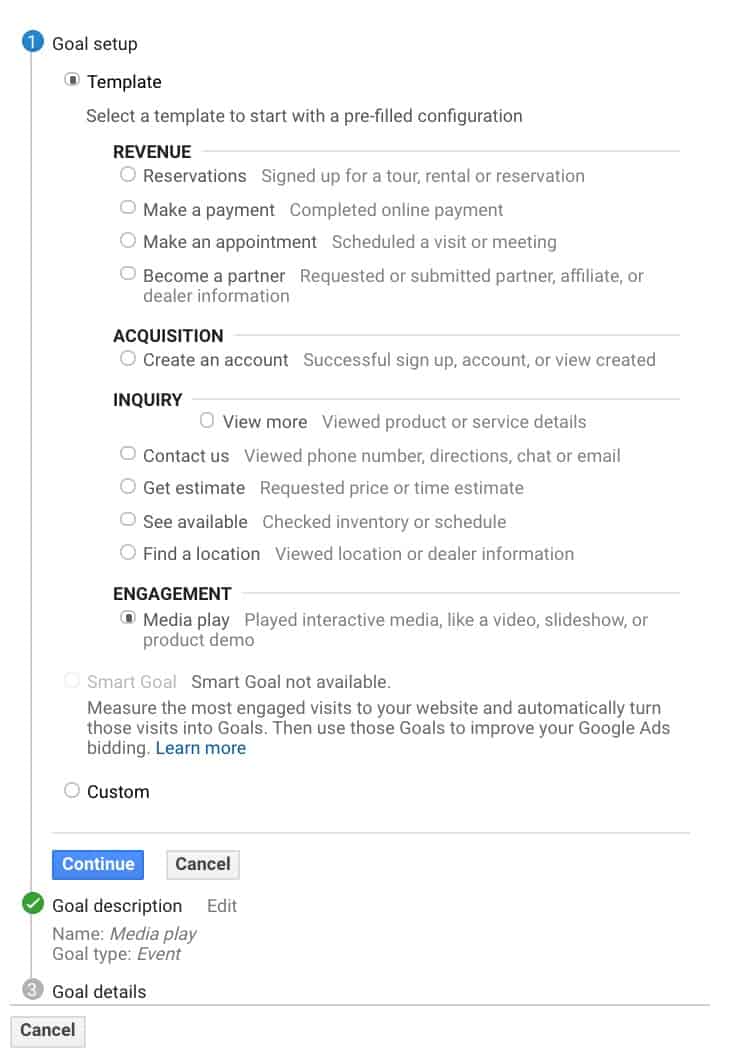
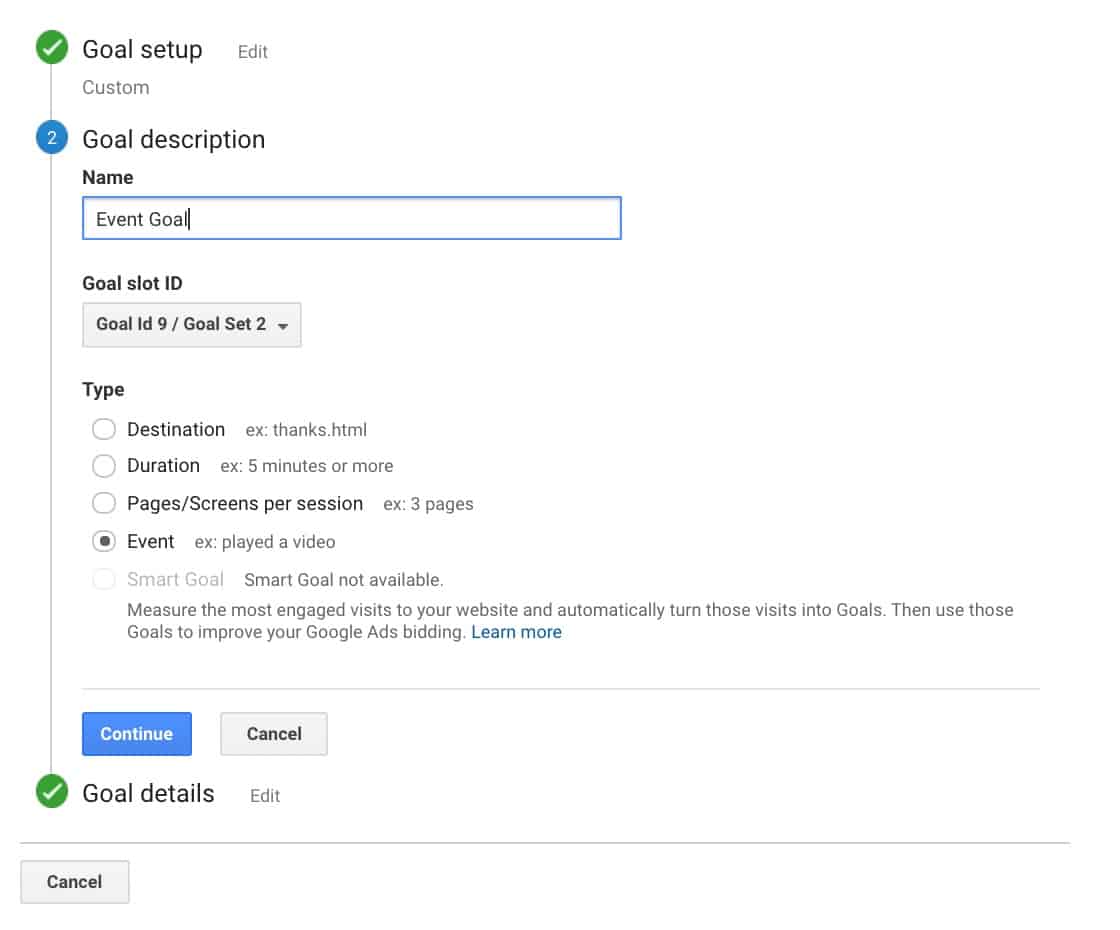
Add a name for your goal then choose the event type. Click Continue.
The last step is to add the event conditions. You will need to add a value in the category and action fields here.
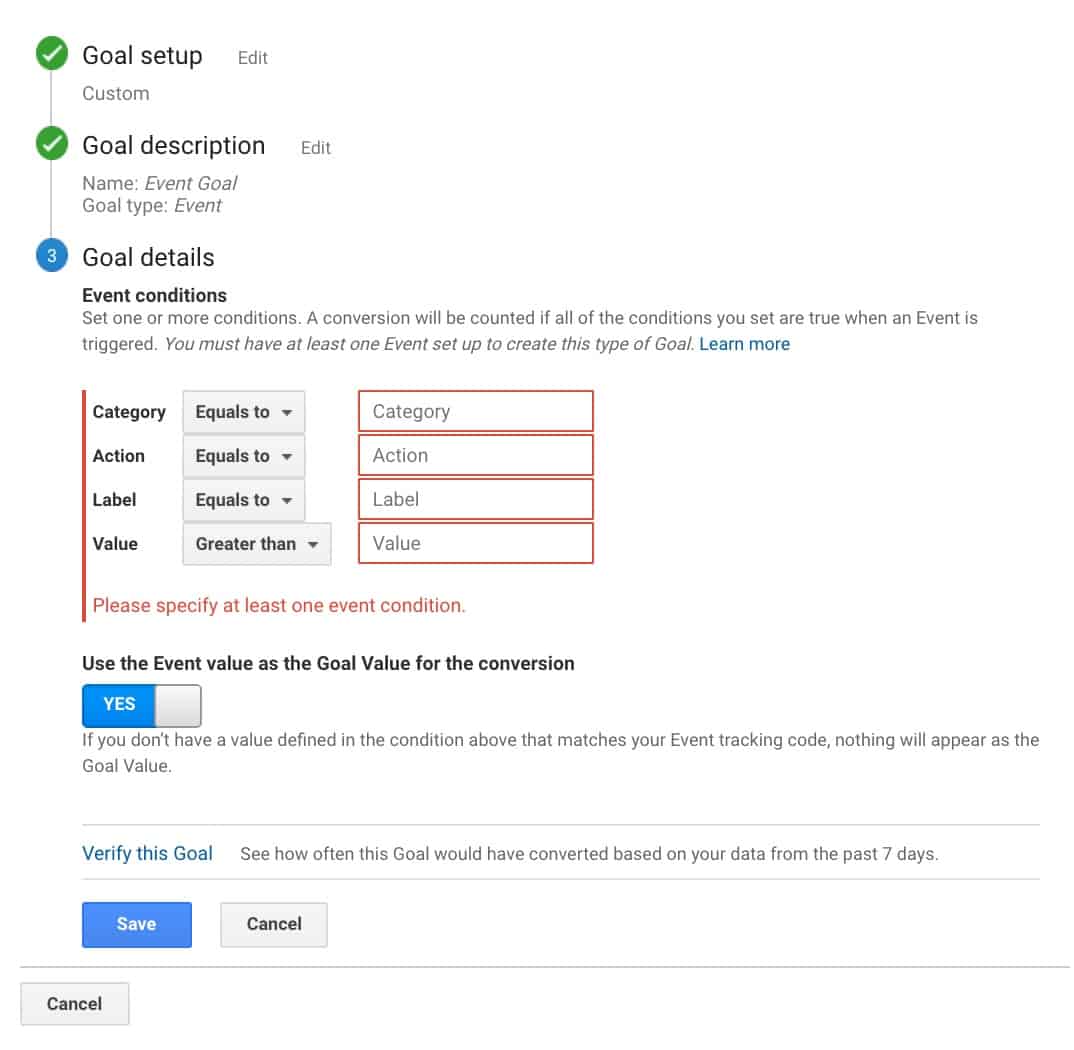
That’s the general overview of creating event goals.
Tools Needed to Track Events Properly
To track events properly, you only need these two tools:
- Google Analytics
- Google Tag Manager
Of the two, Google Tag Manager might be the most unfamiliar. Here is some recommended readings to help you get acquainted with it. It’s the key to tracking events.
- What is Google Tag Manager
- How to Install Google Tag Manager to Your WordPress Website
- How to Add Google Analytics to Google Tag Manager
Step-by-Step Tutorial for Creating and Tracking Event Goals
I’ll share three examples for creating events and tracking them as goals in Google Analytics. Depending on your business, it may or may not be applicable to you. Here are the three events we’ll track plus some example use cases:
- External link clicks—e.g. affiliate link clicks or links to partner websites
- Form submissions—e.g. typical form submits but won’t be using the destination goal
- Video engagement—e.g. plays, pauses, percent of video played, etc.
1. Determine What You Want to Track
The first thing you need to do is figure out what you want to track. Again, this depends on the nature of your business.
In the table below, you’ll see three different websites and the events that matter to them.
| Type of Website | Event Type | Details |
| Affiliate website | External link click | Clicks to product ABC |
| Regular blog | Form submission | Newsletter subscription |
| Online course creator | Video plays | Percentage of video watched |
Pro tip #1: think about the metrics that matter to you. You’re probably already tracking revenues/purchases. But people don’t buy upfront. What are those smaller actions they take on your website before they purchase? These are called micro conversions. They are perfect candidates for event tracking.
Pro tip #2: not all events are created equal. You don’t have to track all events as goals. For example, page scroll by percentage can also be tracked (e.g. scrolled to 25% of page, or 100% of page—they reached the bottom). But these aren’t tied towards your business goals. While you can create events so you see if people get through the bottom of your blog posts, it probably isn’t worthwhile to convert them to a goal.
2. Add an Event Goal in Google Analytics
Now that you’ve identified what events are valuable to you, it’s now time to create an event goal in Google Analytics. You need to fill out two fields: category and label.
You can use any name for the fields, but make sure it means something to you or anyone else who might look at your Google Analytics account. A naming system like this below doesn’t make sense.
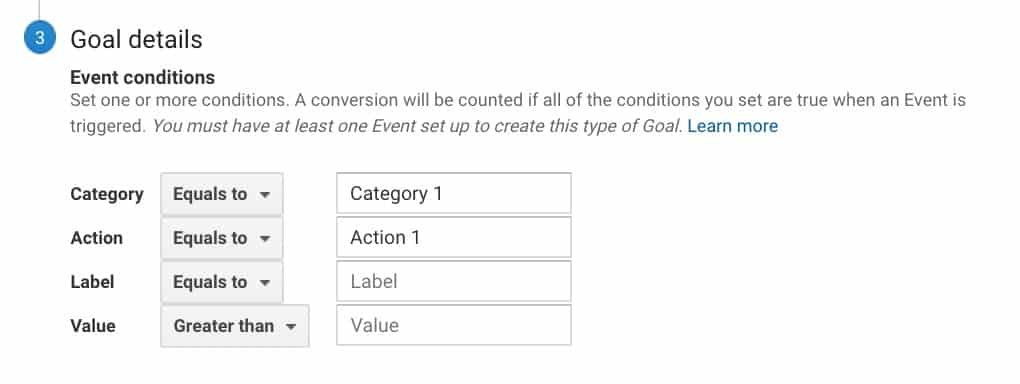
One naming technique that I found useful is to use the object-action framework. You might have noticed it in the examples I shared. So, this is how it may look like for the three businesses:
Sample Event Goal for Affiliate Website
Affiliate sites earn by purchases of the products/services they recommend on their site. If a visitor clicks on the link then decide to purchase, the affiliate site earns a commission.
But that transaction happens on a 3rd party website. The only way to track that is by heading to the respective merchant site to view the reports. But if you’re an affiliate for dozens of companies, it’s time-consuming to go to all those.
The nearest proxy for conversion is the clicks on these links. Using the object-action naming convention I shared earlier, here’s how it might look like:
- Category equals to Affiliate Link
- Action equals to Clicks
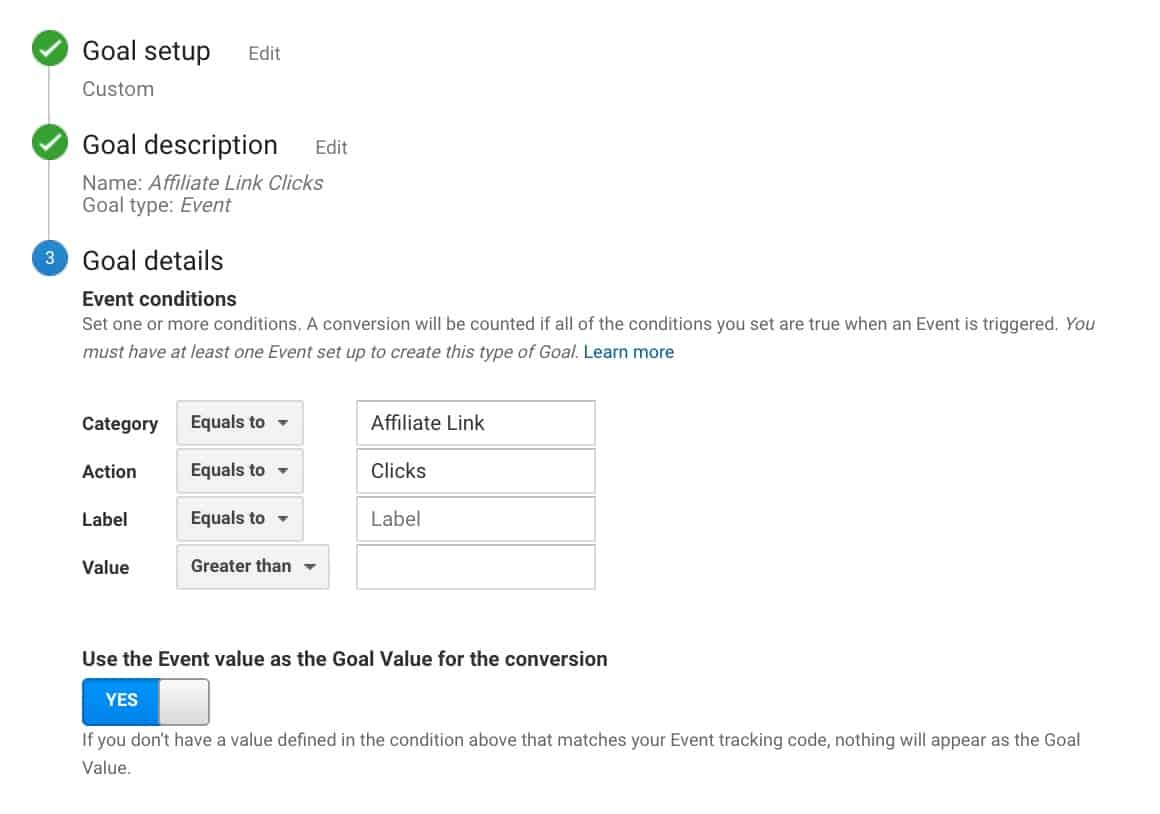
You’re free to use whatever name you want here. For me, it’s just easier to keep track of them using this naming convention. Leave the label and value fields blank. You’ll see why in the next section.
Make sure you toggle the Use the event value as the goal value for the conversion to yes.
Sample Event Goal for Blog
A blog typically publishes content. The most valuable metric for most blogs is email subscribers. There are multiple ways to grow your email list, but the most common is a newsletter subscription. Here’s how that looks like:
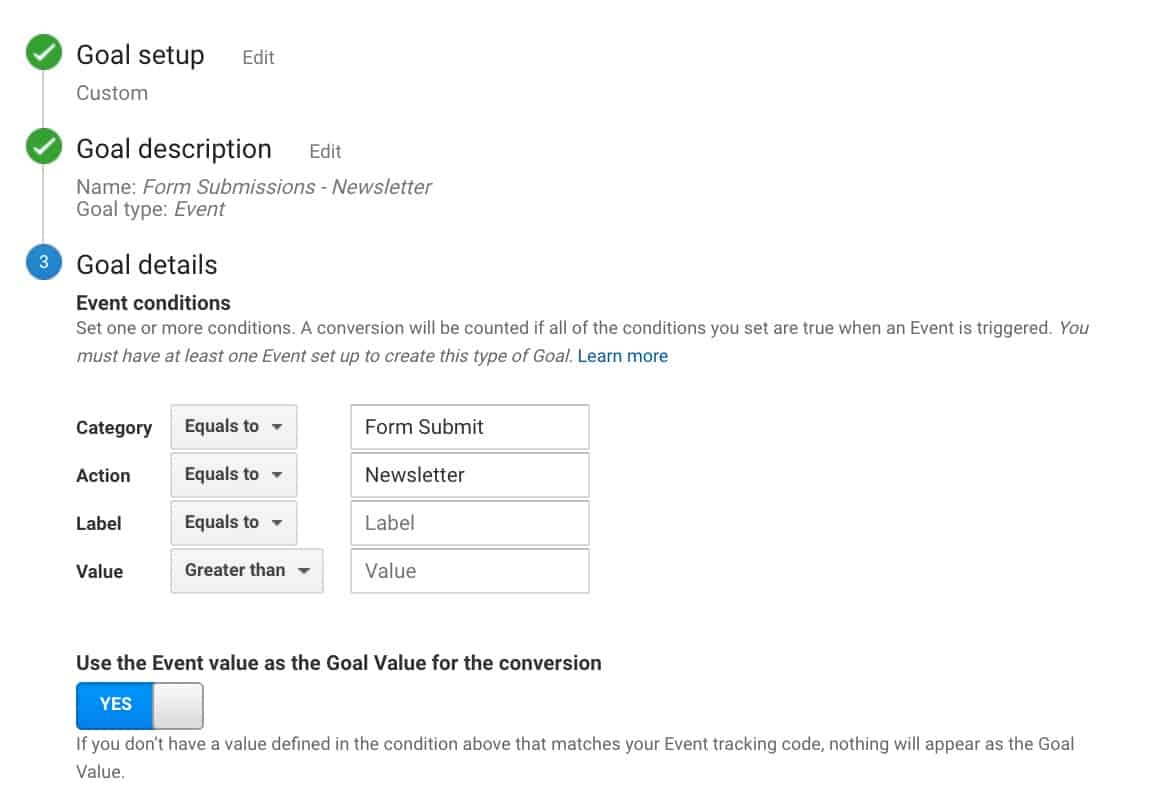
You can use this for any other lead generation tactic you are using. Some examples can be the following:
- PDF Downloads
- Category equals to PDF
- Action equals to Downloads
- Email Course Registration
- Category equals to Email Course
- Action equals to Registration
Follow the same settings as above.
Sample Event Goal for Course Creator
If you create a lot of videos and want to track how people engage with it on your site, you can setup an event goal that looks like this. For example, you deemed that people who watched over 75% of your videos convert better or that’s a target you want to achieve. This is how that would look like.
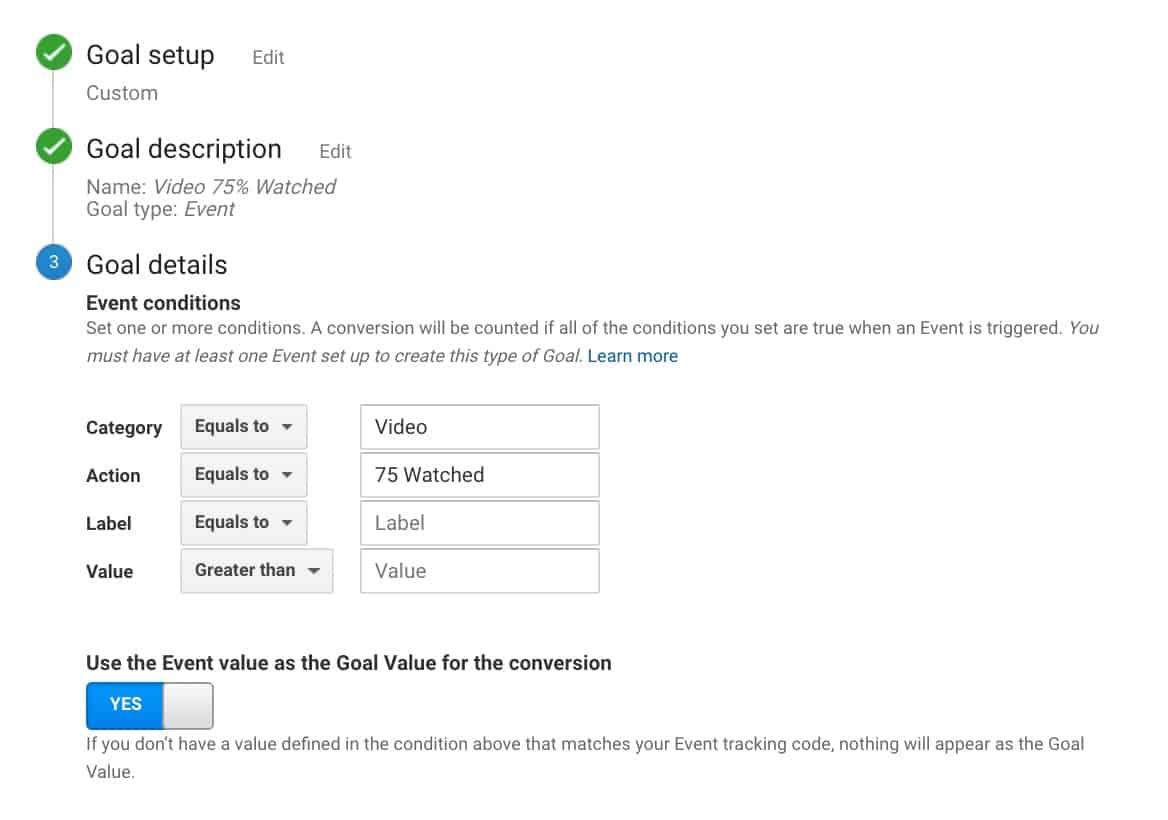
Again, the setup is different for everybody. You can use this to track your video sales letters or explainer videos.
Pro tip #3: Since we’re on the topic of creating goals in Google Analytics, please stop using the duration and pages/screens per session as goals in your account. There are limited use cases for them. Google Analytics goals are tied to your business goals. If a person spends 5 minutes on your site, will that help you grow your business?
3. Implement Using Google Tag Manager
The next step is to create the events themselves. The goal won’t trigger if the events are not created. We’ll handle this using Google Tag Manager. If you haven’t used Google Tag Manager before, here’s a tutorial on how to install it on your website. Once you have it on your site, proceed to the next step.
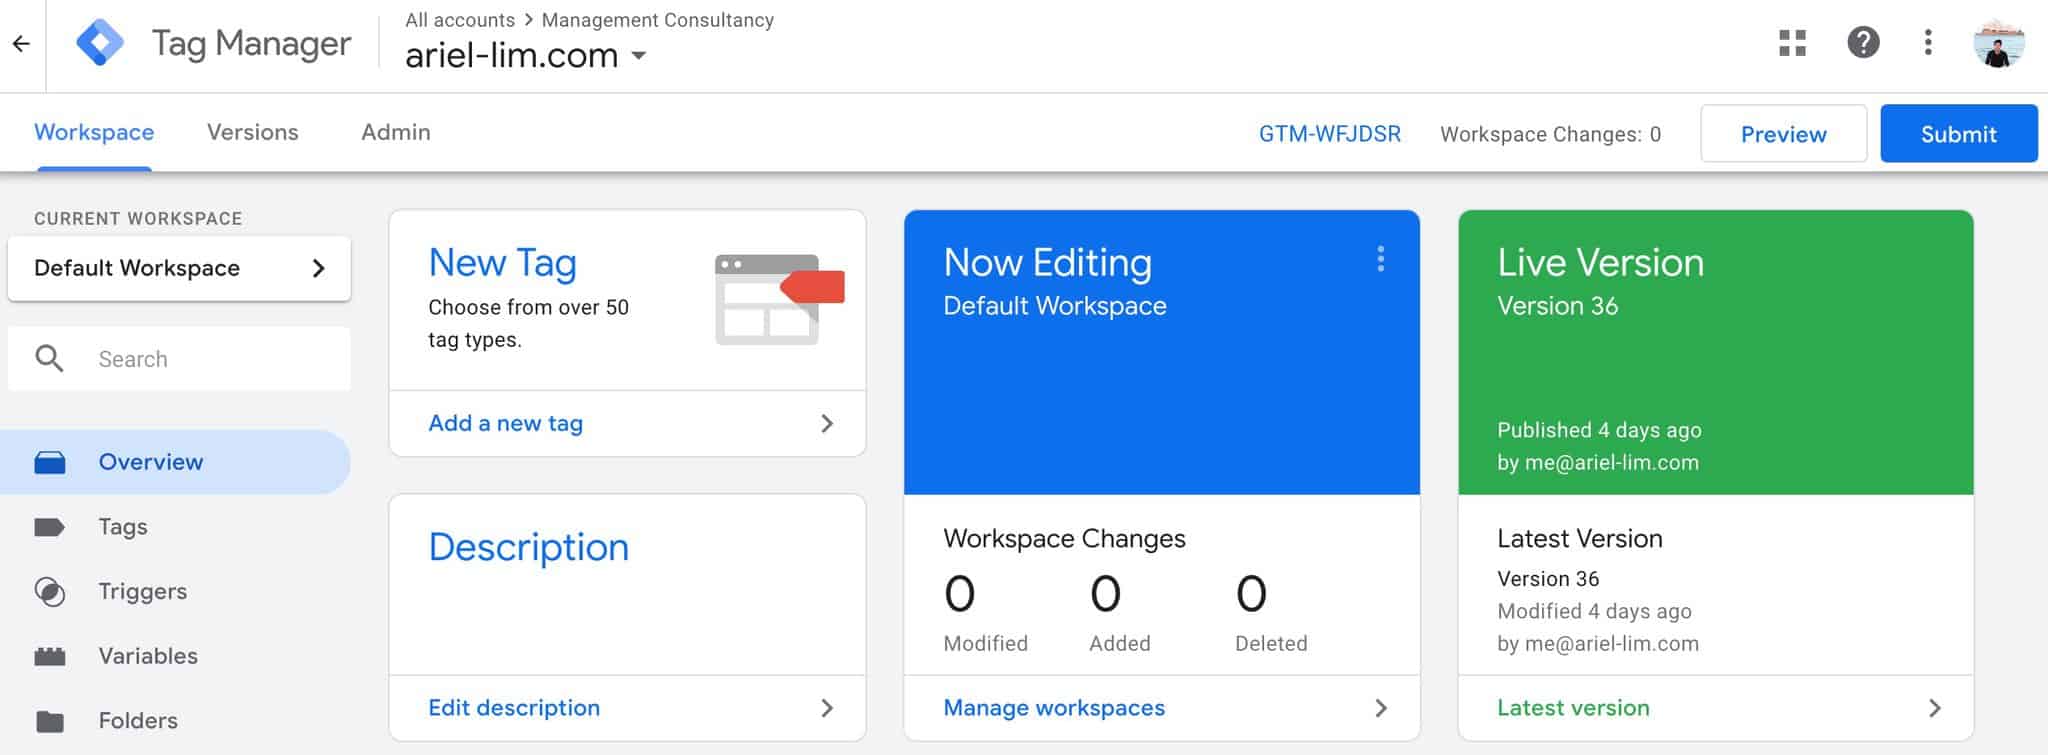
Here’s the overview of how to do it:
- Login to Google Tag Manager
- Enter the proper account and container for your website
- Enable the variables needed to track the events
- Create the necessary triggers
- Create the tag
- Test the configuration
- Publish the changes
A Quick Primer on How Google Tag Manager Works
GTM manages all the code or tags or scripts that you add to your site in one place. Instead of adding them directly on your website one-by-one, you only add the GTM installation code then manage all other tags inside Google Tag Manager.
Most websites will use Google Analytics and the Facebook Pixel. If you add more softwares, you will have to do it manually. But with GTM, you can easily deploy and edit tags using its interface.
A tag is a code that send data to a system such as Google Analytics. It contains a trigger which, when meets the criteria you set, will fire the tag. For example, the default trigger in GTM is a page view for all pages the code is installed on. Any tag (e.g. Google Analytics or Facebook Pixel) that uses that trigger will load on the page.
If you set special rules like form submissions on a specific URL, or page views with /blog/ URL, then the tag will only fire when they meet that trigger condition.
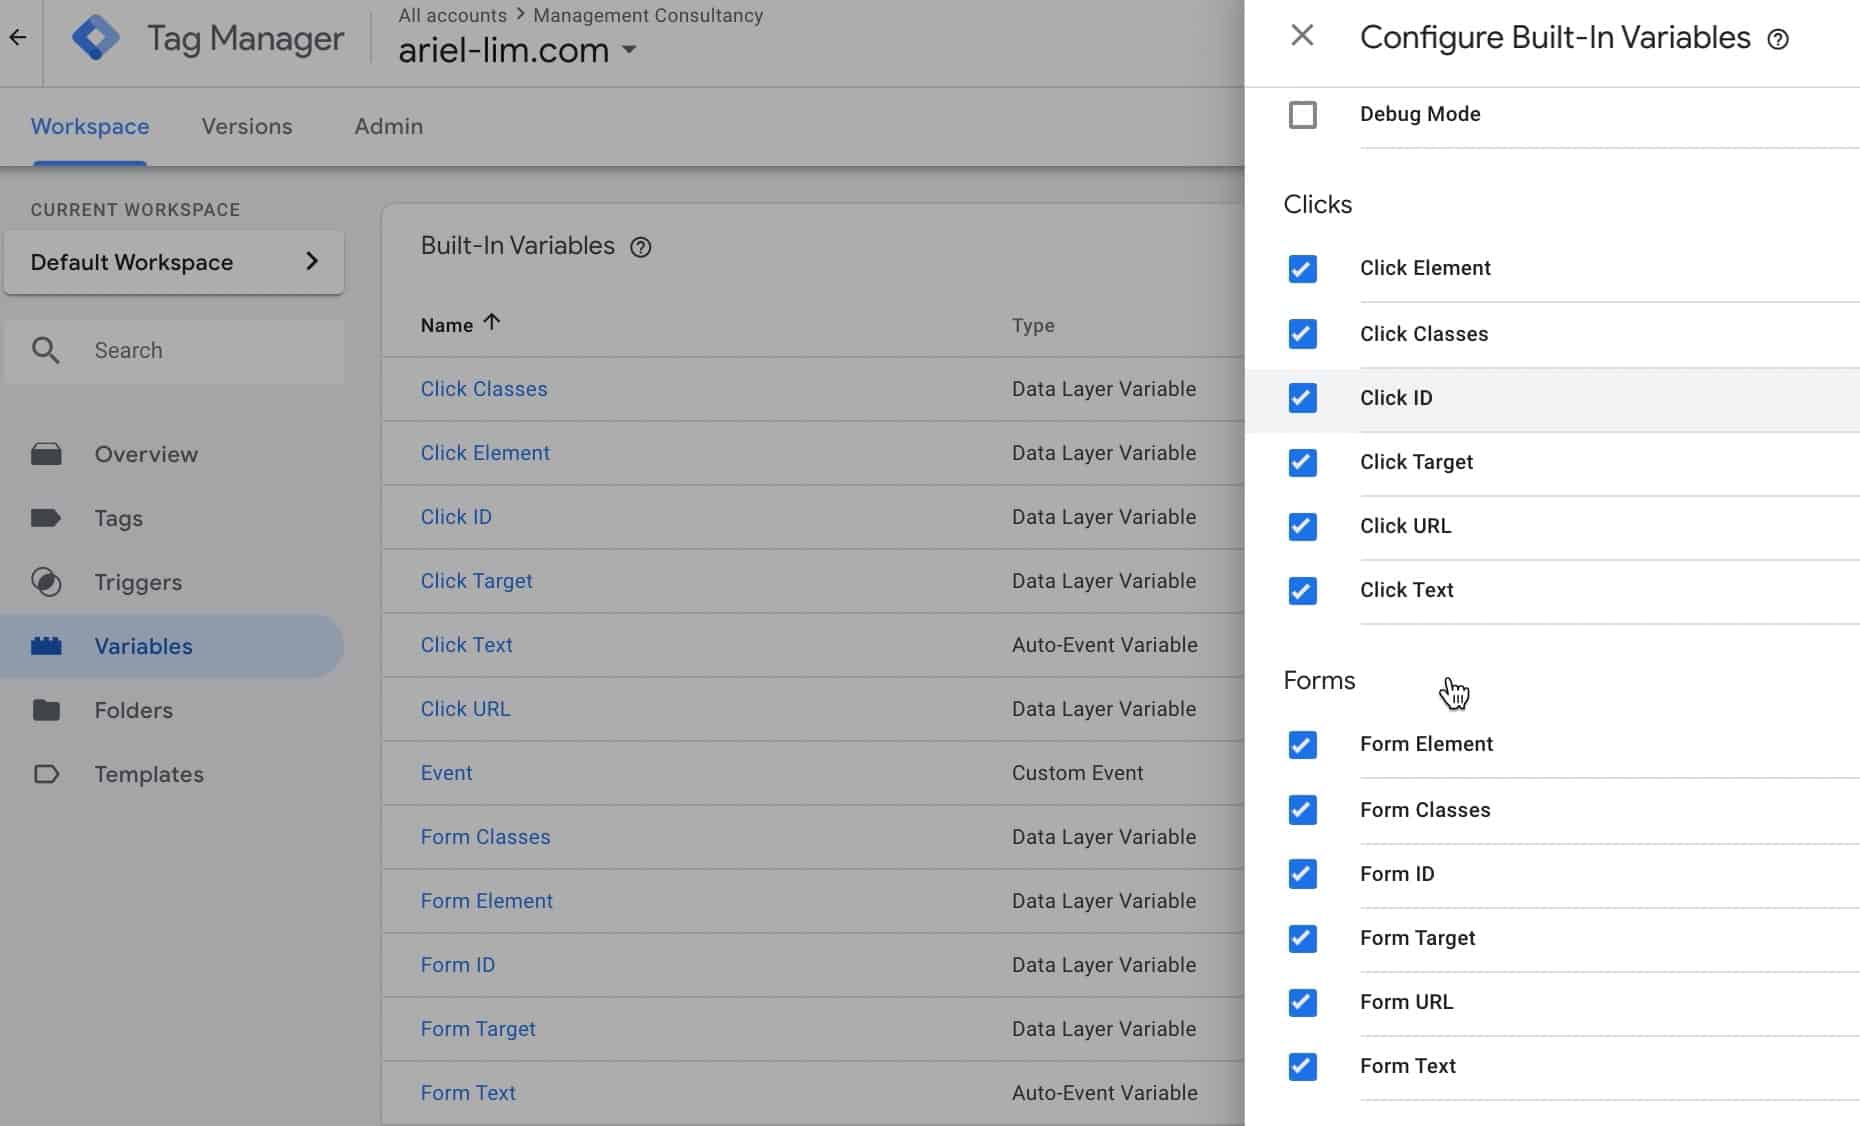
Enable the Variables in Google Tag Manager
The first thing you need to do is enable the built-in variables you want to track. In our examples, here’s what you need to enable:
- Utilities > Events
- Clicks > Everything
- Forms > Everything
- Videos > Everything
Create the Triggers Needed
After enabling the variables, you need to create a trigger.
Sample Trigger for Affiliate Website
For the affiliate site, link clicks are what we want to track. To do this, click on Triggers > New. Then, fill-out the details like the image below.
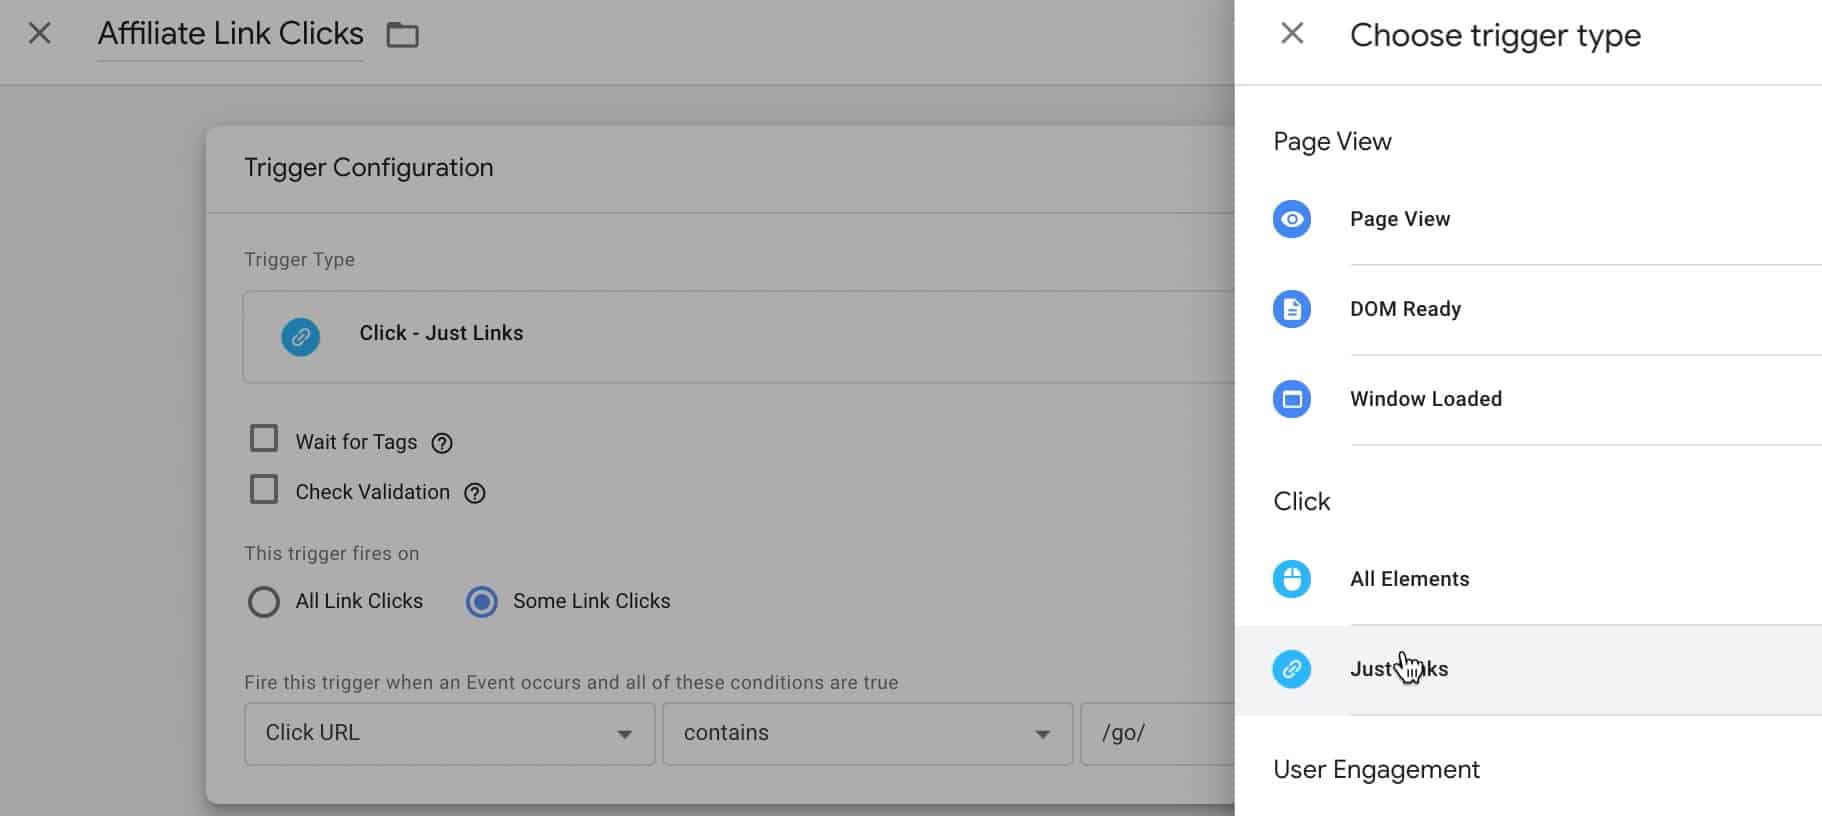
Some important parts I’d like to highlight here:
- Name— use something that makes sense so it’s easier to reference it later
- Trigger type— choose just links since we want to track link clicks
- This trigger will fire on —choose some link clicks here. Why? Because we don’t want to track all link clicks. For example, a link to another page (internal link) isn’t useful, nor is a link to an external site but isn’t an affiliate link.
- Conditions—depending on how you manage your affiliate links, you might have some form of URL convention. In the example above, all affiliate link clicks are handled by a plugin which uses “/go/“ in the URL. That’s why if the click URL contains /go/, this trigger will fire. Otherwise, it won’t fire.
Pro tip #4: If you use affiliate links, it’s recommended to use a plugin to manage all your affiliate links. The main benefit you get is you only have to “add it once” then you can reference it over and over. Then, if for some reason you need up update your links, you only do it once and it updates everywhere.
Sample Trigger for Blog
For our next example, you’ll want to track form submissions. GTM has a trigger for this.
Create a new trigger, add a name, choose the form submission trigger, then have it track all forms.
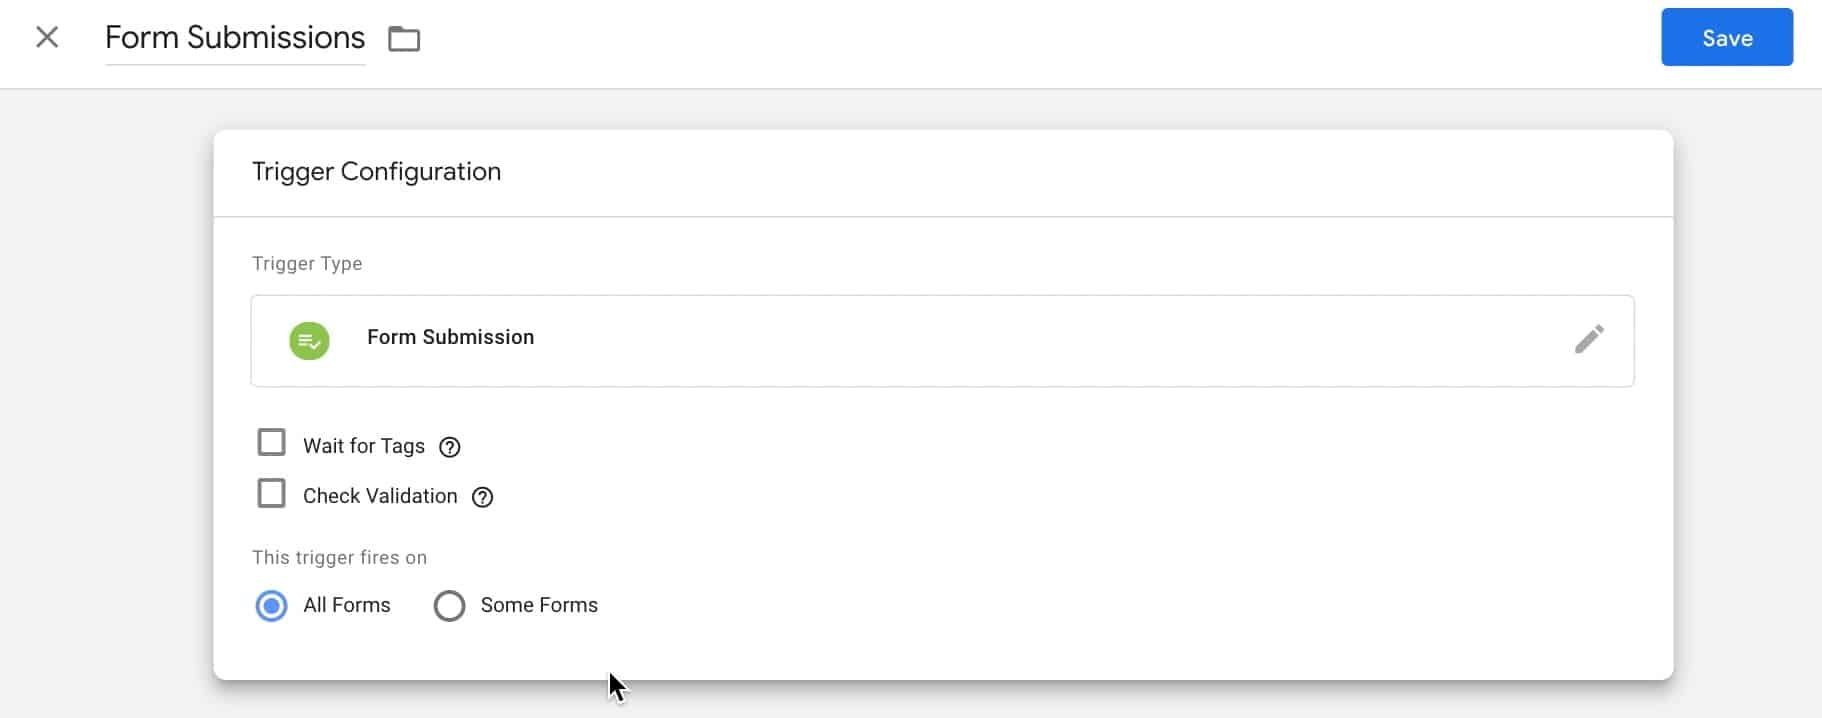
You can choose to track just some forms, but you’ll have to identify them by classes, ids, or the URL where they are located. For example, you have a form with only an email field. Then another form with name, email, and their phone number. You can create separate triggers for each of those.
Sample Trigger for Course Creator
You start by creating a new trigger. Then, choose the YouTube Videos trigger type.
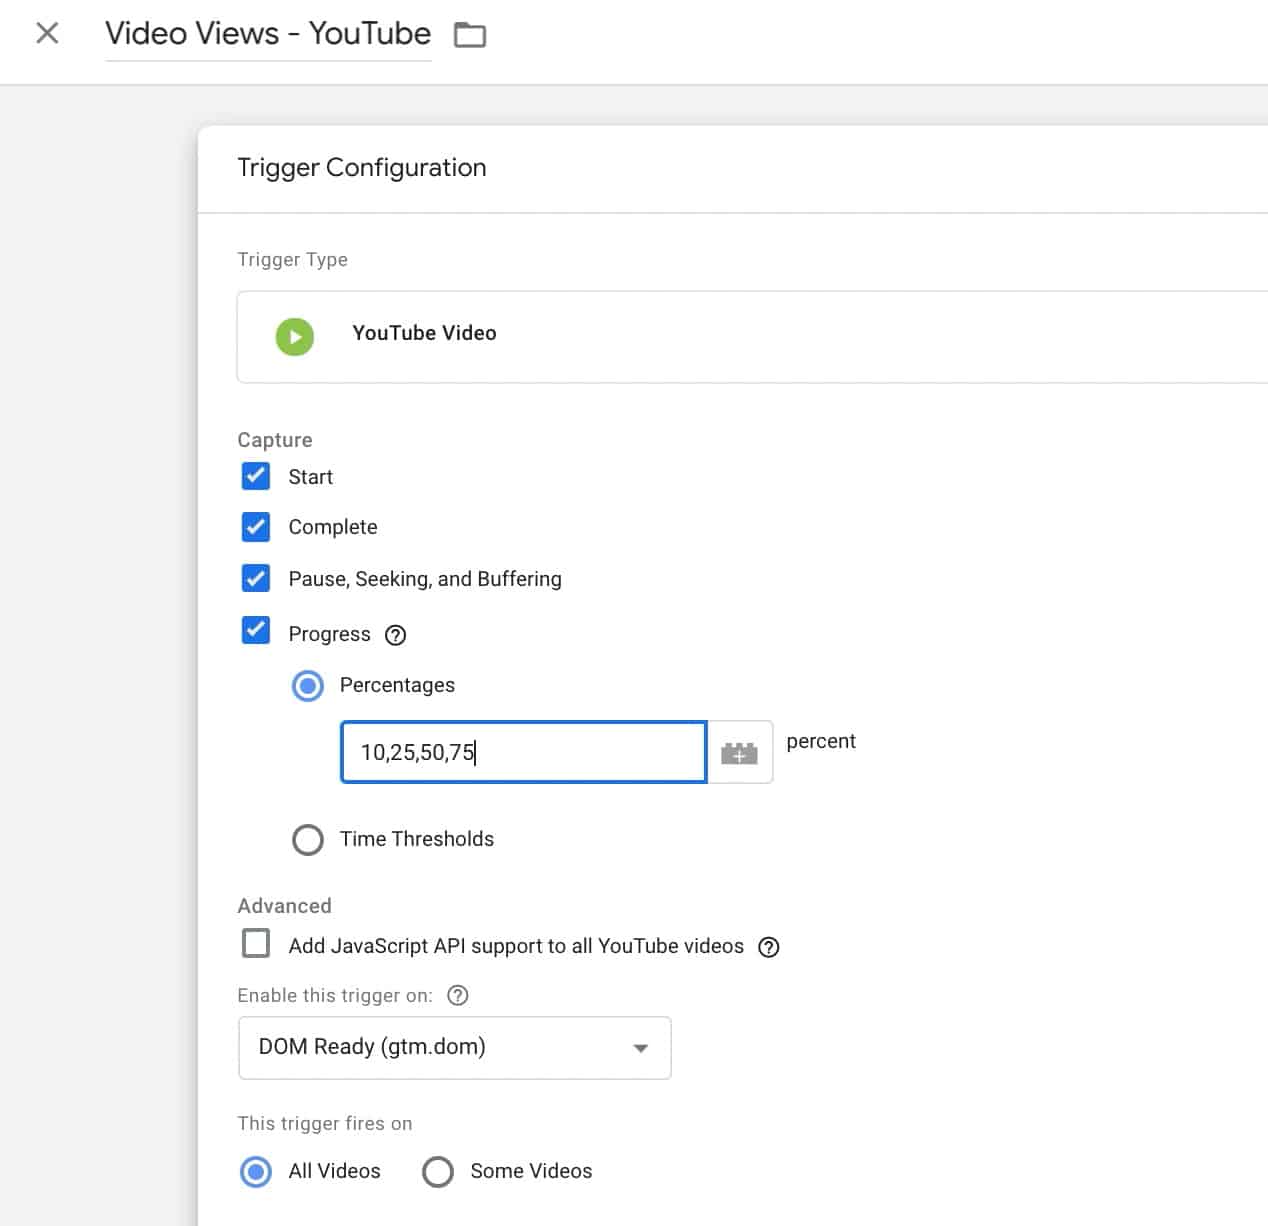
You can leave the rest of the settings by itself, but in the example above, we want to track the percentage watched, i.e. 10%, 25%, etc.
If you only want to track selected videos, you choose some videos in the field for when this trigger fires on. A separate menu will show up. You can specify the conditions for this trigger using classes, IDs, URL paths, etc.
Once you’re done, hit save and proceed to the next step.
Create the Tag
You’ve finished adding the variables and also configured your triggers. Now, it’s time to add the tags. These control what data gets sent to your Google Analytics account. In our case, these are the events that will trigger the goal conversions we setup earlier.

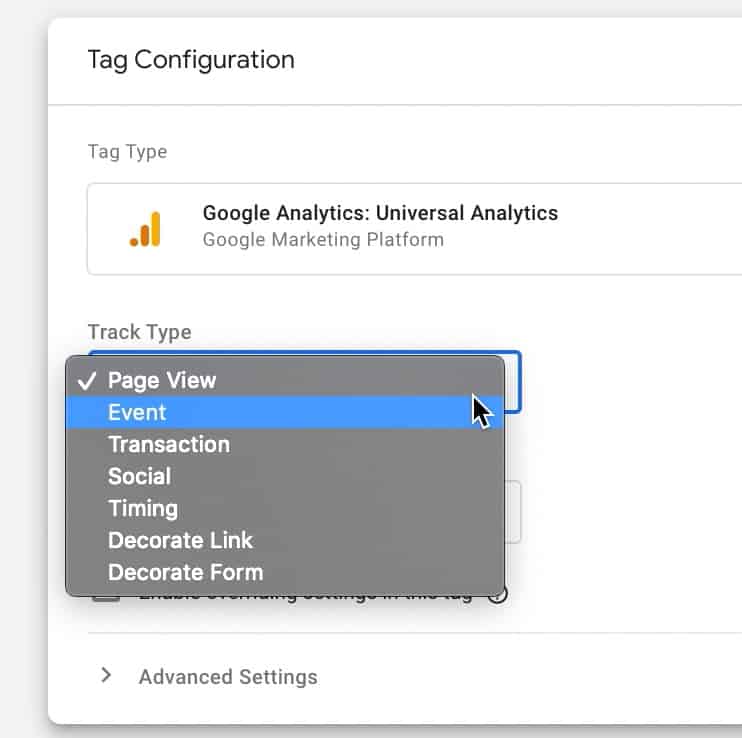
Create a new tag. Choose the Google Analytics Universal Analytics. You’ll see under the track type the default value of page view. Change that into an event.
Sample Tag for Affiliate Website
After that, you’ll see a screen that looks similar to the event goal setup in Google Analytics: category, action, label, and value. Use the values you set earlier in the category and action.
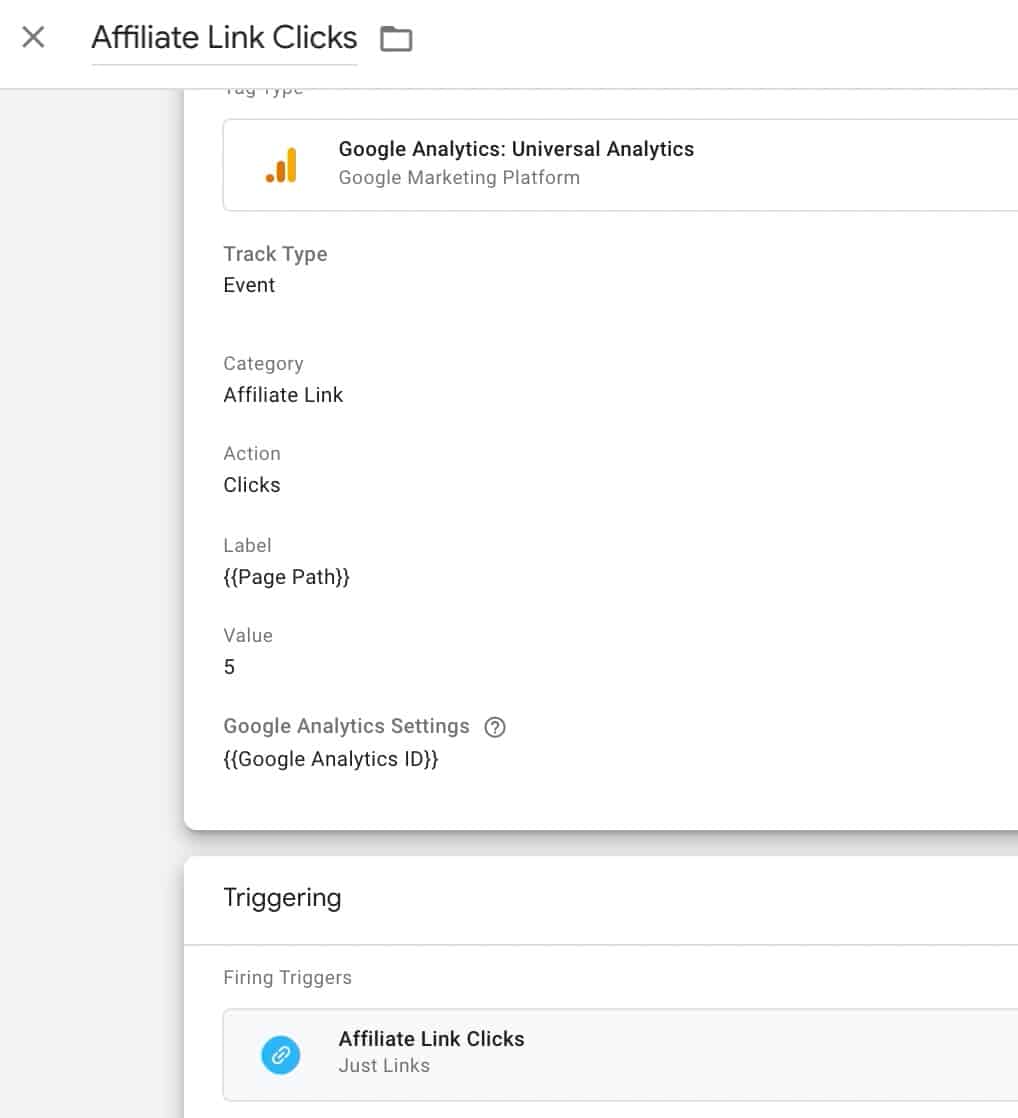
Make sure they match the copy exactly.
- Affiliate Link is not equal to Affiliate link
- Click is different from Clicks
For the label, you can leave this blank. But, if you’d like to know what page on your site people are clicking your affiliate links on, then you can specify the page path in the label field. This will give you an idea of which page is driving those clicks to your affiliate links.

If you have several dozen blog posts filled with affiliate links and only one of them is where majority of your referrals come from, that’s a page you’ll want to monitor and/or improve.
To do that, choose the Page Path as the variable—this is the URL of that page minus the main domain. If the URL is domain.com/blog/awesome-post/, the page path will be /awesome-post/. You will see this in action later on.
Finally, goal conversions in Google Analytics are useless if it doesn’t have any monetary value. There are many ways to assign goal values. If you don’t know where to start, just add a number there.
How much is think affiliate link click worth to you?
Here’s one way to think about it: if the average affiliate revenue I get is $100 and it takes 20 people who clicked on my link before 1 of them buys, the goal value you can add is $5. The idea is if 20 people clicks on that link, all things being equal, you will have earned $100.
Under the trigger, make sure you select the Affiliate Link Clicks trigger you cerated in the previous section.
Configure the Google Analytics Variable
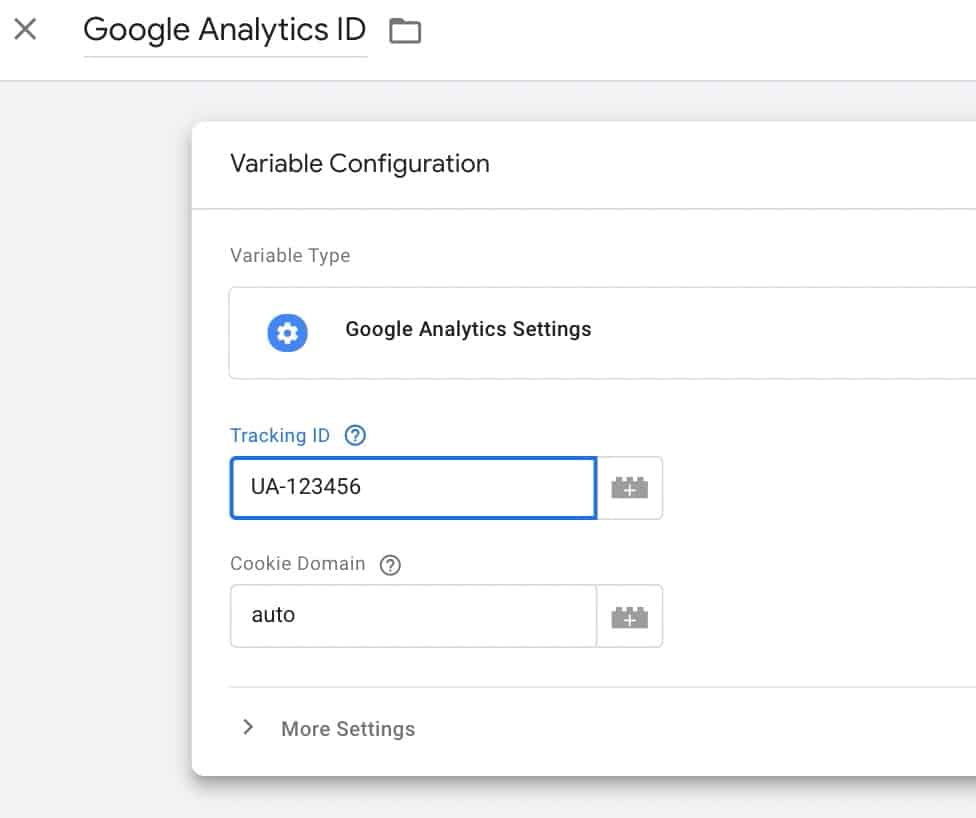
If you haven’t configured the Google Analytics Settings variable, you can do that easily by clicking the lego icon with the + sign, then copy your Tracking ID in the field like this.
It should now show up in the field.
Sample Tag for Blog
To track form submissions on your website, all you need to do is create a tag that will send events back to Google Analytics.
- Create a new tag
- Add the category and label you used in setting the goal in Google Analytics
- Use the page path in the label if you want to track which page people are filling out a form
- Assign a monetary value for this form submission
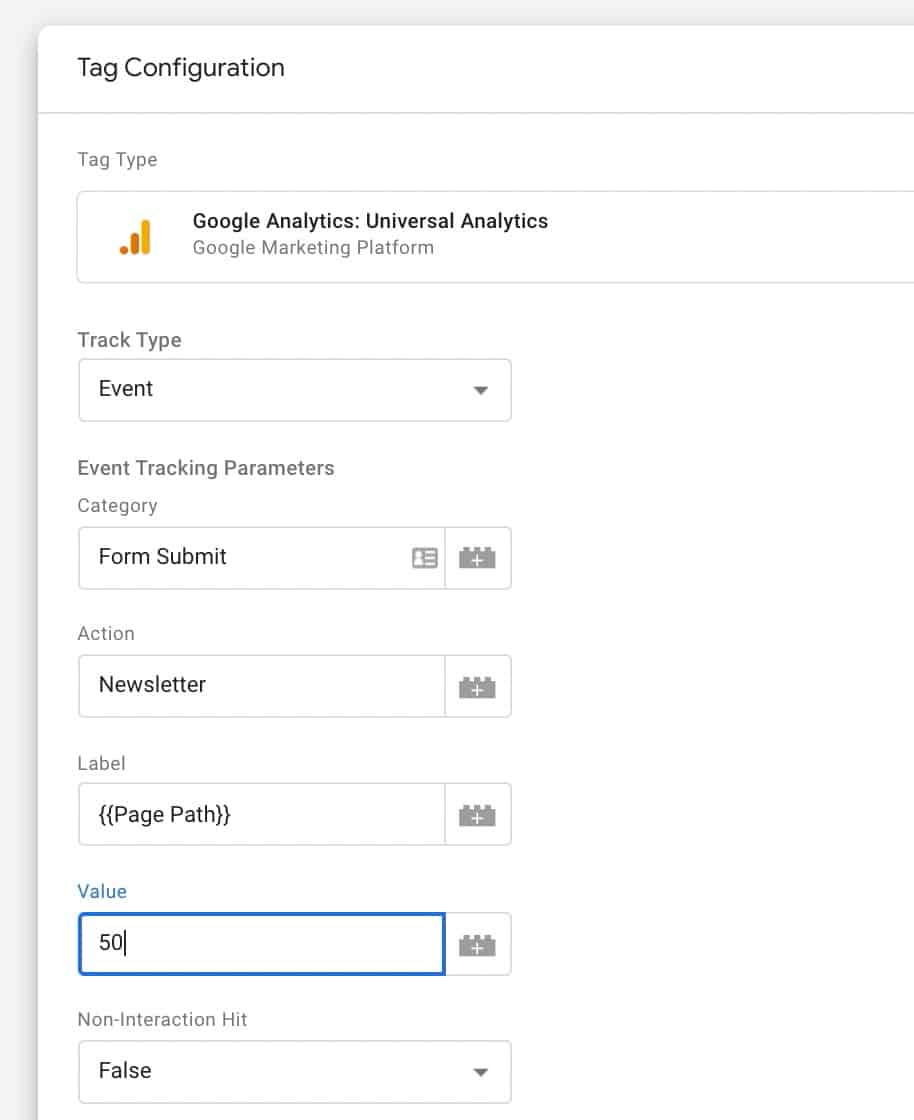
Lastly, make sure you use the trigger for form submissions.
Sample Tag for Course Creator
Configure your video watch tag to something that looks like this.
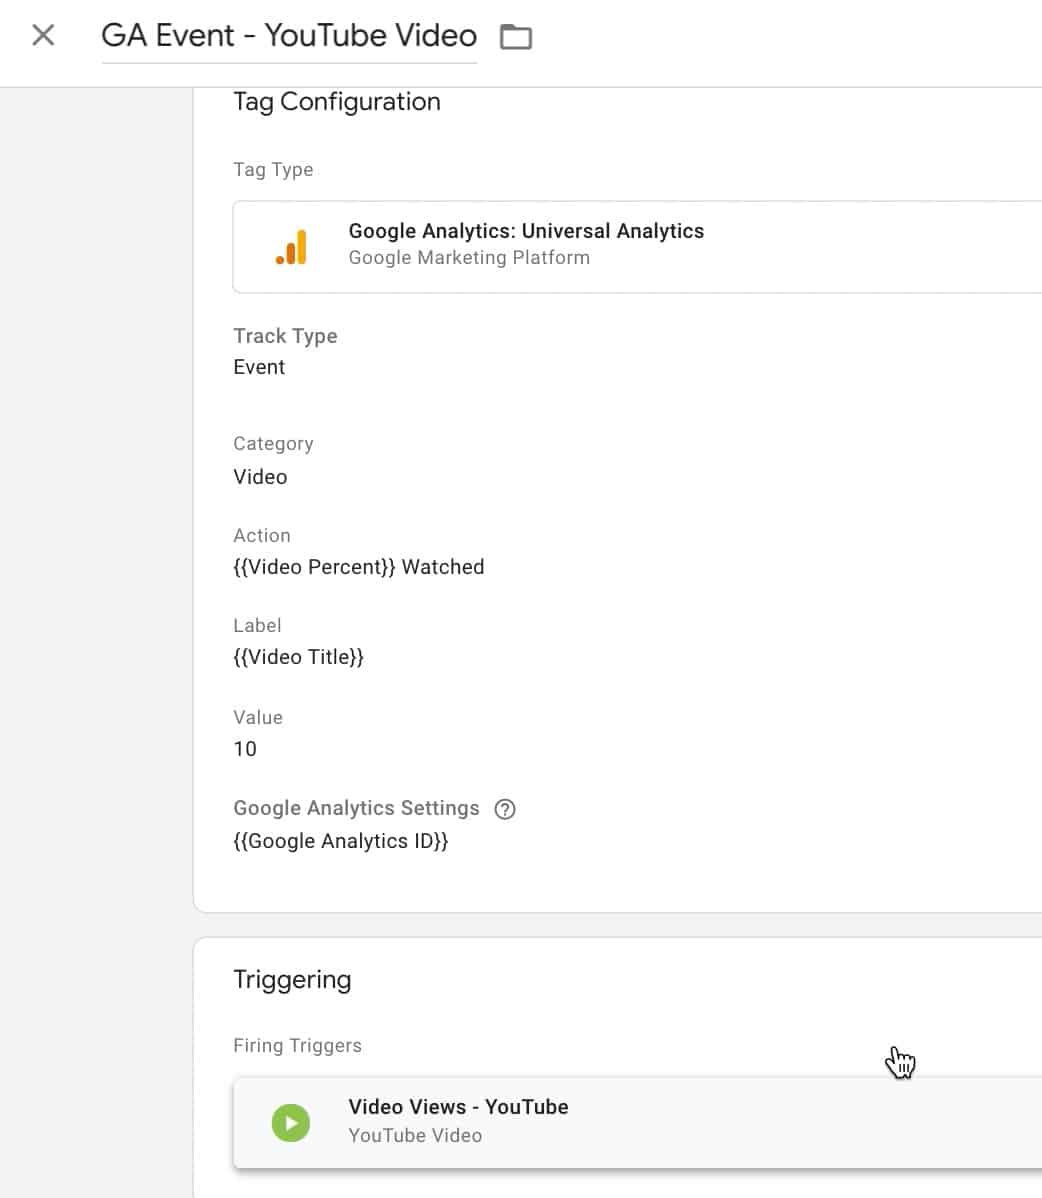
- Category—self explanatory
- Action—this combines the video percent variable that we triggered in the earlier step with a text. What happens is when the video reaches the percentage we setup earlier (i.e. 10, 25, 50, etc.) an event will be sent to Google Analytics with these values. But not all of these will trigger a goal conversion. Remember, our goal conversion is “75 Watched” —> which means it will only trigger if it matches that exactly.
- Label—you can track the page path like the examples earlier, but here, I chose to track the title of the video
- Value—same as above, you need to assign a monetary value; otherwise, it’s pointless to add them as goals.
Under the triggering, make sure you add the YouTube Video trigger you created earlier.
Test the Configuration: Make Sure Your Tags, Triggers, and Variables Are Working Properly
Click on Preview at the top and the page will reload with an orange banner that says you are now in preview mode.

Open another tab on your browser and load a page on your site that contains the events that you want to track:
- A page with an affiliate link
- a page with a form
- a page with a video
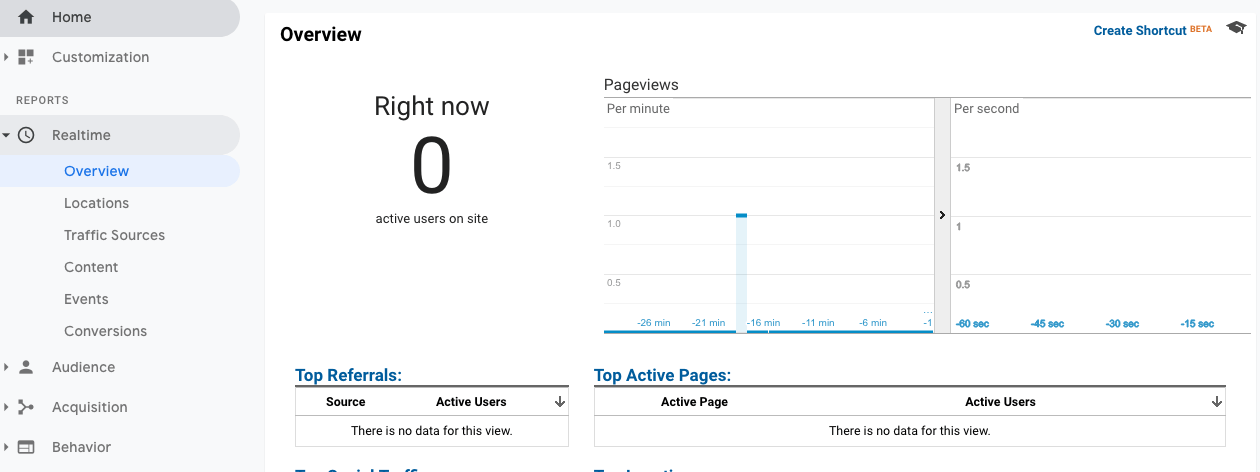
You’ll need to have Google Analytics opened here as well. Head on to Google Analytics > Realtime > Overview
Verifying the Affiliate Link Tag
Head on to a page on your site with an affiliate link. You’ll notice the bottom portion of your screen will have a debug pane.
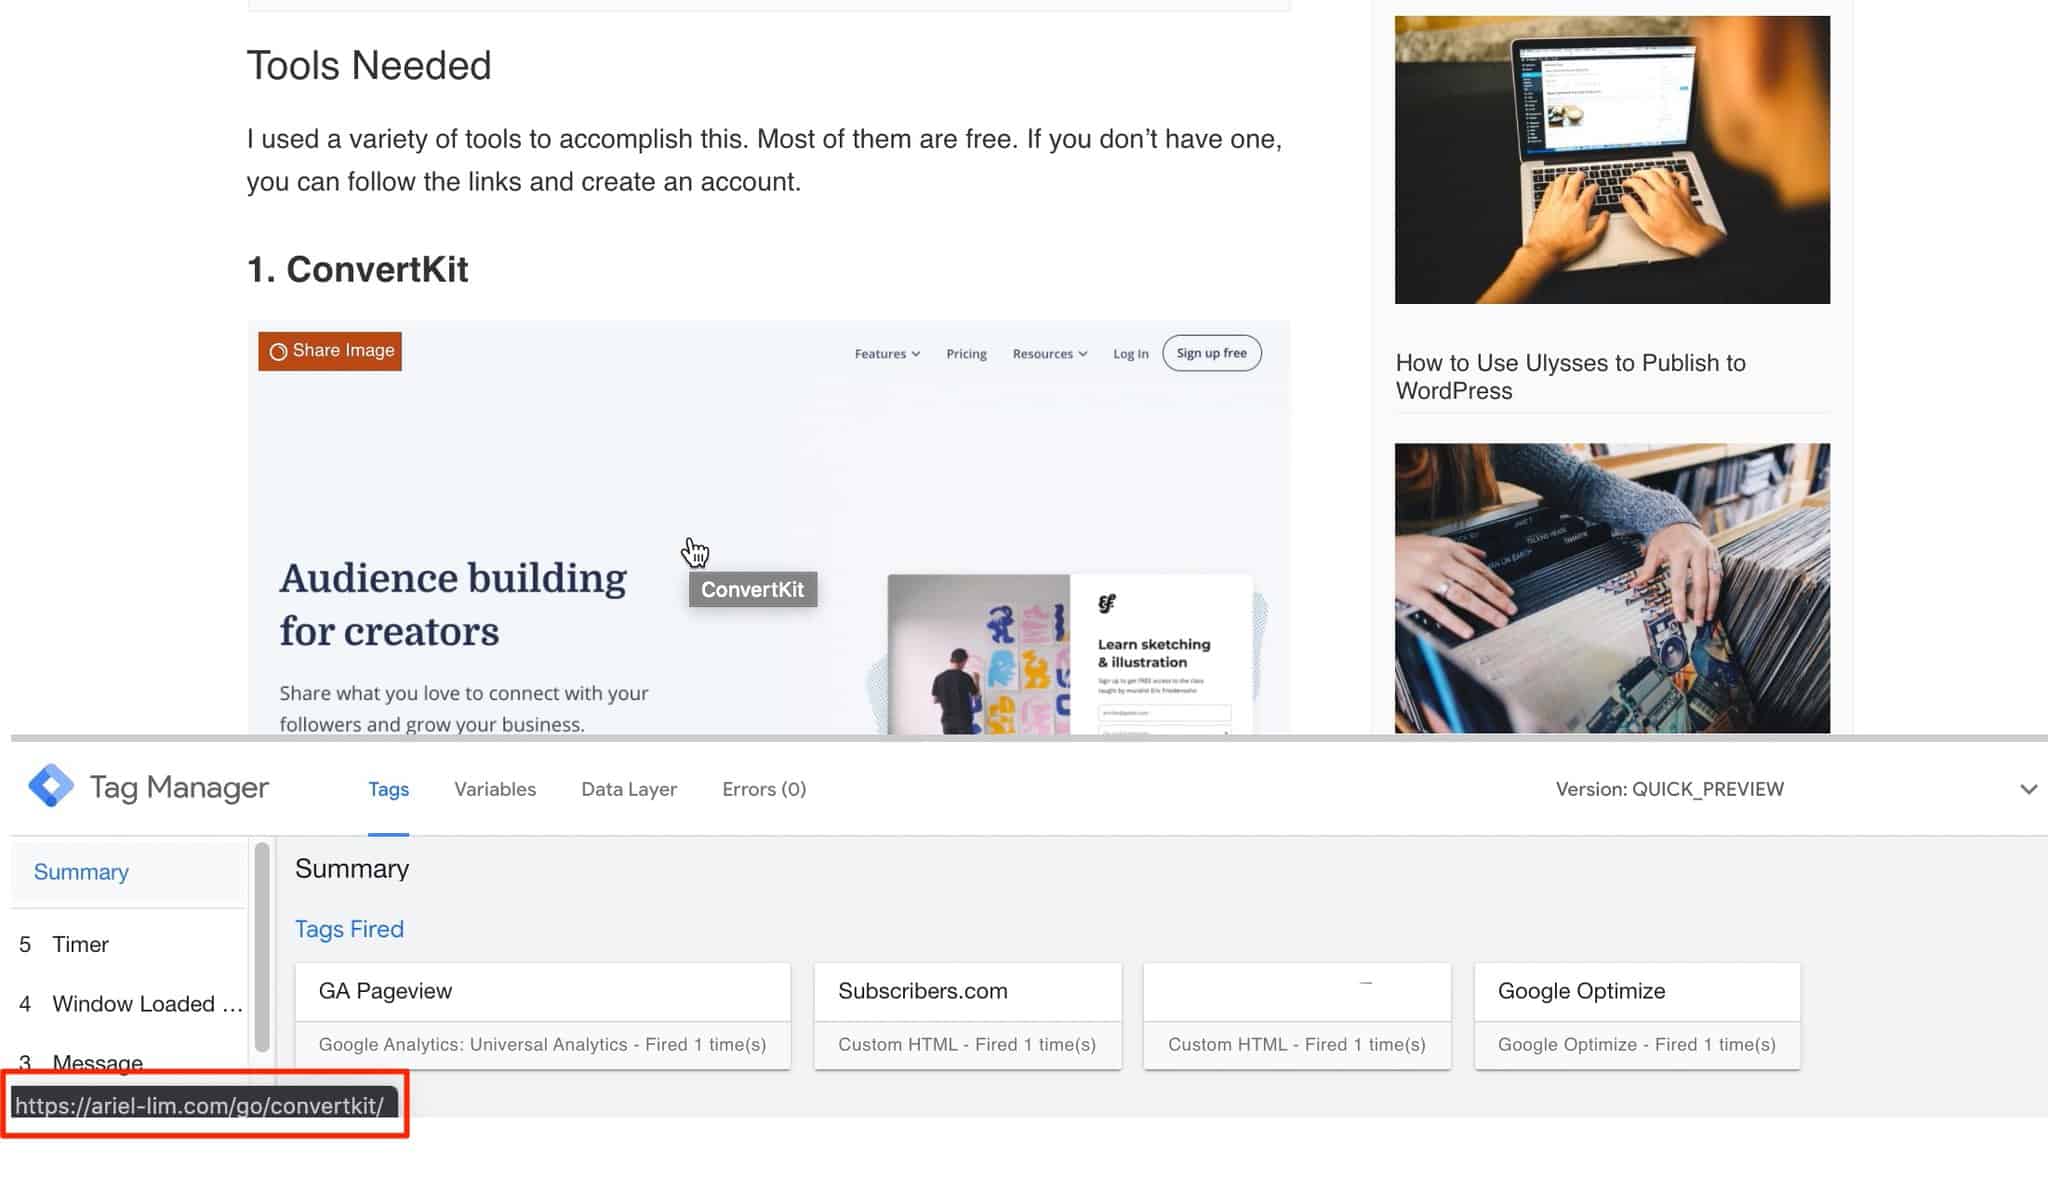
Remember the trigger we setup for affiliate link clicks? It should only trigger for clicks with URLs containing /go/.
In the example above, if I click on that, you will notice the Affiliate Link Click tag will trigger.
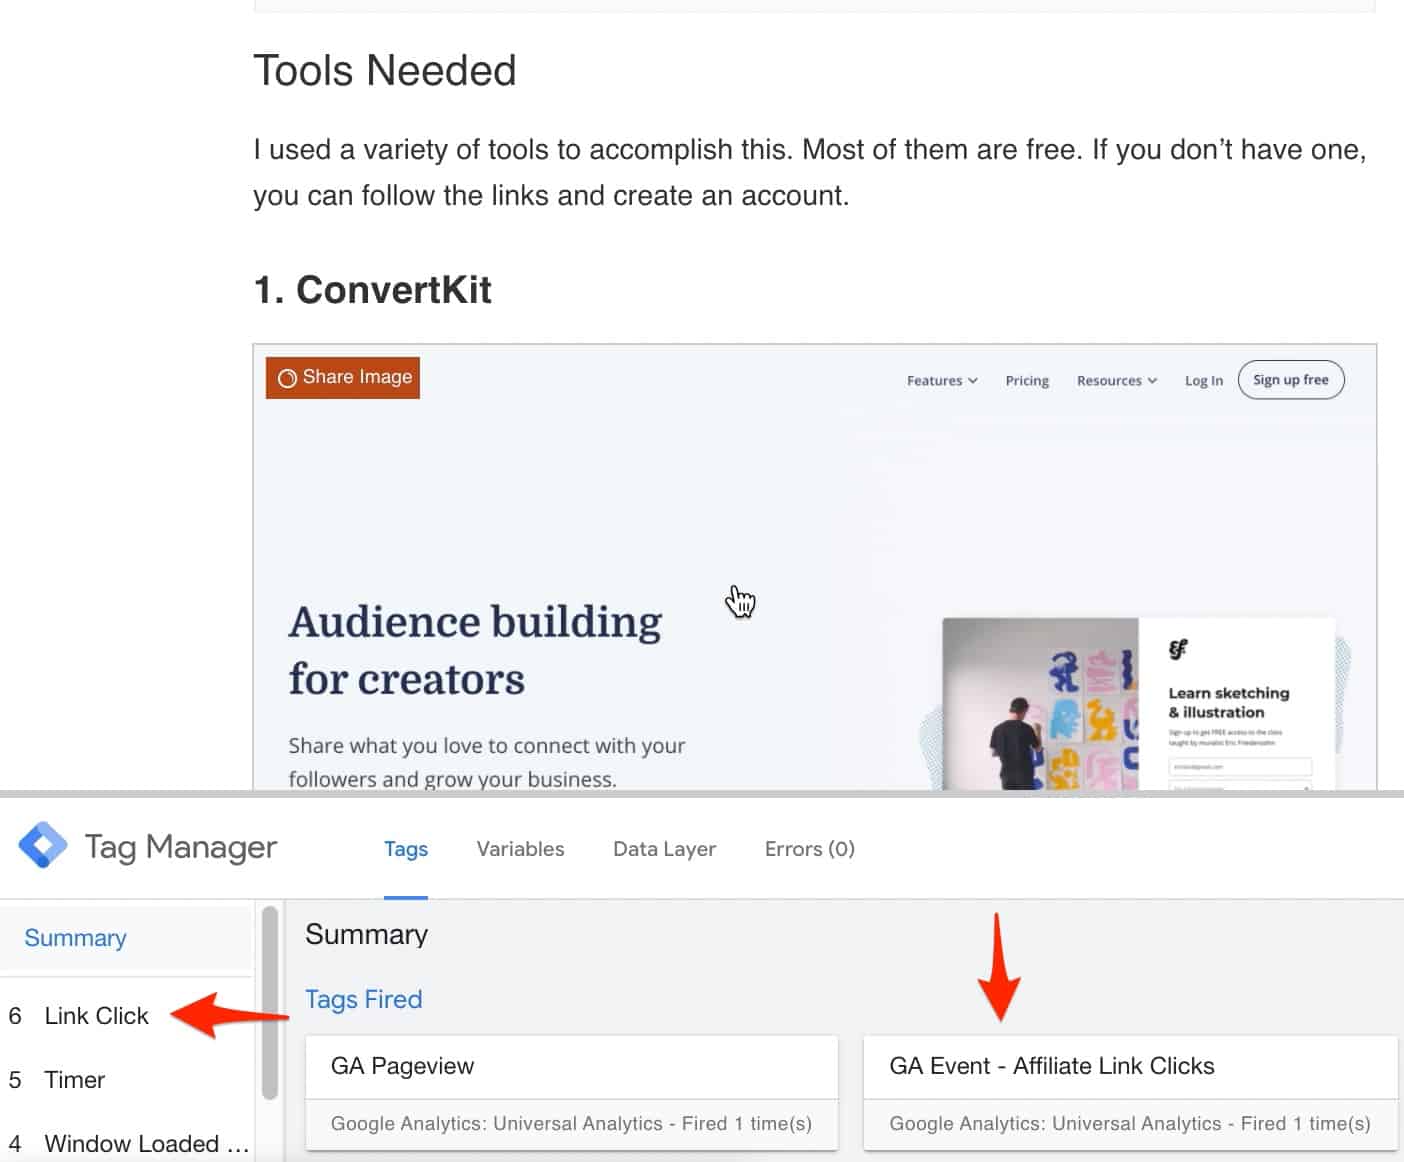
Try clicking on another link that’s not an affiliate link to see if the tag will also trigger. If it doesn’t, then you have configured it properly.
Now, go to the realtime reports in Google Analytics: Realtime > Events
If the event setup is correct, you should something that looks like the one below. You’ll see that the category and action you added in the tag is firing properly.
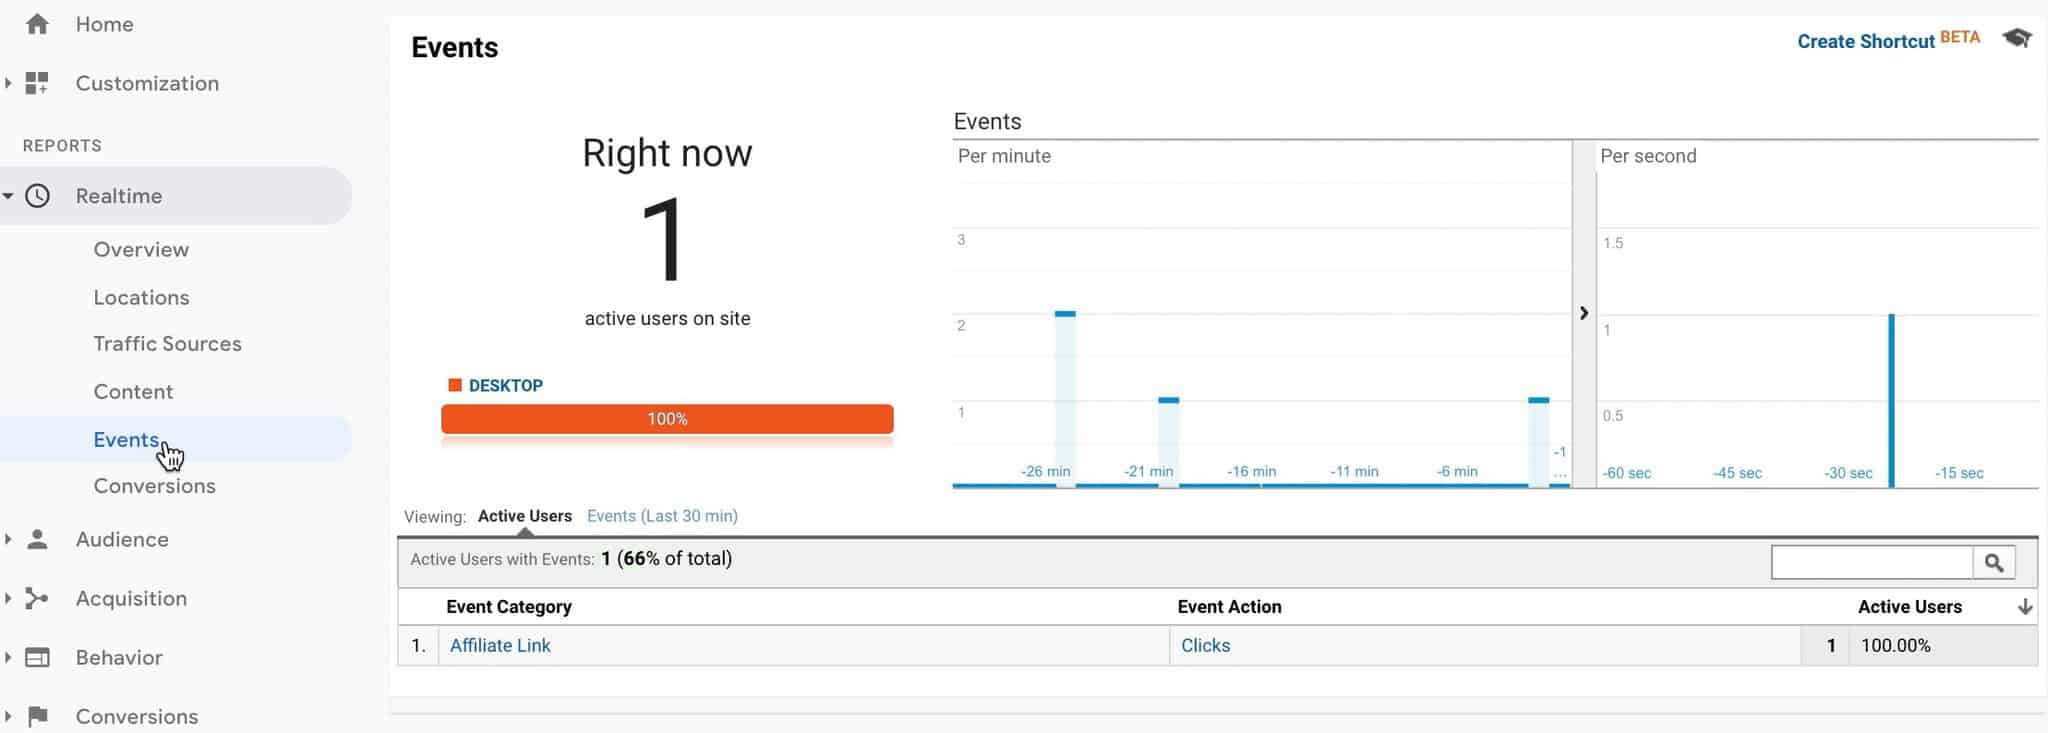
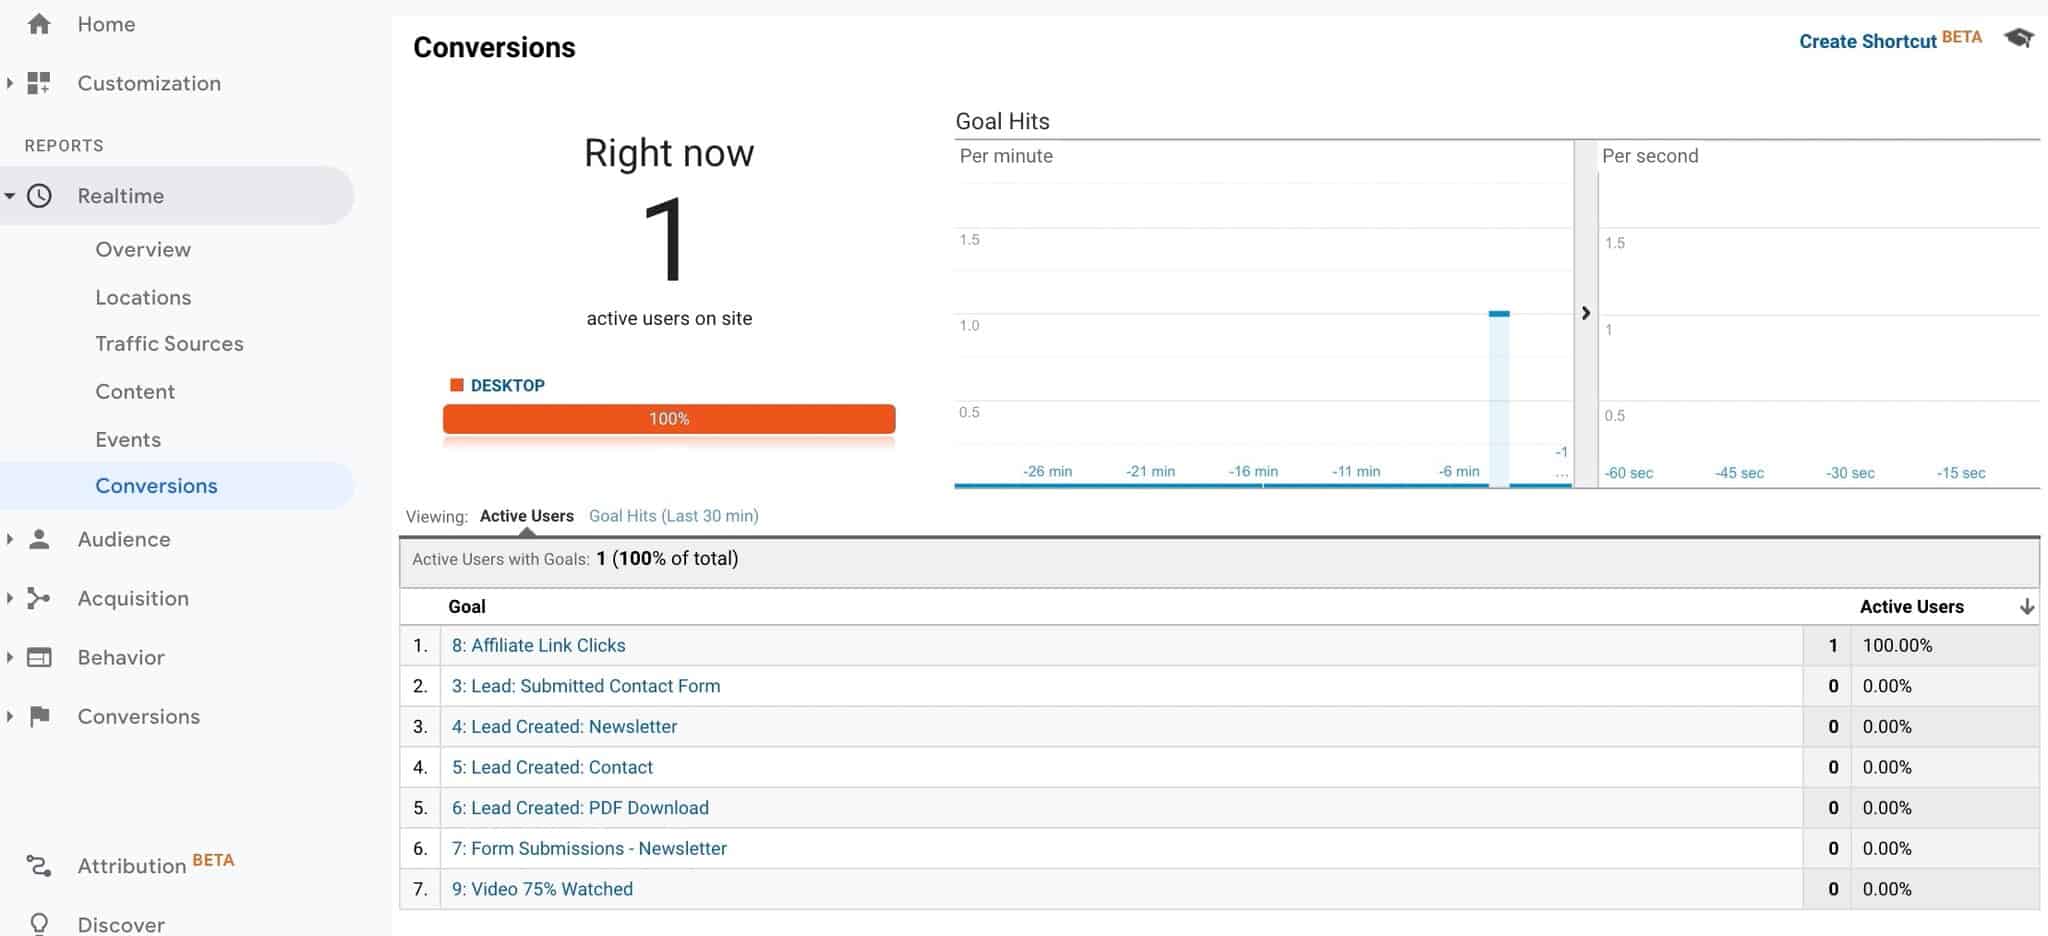
Now, let’s look at the goal conversion itself. Remember, not all events should be tracked as goals (like in the video example below), but in this case, the affiliate link clicks should trigger a goal conversion.
Head on to Realtime > Conversions and you should be able to verify this.
Verifying the Form Submit Tag
Head over to page on your site with a form. Try filling it out. You should see the event trigger in the debug panel.
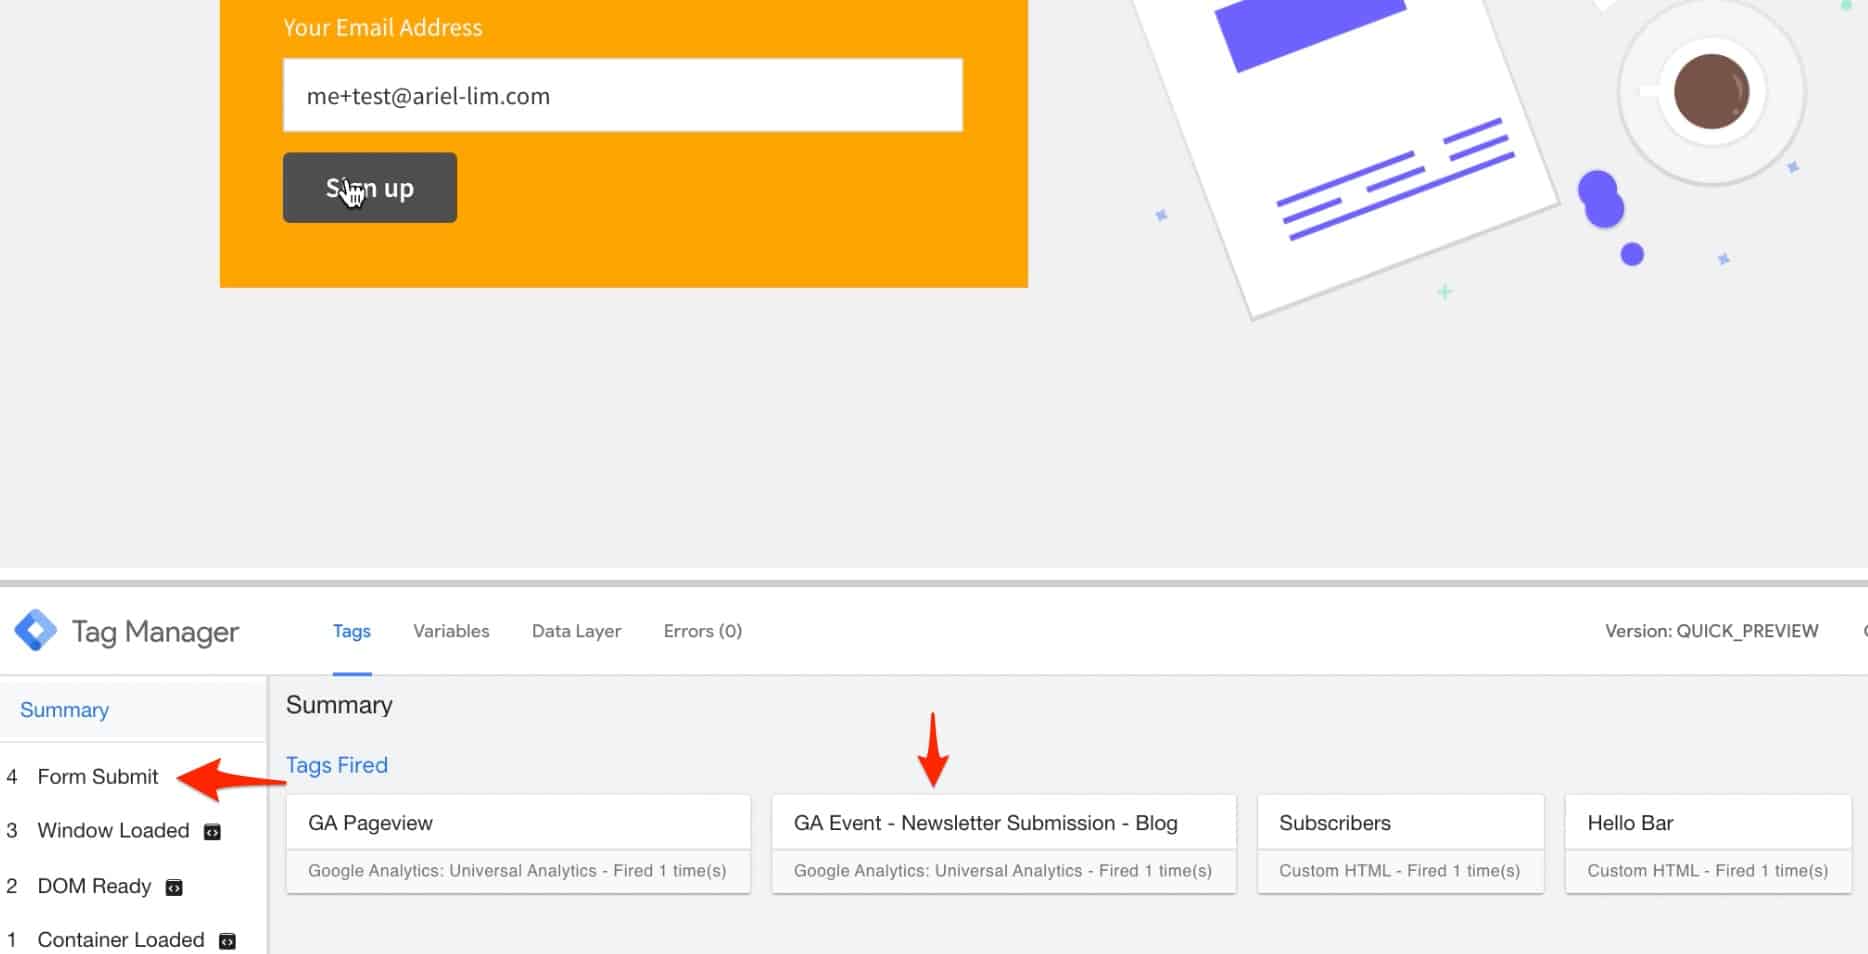
To double-check if the event fired properly, go back to the realtime reports in Google Analytics. Then head over to events.
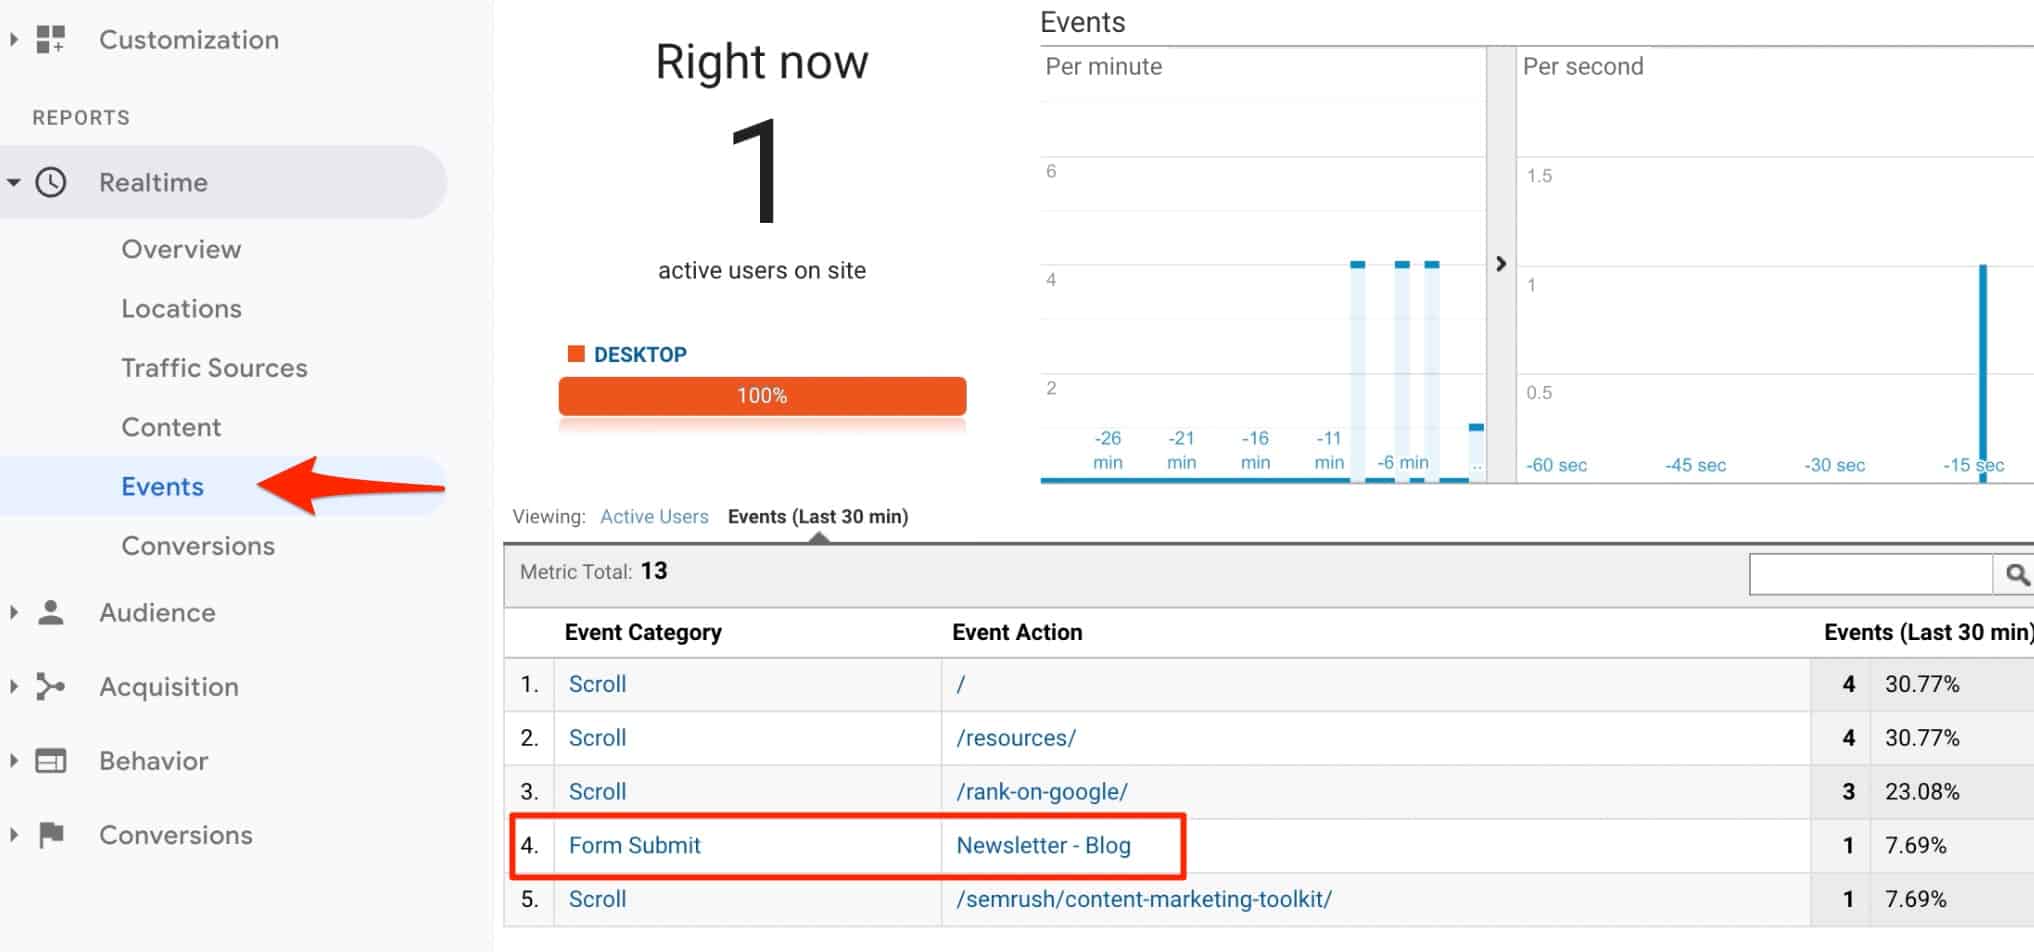
It should trigger properly depending on the naming convention you used. The last step is to check if this also triggered a goal conversion.
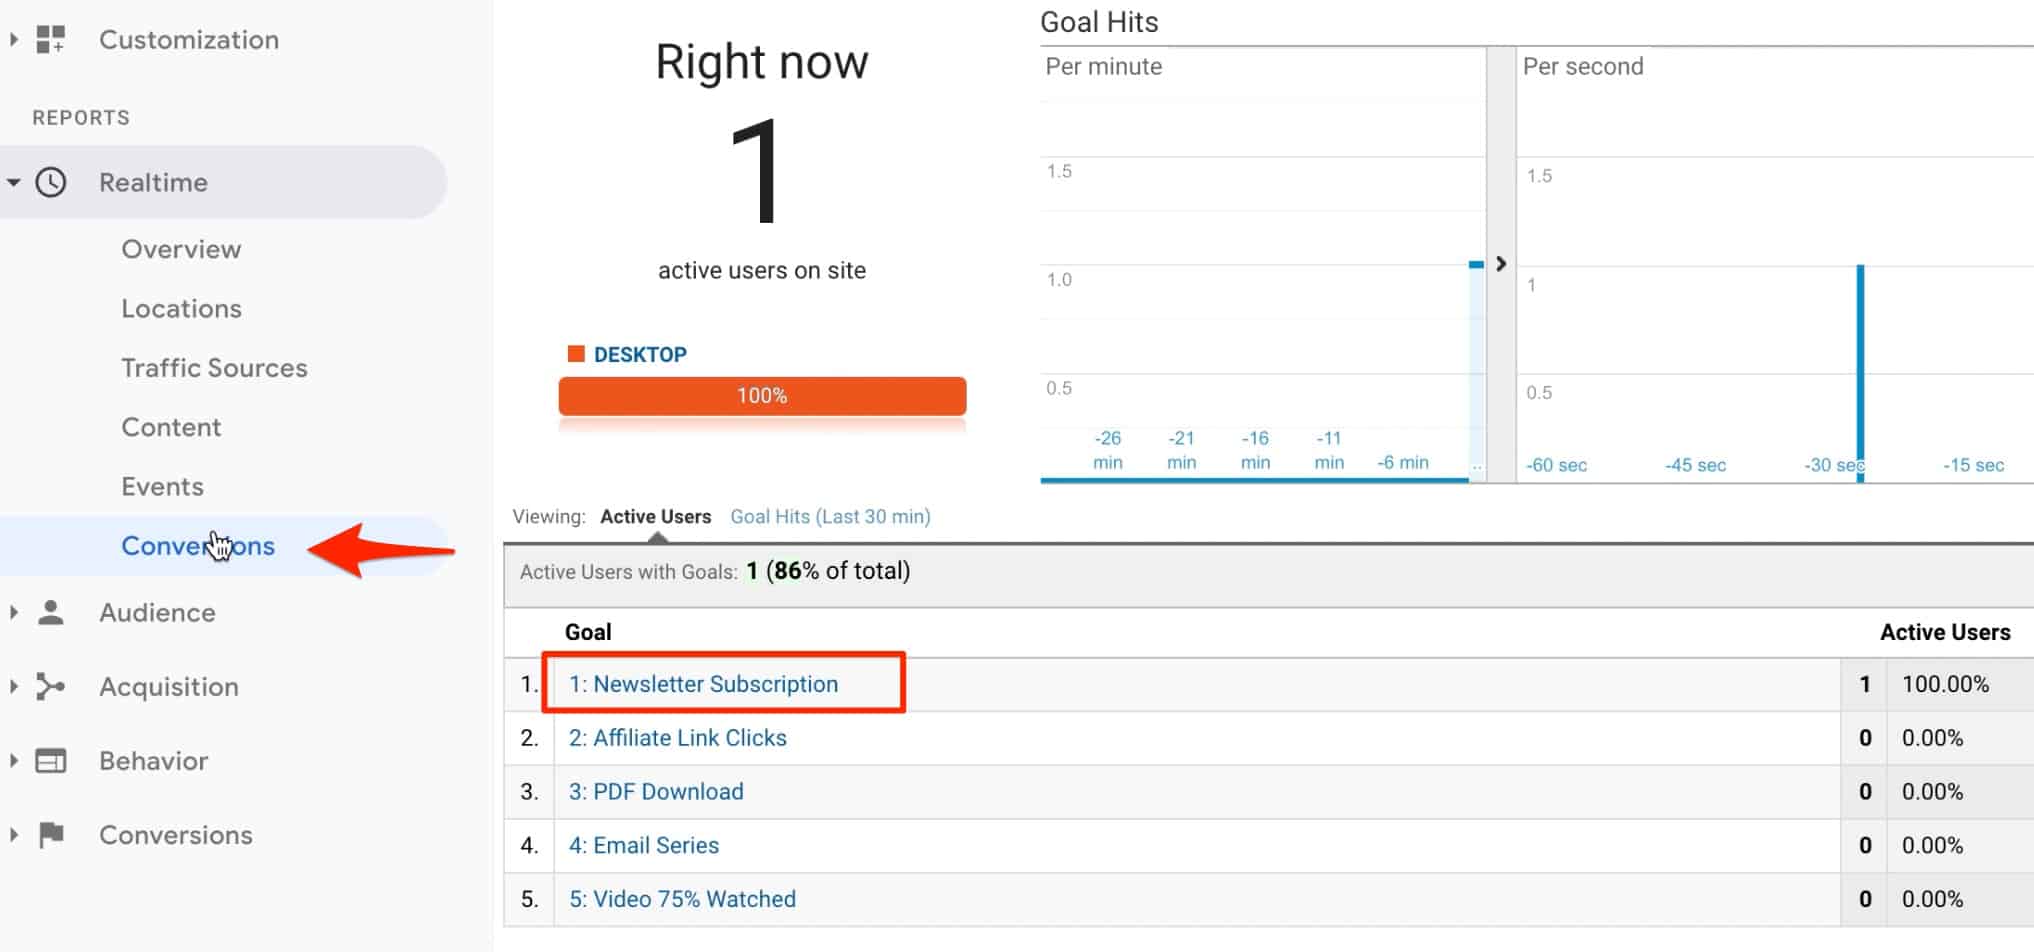
There you have it. You can use the same setup for all your forms. Now, you don’t have to rely on page loads in order to track conversions.
Verifying the Video Play Tag
Finally, for the video play, navigate to a page on your site which has some YouTube videos embedded. Play the video and you’ll see events populate the debug screen.
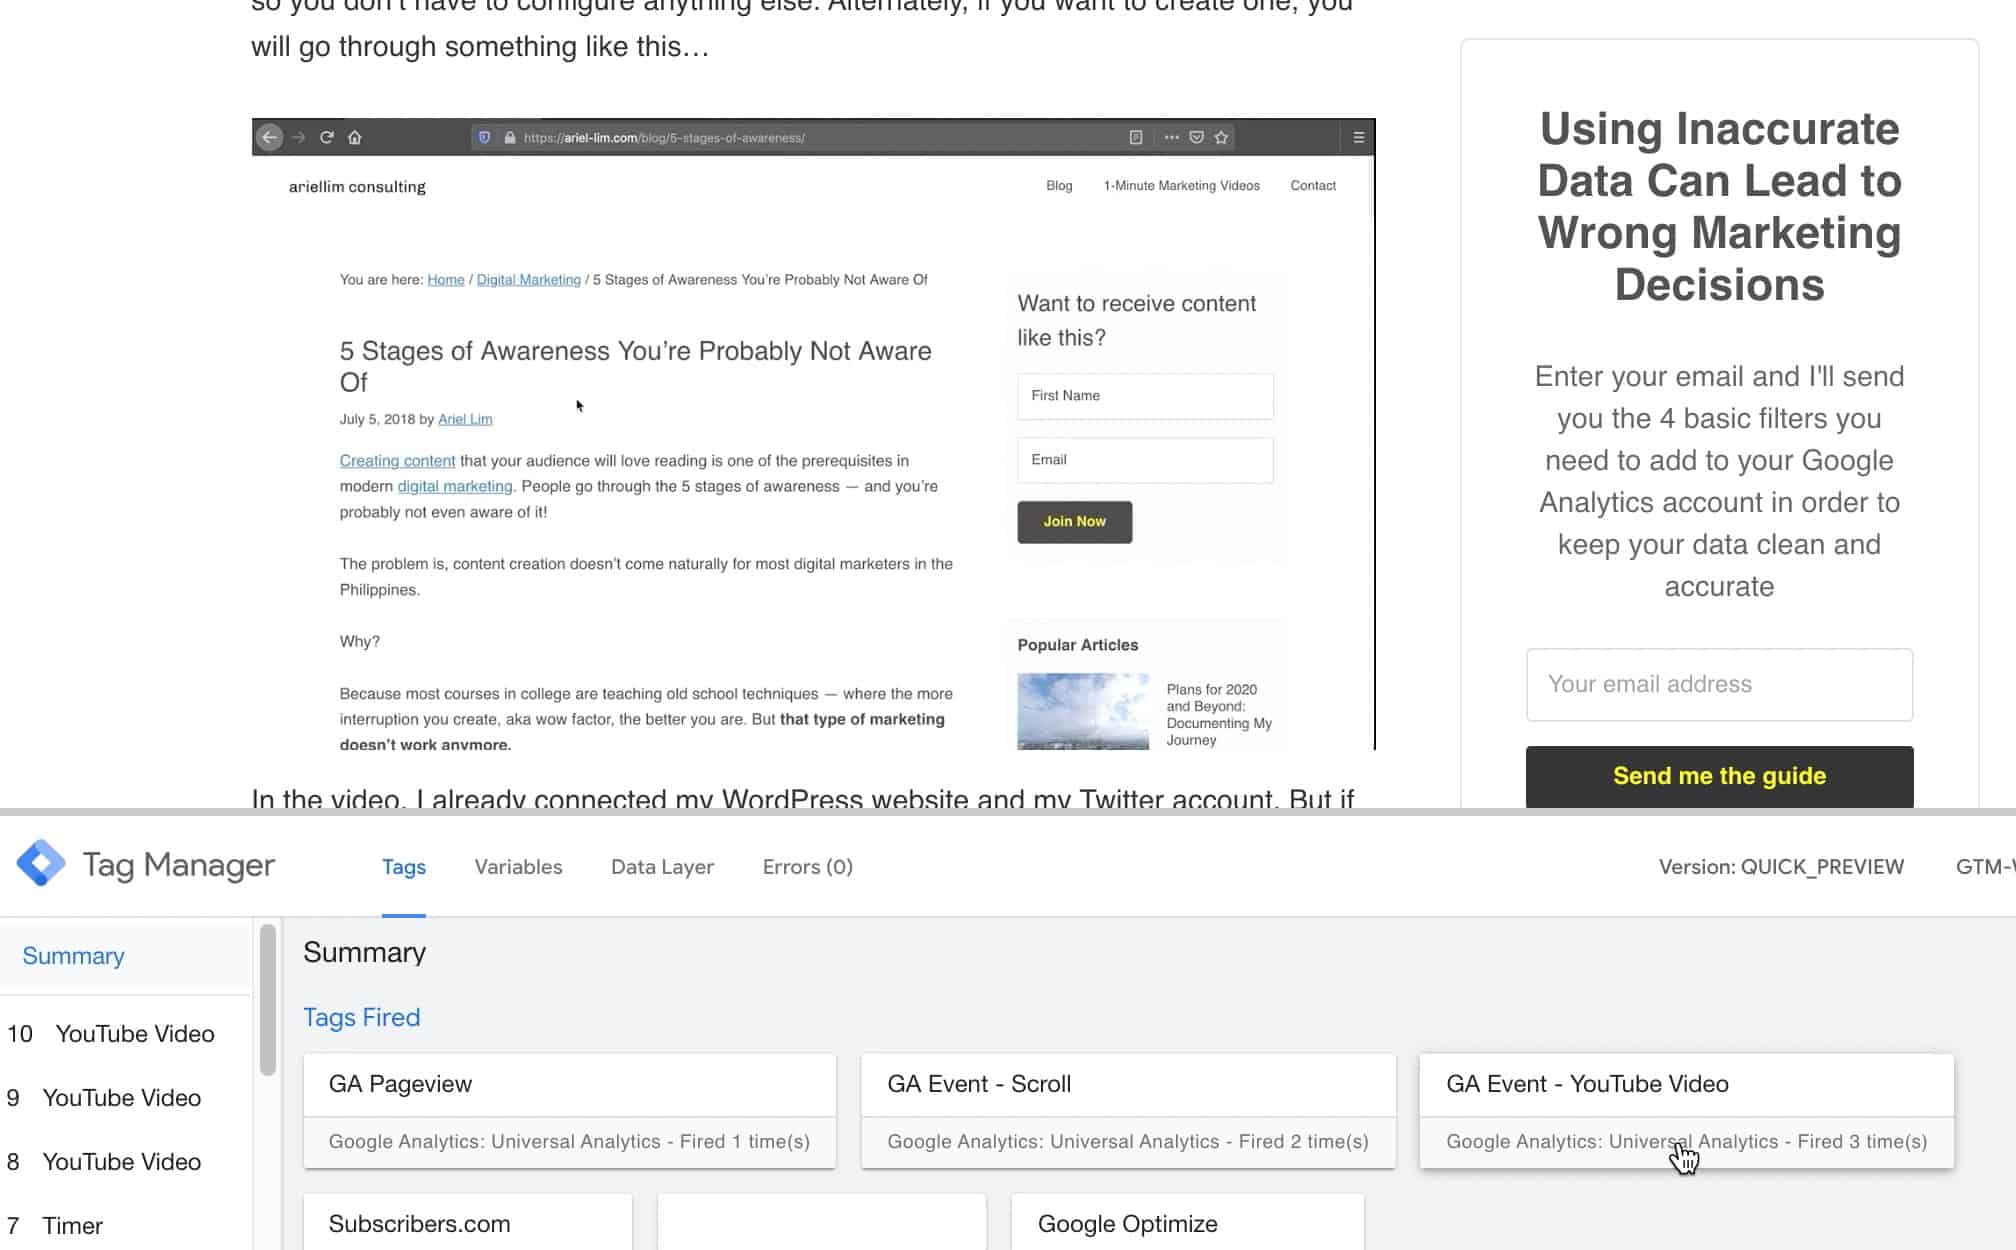
In the example above, the first YouTube Video tag that fired sends an event that the video is played. The next one is 10% watched. The next is 25% watched. Depending on what you configured earlier in the trigger, the tag will fire when those conditions are true.
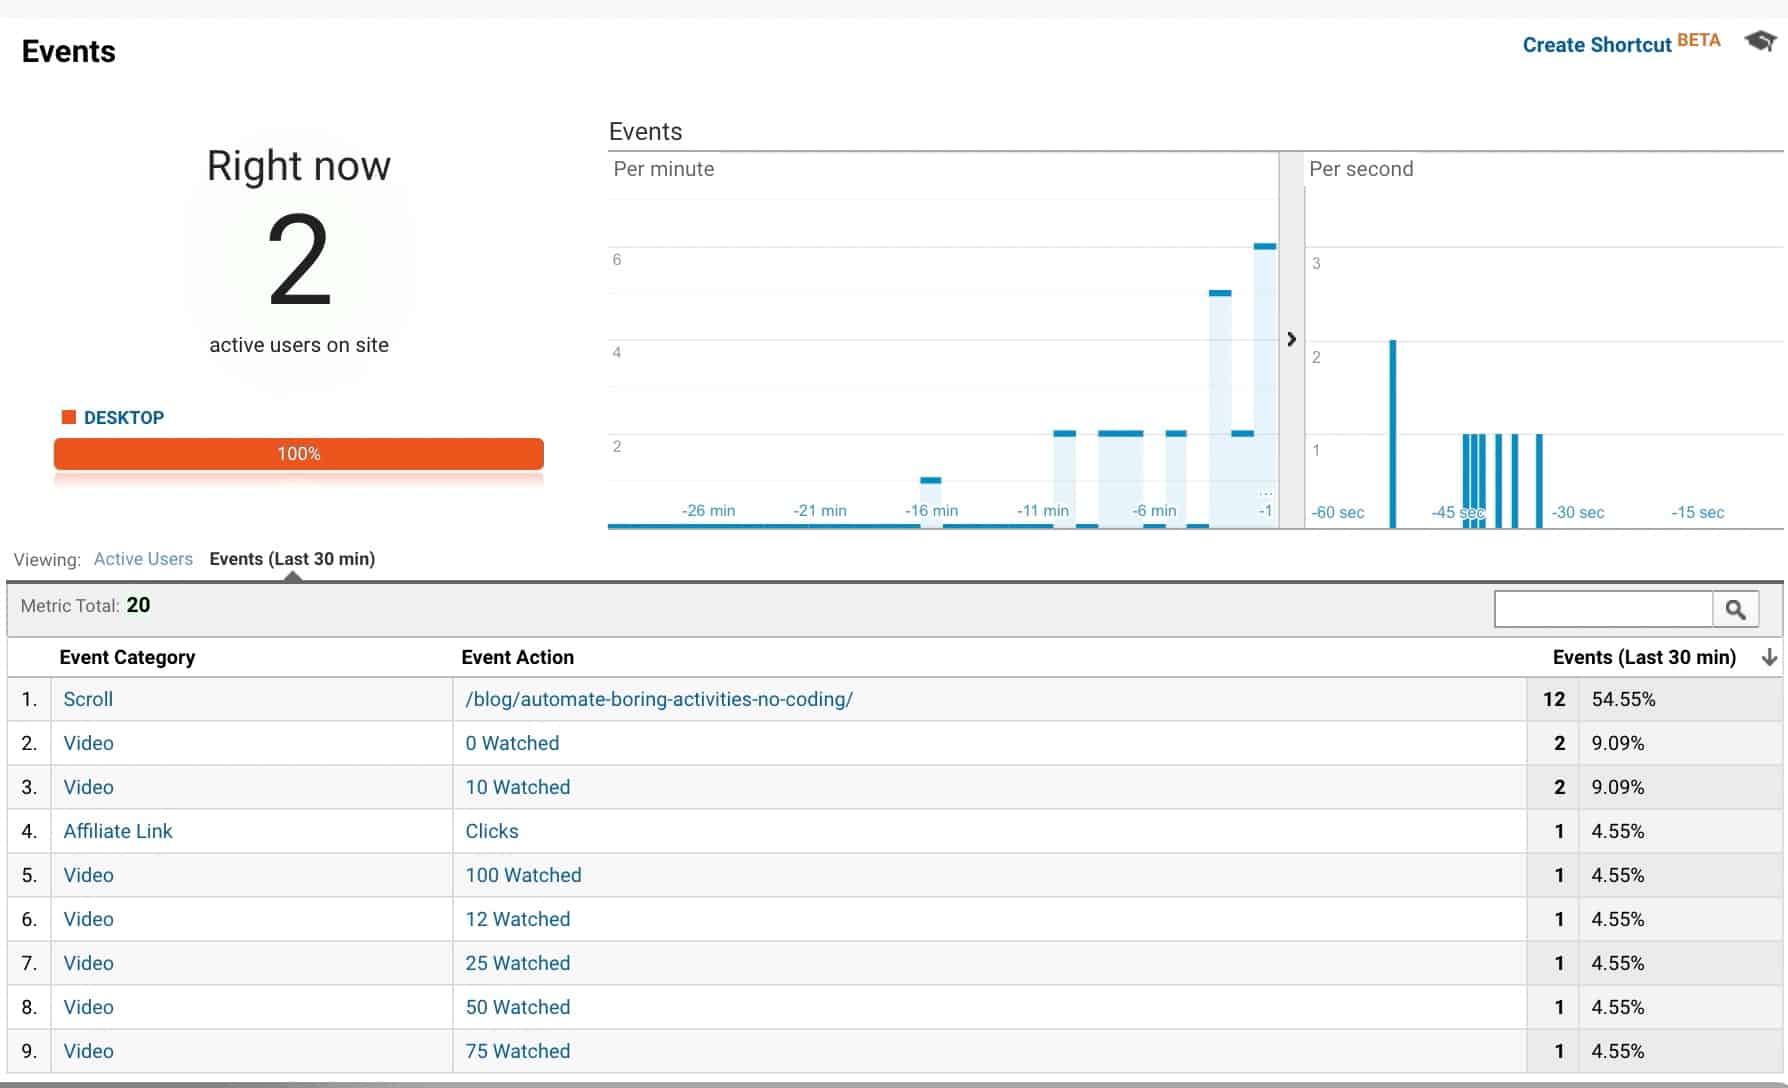
This means that our event is firing properly. Now, let’s verify if it triggers a goal conversion. Earlier, we set the goal to trigger when a person watched 75% of the video.
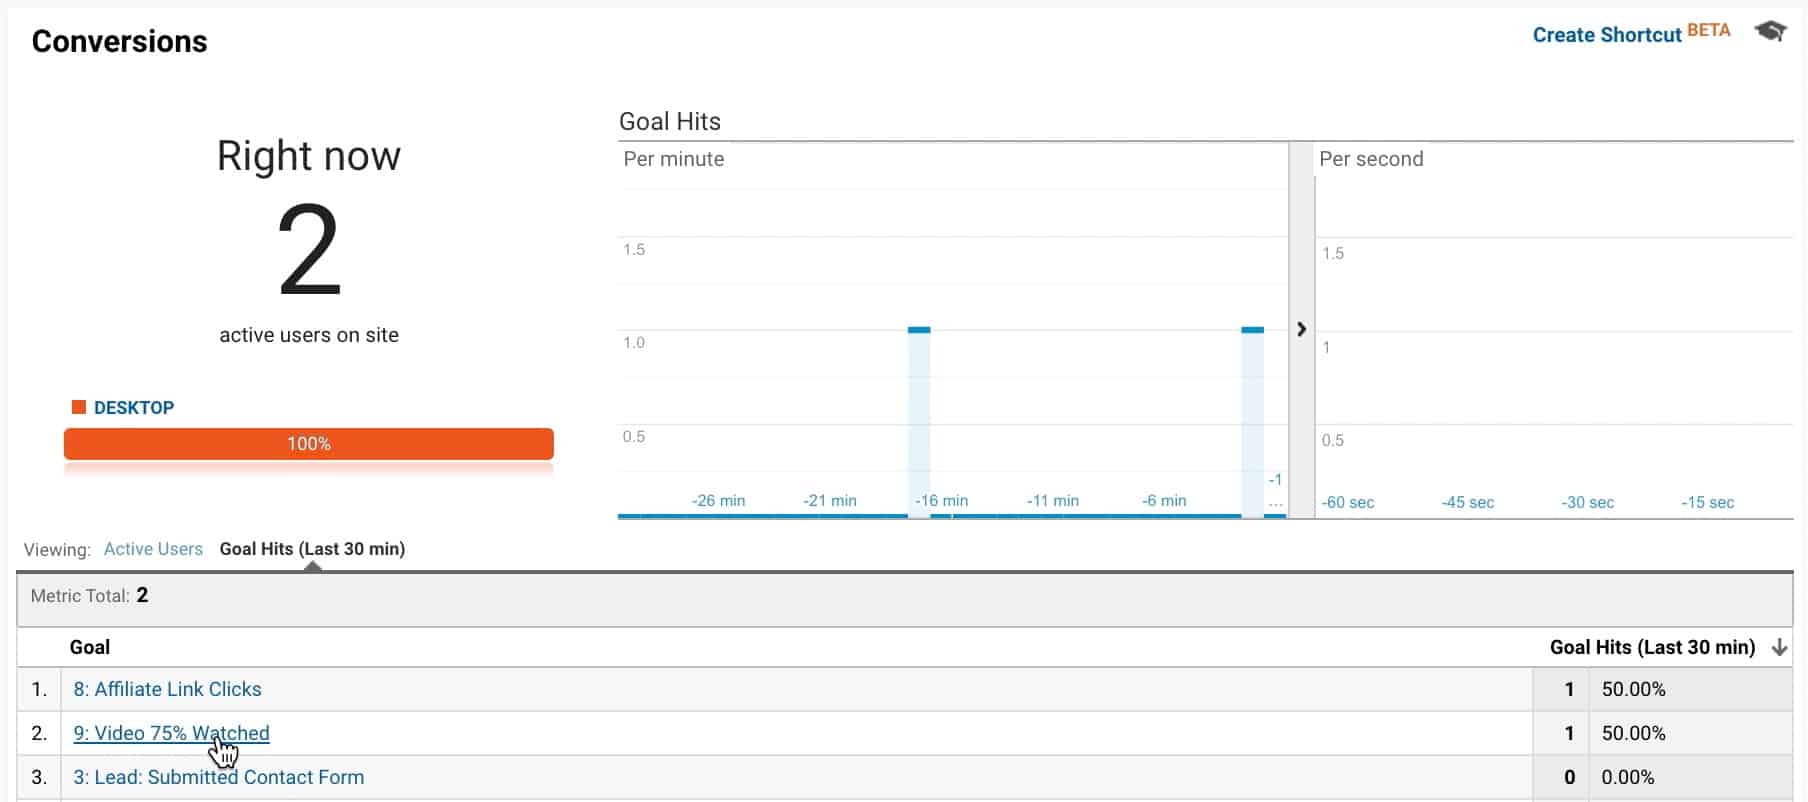
As you can see, even if there are multiple events triggered for the video, the goal is triggered only once. That means we setup our goal properly.
Publish Changes
After verifying that the tags and events are firing correctly, it’s now time to publish the changes you made in Google Tag Manager. Click on Submit at the top, enter a name and add some details as to what changes you made. Once done, click Publish.
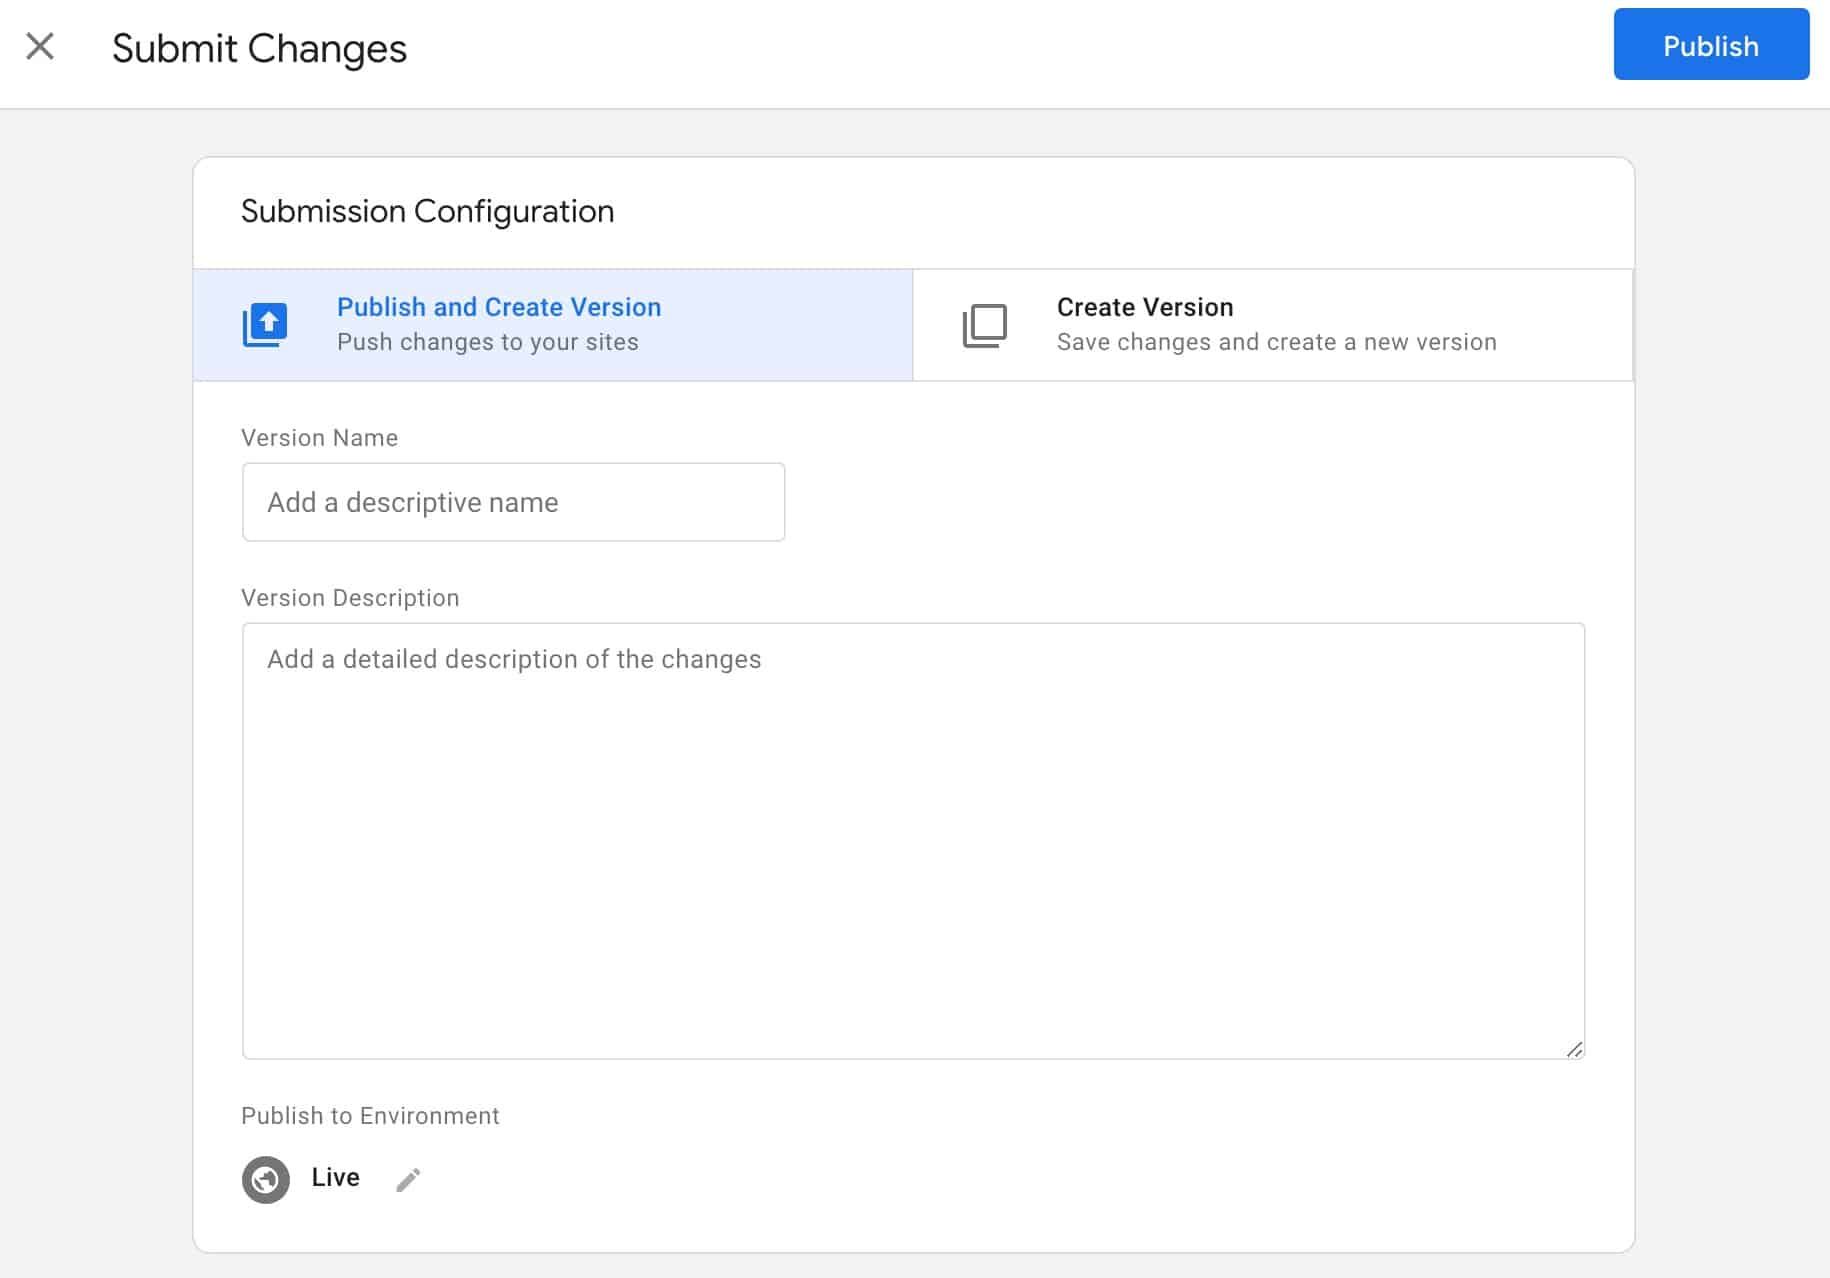
The variables, triggers, and tags you created will now be live on your website. Every time a visitor clicks an affiliate link, submits a form, or plays a video, events will fire on Google Analytics.
You can now view how people are interacting on your website. You can see this in Behavior > Events.
If the event matches the conditions for the goals you setup, conversions will also trigger. Once you have enough data, you can use this for your analysis later on.
Why You Should Stop Using Destination Goals in Google Analytics
Destination goals are triggered when it meets two criteria: your Google Analytics code is installed on that particular page and it loads.
The most common use cases for this are thank you pages for email signups or an order confirmation page. But what if your business model doesn’t rely on static pages? What if you also want to track other important actions on your website that don’t rely on page loads?
These are the limitations of destination goals.
Reason #1: Destination Goals Aren’t Accurate
If a page loads, your destination goal is triggered. If it loads again, that’s another goal conversion. This presents inaccuracies in the data reported. Here are several instances where can be an issue:
- The person reloads the thank you page
- Sends the page URL (e.g. via email or messenger or WhatsApp)
- Bookmarks the page then visits it again
- The browser autocompletes that URL
As you can see, there are various ways your destination goal can be triggered which leads to inaccurate reporting.
Reason #2: Tedious to Maintain
In order to minimize inaccurate data, a best practice for destination goals is to add a noindex tag on the page. That way, visitors can’t find it on search engines.
Some resources also say that you shouldn’t add your PDF download links on the page itself. Instead, use a copy to say that you’ll receive it via email. That way, visitors will have little reason to bookmark the page.
Then again, most websites use a customized thank you page with video sales letters. If people like the contents of the video, they can still go back to it.
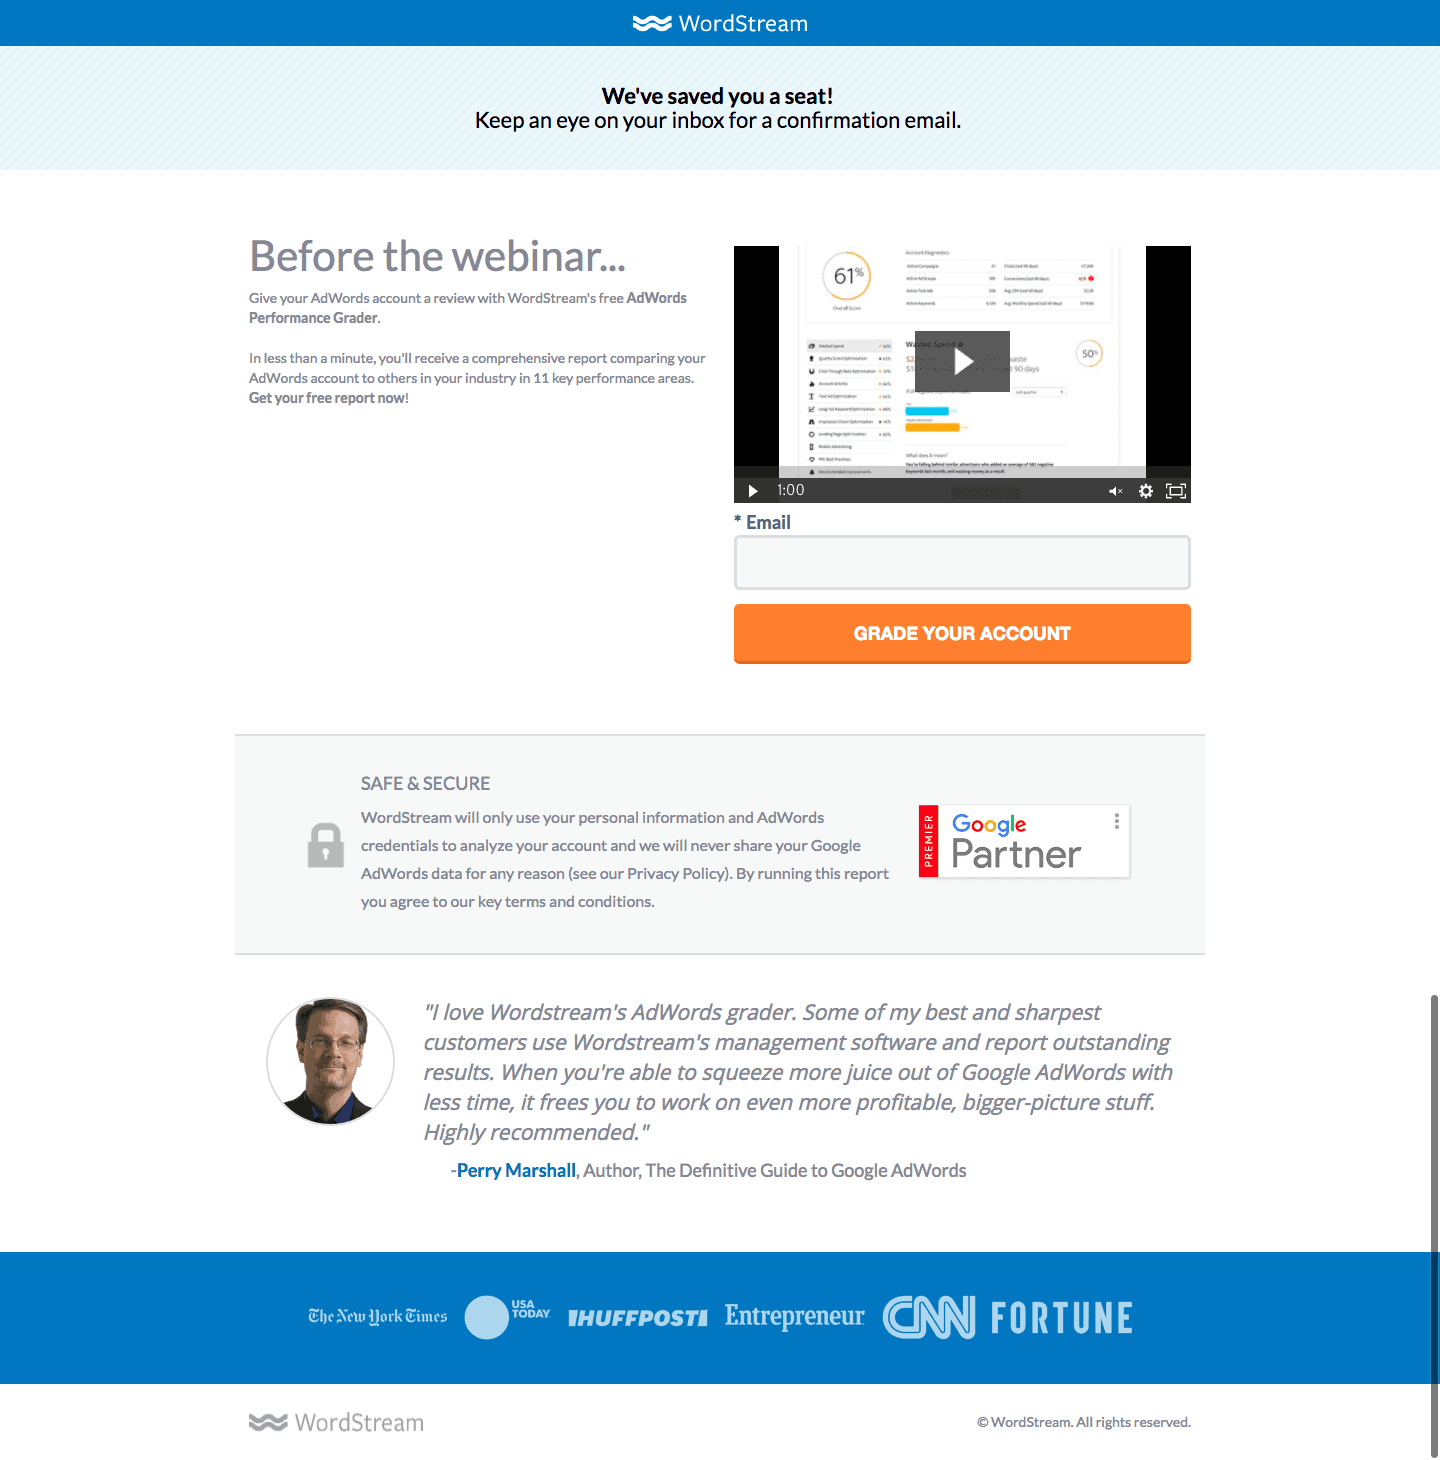
You’ll also realize that if you want to track conversions, you’ll have to use multiple destination goals. Unless you know how to use REGEX or come up with some form of URL convention for your pages, you’ll soon run out of “goal slots.”
Reason #3: Very Limited Use Case
Destination goals aren’t flexible. As mentioned earlier, they trigger when a page loads. That means everything that happens on your site that doesn’t involve another page loading within your website isn’t track.
Here are some examples of those:
- External link clicks
- Switching between tabs
- Playing videos
- Clicking on interactive content
- Toggling accordions and the like
If your business model is like the examples I shared earlier where you also want to track affiliate links, form submissions, or video engagement, then tracking events are a better option for you.
Over to You
In this guide, I shared three examples of how you can create events and use them as goals in Google Analytics without touching your code. Events are more flexible. They give you more insights as to how users engage on your website.
Are you ready to start tracking events? Or will you still rely on destination goals for your conversion?
Either way, I’d love to know below. Or if you have other questions, feel free to tweet me here.
