Over the holidays, I have spent countless hours trying to speed up my website. And that experience was very challenging. But right now, it was well worth it. Take a look at the Google PageSpeed Insights scores of my website — mobile AND desktop.
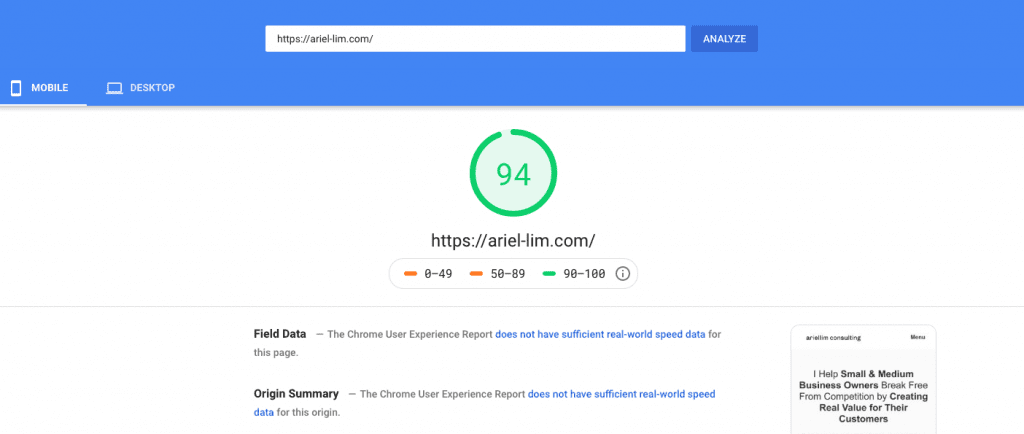
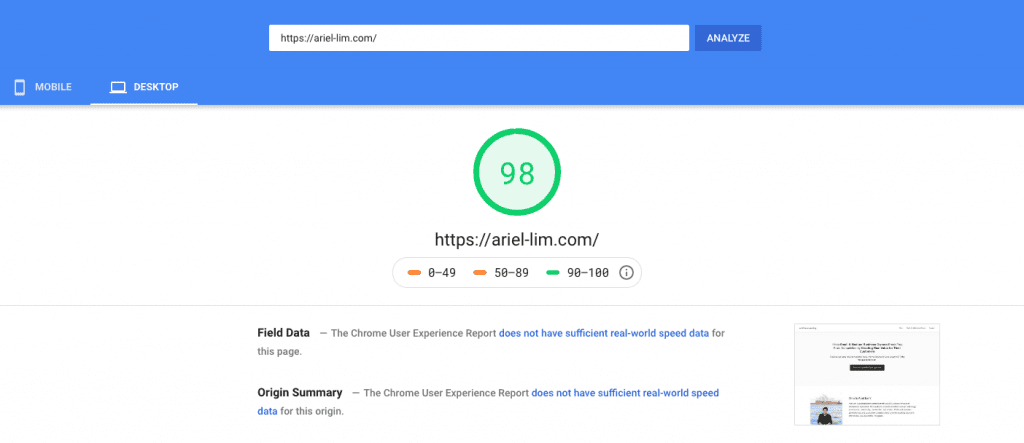
After spending a lot of time (possibly 100+ hours) tweaking my site to improve user experience, I finally made it. I saw the green light. 90+ scores on both mobile and desktop version in the Google PageSpeed Insights. And my optimizations haven’t even finished yet.
Click on any of these to jump straight to that topic
- My Journey to a Fast Website
- Disclaimer
- My Tech Stack
- Optimization Tweaks You Can Do to Speed Up Your Website
- Basic Tweaks to Get to 90s on Google PageSpeed Insights
- Reduce Your Plugins
- Install Google Tag Manager
- Remove Emojis if You’re Not Using Them
- Remove Query Strings from Static Resources
- Remove Google Fonts
- Disable Dashicons on the Frontend
- Use a CDN
- Configure ShortPixel Adaptive Images with Cloudflare
- Additional Configurations Inside Autoptimize
- Conclusion
My Journey to a Fast Website
I started this website in 2014. I was working in corporate doing digital marketing. I was already writing articles and managing the website for the company. I also previously started a website in 2011 for a company I started but had to close down. So I somehow knew what I was doing.
Over the years, I wrote about different topics. Finally, in mid-2019 I decided what I wanted to do.
The problem was I was spending a lot of time working with clients so I didn’t have spare time to work on my own website. Of course, this was not ideal. But in my case, it still works. I get my clients from a different channel so even if I neglected it for a while, I can still make it work.
But during the holidays, I had some downtime. I sat down, visualized what I wanted, thought about how to execute, and just did it.
This kicked off my article on my plans for 2020 and beyond.
This led me to this version of my website. If I remember it correctly, this is the 4th iteration already. So that would make it like I change my website once every year.
The one thing I didn’t pay attention to back then is website speed and how it affected user experience.
Working primarily from the Philippines, my internet speed sucks. Not only is it slow, but it’s also unstable. So, I really didn’t know how fast looks like. Plus, I’m only writing stuff about my own experiences and not getting any traffic, why bother right?
But after some research on the topic, I’m convinced that speed plays a very important factor, especially if you want to grow your traffic and rank your website higher.
And that’s what I’ll be sharing in this article.
Prerequisites and Warnings
A word of caution.
I am not a developer. I’m just someone who knows a little bit of code because it is essential to know them for my line of work.
Also, what I’m sharing are my experiences only. So, it might not work for your specific circumstance.
Lastly, before making any changes, make sure you perform a backup of your website. Sometimes technology fails us. So, if you’re making tweaks to your website, especially with the code and plugins, it’s best to create a backup before making the changes. That way, if something got messed up and you can’t fix it, you can quickly restore that backup.
Technology Stack
With that out of the way, I’d like to share my entire tech stack. And no, these are not affiliate links.
1. Domain
I bought my domain using GoDaddy. They don’t need any introduction on domain names.
If you’re getting a new one, I suggest going for the longer-term (2+ years instead of 1 year) to get a better rate.
I also recommend including a private registration in your purchase to protect your privacy.
2. Web Host
I’ve been using InMotion Hosting as my web host from the beginning. I’m also on the shared hosting plan and have just moved up from the most basic plan (called Launch) to the current Pro plan.
This is important to get it right because your web host is where your website is stored. What that means is how fast your website depends largely on them.
3. WordPress
I’m currently using the latest WordPress version 5.3.2.
It’s also worth noting that i’m using the self-hosted WordPress setup, more specifically the WordPress.org version. This is entirely different from the WordPress.com version.
Here’s a good resource to explain the difference between the two.
4. Genesis Framework and Sample Child Theme
I am also using the Genesis Framework and the Sample Child Theme. It’s a well-known theme and has tons of great reviews.
As a quick explanation, your WordPress website needs a theme. This theme dictates how your website looks like. That is your main theme or the parent theme.
But sometimes, you want to tweak the design of your website. You want to add a certain functionality or make it brand-specific. That’s where child themes come in. You make the changes in the child theme instead of the parent theme. Why? Because if you update the parent theme, most often, your customizations won’t transfer over.
Here’s a great resource to help you understand this topic more.
Speed Up Your Website with These Optimization Tweaks
Generally speaking, the best way to make your website fast is to focus on the must-have’s rather than the nice-to-have’s. Most people obsess about the graphics — or how the website looks like —but sacrifice the functionality of the site.
Oftentimes, when you add pretty things like animation, custom fonts, and all those stuff, your website takes longer to load. And if you want to add these functionalities yourself to a WordPress website, that’s usually done through a plugin.
Unless you can hire an awesome developer, or want to spend a lot of time tweaking and testing, follow these tweaks and let’s make slow websites a thing of the past.
8 Steps to Make Your Website Faster 👈 Start Here
In this article, I described the basic setup on how I got a 98 score on Google PageSpeed insights.
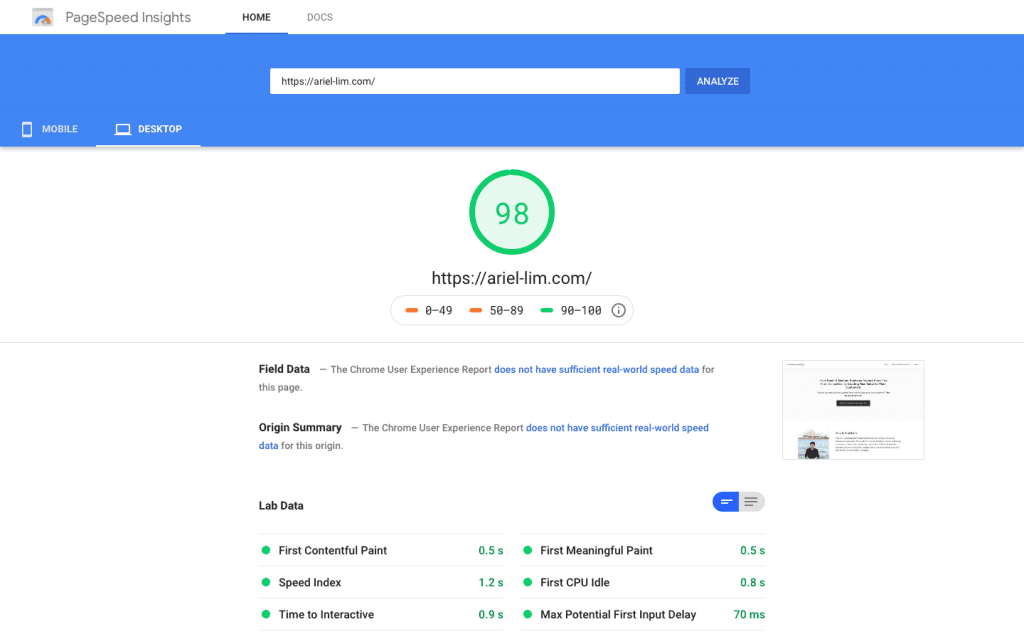
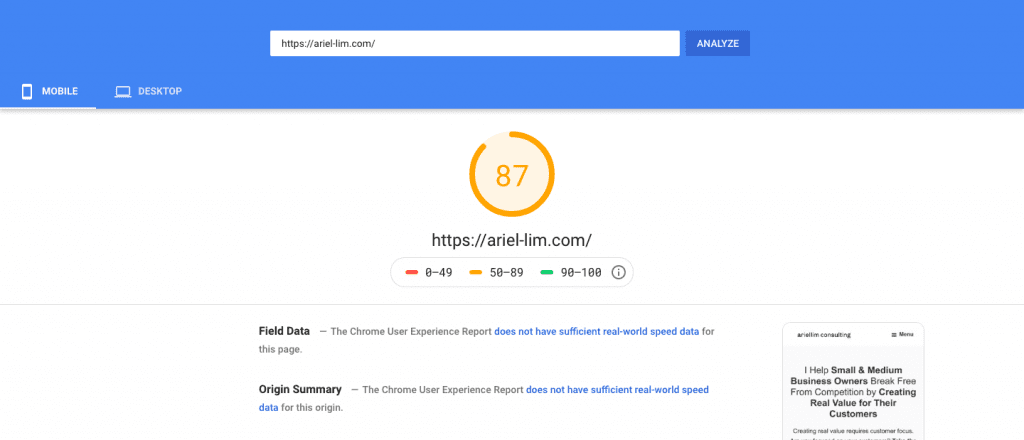
But the problem was it was only for desktop. My mobile version was still in the 80s.
It wasn’t much of a problem really, because my articles are AMP-optimized. But the rest of the site wasn’t. So, I knew I had to do some more tweaking.
In the article, I shared the following:
- How to benchmark your website speed
- Which two plugins to install that will immediately make your website fast
- Showed you the comparison between another popular set of optimization plugins and their results
- And yes, the new ones I recommended are faster and easier to install
- The settings for the new plugins
I highly recommend you start there and follow the step-by-step process I outlined. Once you’re done there, come back here.
And now for the ironic part…
Reduce Plugin Usage
As much as possible avoid using plugins. Why?
Because they make your website load slow. Generally.
Now, there are hundreds of thousands of plugins you can use. And they have different functionalities. Some load the front-end (like page builders) while some are focused on the back-end (like automatic backups).
But it really depends on your business. The most important part is you take the time to really assess if you need it.
Unless it’s absolutely necessary, don’t add or use one. And don’t just deactivate them. Delete them.
Finally, if there is a way to add several lines of code to achieve the same functionality as a plugin, I recommend you do that instead.
And that’s what’s going to be the focus below—to help each of your web pages load faster.
Install Google Tag Manager on Your Website
Adding Google Tag Manager to your website is one of the first things you need to do on your website. You can do this via a plugin, but if it’s relatively easy to add the code than to rely on a plugin. Go that route instead.
Before anything else, this actually won’t directly speed up your website. Rather, it will help later on once you add several software to your site by making them load asynchronously. This is very important because when you do website speed tests, you will often see a portion called eliminate render-blocking resources. The way to overcome that is to remove what is causing it. If you can’t, load it later or load it asynchronously.
The tools and apps available today that allow you to do awesome things on your website is done by adding a tracking code (or code snippet) on your website. Here’s a list of the popular software used on websites today:
- Analytics and Performance Tracking
- Google Analytics
- Facebook Pixel
- Ads and Remarketing
- Facebook Pixel
- Google Ads
- A/B Optimization
- HotJar
- CrazyEgg
- Google Optimize
- VWO
- CRM and Email Marketing
- HubSpot
- MailChimp
- Autopilot
- Live Chat and Chat Bots
- ManyChat
- Intercom
- Mobile Monkey
And a whole lot more.
If you are not technically-savvy, you wouldn’t want to keep editing your website’s code and hope nothing will get messed up. Of course, you can have a developer/programmer do it for you, but it might take time and cost you money. Just follow these 3 simple steps to adding GTM to your website and you’ll be on your way.
If you know what you’re doing, just copy-paste the code below on your functions.php file, then replace the GTM-ABCDEF with your own GTM ID. If you need specific step-by-step instructions, check out the article above.
// Add Google Tag Manager code in <head>
add_action( 'wp_head', 'google_tag_manager_head' );
function google_tag_manager_head() { ?>

    <! – Google Tag Manager -->
<script>(function(w,d,s,l,i){w[l]=w[l]||[];w[l].push({'gtm.start':
new Date().getTime(),event:'gtm.js'});var f=d.getElementsByTagName(s)[0],
j=d.createElement(s),dl=l!='dataLayer'?'&l='+l:'';j.async=true;j.src=
'https://www.googletagmanager.com/gtm.js?id='+i+dl;f.parentNode.insertBefore(j,f);
})(window,document,'script','dataLayer','GTM-ABCDEF');</script>
<! – End Google Tag Manager -->

<?php }


// Add Google Tag Manager code immediately below opening <body> tag
add_action( 'genesis_before', 'google_tag_manager_body' );
function google_tag_manager_body() { ?>

<! – Google Tag Manager (noscript) -->
<noscript><iframe src="https://www.googletagmanager.com/ns.html?id=GTM-ABCDEF"
height="0" width="0" style="display:none;visibility:hidden"></iframe></noscript>
<! – End Google Tag Manager (noscript) -->

<?php }
Remove Emojis if You’re Not Using Them
Unless you are using emojis on your website, you don’t need them.
But if you’re not using them, there’s nothing to remove, right?
Not necessarily.
Every website is made up of three parts: html, css, and javascript. You don’t need to know these things, but it’s helpful if you do. A very simple explanation for what they are is this: html makes up the text, css determines how they are displayed, and javascript controls the special effects.
If you are using WordPress, some of those files loaded automatically, including emoji support. And that adds up to your load time. In order to prevent them from loading, login to your WordPress account and disable them via Autoptimize. If you followed the article I shared about getting the 98 score initially on desktop, you should already have this plugin installed.
Go to Settings > Autoptimize > Extra.
Then, just check the box for remove emojis.
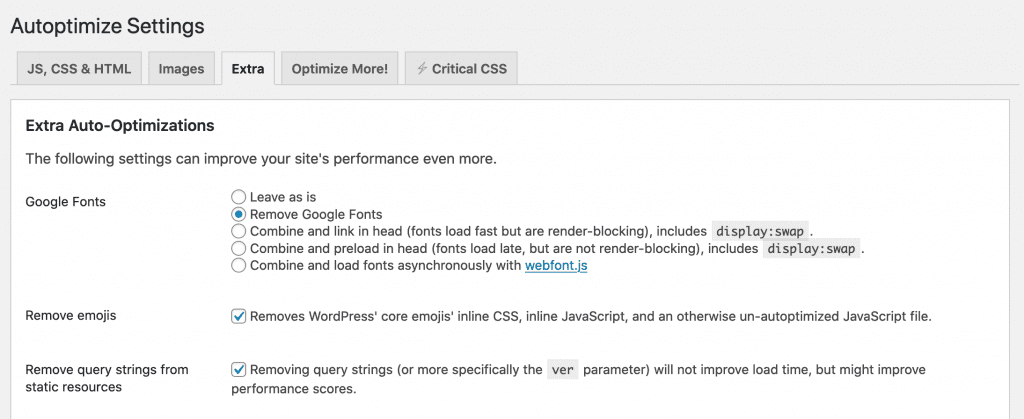
Remove Query Strings from Static Resources
And while you’re in there, check the box for remove query strings for static resources too. While it may not affect your website speed directly, sometimes it affects website speed scores.
Hit save and clear your cache.
Using Google Fonts?
Lastly, are you using custom Google fonts? If not, prevent them from loading too.
All these small changes can help your site load faster.
Prevent Dashicons from Loading on Your Website’s Front End
Dashicons are similar to the emojis. These are the icons you see when you login to your WordPress site. Here’s what they look like…
Some websites use them to add some styling on the front-end, like this one.

Again, this goes back to my earlier point. Do you absolutely need it?
If you are not displaying them to your website visitors and only using it on the backend, you should also prevent them from loading.
Go to your themes editor and add this code in the functions.php file.
Go to Appearance > Theme Editor
On the right-hand side, click on the Theme Functions (functions.php). Scroll to the bottom and paste this code. Once you’re done, hit save.
// Disable dash icons on front end

function wpdocs_dequeue_dashicon() {
        if (current_user_can( 'update_core' )) {
            return;
        }
        wp_deregister_style('dashicons');
}
add_action( 'wp_enqueue_scripts', 'wpdocs_dequeue_dashicon' );
This will remove dashicons from the front-end of your website.
Use a CDN
I’m sure you’ve encountered CDNs in your quest to make your website faster. CDN stands for Content Delivery Network. There’s a lot of technicality involved here. But the only thing you need to understand is that it makes your site load faster.
One of the most well-known CDN providers is Cloudflare.
Just follow these 5 simple steps:
- Sign up for a free account at Cloudflare
- Add your website domain
- Choose the free plan
- Change your nameservers (from your domain provider)
- Check if it’s working
I went through this process of setting up Cloudflare as your CDN here step-by-step with images. Feel free to check it out if you feel a bit lost.
But don’t exit Cloudflare yet. Now that you’ve enabled CDN, and you are also using ShortPixel Adaptive Images (SPAI), follow the instructions below.
Configure ShortPixel Adaptive Images with Cloudflare
ShortPixel has a document explaining the step-by-step process for using Cloudflare with SPAI. There are only two steps involved.
Step 1: Add a CNAME record in Cloudflare
Inside your Cloudflare account, click on the DNS tag from the menu. Then, add a new record. Here’s what mine looks like.

Step 2: Change the API URL inside WordPress
Go back to your WordPress account. Then, make the following change to the API URL but change it to your actual domain name. You can find it in Settings > ShortPixel AI > Advanced.

Feel free to create an account on ShortPixel. Use this link so you can get an extra 100 images that you can use to optimize your website. The free account only gives you credits for 100 images/month.
Additional Configurations in Autoptimize
If you followed along and tried testing your website speed along the way, you should see some improvements in your score already.
One of the last few things that affected my scores negatively during the Google PageSpeed Insights test was that the aggregated CSS from Autoptimize is “render-blocking.” You will also notice that another file called jquery will also be present as render-blocking.
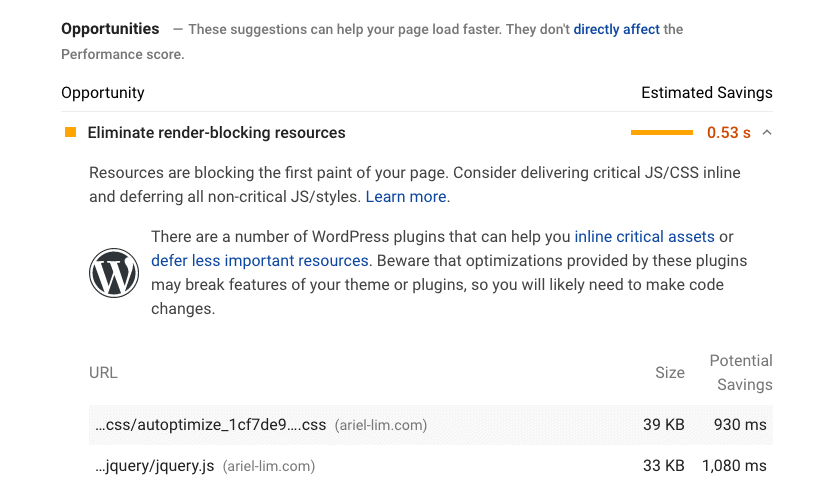
To resolve both of these, follow these steps.
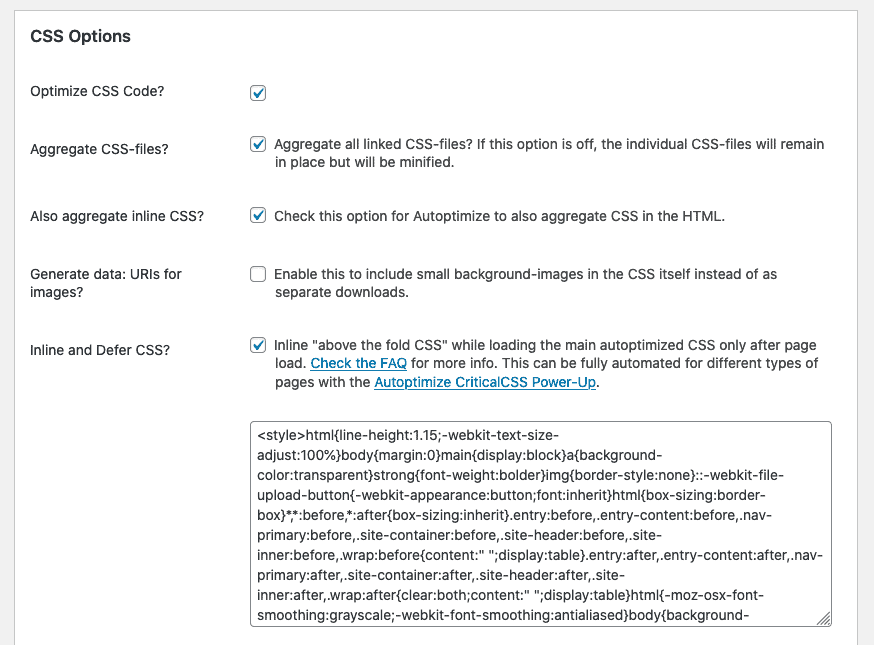
Step 1: Check the box for Inline and Defer CSS
You can find this in Settings > Autoptimize > JS, CSS & HTML tab.
Scroll down and you should see a section that looks like this.
Step 2: Generate your CSS critical path
Head on over to this website and generate your critical path CSS. Enter your domain name and copy the code generated.
Step 3: Paste the code inside the text box inside Autoptimize
Paste the critical path CSS in the section provided inside Autoptimize.
Scroll all the way down. Click the button for Save changes and empty cache.
This should help remove the CSS from being render-blocking.
Now, the final step…
Step 4: Make the jquery load asynchronously
You can do this by going to the Extra tab. Scroll down a bit until you find the Async Javascript-files section.
Paste this code then hit save.
js/jquery/jquery.js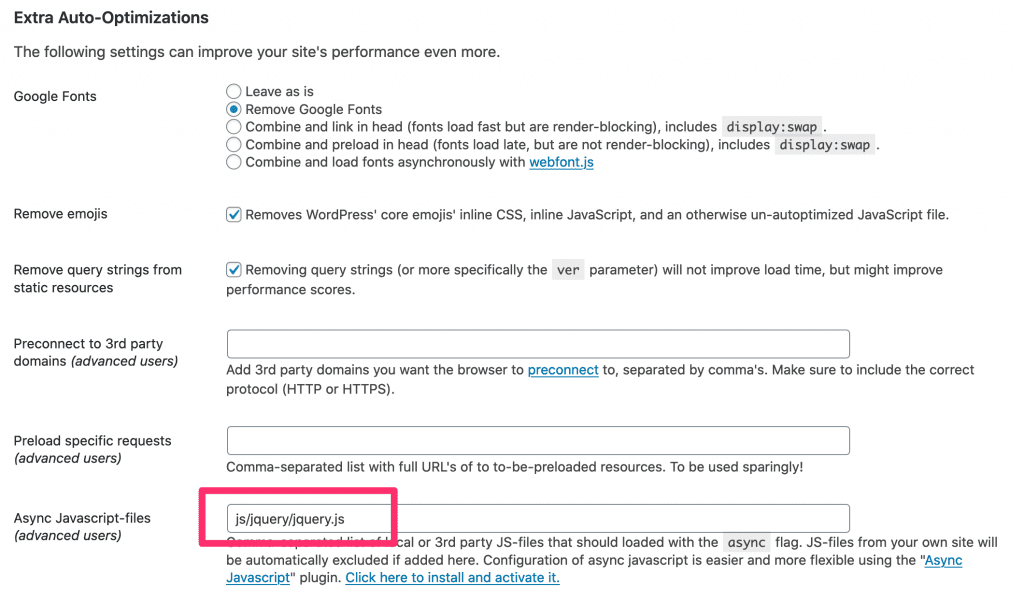
Over to You
After following everything, hit save. Clear your cache.
Run the Google PageSpeed Insights test again and you should see the results in the 90s just like mine.
I hope that these instructions will help you speed up your website without spending too much time nor spend money to achieve it.
If not, then there’s probably some special configuration on your site. Let me know in the comments below and I’ll try to help to the best of my ability.
