There are various ways to use Google Tag Manager (GTM) on your WordPress website. The easiest and most popular way is to use a plugin. But, as I mentioned before, it’s generally better to not rely on plugins.
So, the other way to do it is by adding some code to your website. And that’s what I’m going to share in this article.
Click on any of these to jump straight to that topic
Why You Should Use Google Tag Manager on Your Website
There are various reasons for using Google Tag Manager on your website. Here are the three most important ones.
1. Faster Implementation of New Technologies
The biggest benefit of using GTM on your website is it allows you to implement new technologies faster.
As I’m sure you already know, the tools and apps available today that allow you to do awesome things on your website is done by adding some code on your website. Let’s say you want to track your website visits and performance, you would have to install Google Analytics.
If you want to track your Facebook ads performance properly, you would have to install the Facebook Pixel. This goes the same for Google Ads. You also do this for your live chat software, email marketing, CRM, and the list goes on.
As you can imagine, that is a lot of code to be added on your website. If you are not technically-savvy, you wouldn’t want to keep editing your website’s code and hope nothing will get messed up.
By using Google Tag Manager to manage your code implementation, it will be easier to implement and test new technologies for your business.
2. Eliminate Down Time
The traditional way to add code to your website is by sending it over to programmers/developers. That would mean you would send them the code and the instructions.
This usually takes a couple of days to a couple of weeks, depending on how they do their work. Unless you have someone on standby, that would mean you won’t be able to move forward with your testing or implementation until this part is done.
And as you already know, the ability to move fast in today’s markets is important. If you use GTM, you can add new code to your website in just 5 minutes.
3. Potentially Avoid Slowing Down Your Website
The other solution for implementing new technology or functionality on your website is through the use of a plugin. While there’s nothing wrong with using them, it’s generally advisable to avoid using too much plugins.
Also, all tags/code added via Google Tag Manager loads asynchronously. In simpler terms, it means load at the same time. This is very important because when you do website speed tests, you will often see a portion called eliminate render-blocking resources. The way to overcome that is to remove what is causing it. If you can’t, load it later or load it asynchronously.
Poorly coded plugins are usually the main culprit. They make your website load slowly and affects user experience. This is something you don’t want to happen. That’s why it’s important to speed up your website.
Preparatory Points
This is for you if you meet the following criteria:
- You want to speed up your website
- You are running on WordPress
- And using the Genesis Framework
How to Install Google Tag Manager on Your Website
Adding GTM to your Genesis theme involves three steps:
Step 1: Prepare Your WordPress Account
The first thing you need to do is log in to your WordPress dashboard. Then, go to your theme editor.
Appearance > Theme Editor
On the right-hand side, click on the Theme Functions (functions.php). Scroll to the bottom and paste this code.
// Add Google Tag Manager code in <head>
add_action( 'wp_head', 'google_tag_manager_head' );
function google_tag_manager_head() { ?>

//Replace this entire line with the first part of the code <head>

<?php }


// Add Google Tag Manager code immediately below opening <body> tag
add_action( 'genesis_before', 'google_tag_manager_body' );
function google_tag_manager_body() { ?>

//Replace this entire line with the second part of the code <body>

<?php }
Step 2: Get Your Google Tag Manager Installation Code
Next, head on over to Google Tag Manager and get the installation code. If you haven’t created an account, it’s easy to do so. All you need is a Gmail account.
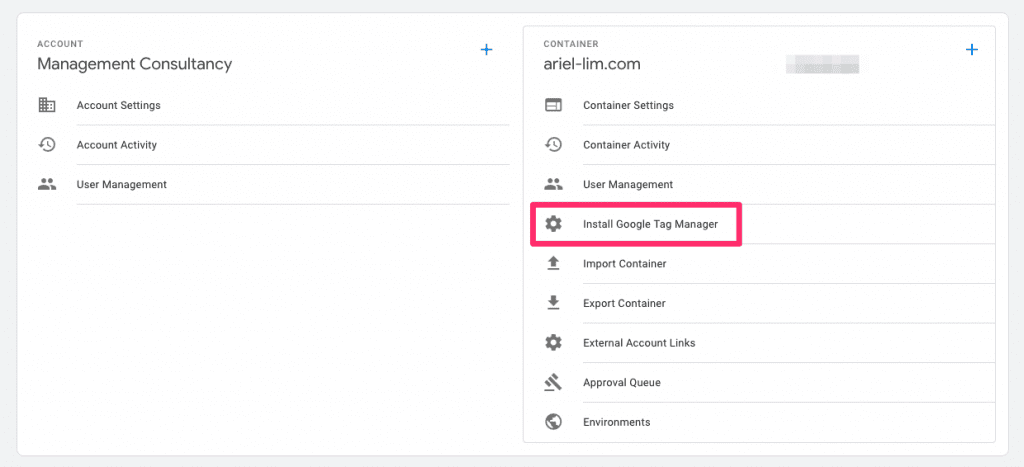
Once you’re in, go to the admin section.

Next, click on install google tag manager.

You should see two sets of code. One to include at the <head> section, while the other at the <body> section. Copy the first part, then move to the next step.
Step 3: Add the GTM Code to WordPress
Now, go back to WordPress and replace the line where it says to replace it.
You should now end up with something that looks like this.
// Add Google Tag Manager code in <head>
add_action( 'wp_head', 'google_tag_manager_head' );
function google_tag_manager_head() { ?>

    <! – Google Tag Manager -->
<script>(function(w,d,s,l,i){w[l]=w[l]||[];w[l].push({'gtm.start':
new Date().getTime(),event:'gtm.js'});var f=d.getElementsByTagName(s)[0],
j=d.createElement(s),dl=l!='dataLayer'?'&l='+l:'';j.async=true;j.src=
'https://www.googletagmanager.com/gtm.js?id='+i+dl;f.parentNode.insertBefore(j,f);
})(window,document,'script','dataLayer','GTM-ABCDEF');</script>
<! – End Google Tag Manager -->

<?php }


// Add Google Tag Manager code immediately below opening <body> tag
add_action( 'genesis_before', 'google_tag_manager_body' );
function google_tag_manager_body() { ?>

<! – Google Tag Manager (noscript) -->
<noscript><iframe src="https://www.googletagmanager.com/ns.html?id=GTM-ABCDEF"
height="0" width="0" style="display:none;visibility:hidden"></iframe></noscript>
<! – End Google Tag Manager (noscript) -->

<?php }
Over to You
Now, whenever you need to add, test, or implement new technology, you only have to do that within Google Tag Manager. I’ll write more about this in the future.
Hope you found this helpful. If you want to speed up your website, find out how you can achieve 90+ scores on Google PageSpeed Insights for both mobile and desktop here.
