Google Analytics Event Tracking: Use Event Goals to Track Form Submissions, Affiliate Link Clicks, and Video Engagement

analysis reports

Google Analytics is a great analytical tool if used properly. Unfortunately, you need to configure it to get the most of it.

You need to install it on all pages, add filters, and set up goals. The first one is easy. The second one is a bit more technical, but still easy to do. The third one is where it gets tricky.

In this post, I’ll walk you through a step-by-step process for tracking events and using them as goals in your Google Analytics account. You’ll learn how to set them up without touching any code.

I’ll provide three use cases at each step. If you want to track your form submissions, affiliate link clicks, and video engagement, this guide is perfect for you. I’ll also share why you should stop using destination goals.

To create an event goal, you need to do two things:

  1. Track the event
  2. Create a goal for the event

The first one lets you see everything that happens on your site. But some interactions are more valuable than others. Creating a goal out of these valuable interactions will help you make business decisions quickly.

What Are Events in Google Analytics

Events in Google Analytics are actions that happen on your website that a user takes. Here are some examples of events:

  • Link clicks — internal and external
  • Form submissions
  • Scroll
  • Clicks on tabs, accordions, and other elements
  • Video plays/pause/stop

Out-of-the-box, Google Analytics doesn’t track what visitors do on your website. The only thing it does is track page views. If they watched a video or filled out a form and does not lead to a new page (or reload), Google Analytics will not know.

This leaves you clueless about what users do on your site as well. That’s why it’s important to set up event tracking.

Tracking Events in Google Analytics

There are two main ways to track events in Google Analytics:

  1. Add the event code on the action you want to track; or,
  2. Use Google Tag Manager to handle this for you

I’ll focus on the second method because it’s easier and more flexible. Using Google Tag Manager (GTM) allows you to create events without the need to learn how to code.

If you’re not new to events, you can skip to the next section. But if you need a refresher, here are the basic things you need to know.

  1. Events are only tracked on pages you have your Google Analytics code installed, i.e. your website
  2. They are triggered only if you configured them either by adding a code manually or using Google Tag Manager to handle the implementation
  3. There are four fields you can set up. The first two are required:
    1. Category—Typically the object that was interacted with (e.g. ‘Video’)
    2. Action—The type of interaction (e.g. ‘play’)
    3. Label—Useful for categorizing events (e.g. ‘Fall Campaign’)
    4. Value—A numeric value associated with the event (e.g. 42)

Events are flexible. You can use it to track what users are really doing on your site. When you install Google Analytics on your site, it’s out-of-the-box configuration works when a page loads. It gives you some data on where the traffic came from or the page they are viewing. But it doesn’t track what people do on the page itself. That’s where events come in.

Google Analytics Events vs Event Goals

Events are user interactions with content that can be measured independently from a web-page or a screen load. Downloads, link clicks, form submissions, and video plays are all examples of actions you might want to analyze as Events.

Event goals are Google Analytics goals that you define as a conversion. These are specific events that are more valuable than other events and should be linked directly to your business goals.

Simply put: All event goals are events. Not all events are (nor should be) event goals.

How to Create an Event Goal in Google Analytics

You probably know how to create a destination goal. But that goal is only triggered when a page loads. If you want to track user behavior on a page that doesn’t involve a new page loading, you’ll have to use events.

The process to creating event goals is similar to destination goals. Here’s a quick overview of the process:

  1. Login to your Google Analytics account
  2. Go to Admin
  3. Under the View, click on Goals
  4. Click on New Goal

From there, you’ll see the goal setup page. Choose Custom and click Continue.

Google Analhytics Goal Setup

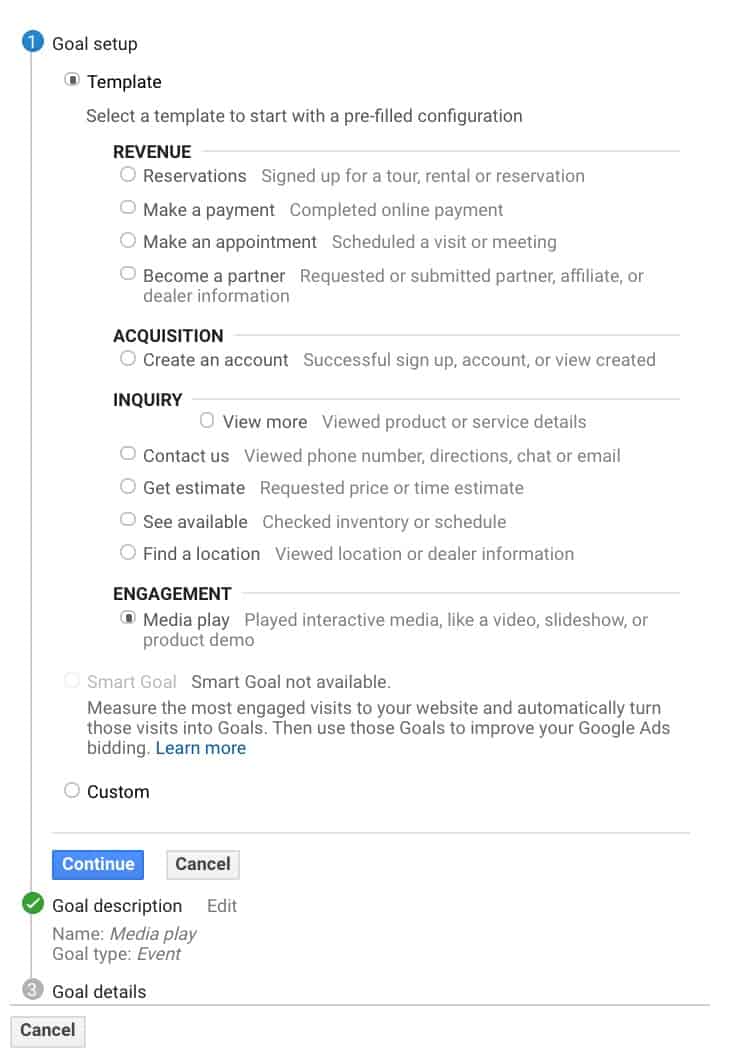
Add a name for your goal then choose the event type. Click Continue.

Google Analytics Goal Setup Using Events

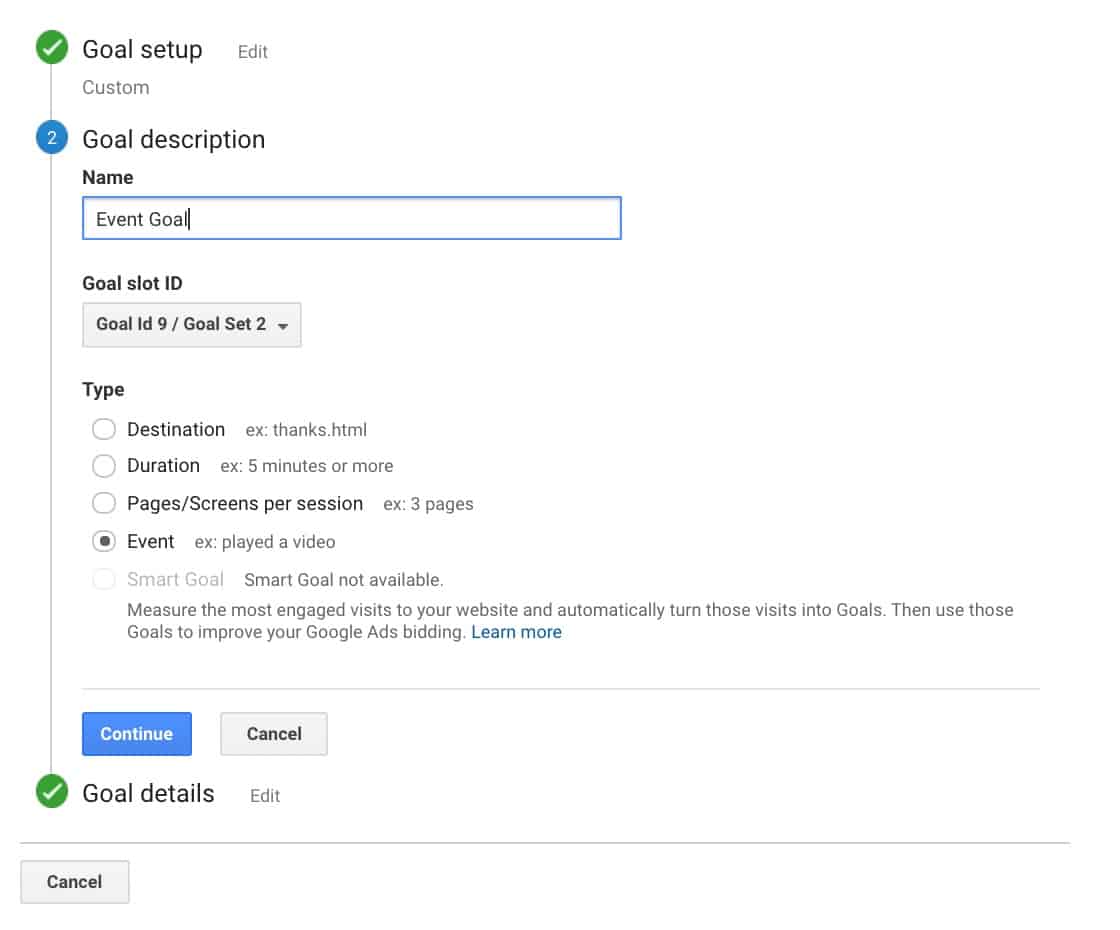
The last step is to add the event conditions. You will need to add a value in the category and action fields here.

Adding Event Conditions for Google Analytics Event Goals

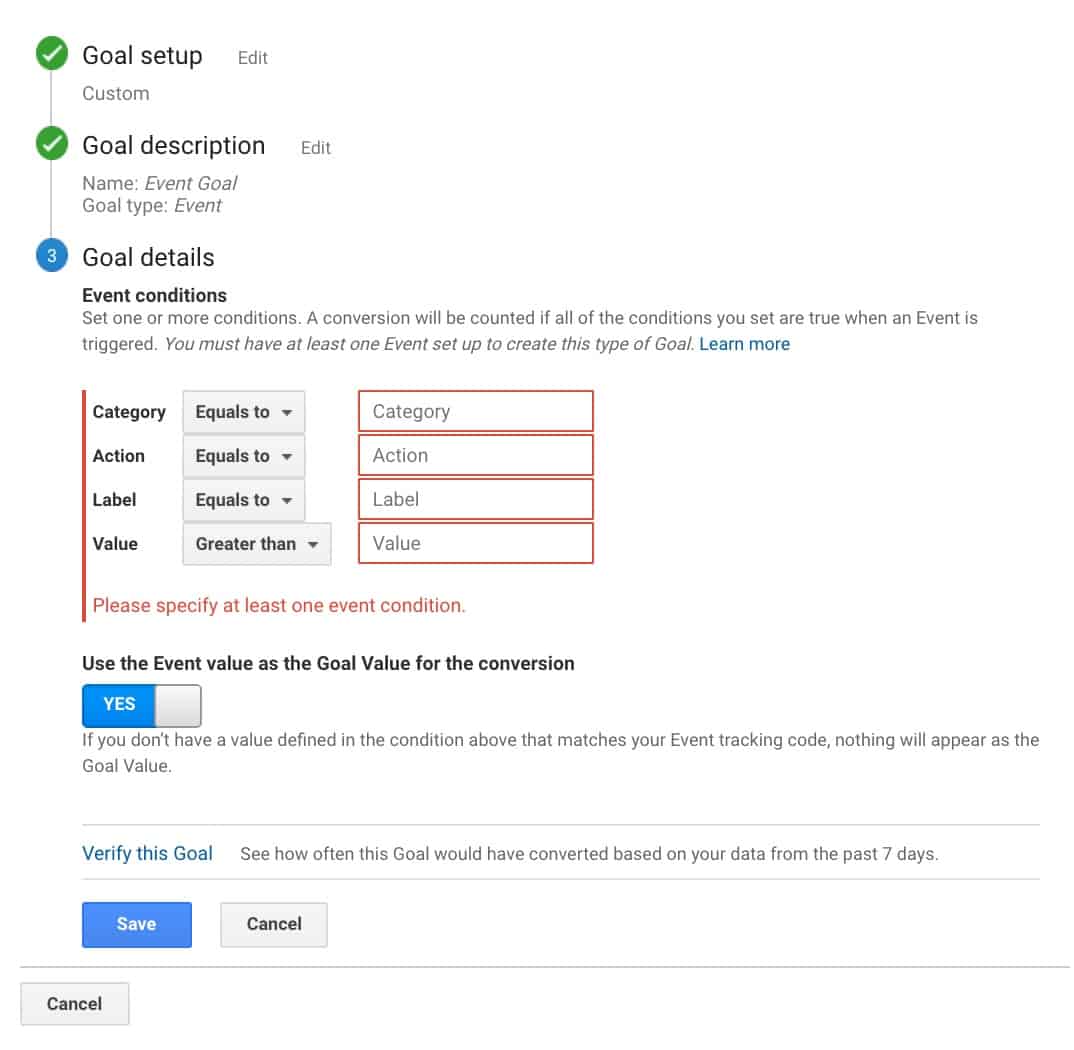
That’s the general overview of creating event goals.

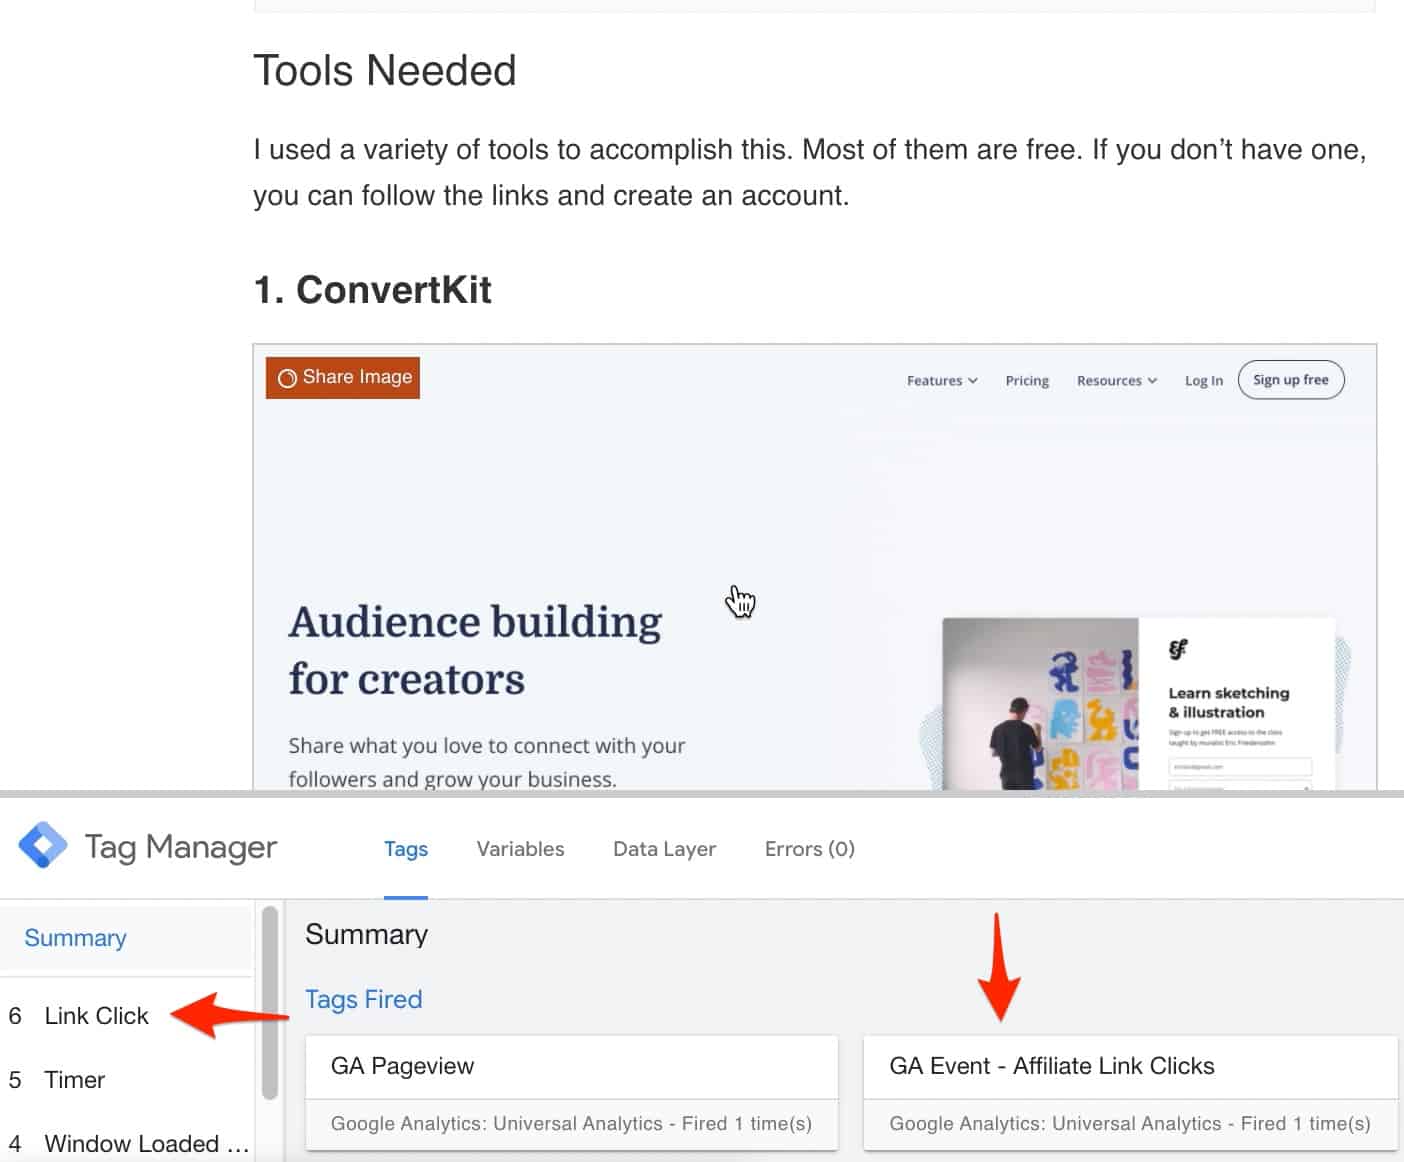
Tools Needed to Track Events Properly

To track events properly, you only need these two tools:

  1. Google Analytics
  2. Google Tag Manager

Of the two, Google Tag Manager might be the most unfamiliar. Here is some recommended readings to help you get acquainted with it. It’s the key to tracking events.

Step-by-Step Tutorial for Creating and Tracking Event Goals

I’ll share three examples for creating events and tracking them as goals in Google Analytics. Depending on your business, it may or may not be applicable to you. Here are the three events we’ll track plus some example use cases:

  1. External link clicks—e.g. affiliate link clicks or links to partner websites
  2. Form submissions—e.g. typical form submits but won’t be using the destination goal
  3. Video engagement—e.g. plays, pauses, percent of video played, etc.

1. Determine What You Want to Track

The first thing you need to do is figure out what you want to track. Again, this depends on the nature of your business.

In the table below, you’ll see three different websites and the events that matter to them.

Type of WebsiteEvent TypeDetails
Affiliate websiteExternal link clickClicks to product ABC
Regular blogForm submissionNewsletter subscription
Online course creatorVideo playsPercentage of video watched

Pro tip #1: think about the metrics that matter to you. You’re probably already tracking revenues/purchases. But people don’t buy upfront. What are those smaller actions they take on your website before they purchase? These are called micro conversions. They are perfect candidates for event tracking.

Pro tip #2: not all events are created equal. You don’t have to track all events as goals. For example, page scroll by percentage can also be tracked (e.g. scrolled to 25% of page, or 100% of page—they reached the bottom). But these aren’t tied towards your business goals. While you can create events so you see if people get through the bottom of your blog posts, it probably isn’t worthwhile to convert them to a goal.

2. Add an Event Goal in Google Analytics

Now that you’ve identified what events are valuable to you, it’s now time to create an event goal in Google Analytics. You need to fill out two fields: category and label.

You can use any name for the fields, but make sure it means something to you or anyone else who might look at your Google Analytics account. A naming system like this below doesn’t make sense.

GA event goal setup that isn't helpful

One naming technique that I found useful is to use the object-action framework. You might have noticed it in the examples I shared. So, this is how it may look like for the three businesses:

Sample Event Goal for Affiliate Website

Affiliate sites earn by purchases of the products/services they recommend on their site. If a visitor clicks on the link then decide to purchase, the affiliate site earns a commission.

But that transaction happens on a 3rd party website. The only way to track that is by heading to the respective merchant site to view the reports. But if you’re an affiliate for dozens of companies, it’s time-consuming to go to all those.

The nearest proxy for conversion is the clicks on these links. Using the object-action naming convention I shared earlier, here’s how it might look like:

  • Category equals to Affiliate Link
  • Action equals to Clicks
Sample Google Analytics Event Goal for Affiliate Link Clicks

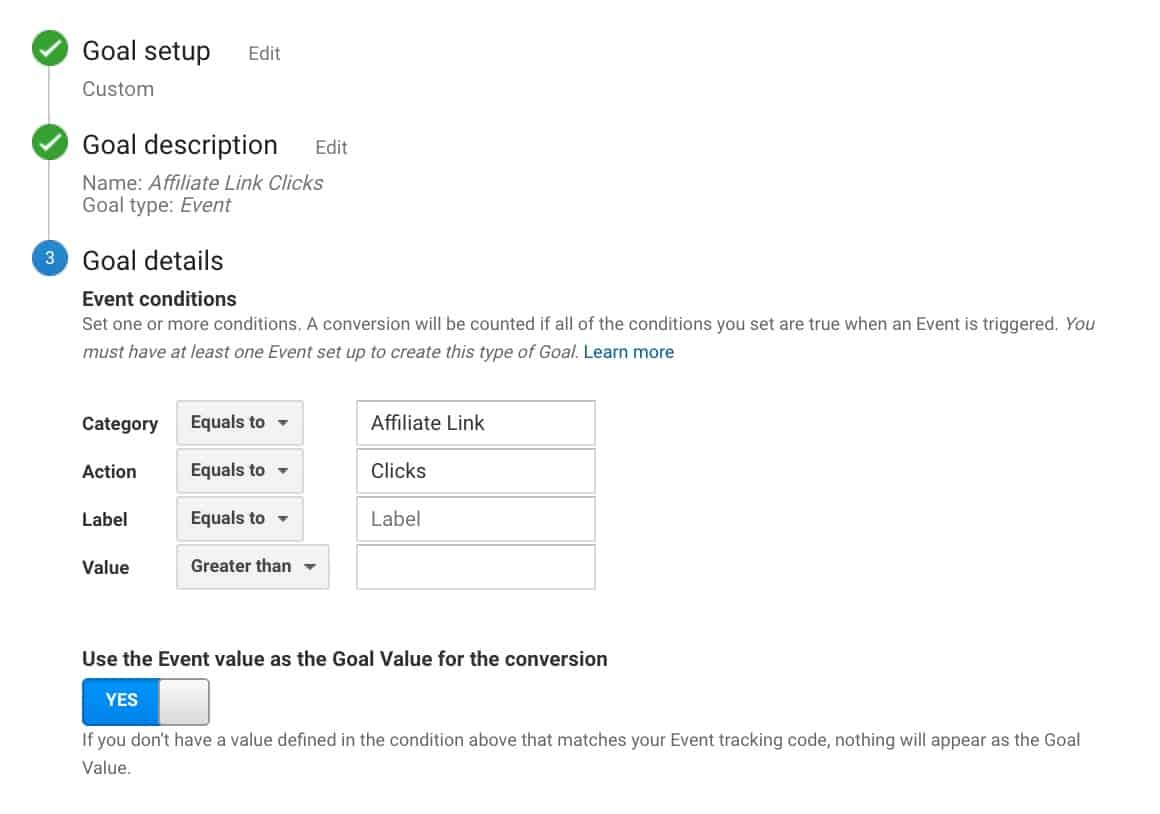
You’re free to use whatever name you want here. For me, it’s just easier to keep track of them using this naming convention. Leave the label and value fields blank. You’ll see why in the next section.

Make sure you toggle the Use the event value as the goal value for the conversion to yes.

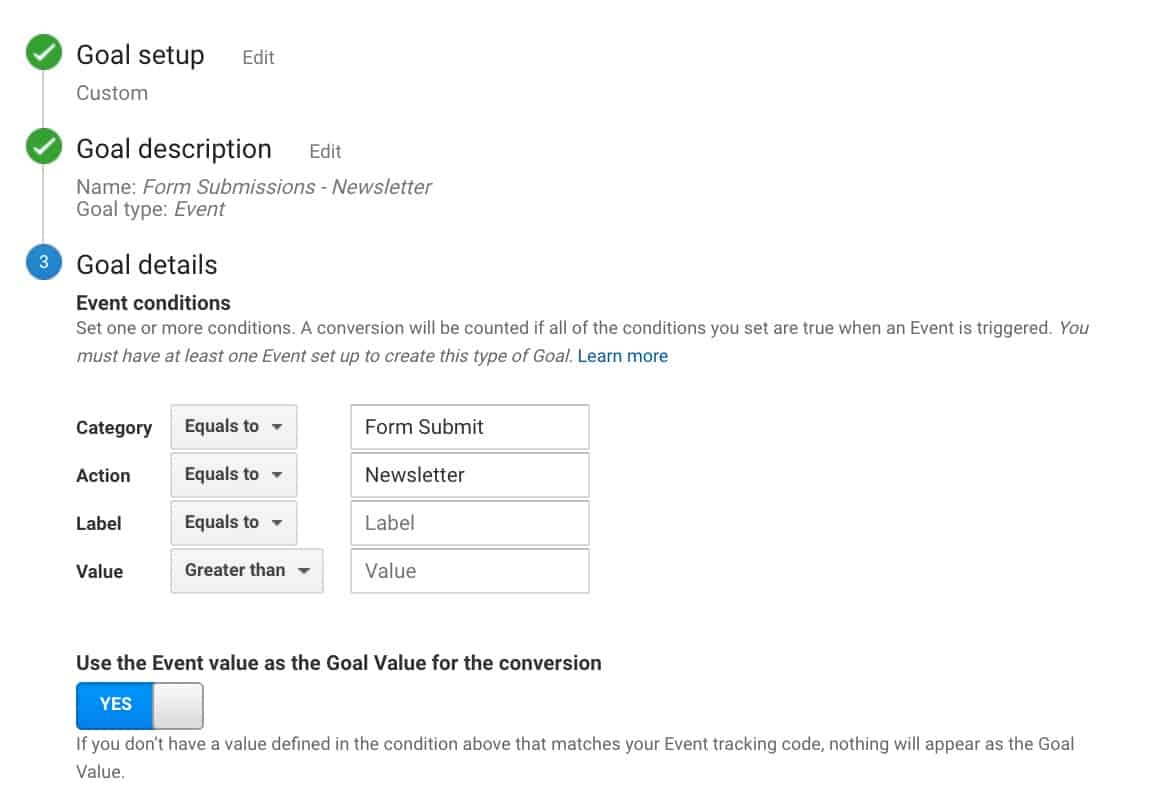
Sample Event Goal for Blog

A blog typically publishes content. The most valuable metric for most blogs is email subscribers. There are multiple ways to grow your email list, but the most common is a newsletter subscription. Here’s how that looks like:

Sample Google Analytics Event Goal for Newsletter Subscription

You can use this for any other lead generation tactic you are using. Some examples can be the following:

  • PDF Downloads
    • Category equals to PDF
    • Action equals to Downloads
  • Email Course Registration
    • Category equals to Email Course
    • Action equals to Registration

Follow the same settings as above.

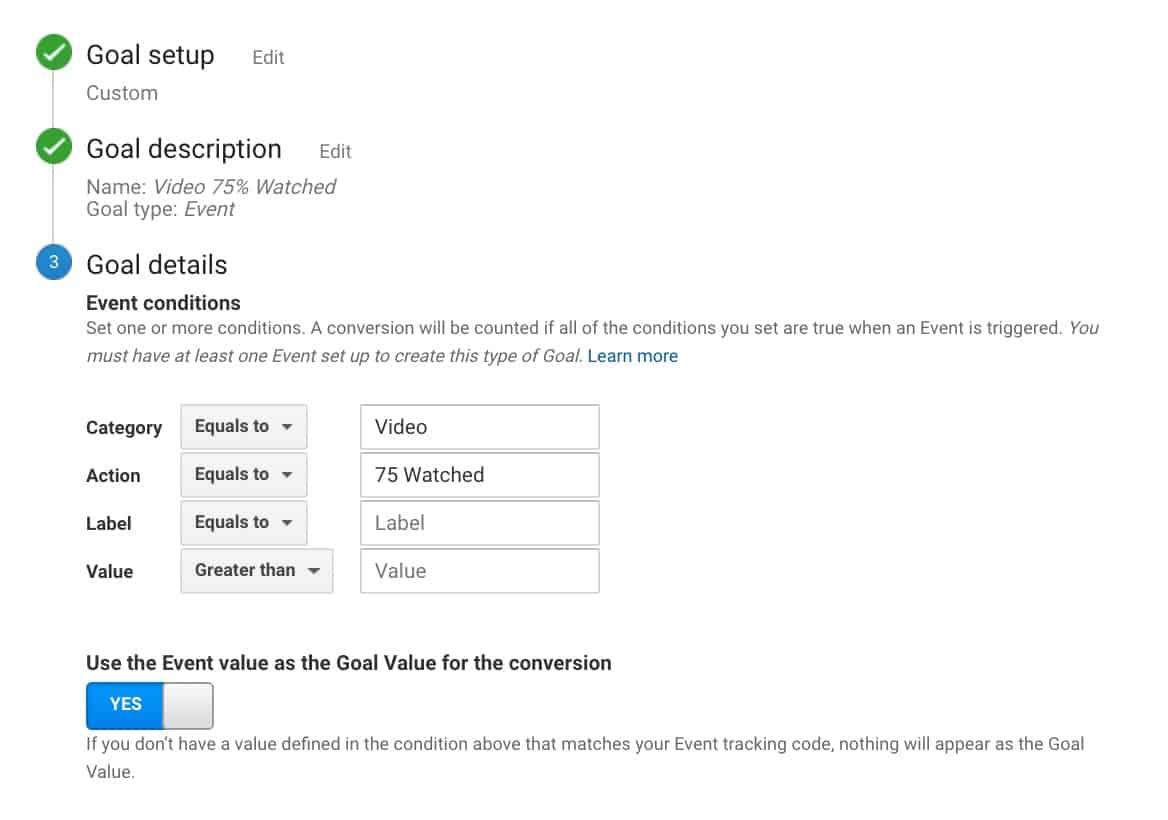
Sample Event Goal for Course Creator

If you create a lot of videos and want to track how people engage with it on your site, you can setup an event goal that looks like this. For example, you deemed that people who watched over 75% of your videos convert better or that’s a target you want to achieve. This is how that would look like.

Sample Google Analytics Event Goal for Percentage of Video Watched

Again, the setup is different for everybody. You can use this to track your video sales letters or explainer videos.

Pro tip #3: Since we’re on the topic of creating goals in Google Analytics, please stop using the duration and pages/screens per session as goals in your account. There are limited use cases for them. Google Analytics goals are tied to your business goals. If a person spends 5 minutes on your site, will that help you grow your business?

3. Implement Using Google Tag Manager

The next step is to create the events themselves. The goal won’t trigger if the events are not created. We’ll handle this using Google Tag Manager. If you haven’t used Google Tag Manager before, here’s a tutorial on how to install it on your website. Once you have it on your site, proceed to the next step.

Google Tag Manager overview dashboard

Here’s the overview of how to do it:

  1. Login to Google Tag Manager
  2. Enter the proper account and container for your website
  3. Enable the variables needed to track the events
  4. Create the necessary triggers
  5. Create the tag
  6. Test the configuration
  7. Publish the changes

A Quick Primer on How Google Tag Manager Works

GTM manages all the code or tags or scripts that you add to your site in one place. Instead of adding them directly on your website one-by-one, you only add the GTM installation code then manage all other tags inside Google Tag Manager.

how gtm works

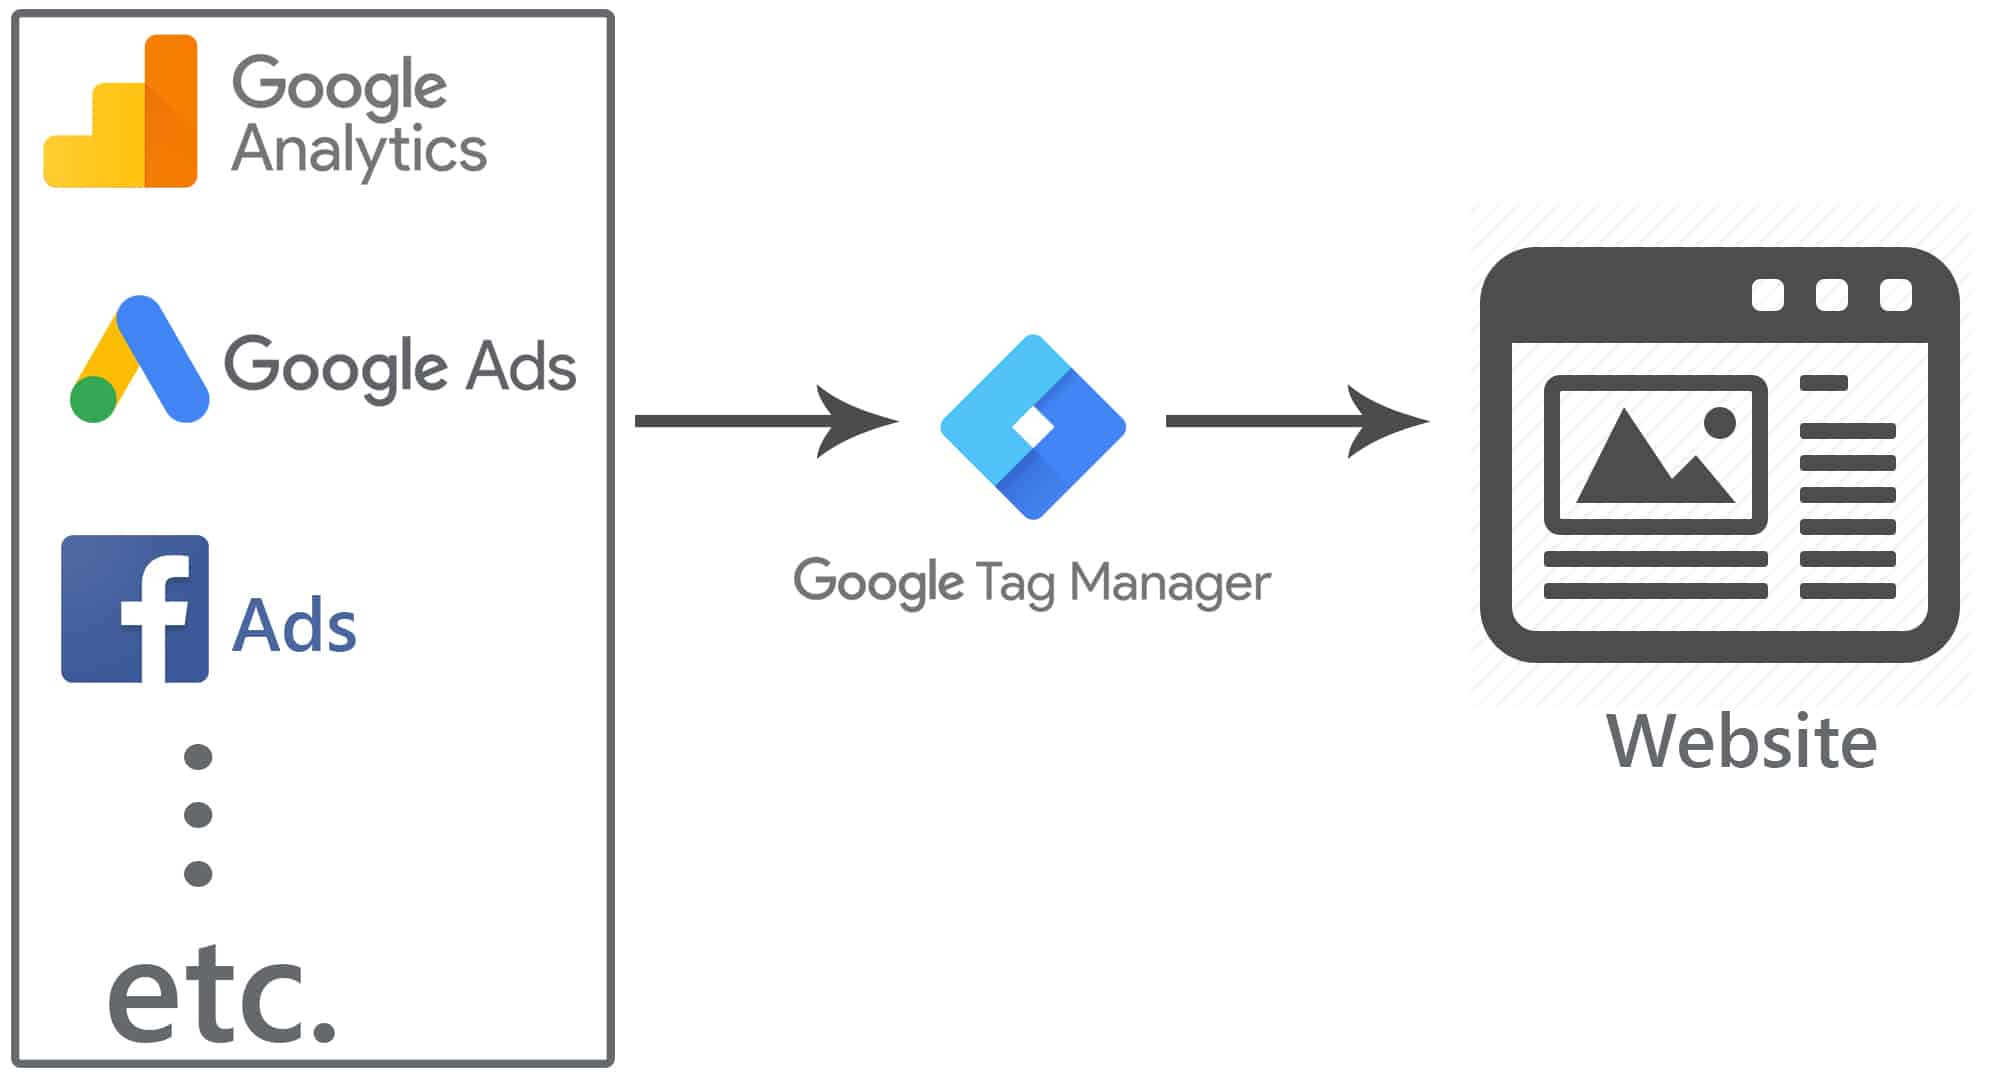
Most websites will use Google Analytics and the Facebook Pixel. If you add more softwares, you will have to do it manually. But with GTM, you can easily deploy and edit tags using its interface.

A tag is a code that send data to a system such as Google Analytics. It contains a trigger which, when meets the criteria you set, will fire the tag. For example, the default trigger in GTM is a page view for all pages the code is installed on. Any tag (e.g. Google Analytics or Facebook Pixel) that uses that trigger will load on the page.

If you set special rules like form submissions on a specific URL, or page views with /blog/ URL, then the tag will only fire when they meet that trigger condition.

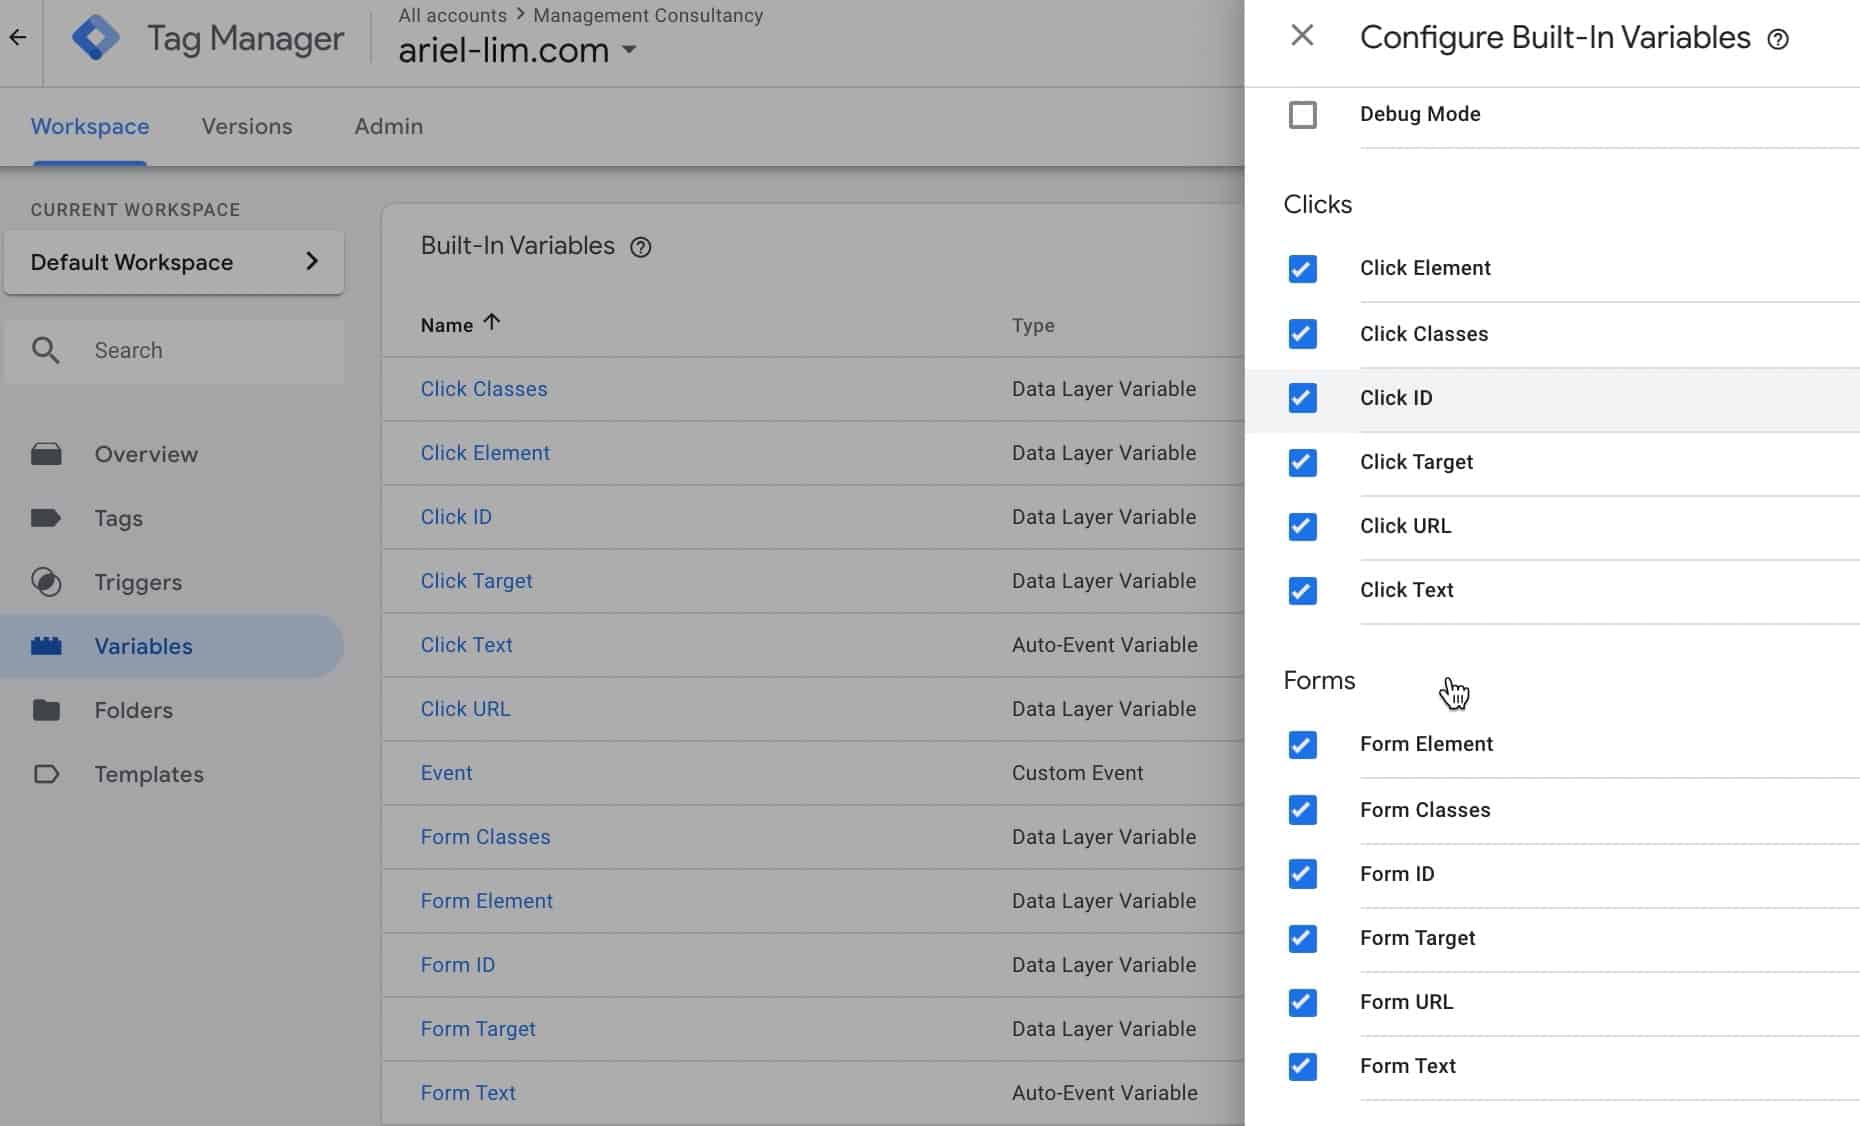
Enable the Variables in Google Tag Manager

The first thing you need to do is enable the built-in variables you want to track. In our examples, here’s what you need to enable:

  • Utilities > Events
  • Clicks > Everything
  • Forms > Everything
  • Videos > Everything
Enable built-in variables in Google Tag Manager to start tracking events

Create the Triggers Needed

After enabling the variables, you need to create a trigger.

Sample Trigger for Affiliate Website

For the affiliate site, link clicks are what we want to track. To do this, click on Triggers > New. Then, fill-out the details like the image below.

Sample GTM Trigger for Affiliate Websites

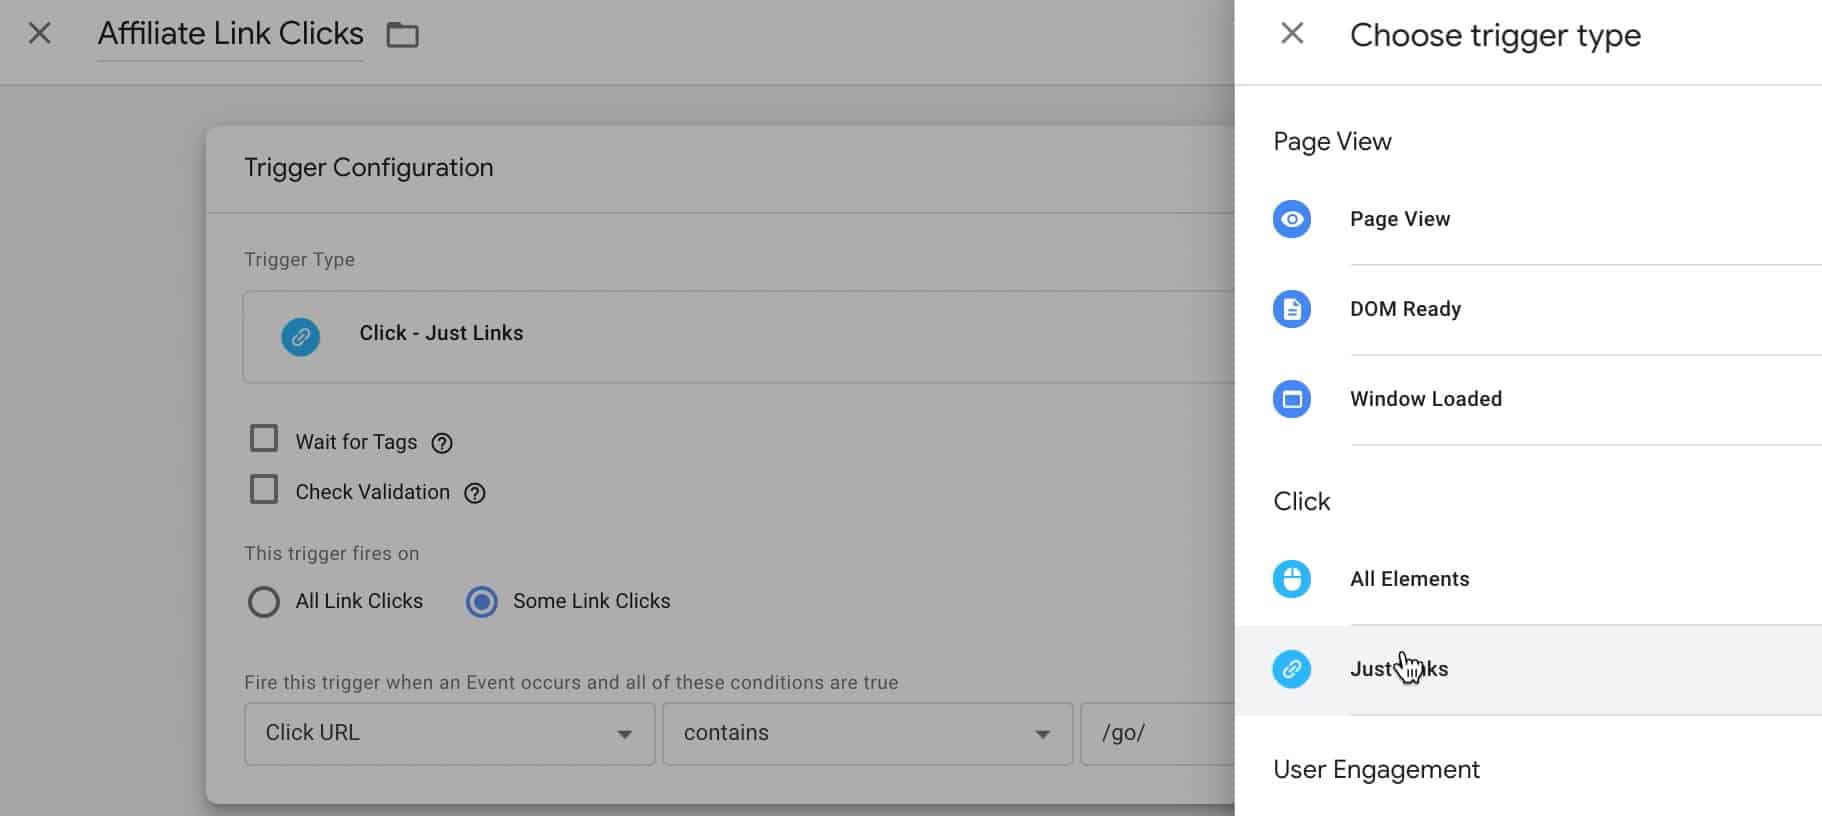
Some important parts I’d like to highlight here:

  • Name— use something that makes sense so it’s easier to reference it later
  • Trigger type— choose just links since we want to track link clicks
  • This trigger will fire on —choose some link clicks here. Why? Because we don’t want to track all link clicks. For example, a link to another page (internal link) isn’t useful, nor is a link to an external site but isn’t an affiliate link.
  • Conditions—depending on how you manage your affiliate links, you might have some form of URL convention. In the example above, all affiliate link clicks are handled by a plugin which uses “/go/“ in the URL. That’s why if the click URL contains /go/, this trigger will fire. Otherwise, it won’t fire.

Pro tip #4: If you use affiliate links, it’s recommended to use a plugin to manage all your affiliate links. The main benefit you get is you only have to “add it once” then you can reference it over and over. Then, if for some reason you need up update your links, you only do it once and it updates everywhere.

Sample Trigger for Blog

For our next example, you’ll want to track form submissions. GTM has a trigger for this.

Create a new trigger, add a name, choose the form submission trigger, then have it track all forms.

Sample GTM Trigger for to Track Form Submissions

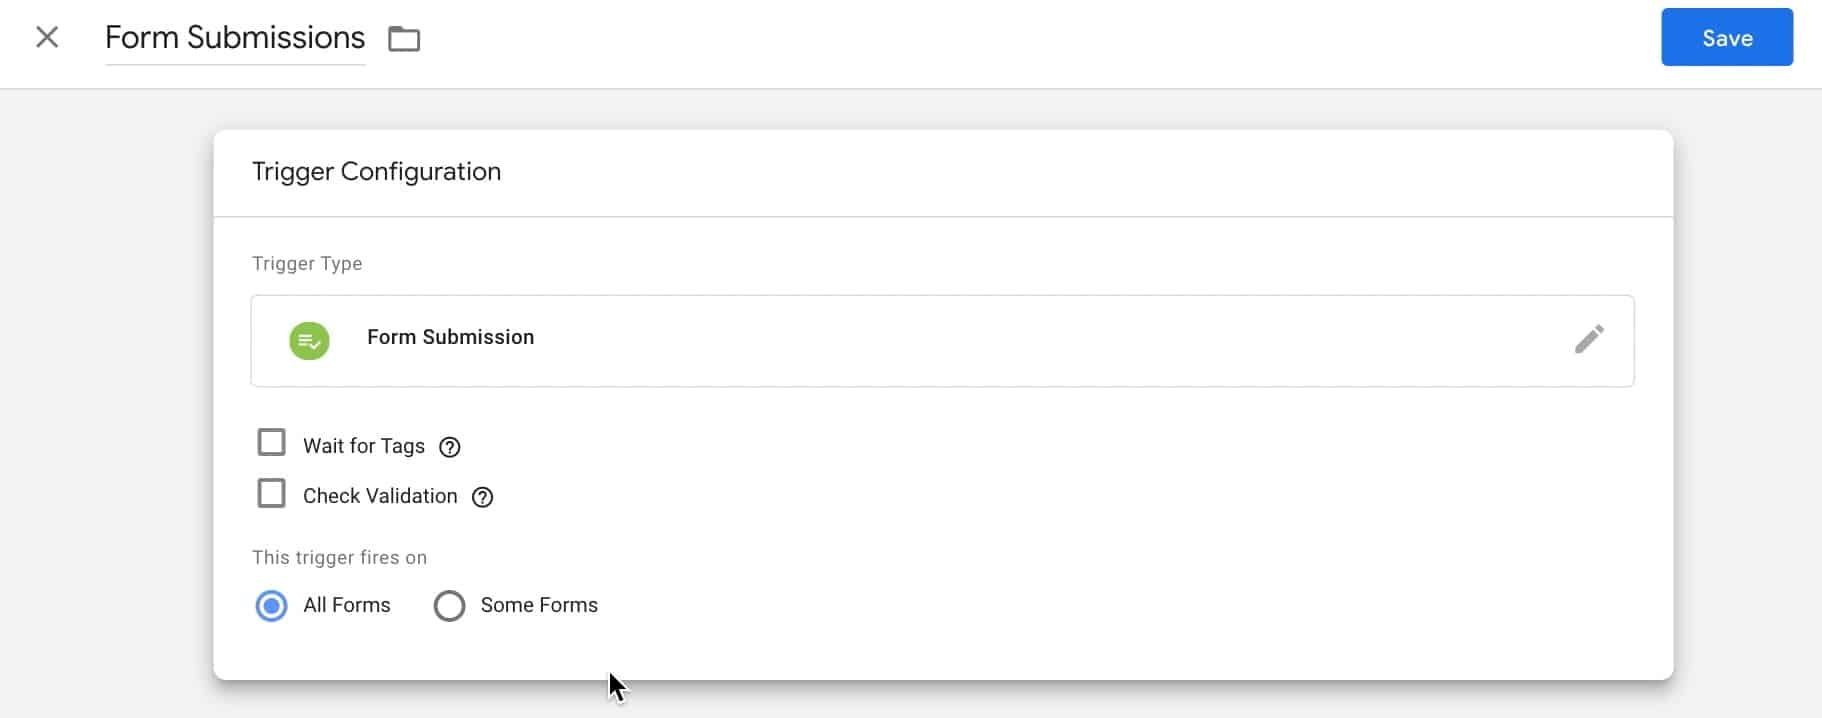
You can choose to track just some forms, but you’ll have to identify them by classes, ids, or the URL where they are located. For example, you have a form with only an email field. Then another form with name, email, and their phone number. You can create separate triggers for each of those.

Sample Trigger for Course Creator

You start by creating a new trigger. Then, choose the YouTube Videos trigger type.

Sample GTM Trigger for to Track Percentage of Video Watched

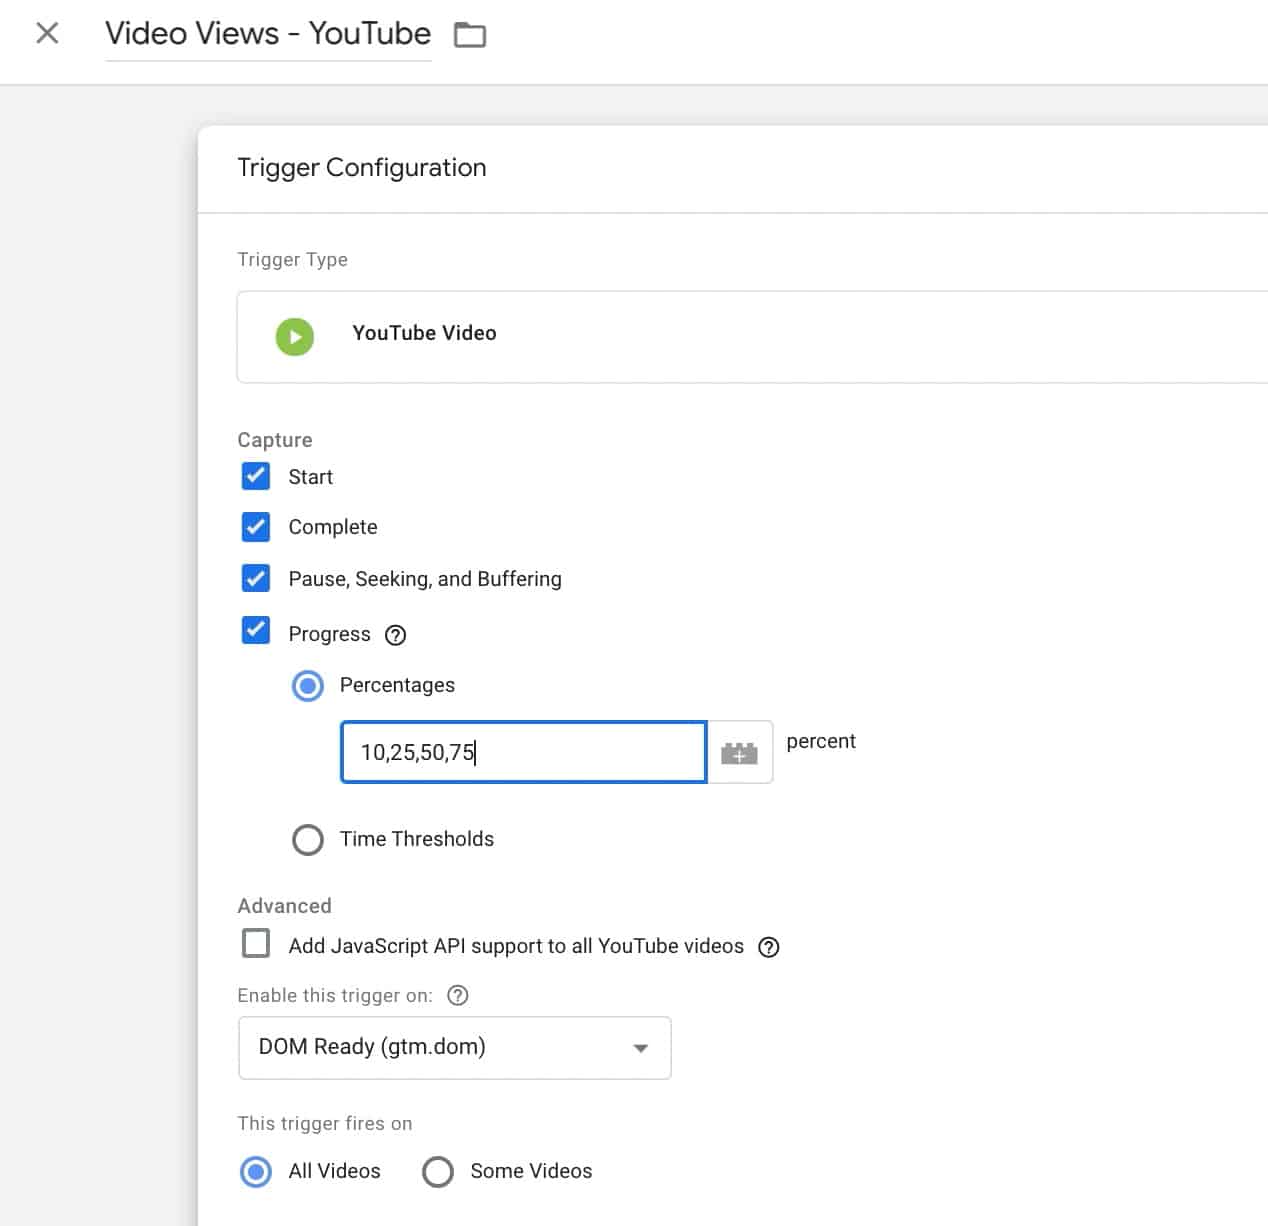
You can leave the rest of the settings by itself, but in the example above, we want to track the percentage watched, i.e. 10%, 25%, etc.

If you only want to track selected videos, you choose some videos in the field for when this trigger fires on. A separate menu will show up. You can specify the conditions for this trigger using classes, IDs, URL paths, etc.

Once you’re done, hit save and proceed to the next step.

Create the Tag

You’ve finished adding the variables and also configured your triggers. Now, it’s time to add the tags. These control what data gets sent to your Google Analytics account. In our case, these are the events that will trigger the goal conversions we setup earlier.

Create a GTM Tag for Tracking Events

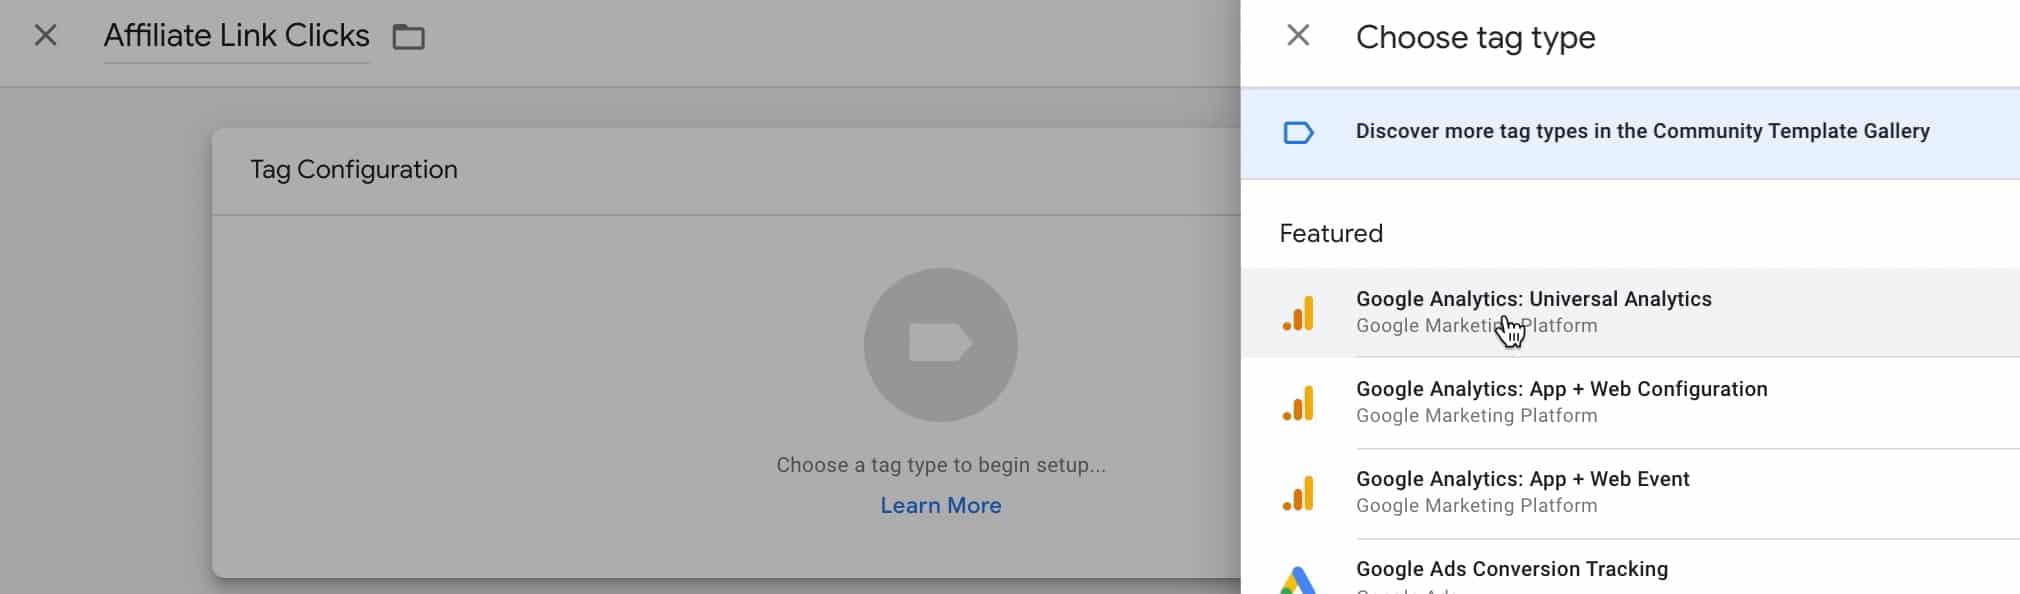
Create a new tag. Choose the Google Analytics Universal Analytics. You’ll see under the track type the default value of page view. Change that into an event.

Make sure you pick the event type in your tag creation
Sample Tag for Affiliate Website

After that, you’ll see a screen that looks similar to the event goal setup in Google Analytics: category, action, label, and value. Use the values you set earlier in the category and action.

Sample Tag Configuration in GTM for Affiliate Link Clicks

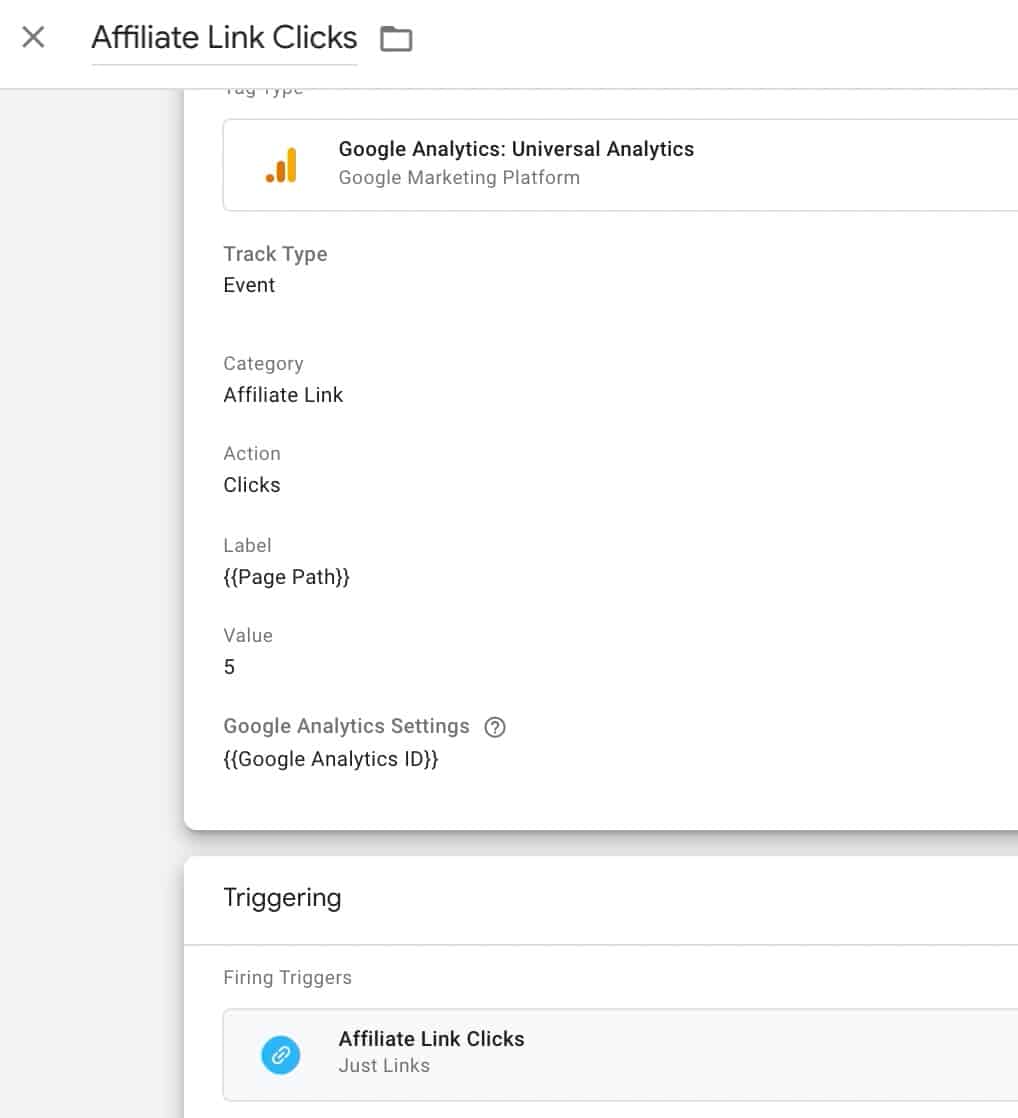
Make sure they match the copy exactly.

  • Affiliate Link is not equal to Affiliate link
  • Click is different from Clicks

For the label, you can leave this blank. But, if you’d like to know what page on your site people are clicking your affiliate links on, then you can specify the page path in the label field. This will give you an idea of which page is driving those clicks to your affiliate links.

How events show up on Google Analytics

If you have several dozen blog posts filled with affiliate links and only one of them is where majority of your referrals come from, that’s a page you’ll want to monitor and/or improve.

To do that, choose the Page Path as the variable—this is the URL of that page minus the main domain. If the URL is domain.com/blog/awesome-post/, the page path will be /awesome-post/. You will see this in action later on.

Finally, goal conversions in Google Analytics are useless if it doesn’t have any monetary value. There are many ways to assign goal values. If you don’t know where to start, just add a number there.

How much is think affiliate link click worth to you?

Here’s one way to think about it: if the average affiliate revenue I get is $100 and it takes 20 people who clicked on my link before 1 of them buys, the goal value you can add is $5. The idea is if 20 people clicks on that link, all things being equal, you will have earned $100.

Under the trigger, make sure you select the Affiliate Link Clicks trigger you cerated in the previous section.

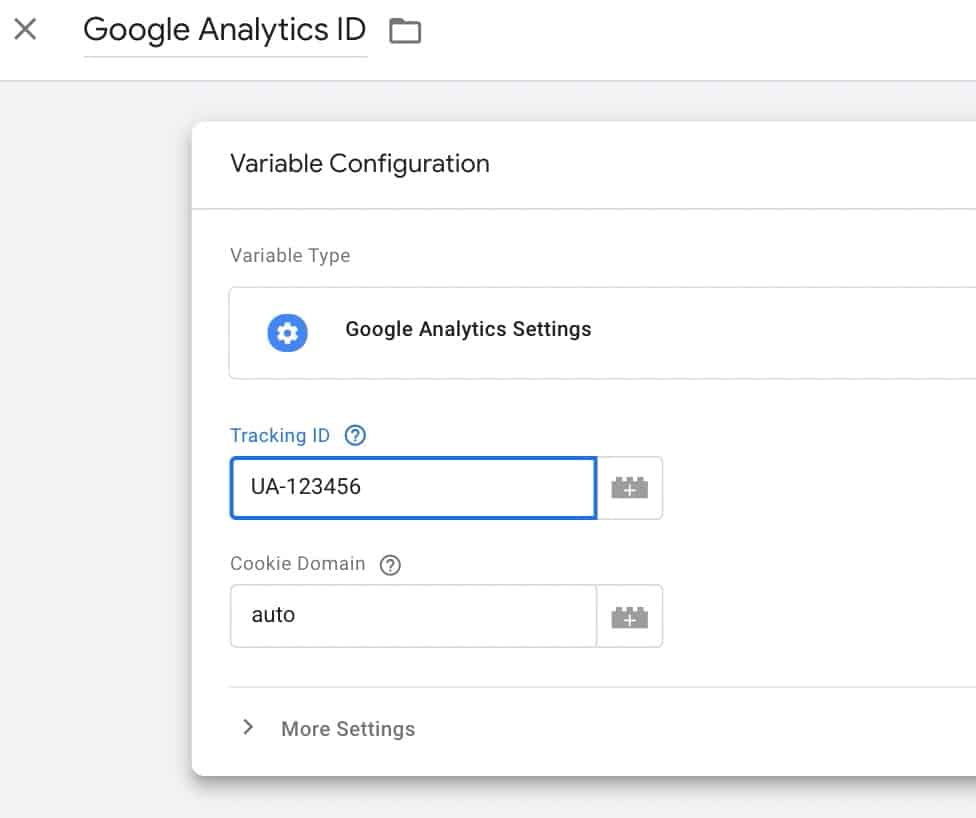
Configure the Google Analytics Variable

If you haven’t configured the Google Analytics Settings variable, you can do that easily by clicking the lego icon with the + sign, then copy your Tracking ID in the field like this.

It should now show up in the field.

Enter your Google Analytics Tracking ID
Sample Tag for Blog

To track form submissions on your website, all you need to do is create a tag that will send events back to Google Analytics.

  • Create a new tag
  • Add the category and label you used in setting the goal in Google Analytics
  • Use the page path in the label if you want to track which page people are filling out a form
  • Assign a monetary value for this form submission
Sample Tag Configuration in GTM for Form Submissions

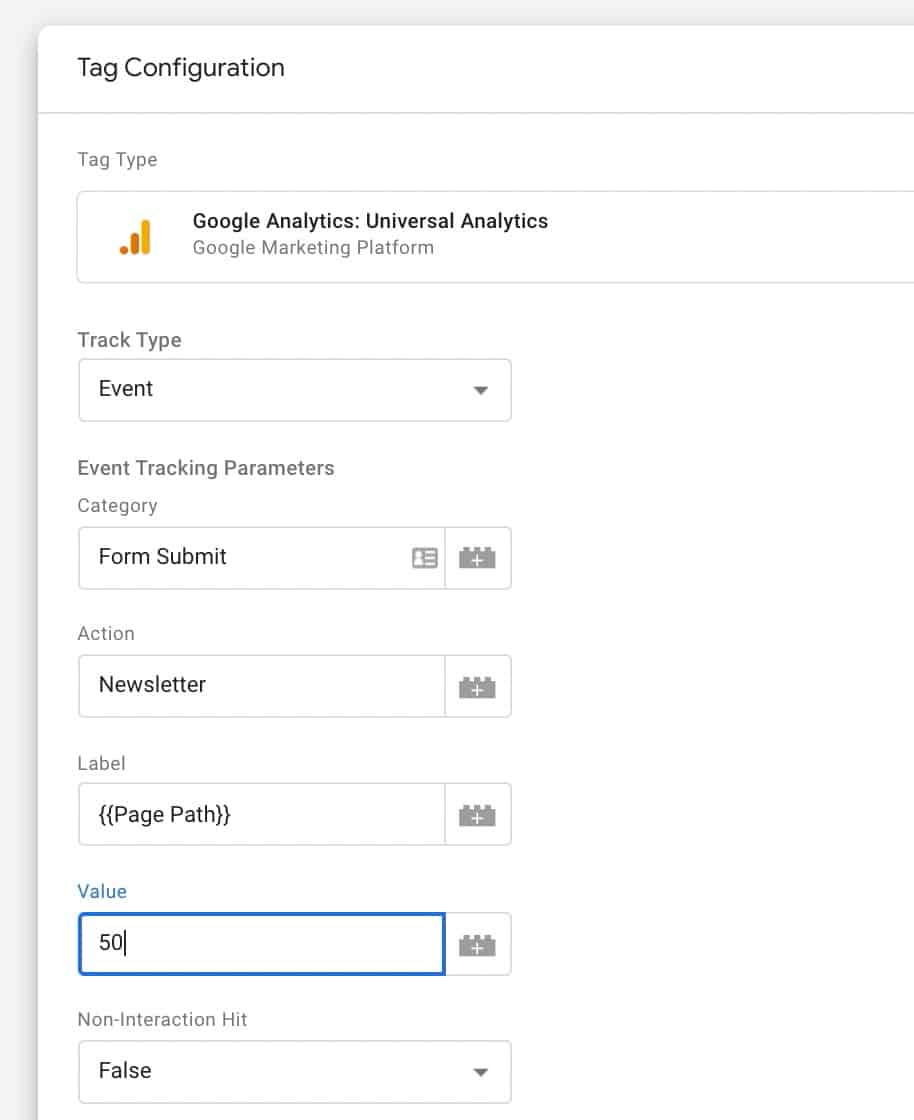
Lastly, make sure you use the trigger for form submissions.

Sample Tag for Course Creator

Configure your video watch tag to something that looks like this.

Sample Tag Configuration in GTM for View Views
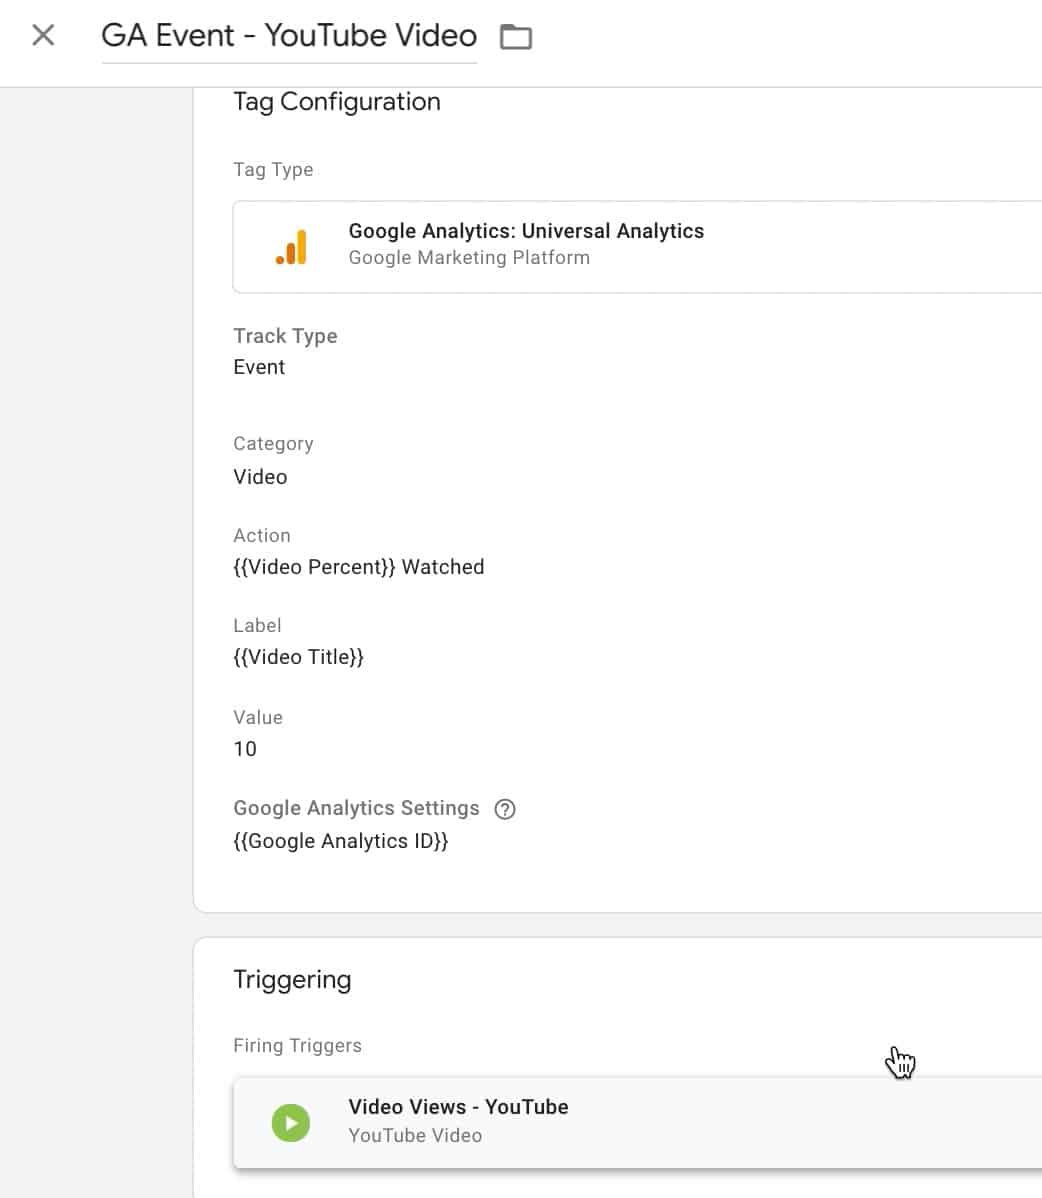
  • Category—self explanatory
  • Action—this combines the video percent variable that we triggered in the earlier step with a text. What happens is when the video reaches the percentage we setup earlier (i.e. 10, 25, 50, etc.) an event will be sent to Google Analytics with these values. But not all of these will trigger a goal conversion. Remember, our goal conversion is “75 Watched” —> which means it will only trigger if it matches that exactly.
  • Label—you can track the page path like the examples earlier, but here, I chose to track the title of the video
  • Value—same as above, you need to assign a monetary value; otherwise, it’s pointless to add them as goals.

Under the triggering, make sure you add the YouTube Video trigger you created earlier.

Test the Configuration: Make Sure Your Tags, Triggers, and Variables Are Working Properly

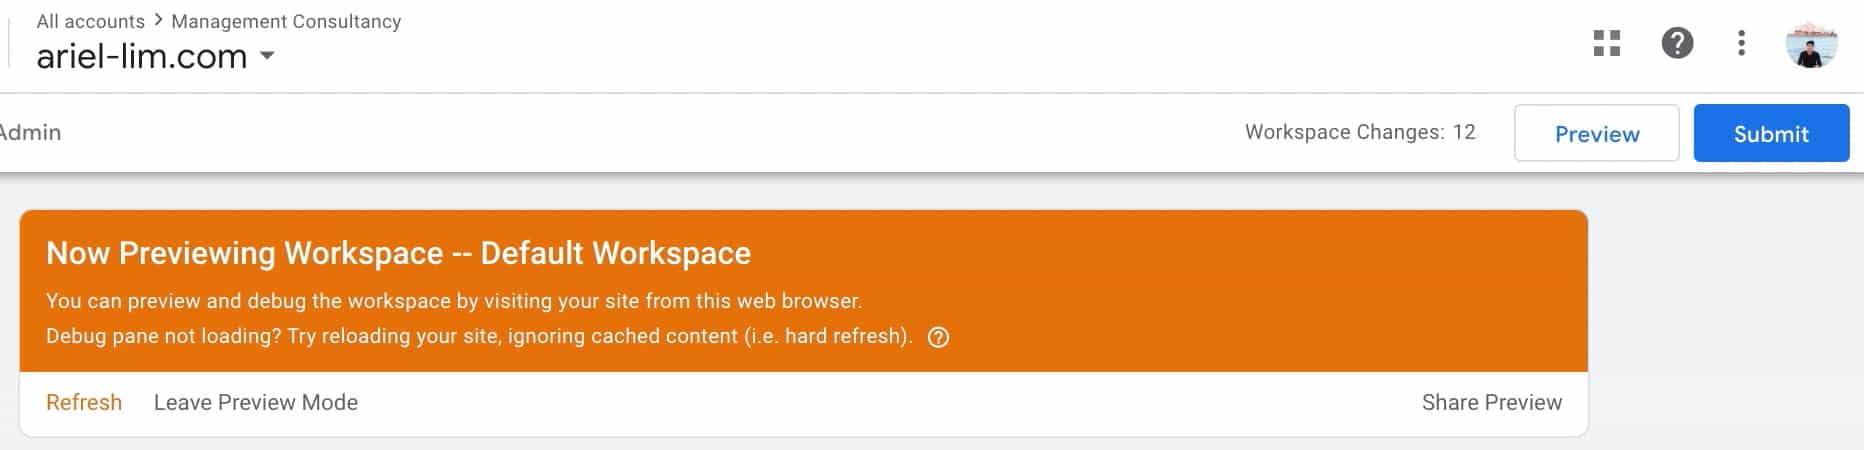
Click on Preview at the top and the page will reload with an orange banner that says you are now in preview mode.

Preview tag configuration if it's working

Open another tab on your browser and load a page on your site that contains the events that you want to track:

  • A page with an affiliate link
  • a page with a form
  • a page with a video

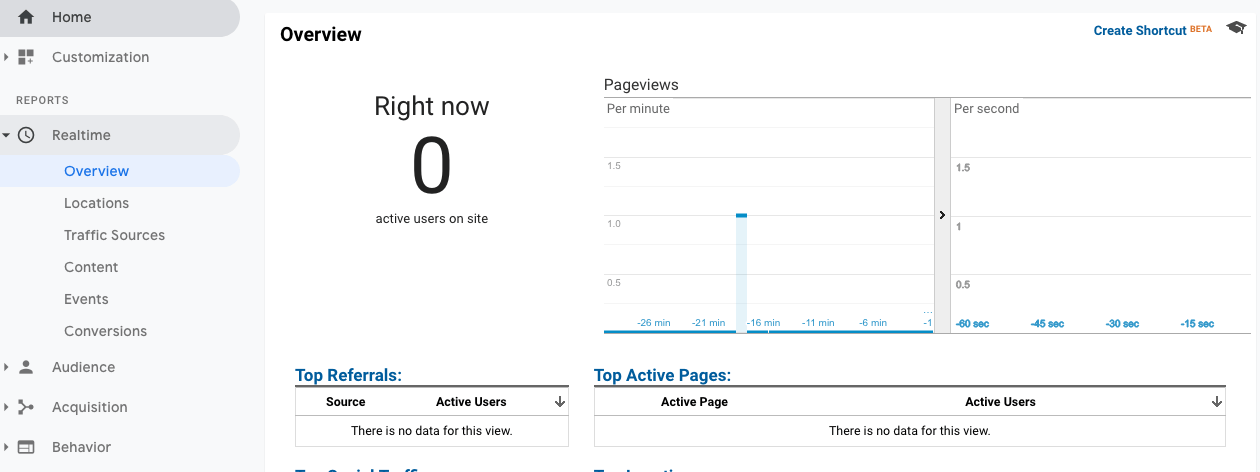
You’ll need to have Google Analytics opened here as well. Head on to Google Analytics > Realtime > Overview

Real-time reports in Google Analytics to display event tests
Verifying the Affiliate Link Tag

Head on to a page on your site with an affiliate link. You’ll notice the bottom portion of your screen will have a debug pane.

GTM Debug Mode showing which tags are firing

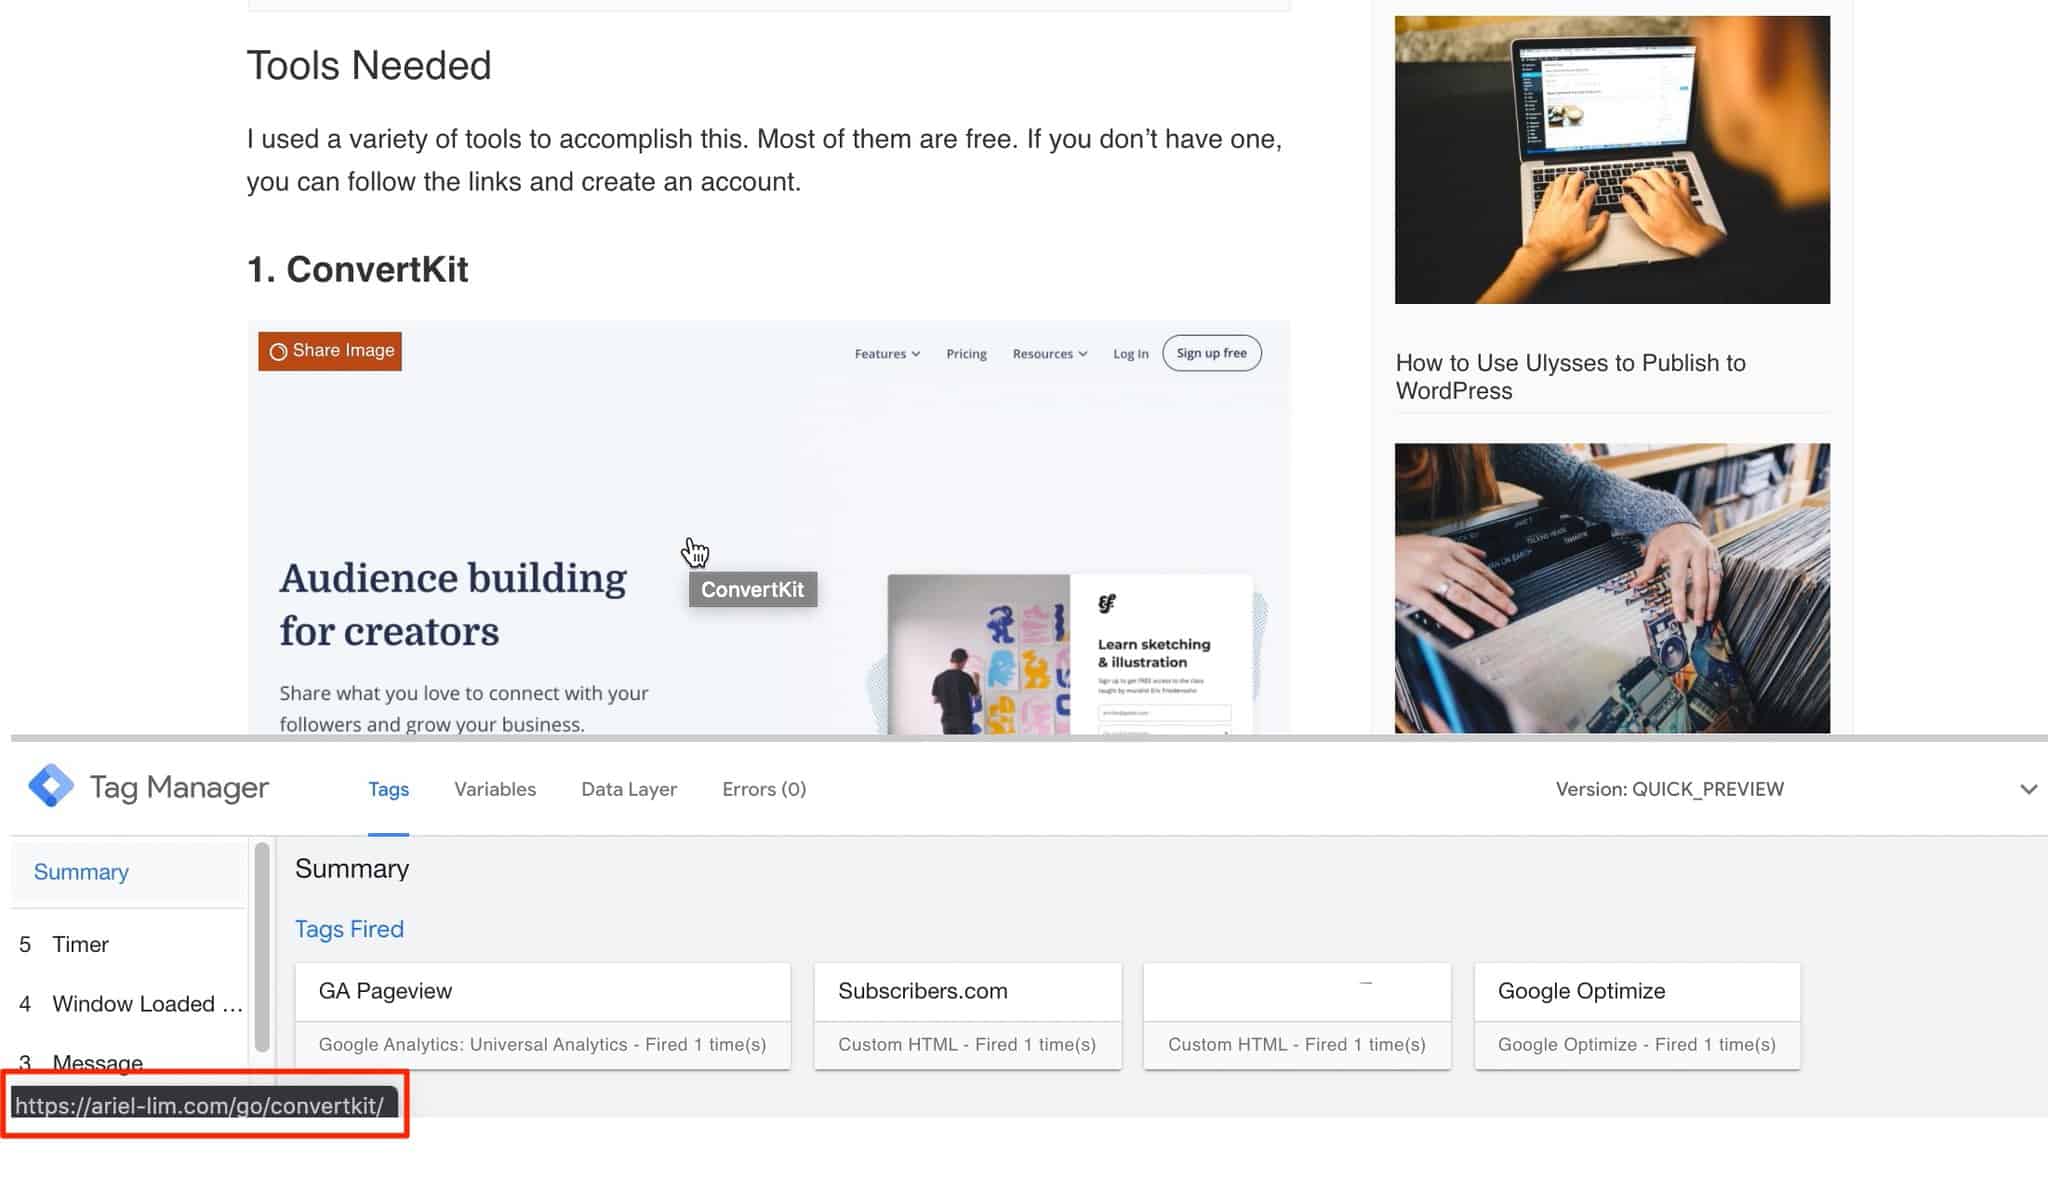
Remember the trigger we setup for affiliate link clicks? It should only trigger for clicks with URLs containing /go/.

In the example above, if I click on that, you will notice the Affiliate Link Click tag will trigger.

GTM Debug Mode showing which tags are firing

Try clicking on another link that’s not an affiliate link to see if the tag will also trigger. If it doesn’t, then you have configured it properly.

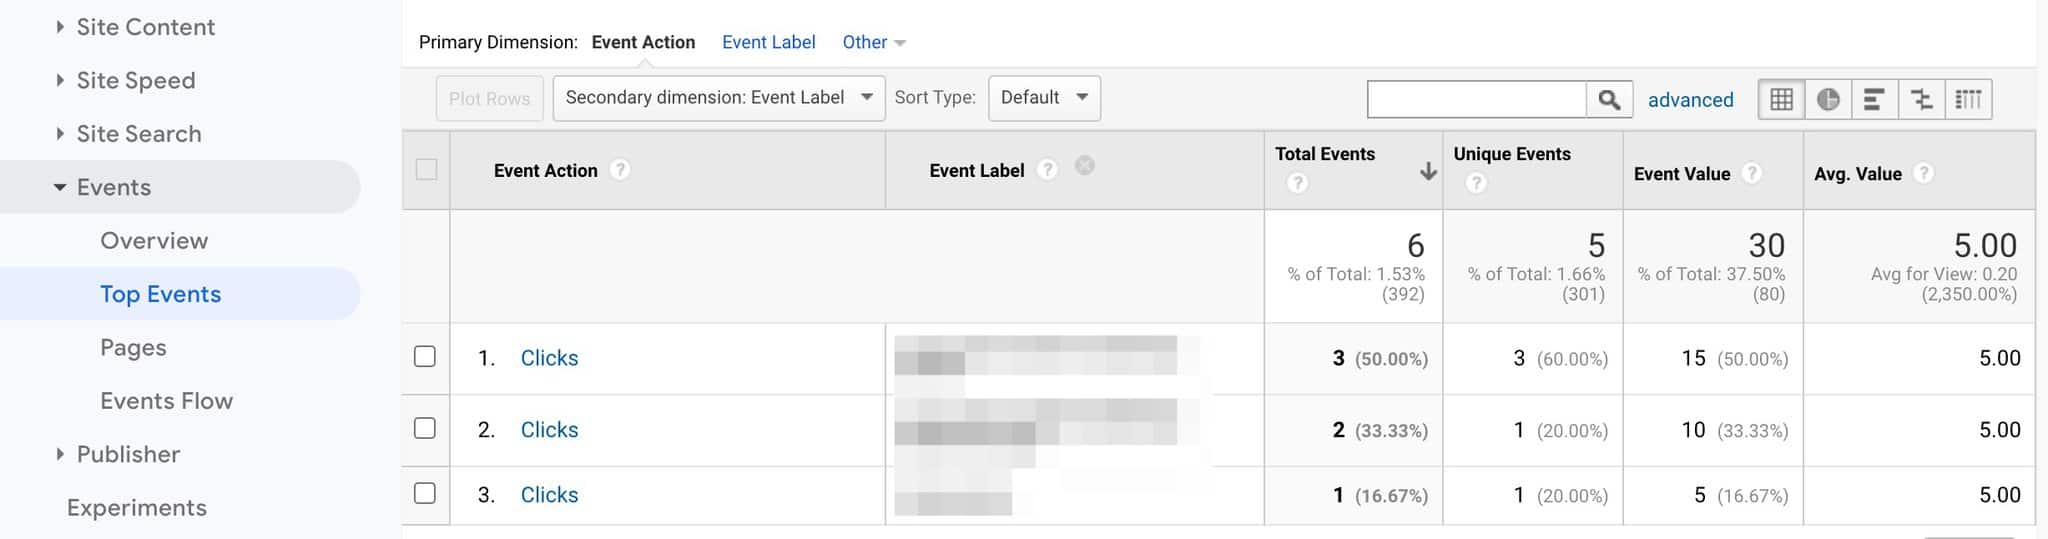
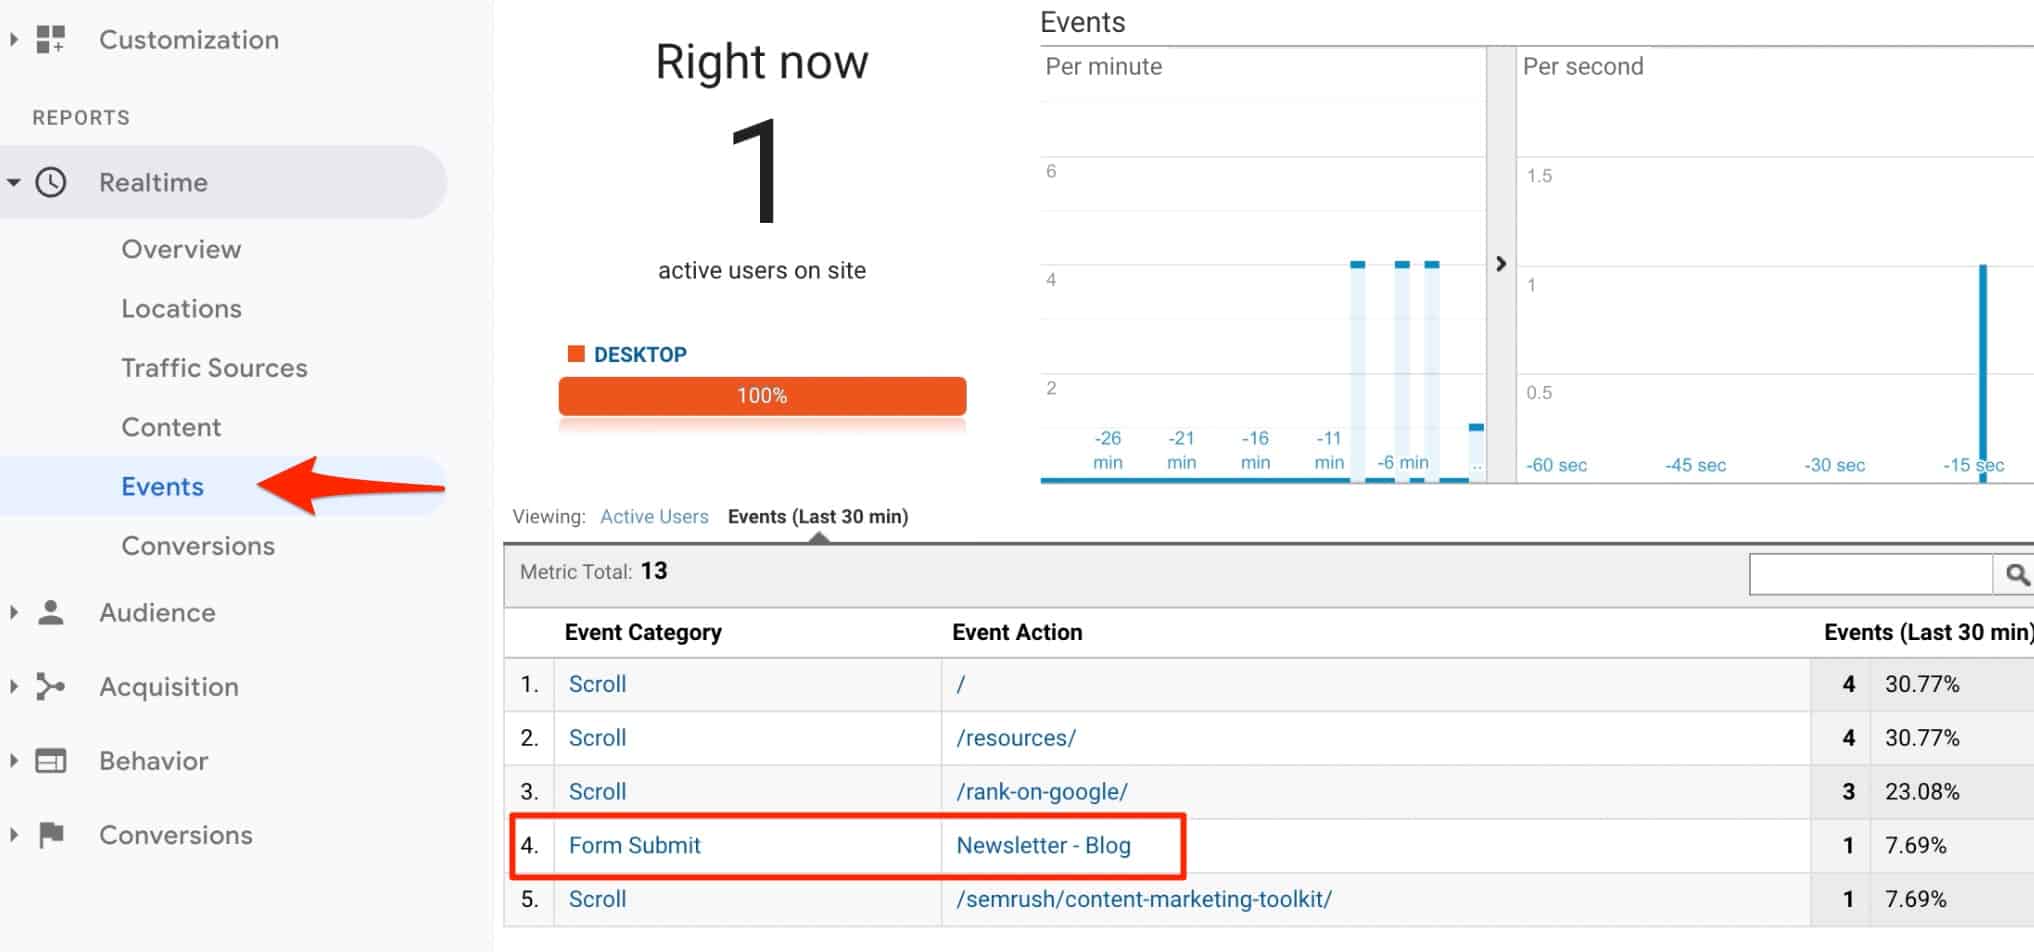
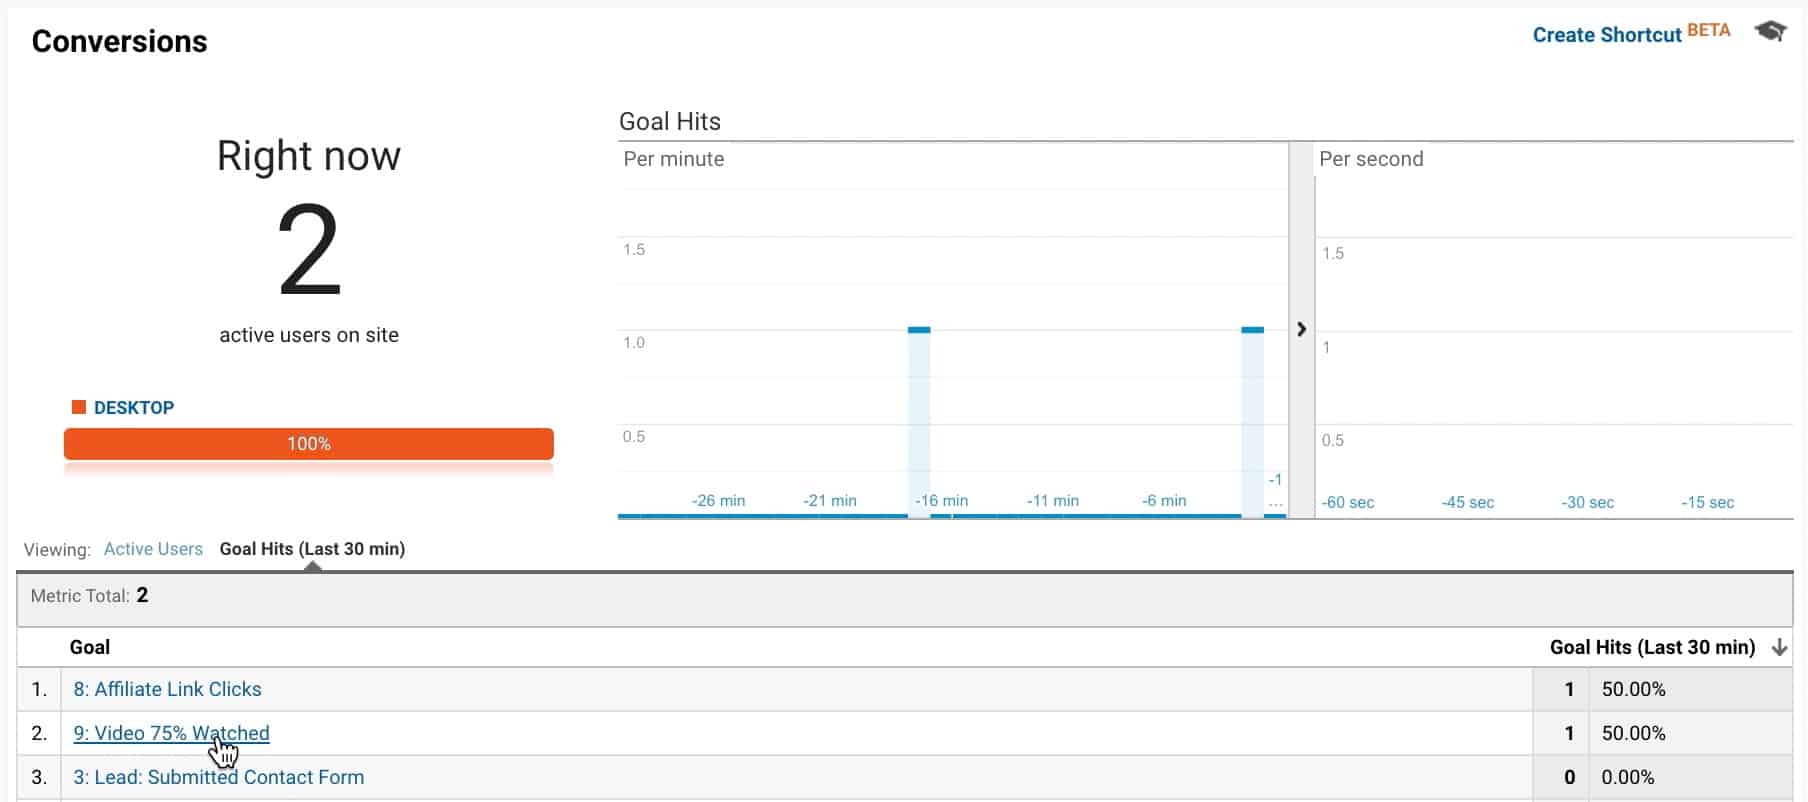
Now, go to the realtime reports in Google Analytics: Realtime > Events

If the event setup is correct, you should something that looks like the one below. You’ll see that the category and action you added in the tag is firing properly.

Verify event in real-time reports in Google Analytics

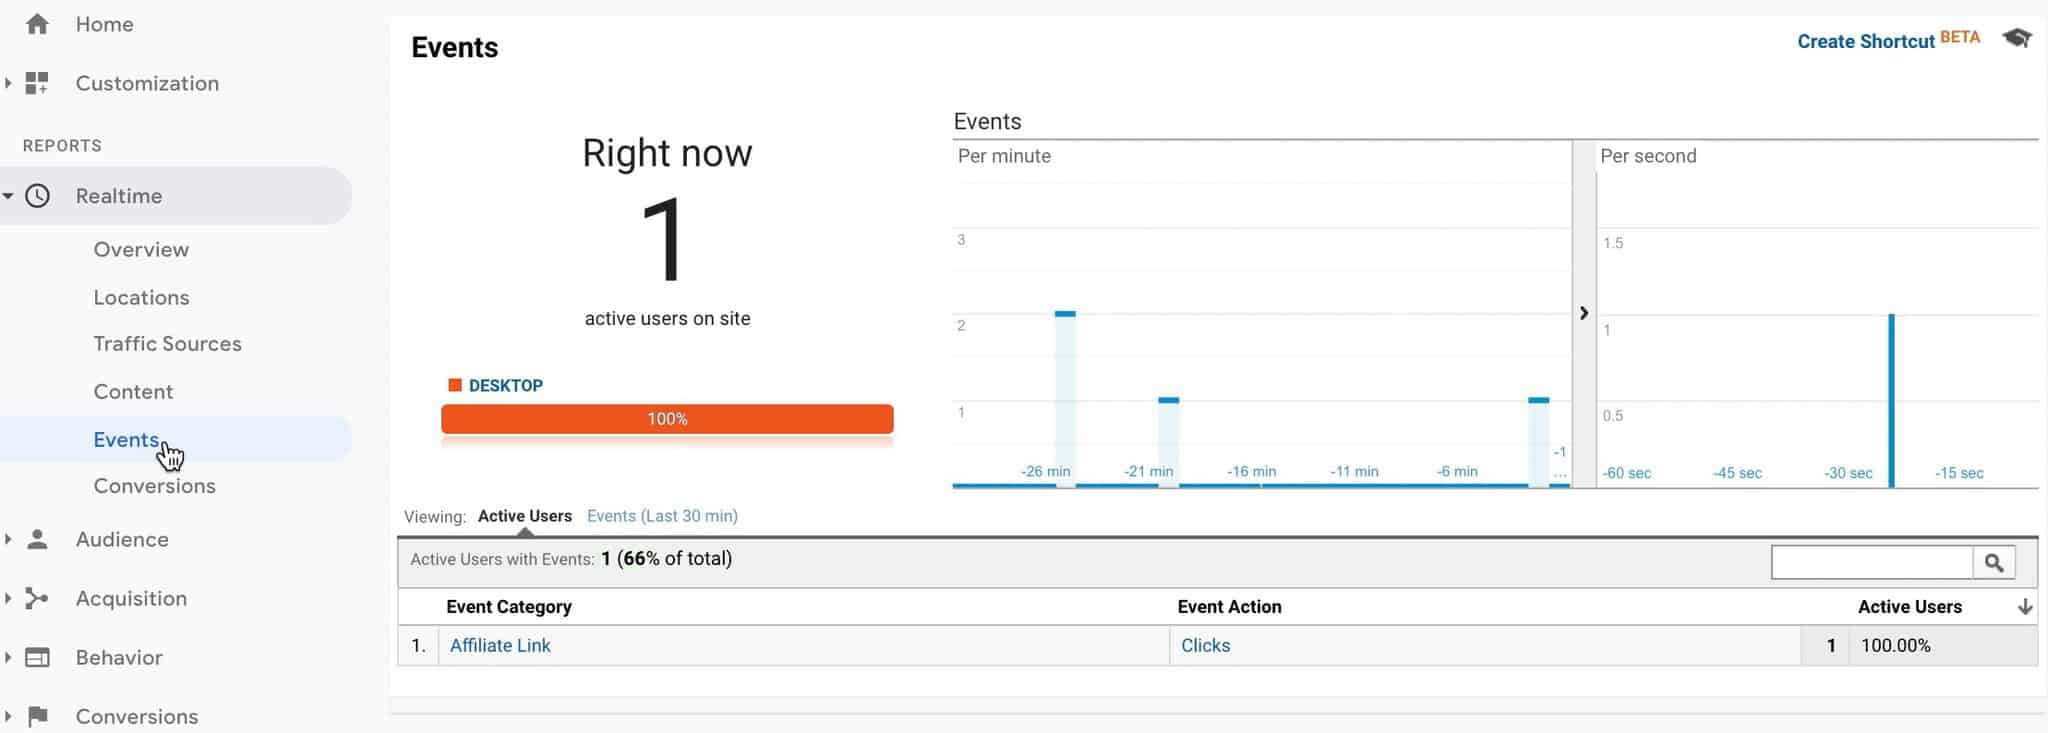
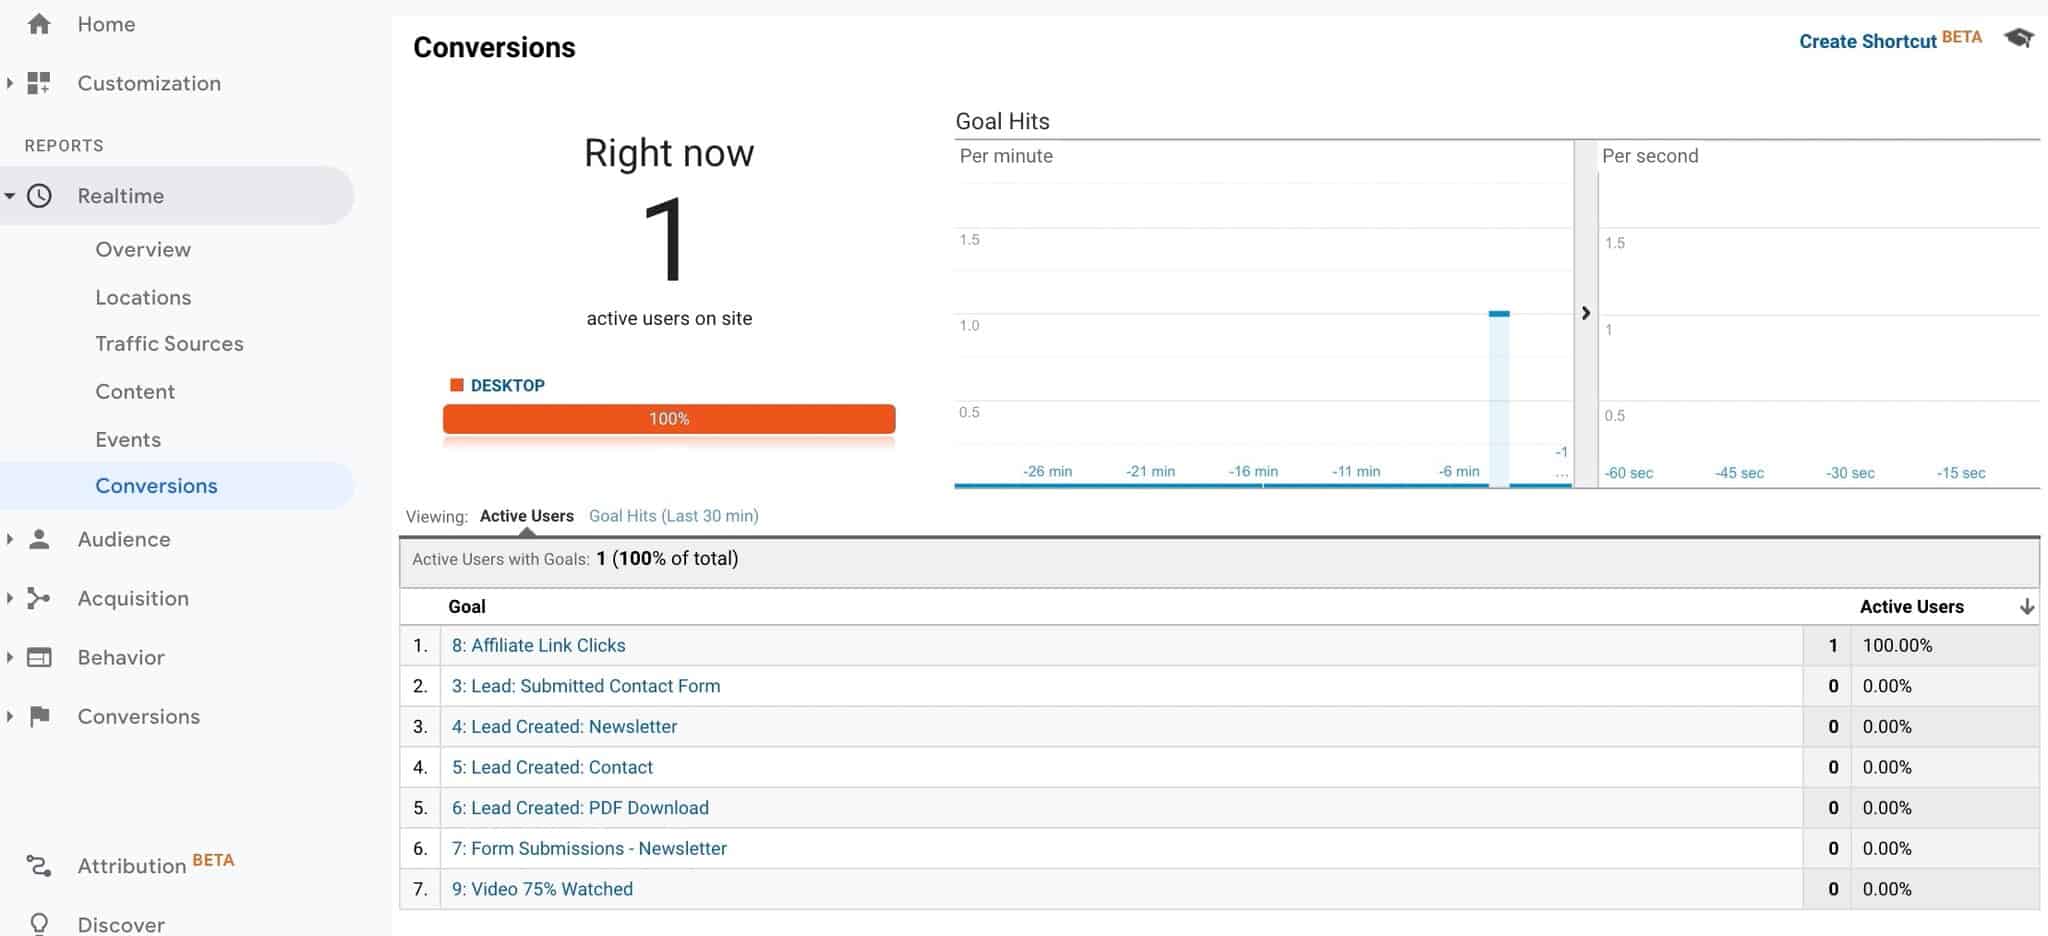
Now, let’s look at the goal conversion itself. Remember, not all events should be tracked as goals (like in the video example below), but in this case, the affiliate link clicks should trigger a goal conversion.

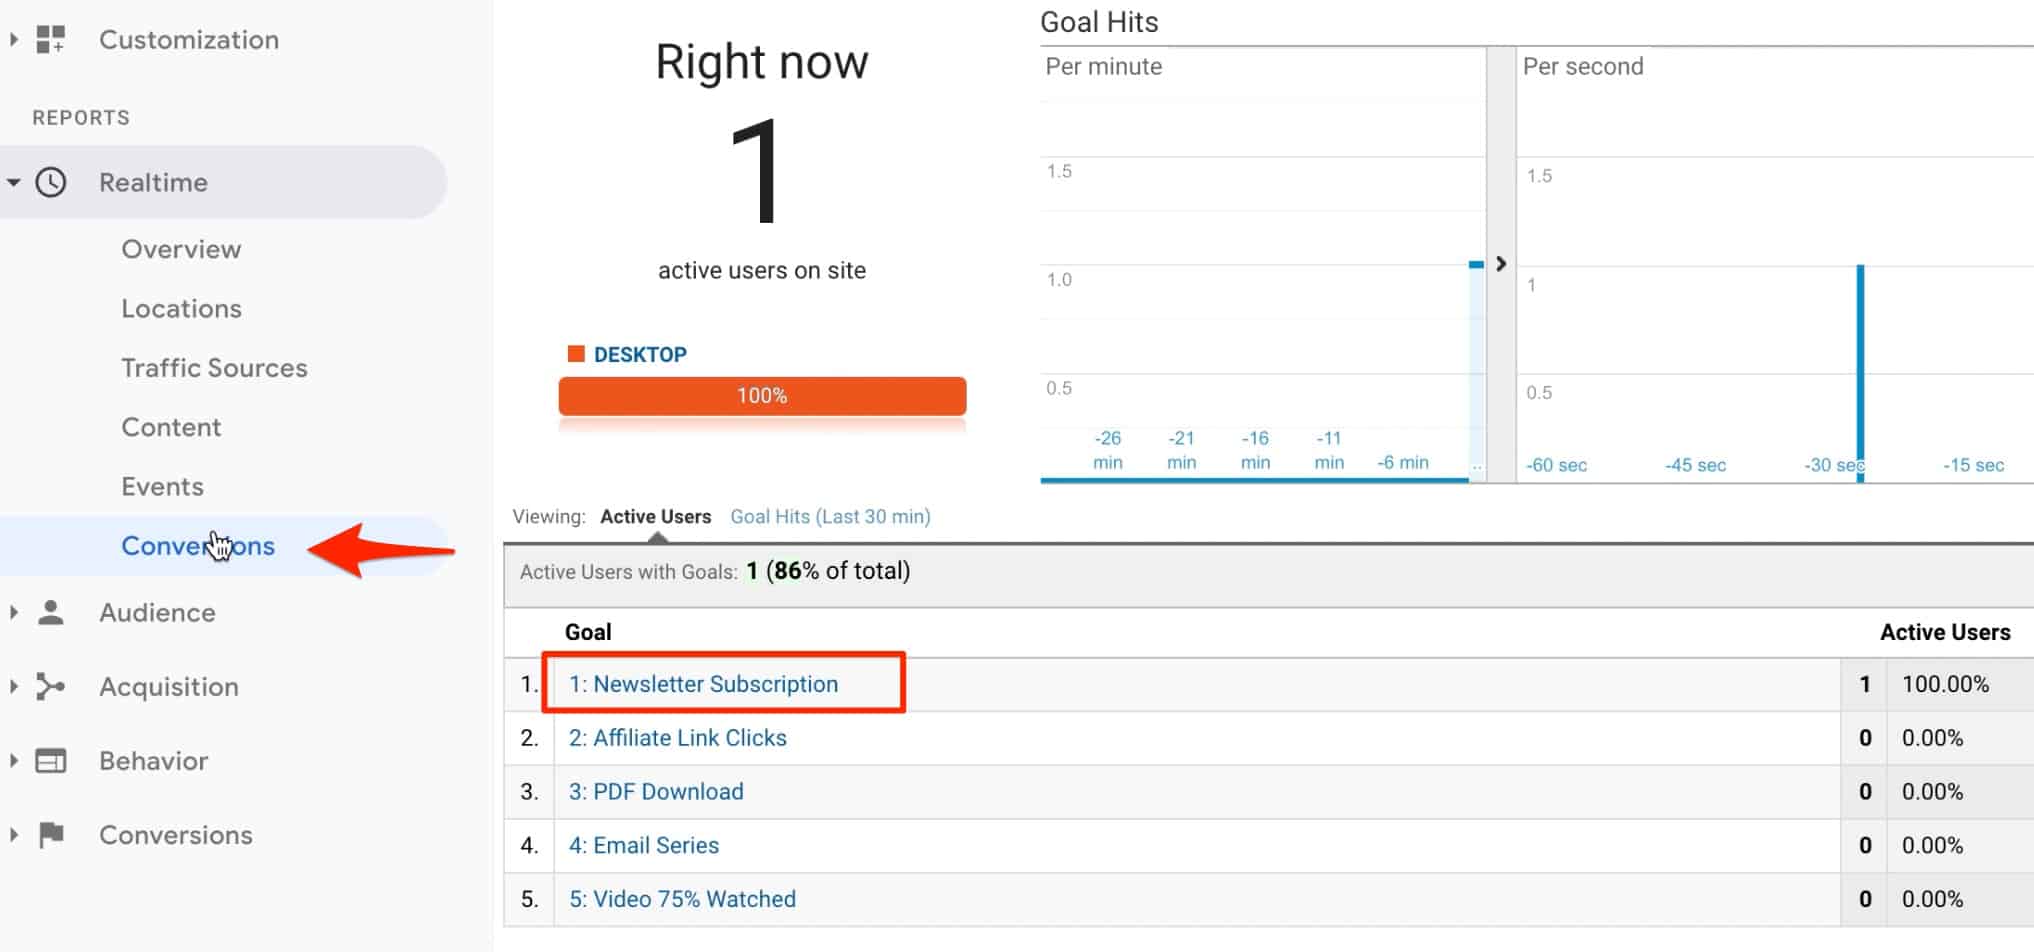
Head on to Realtime > Conversions and you should be able to verify this.

Verify conversion in real-time report in Google Analytics
Verifying the Form Submit Tag

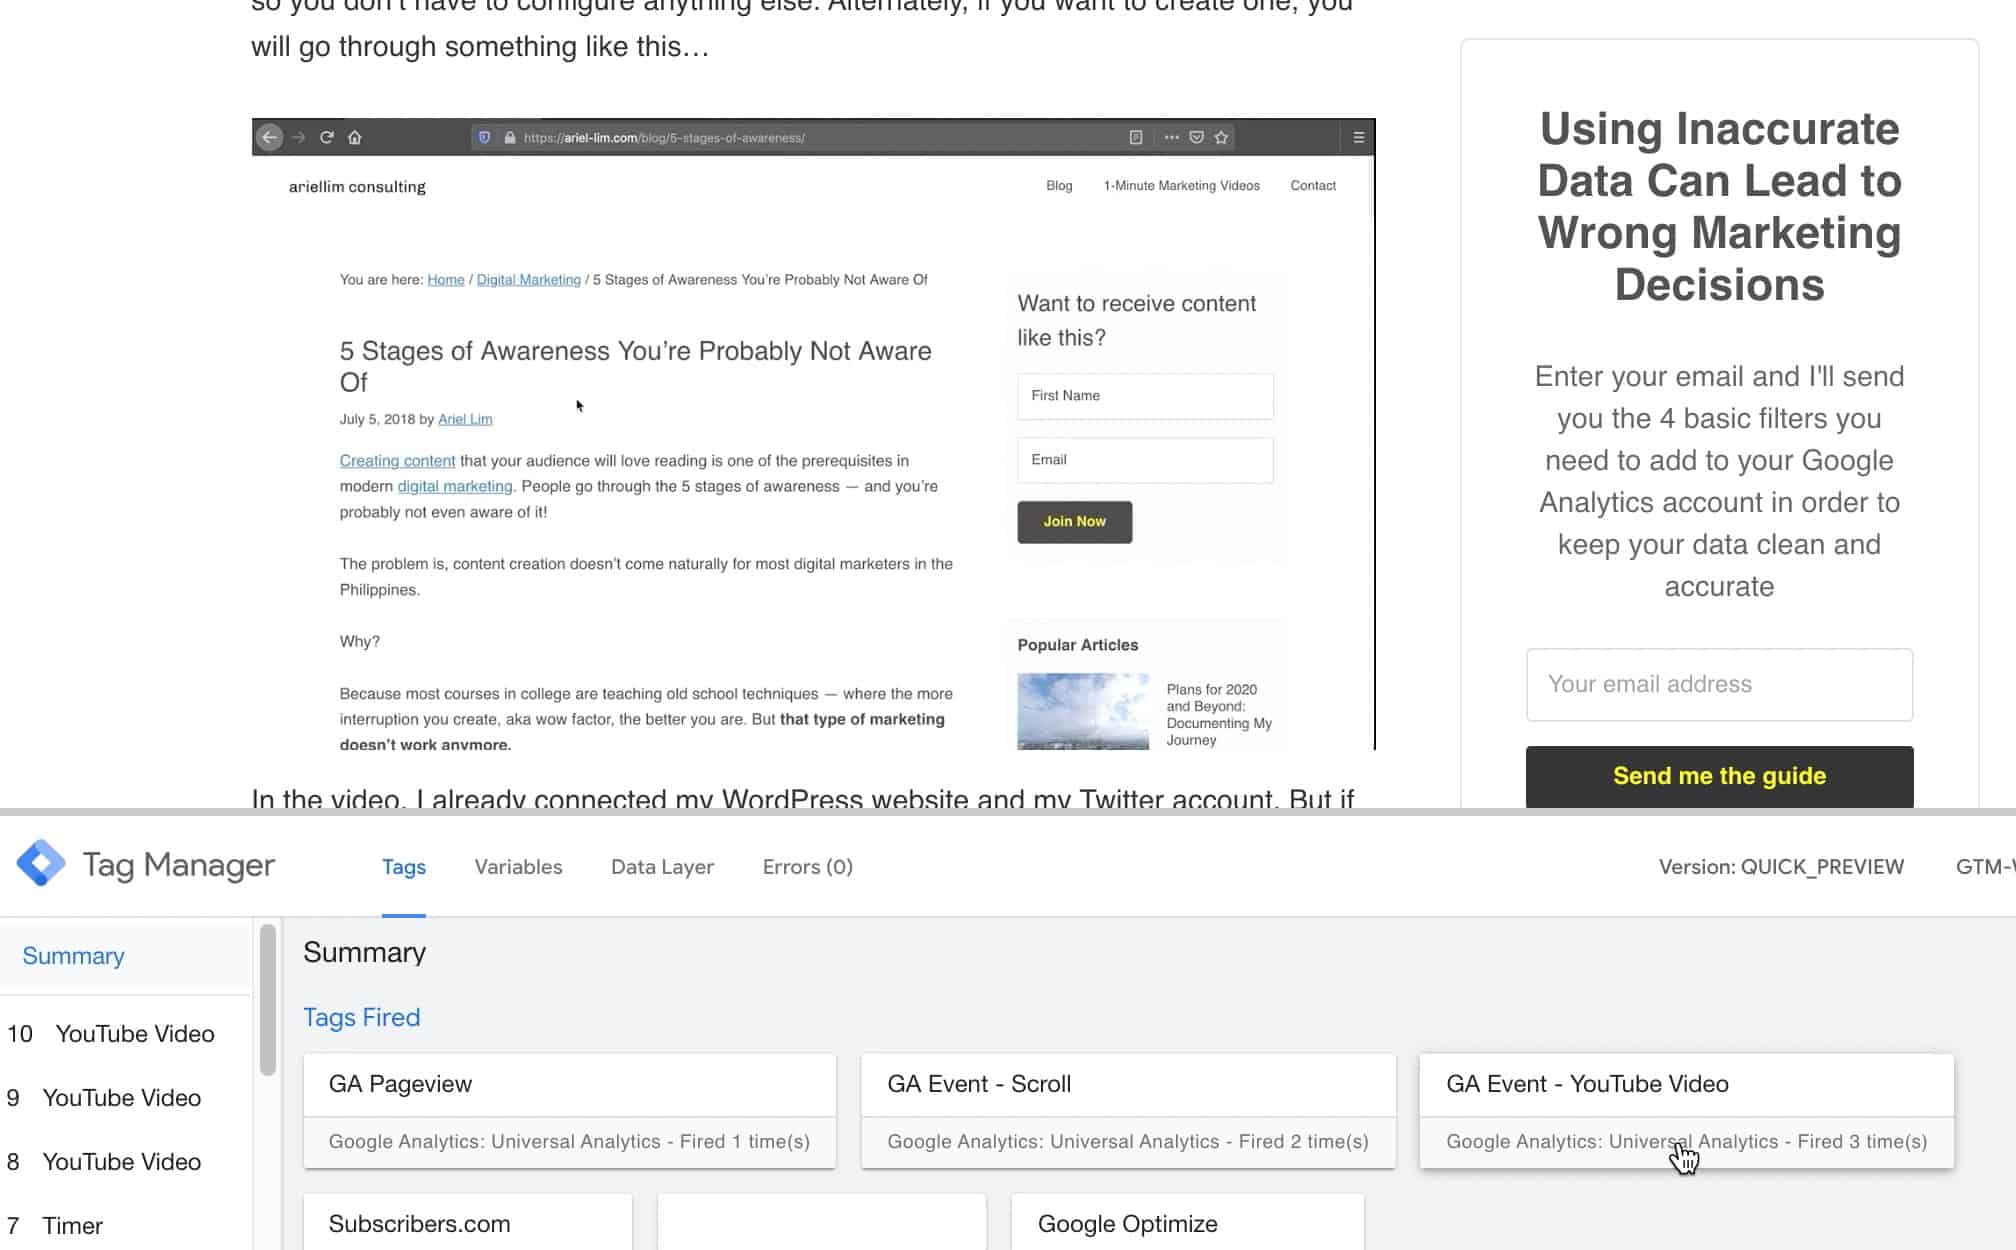
Head over to page on your site with a form. Try filling it out. You should see the event trigger in the debug panel.

Verify Form Submit Event in Real-time Report in GTM debug

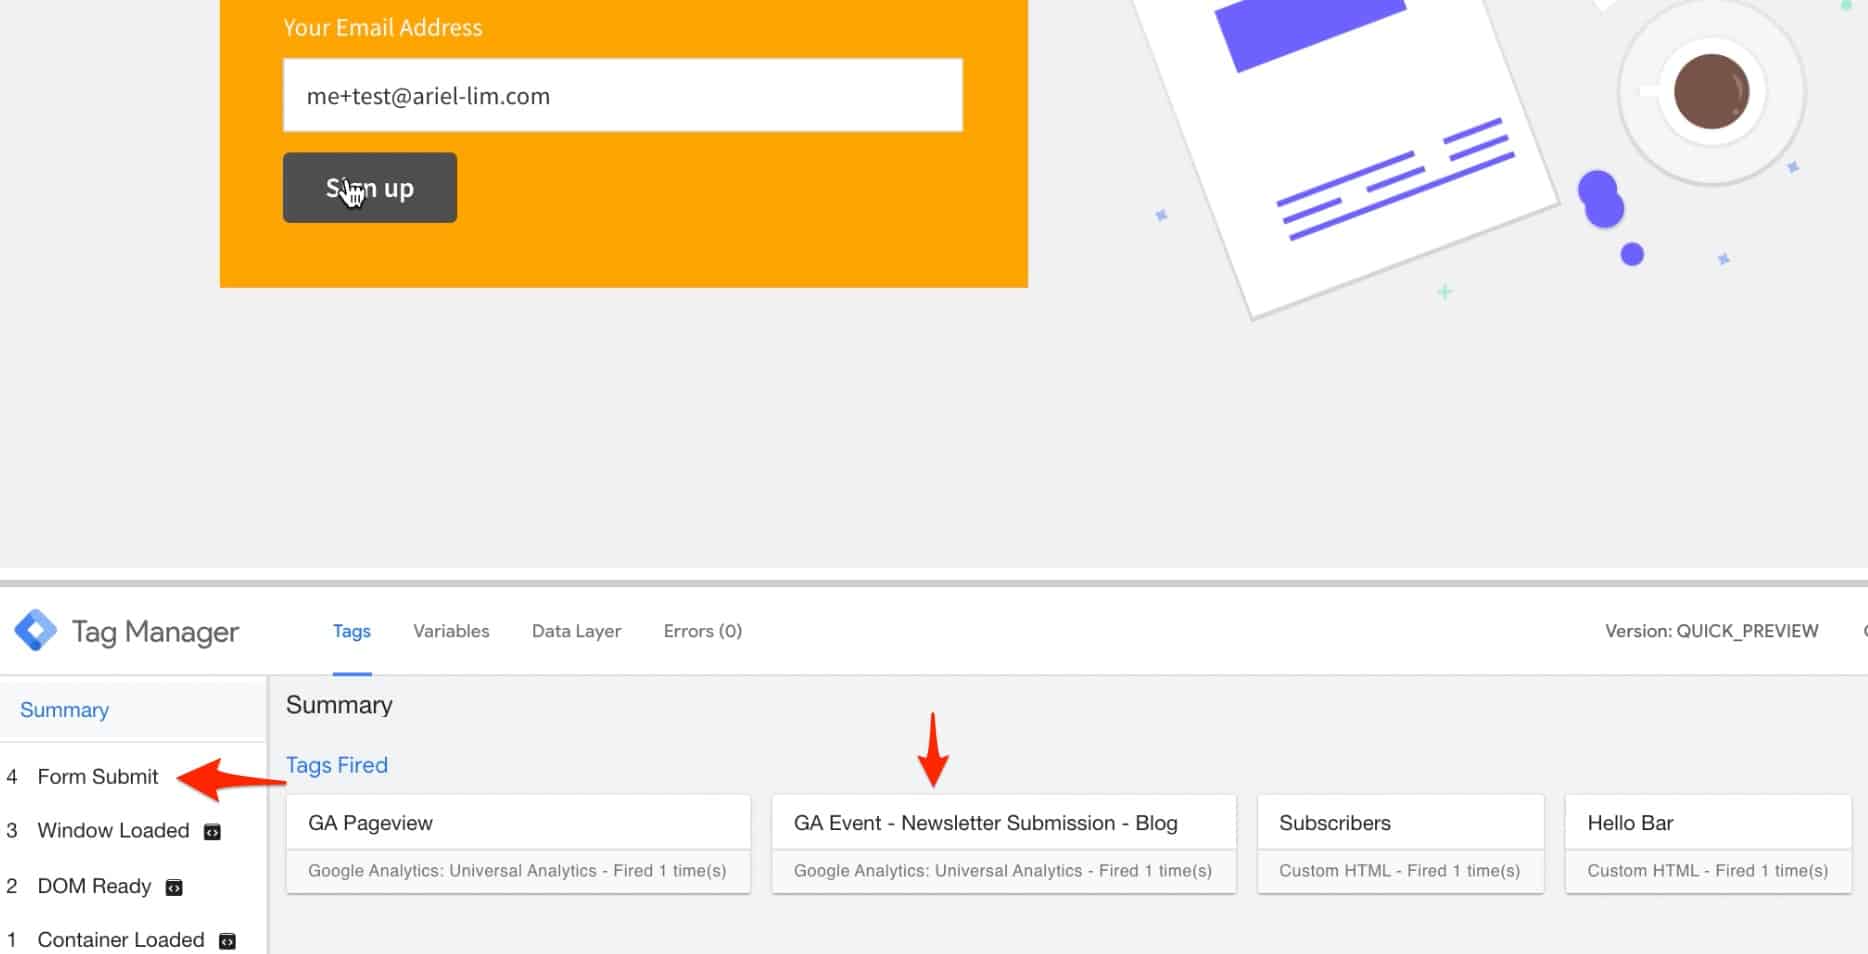
To double-check if the event fired properly, go back to the realtime reports in Google Analytics. Then head over to events.

Verify Form Submit Event in Real-time Report in GA

It should trigger properly depending on the naming convention you used. The last step is to check if this also triggered a goal conversion.

Verify Form Submit Conversion in Real-time Report in GA

There you have it. You can use the same setup for all your forms. Now, you don’t have to rely on page loads in order to track conversions.

Verifying the Video Play Tag

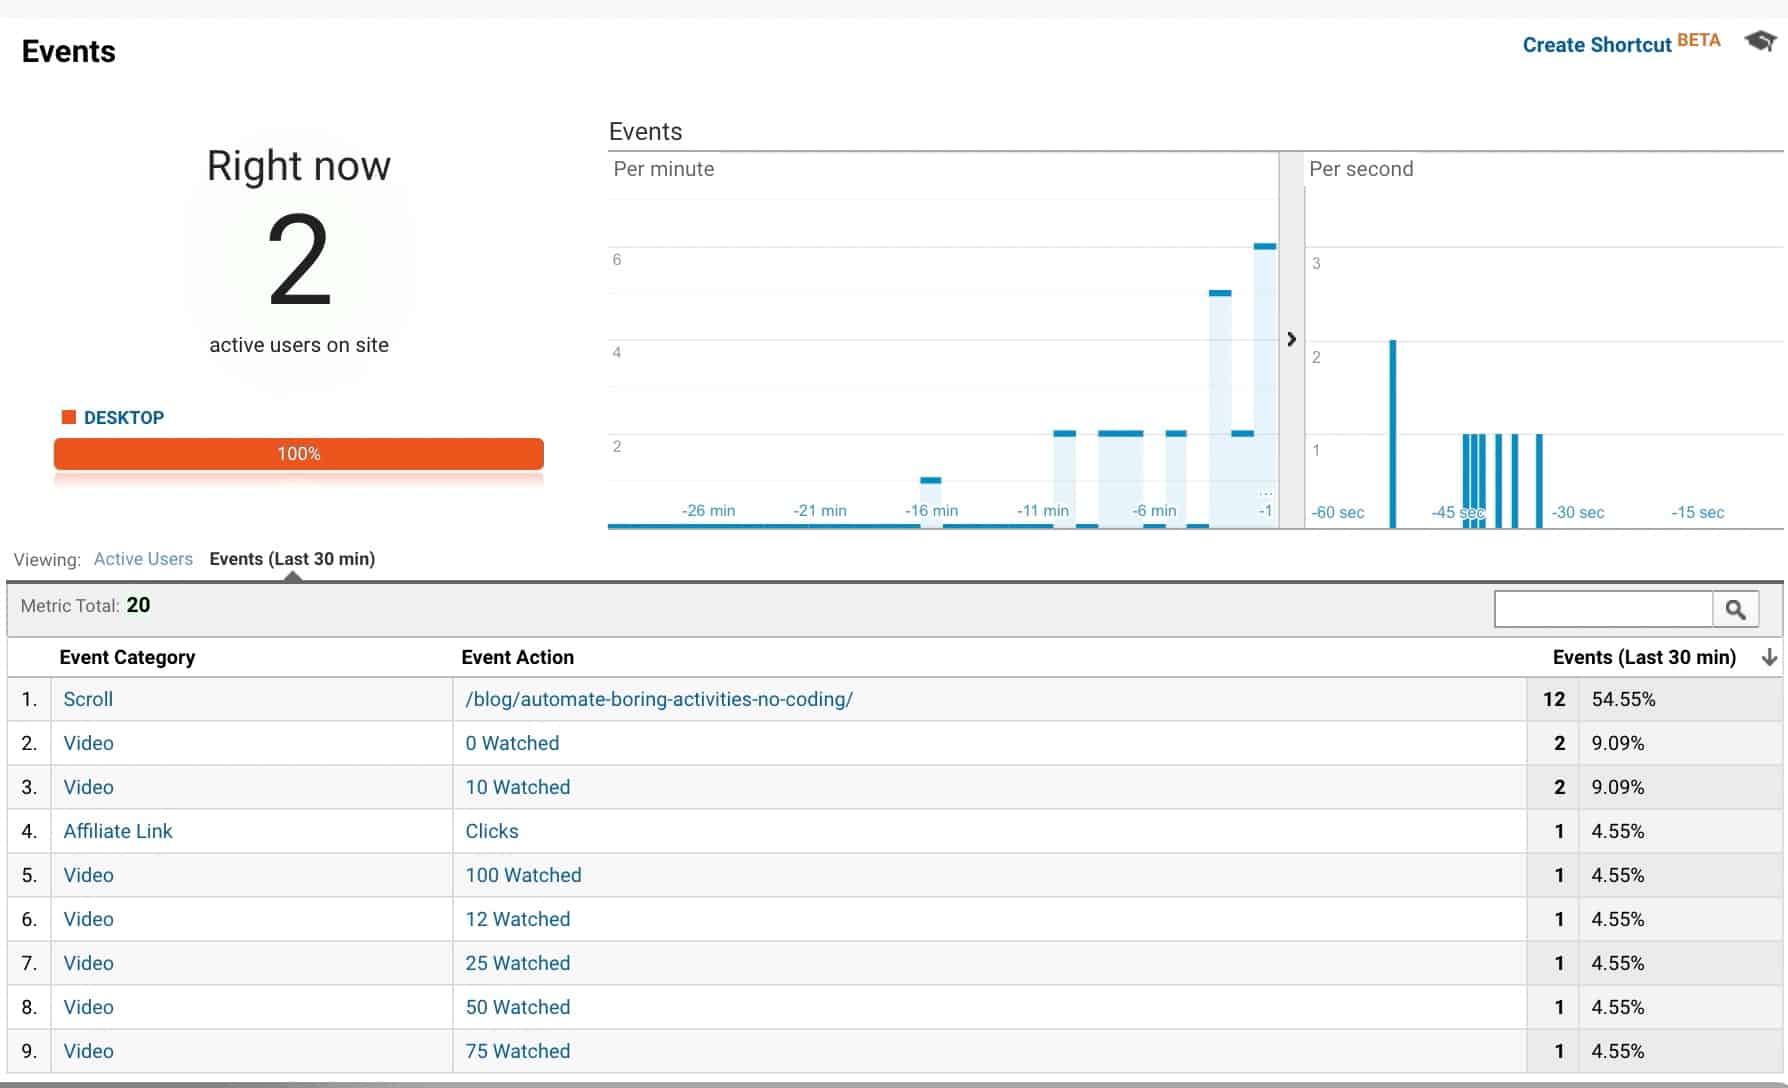
Finally, for the video play, navigate to a page on your site which has some YouTube videos embedded. Play the video and you’ll see events populate the debug screen.

Verify Video Watched Event in Real-time Report in GTM Debug Mode

In the example above, the first YouTube Video tag that fired sends an event that the video is played. The next one is 10% watched. The next is 25% watched. Depending on what you configured earlier in the trigger, the tag will fire when those conditions are true.

Verify Video Watched Event in Real-time Report in GA

This means that our event is firing properly. Now, let’s verify if it triggers a goal conversion. Earlier, we set the goal to trigger when a person watched 75% of the video.

Verify Video Watched Goal Conversion in Real-time Report in Google Analytics

As you can see, even if there are multiple events triggered for the video, the goal is triggered only once. That means we setup our goal properly.

Publish Changes

After verifying that the tags and events are firing correctly, it’s now time to publish the changes you made in Google Tag Manager. Click on Submit at the top, enter a name and add some details as to what changes you made. Once done, click Publish.

Publish GTM container to deploy changes

The variables, triggers, and tags you created will now be live on your website. Every time a visitor clicks an affiliate link, submits a form, or plays a video, events will fire on Google Analytics.

You can now view how people are interacting on your website. You can see this in Behavior > Events.

If the event matches the conditions for the goals you setup, conversions will also trigger. Once you have enough data, you can use this for your analysis later on.

Why You Should Stop Using Destination Goals in Google Analytics

Destination goals are triggered when it meets two criteria: your Google Analytics code is installed on that particular page and it loads.

The most common use cases for this are thank you pages for email signups or an order confirmation page. But what if your business model doesn’t rely on static pages? What if you also want to track other important actions on your website that don’t rely on page loads?

These are the limitations of destination goals.

Reason #1: Destination Goals Aren’t Accurate

If a page loads, your destination goal is triggered. If it loads again, that’s another goal conversion. This presents inaccuracies in the data reported. Here are several instances where can be an issue:

  • The person reloads the thank you page
  • Sends the page URL (e.g. via email or messenger or WhatsApp)
  • Bookmarks the page then visits it again
  • The browser autocompletes that URL

As you can see, there are various ways your destination goal can be triggered which leads to inaccurate reporting.

Reason #2: Tedious to Maintain

In order to minimize inaccurate data, a best practice for destination goals is to add a noindex tag on the page. That way, visitors can’t find it on search engines.

Some resources also say that you shouldn’t add your PDF download links on the page itself. Instead, use a copy to say that you’ll receive it via email. That way, visitors will have little reason to bookmark the page.

Then again, most websites use a customized thank you page with video sales letters. If people like the contents of the video, they can still go back to it.

WordStream Thank You Page

You’ll also realize that if you want to track conversions, you’ll have to use multiple destination goals. Unless you know how to use REGEX or come up with some form of URL convention for your pages, you’ll soon run out of “goal slots.”

Reason #3: Very Limited Use Case

Destination goals aren’t flexible. As mentioned earlier, they trigger when a page loads. That means everything that happens on your site that doesn’t involve another page loading within your website isn’t track.

Here are some examples of those:

  • External link clicks
  • Switching between tabs
  • Playing videos
  • Clicking on interactive content
  • Toggling accordions and the like

If your business model is like the examples I shared earlier where you also want to track affiliate links, form submissions, or video engagement, then tracking events are a better option for you.

Over to You

In this guide, I shared three examples of how you can create events and use them as goals in Google Analytics without touching your code. Events are more flexible. They give you more insights as to how users engage on your website.

Are you ready to start tracking events? Or will you still rely on destination goals for your conversion?

Either way, I’d love to know below. Or if you have other questions, feel free to tweet me here.

Structure Your Processes and Policies Around Your Customer

bureaucracy binders paper work

If you look at most businesses today, you will notice that a lot of corporate policies and processes exist. Unfortunately, these rules are created to protect itself from potential wrongdoings of employees instead of setting them up to succeed.

Too many rules at work keep you from getting things done. In a TED talk, Yves Morieux, Director at BCG, said that “we pay more attention to knowing who to blame in case we fail, than creating the conditions to succeed.

They lose sight of what’s really important—winning. In business, this means creating more customers so you grow your revenues and profits, which you need to grow your business further, so you can continue serving more customers.

A Tale of Two Competitors: What to Do and What Not to Do

Early this year I got on a call with the customer support of a big tollway company. Let’s call them Company ABC. I called because I needed to update my credit card because my old one expired. After I hang up, I was literally cursing and shouting.

I emailed their customer care address about my credit card issue a few weeks before. I followed all the instructions on their website, downloaded the form, then sent my email. I followed up several times using different channels —email and contact form. No response. Not even an acknowledgement receipt of my email.

It was exactly 28 days since I first sent my updated forms. That’s when I called the hotline. When I asked the rep about it, he said, that’s their policy. If the submitted information was incomplete or wrong, they don’t say anything. No reply. They won’t even inform the sender.

Can you believe that? As a customer, how would you know the status if there is no communication from Company ABC?

Now, don’t get me wrong. I’m not angry at the customer service rep. In fact, he was very helpful. He made me realize that this company he’s working for don’t care about their customers. And it’s reflected in their policy.

Let’s contrast this to my experience with their direct competitor, Company XYZ, which run the southern roads. I followed the same procedure as I did in Company ABC. I received acknowledgement and the entire credit card update process was finished in 5 days.

Both companies don’t have an online system where you can update the credit card information yourself. The only way is to either visit a satellite office and manually submit a form, or via email. Phone calls only tell you what to do. You can’t make any changes there either.

Lessons Learned from Two Companies with Different Policies

What can you learn from this story?

Never lose sight of the most important thing—your customer. As I mentioned over and over again, customer focus is what sets successful companies apart. Adding value to their lives is the most important thing you should focus on.

Creating customers is the real purpose of a business. Without them, businesses will cease to exist. The best way to focus on customers is to use the buyer utility map to map out the customer journey.

The main question you need to answer is this:

What policies do I have to make it easy for my customers to do what they need to do during the _________ stage?

Structure Your Business Policies Around Your Customers

Make sure your policies and other processes make it easier for the customer to do business with you. Here are a few examples of how you do that.

1. Purchase

What policies or processes do you have that help customers buy from you?

  • Do you have a system for helping customers solve their problems? Content marketing and social media fall under here.
  • Do you offer warranties, guarantees, returns and refunds to qualm their fears of buying from you?
  • How easy is it for your customers to buy from you? Can they do it on their phones? Do they need to create an account? Can they pay using credit card or online? Or do they have to physically visit your stores or go to the bank just to settle and payments?

2. Delivery

Some important questions to answer for the deliver stage are the following:

  • How much time and effort does a customer need to do to get updates on their delivery? Do they have to followup with you manually each time like sending an email or calling you? How long do you get back to them? Or do you have an automated and proactive way to communicate that status of their delivery?
  • What policy do you have for lost or stolen packages?
  • Do you have a promise like the 2-day delivery of Amazon Prime?

3. Use

What policies or systems do you have in place to help your customers get the most of your products and services?

  • Do you have a customer support hotline that people can reach if they need help to use your product?
  • What about a self-service portal where they can make changes to their own accounts? Or do your customers have to go physically visit a store in order to update their information?
  • Is there a dedicated support team to help your customers succeed?

4. Supplements

Supplements deal with other products/services needed in order to get yours to work. For most software companies, APIs and other integrations fall under here.

  • Do you have an API or integration with other applications to help your customers succeed? Does it have documentation? Or they need highly specialized (and expensive) skills to do so?
  • Do you have documentation on workarounds or alternatives about using your products/services with others?

5. Maintenance

How easy do you make it for your customers to maintain and keep your products at peak performance?

  • Do you offer maintenance services? Or do customers have to buy and replace their existing products with new ones if they break?
  • Can they take it to a repair shop/store that is easily accessible?
  • How easy is it to upgrade the product? For example, Apple Mac’s used to have swappable RAM slots, but newer models now are soldered directly, making upgrades impossible.

6. Disposal

What policies or processes do you have around disposal of products?

  • Can customers trade-in their products for some sort of credit or discount off their next purchase?
  • Do you offer recycling or drop-off points for waste products? Or do you pass this burden off to consumers? For example, this is what the bottled water/beverage industry does. Instead of having their own waste disposal and collection systems, they rely on 3rd party recycling plants and consumers to manage recycling.

Over to You

No matter your industry or business is, make sure that you structure your policies and systems and other processes around your customer. Always put them first and the rest will follow.

Don’t spend too much time crafting every imaginable scenarios for internal policies that don’t matter. All results are external the organization. If you focus too much on creating rules for your team to follow, you will lose sight of the bigger picture.

Instead of creating value for customers, everybody will start to focus on not making mistakes. This won’t help your business succeed.

What do you think? Do you have corporate policies that hinder you from achieving customer success? Or are your policies all geared towards helping them get the most value? Either way, I’d love to know.

Direct Traffic: A Sign of Brand Awareness (+5 Warnings to Heed)

What Is Direct Traffic

Direct traffic is one of the default channel groupings in Google Analytics. It’s the kind of traffic that comes from people directly typing or entering your website’s URL on their browsers. It is also the catchall or fall-back channel in Google Analytics.

I’ll elaborate on this below, but first, let’s go through the technical definition of a direct traffic in Google’s eyes.

Direct Traffic: A Technical Definition

Direct traffic is traffic that has:

  • Source exactly matches direct AND Medium exactly matches (not set); or
  • Medium exactly matches (none)

In other words, direct traffic is defined as any visit where there is no referring website.

Importance and Use of Direct Traffic

Direct traffic is a sign of brand recognition or repeat visits. There are only four main ways someone enters your website directly on their browsers:

  1. They know the URL address
  2. Through an auto suggest feature
  3. Opening a bookmark
  4. Mistyped another address

The first one is an indication of brand awareness. They already know your website that’s why they type it in. It’s the same as when you try to visit Facebook, Amazon, or Google. You know the URL by heart so you type it in directly.

If the website is known globally like the examples above or you visit the website often, your browser will auto-complete it for you. All you have to do is type a few letters, then the entire URL suggestion will appear. Press enter and your browser will take you to that website.

Safari Autocomplete URL

If someone bookmarks your page then opens it again, that is also counted as direct traffic. The other time people land on your website through direct traffic is if they mistyped another URL.

But, there are other instances where direct traffic is recorded on your GA account when it shouldn’t be the case. Below are the most common causes of it and how you can fix them.

Direct Traffic Issues You Need to Know

While direct traffic is an indication of brand awareness, not taking these issues can lead you to incorrect insights. Knowing them beforehand and placing measures to prevent them from happening is something you should do sooner rather than later.

1. Catchall Traffic Channel

This is the main thing you need to understand about direct traffic to ensure that the traffic recorded in your Google Analytics account is accurate.

Direct traffic is the traffic channel assigned by Google Analytics if it does not know where it came from. Take a look at this image below.

campaign processing google analytics

When someone visits your website, that traffic goes through that funnel where it looks for certain things first (like source, medium, referrer, etc.). If it finds a match at the early stages, it goes to that channel grouping. But after going through the funnel and there’s no match for anything that traffic will be recorded as direct traffic.

Below is the most common example where this might occur.

2. Untagged and Misconfigured Email Links

Links in emails —both from your email marketing software and 1:1 emails—are recorded as direct traffic if you don’t add UTM parameters.

For your email marketing software, if you linked it directly to Google Analytics or if it has a feature to automatically add UTM tags, that’s the only time it will show up as email traffic. But if you don’t configure it, they will be categorized as direct traffic.

Google Analytics Daily View of Direct Traffic Spikes

See those spikes in direct traffic? They are all coming from the email marketing software every time the brand sends out an email. It’s misleading and inaccurate. Using it as inputs in your analysis can lead to bad insights and business decisions.

3. HTTPS to HTTP Traffic

If your website is still using the HTTP protocol, you can expect a high percentage of direct traffic. The main reason for this is the way the secure protocol was designed.

This isn’t a problem if your site is using SSL already. But if you haven’t, take this opportunity to do so since a secured site is part of Google’s ranking factors.

Also, having an unsecured site isn’t great for user experience. Most modern browsers give a warning to users that they are visiting an unsecured site.

Unless they are familiar with your brand, which statistically speaking most people aren’t, they’ll most likely not click through your site anymore.

4. Visits to Your Own Site

Another issue you should be aware of are visits to your own website. Since you visit your site often, it will be part of the autocomplete feature in your browser.

If you don’t add an IP exclude filter or a plugin that automatically does this for you, then every time a page loads (or reloads) will get logged in your analytics account as direct traffic.

Your team’s browsing activity is also a part of this. Think about your developers, graphic designers, writers, and all other employees. If they constantly refer back to your website, it’s a best practice to exclude your internal IP address from your Google Analytics account.

This becomes more prominent if your team is required to login using your website. They type your homepage then click the login button at the top. That’s counted as direct traffic. If your GA code is also implemented on custom pages, like internal reports or forms that’s also hosted on your website, those will all count towards your traffic.

If internal traffic usage is important to you, create a separate view in your GA account to track them instead. This way, you separate external usage (i.e. prospects and customers) from internal usage (i.e. employees and other team members).

5. Dark Social Traffic

Do you use messaging apps like WhatsApp, Telegram, or Messenger?

Visits from links shared through these channels are recorded as direct traffic too. Unless you add UTM parameters, like I shared in #2 above, all the traffic will get tagged under direct traffic.

The growing popularity of these messaging apps are becoming a problem for marketers since you cannot break them down further.

On the other hand, this also presents a bigger opportunity for more targeted and relevant interactions. If you are utilizing social shares, or know your audience are using it, it’s best to add UTM tags so you can get a better understanding of where people are coming from and what content are they sharing.

Increase or Decrease Direct Traffic?

Tackling direct traffic is not as simple as other default channels because there is so much going in here. It’s the fallback channel grouping in Google Analytics.

The first step is to make sure that direct traffic is really direct traffic, not misattribution.

  1. Follow best practices such as having internal IP exclude filters to keep your own traffic out of the direct channels report.
  2. Migrate your site to the HTTPS protocol if you haven’t already.
  3. Lastly, make sure you are using UTM parameters properly so that traffic gets logged in the appropriate channel.

Once you fix all those, realize that there is no one way to increase your direct traffic other than to build brand awareness. That means getting your brand in front of other people.

Writing content, sharing on social media, sending email, and distributing content on other channels all contribute to growing your brand awareness.

Entering partnerships and other collaboration opportunities are also great ways to increase visibility of your brand.

Over to You

A direct traffic that is growing is a great sign of brand awareness and retention. People are learning more about your website and they are typing it directly to their browsers. A great way to verify this is check your repeat visits as well.

If you applied proper filters to prevent collecting inaccurate data and add UTM tags to your email links, then you should not worry about bad data. You can be confident that the growth you see is linked to your brand awareness campaigns paying off.

What do you use direct traffic for? Have you addressed the issues I mentioned above? I’d love to hear what you think.

7 Lessons from 7 Years of Bullet Journalling

bullet journal

Bullet journals have risen to popularity in the last few years. After discovering this wonderful note-taking system, I never looked back. Despite being an advocate of automation tools, I find myself going back to my bullet journal no matter how many apps I tried. 

All studies point that writing things down help you remember things more. Yes, you can type faster with laptops and other tools, but it doesn’t help with remembering what you wrote down. 

I’ve used the bullet journal on both the corporate and freelance setting. When someone comes into a meeting with a laptop, the first and only thing that comes to mind is they are doing something else like email. It appears very unprofessional. 

And even if that person is really taking down notes, that person can’t control what other people are thinking. With high risk and little reward, it’s better to use notebooks instead. 

Here are the top 7 lessons I learned from 7 years of bullet journalling. If you’re still trying to figure out how to start with bullet journals, I hope these lessons will help you in your journey. 

Keep Your Bullet Journal Notebook Simple

Google “bullet journal ideas” and you’ll find thousands of search results showing you pages with fancy colors and graphics. But that’s not a practical approach. 

Will you bring all these colored markers and pens with you every single time you go to a cafe or travel?

Dozens of colored pens and markers

This works if you are in your office cubicle or at home. It also works if you’re an artist or have talent in that field, but copying others’ design will only hinder you from getting started. 

One of the biggest hurdles for starting something is wanting to do everything at the same time. Colorful pages on your bullet journal might look nice, but does it affect your ability to do your work? 99% of the time, it’s not even about the work you’re supposed to do. 

Key takeaway: As I wrote here and here, you don’t reap any benefits if you don’t do anything. If you want to get started with bullet journalling, keep it simple. 

Copy This Secret Bullet Journal Key to Double Your Productivity

The bullet journal system provides you with several tools that work by itself, there is something that it lacks. And that’s the ability to quickly find what you’re looking for. 

The bullet journal index or table of contents allow you to find what you’re looking for in a chronological order. 

Bullet Journal Index

But, as you record more to your index, you’ll find that you’ll often find you have pages that are similar to each other. For example, you’d have several pages about your personal tasks, client work, future plans for your own business, and even track expenses or budgeting. 

The problem with the bullet journal table of contents is you will find yourself recording each of these over and over because these types of notes don’t just occur once. 

That’s where adding an index at the back of your notebook comes in. 

Back Index

You can find this article a good starting point for coming up with your own organization. 

Key takeaway: The bullet journal index is your notebook’s table of contents in chronological order. The back index is a way to categorize or group together your pages so you can find them easily. 

Create a Detachable Bullet Journal Index

Over time, you’ll completely use up your notebook. No matter how much time and effort you put in keeping things organized, you will run out of space. When this happens, you’ll use a separate notebook. 

The question you have to answer now is, “how do you keep track of important pages on your past journals?”

That’s why having a detachable index is handy. 

To do this, you need three things: 

  1. Name your bullet journals (e.g. BuJo 1905-1912 for Bullet Journal covering May 2019 to December 2019)
  2. Transfer the important pages/notes to the detachable index
  3. Add the index to your current bullet journal notebook

Following these three simple tips allow you to find important notes on your past BuJos easily. You don’t have to open every one of your notebooks and look through the index. 

Imagine how time-consuming that would be if you have several bullet journals over the years.

Bullet Journals over the Years

Key takeaway: think of the detachable index as a master table of contents. 

Don’t Be Afraid to Use a Separate Page on Your Bullet Journal

One of the main principles in the bullet journal is collections. Here’s what Ryder Carroll, creator of the bullet journal, says about it:

Each module, or Collection, serves to organize related information. You can mix and match, customize, or even create Collections to best suit your needs. 

This can be anything from a simple shopping/grocery list, a process workflow, a mind map drawing, or a custom calendar. The customizations start with using a separate, new page on your notebook. 

When I was starting, I struggle with starting a new page because I think it’s wasteful. As I unwillingly tried to create collections, over time I realized its power. It helps with organization. It also speeds up finding things you’d need later on. 

If you have a separate idea that can turn into a collection, don’t be afraid to use a new page in your bullet journal. 

Key takeaway: use a separate page for every collection, then add it to your index later on. This will help greatly when you try to search for it later on. 

Improve Using Templates and Sticky Notes

Sometimes, it’s easier to use templates and sticky notes in your bullet journal. For example, every year or month or week, you’ll create the same spread over and over. You can write/design those pages every time, or you can have printable pages like these.

Monthly Goal Template

Stick them to the appropriate pages and you’re good to go. 

For the sticky notes, I use them for things that I can move around. I use the OKR system to track my personal and professional goals. What I do is write the header then stick my notes there. For example, I have a Q1 OKR header then the rest are listed below. 

Sample OKRs in Bullet Journal

For the next quarter, I’ll copy over the same ones that I can use again. 

Key takeaway: You don’t have to create everything from scratch. The main objective of bullet journals is to help you become more productive. Needlessly recreating every page template is not productive; rather, it just keeps you busy. 

Incorporate Other Techniques

If you’ve done your research on note-taking, you’ve most likely come across the Cornell Note Taking System. By itself, it’s already powerful enough for taking notes on topics and/or subjects. 

Cornell Note Taking Template

Once you incorporate this into the bullet journal system with the front and back index, rapid logging, and other principles, you’ll come up with a better productivity system. 

Key takeaway: The bullet journal is a flexible note-taking system that you can customize. The more you make it your own system, the more you’ll use it. And the more you use your BuJo, the more productive you become. 

Keep Using Your BuJo

As with any habit, you will struggle at first. You’ll feel that your bullet journal “isn’t” as inspirational or nice-to-look-at compared to the ones you find on the internet. You’ll think that one notebook might not be enough or you need to use multiple colored pens and markers. 

All those doesn’t matter as long as you find what works for you. 

I tried multiple notebooks but eventually went back to one. I realized that carrying 3 separate notebooks to a cafe isn’t practical (as I mentioned above). I also noticed myself using it less and less because I have to switch back-and-forth, which adds more time and complications. 

The same goes for colored pens. Using multiple pens just to write a single task or collection takes a lot of time. Yes, it may look pretty for outsiders, but they are not the ones who are using your BuJo. 

Key takeaway: Keep using your bullet journal. You’ll eventually find a BuJo system that works for you. 

Over to You

The bullet journal is one of the best note-taking systems out there. If you customize it further and add best-practices from other systems like the Cornell Note Taking System, it takes your productivity to an entirely new level. 

Have you used bullet journals before? Or is this the first time you’re hearing about it?

Create Your Own Business Playbook: Build Systems and Processes That Work

writing systems playbook

Every successful company has its own business playbook. Every single one of them. So, why don’t you have one?

Taken from sports, a playbook is a set of instructions that you execute for every imaginable scenario. If the opposing team runs a blitz, here’s what you do. If they go on a full court defense, here’s a play to counter it.

If this happens, then you do this.

What Is a Business Playbook?

A business playbook is sometimes called a manual or standard operating procedures (SOPs). Depending on the size of your business, you can have individual playbooks for each department (HR, accounting, marketing) or business units or per location.

Regardless of the name you choose, the principle behind it remains the same:

A playbook tells you what to do, when to do it, and how you do it. Sometimes, the why is also included. But the point is it helps your business get through each day efficiently and effectively.

Businesses don’t become successful then create their playbook. Rather, they became successful because they have one.

Why You Need a Business Playbook

Think of a playbook as a framework for success. Below are the five main benefits of having a playbook.

1. Save Time

Because you don’t have to reinvent every process, you just follow a checklist and you’re good to go. This is the most efficient way to manage your business no matter how big or small it is. Whether you’re an agency, an e-commerce shop, or even an individual freelancer, a playbook will help you save time.

Because you can finish the work you intend to do easily, the extra time can be spent on other value-adding activities like getting new customers or searching for partners and other collaboration opportunities.

2. Produce Quality Work

A playbook contains procedures for the things you need to accomplish. Because it’s been added there, it means it is of a level of quality that is acceptable to the business.

3. Help You Scale

By following the playbook, anyone can produce quality work—even beginners and new-hires.

Imagine for a second that your business picks up and you need to hire more people. Because you already have the playbook, anyone you hire can get up-to-speed immediately. That person can perform the work as if he/she is already a veteran in the company.

4. Free Up Time

The other benefit of a business playbook is you do not need to get involved in the day-to-day activities. You can get to take vacations without worrying that your business will crumble without you.

5. Achieve Peace of Mind

One of the biggest problems business owners often share is that they are needed in the business every day because of issues that creep up. But if you have a playbook and everyone follows it, there will be no fires to put out. And if there are fires to put out, parts of your playbook will be able to address them.

How to Create Your Own Playbook

There are many ways of creating a playbook. The approach I’ll share here is a practical approach.

1. Start with a Template

You don’t need to start from scratch every single time. One of the best traits of humans is the ability to learn from others.

I found a simple template that you can download here. Of course, you’d have to customize it to your own business but it provides you with the necessary ones you need.

2. Address Culture

Culture is simply a set of behaviors that everyone in your business does. A high-performing culture is an aggregate of people who perform high-quality work.

If you want to succeed, there are two behaviors you need to address:

  1. The playbook must be open if you’re doing the work
  2. Update the playbook in real-time as needed

The first behavior is that everyone who does the work, assuming it is covered in the playbook, has to have the playbook opened.

The next behavior is if the playbook isn’t updated anymore, for example the process have changed because of some software updates or there is no process for the work, the person who is doing the task adds it to the playbook.

3. Keep Using the Playbook

As you and your team keep using and adding the playbook, over time it will become a document that you can’t live without.

If you’re a one-man team, you’ll probably start off by adding operational processes—how you do your work.

  • If you’re a writer, you might have several processes for researching topics and for after you finish the article.
  • If you’re handling Facebook ads, you might have a checklist for how you handle a reach campaign or a lead generation campaign
  • You might also have an interview questionnaire for onboarding new clients to help you understand the business and its customers and the problems they are facing

You add all these in your playbook. The first two examples are processes for doing the work, while the last one goes into your templates (which you can also reference in the onboarding new clients process).

As you keep using the playbook, you’ll eventually add processes for how to handle expense monitoring and your taxes, how you hire and onboard new team members, and many more.

Over to You

Creating your own business playbook is easy. It provides you with a lot of benefits. The only downside is a little bit of time every day to create it.

Overcome this hurdle and you can expect to reap the benefits of having your own business playbook.

Do you have your own playbook? Or do you think you don’t need one? Either way, I’d love to know what you think.

Want to Make Your Competition Irrelevant? Stop Competing and Do This Instead

competition sports baseball

Humans love to compete. This desire to win is so strong that our history is filled with examples:

  • Cain and Abel
  • Countless Wars
  • Olympics

Today, this competition is still rampant. Countries, businesses, and individuals all compete with each other to win a prize whether that’s recognition or land or profits.

In the business context, competition mean more people fighting for the same pie. This makes it harder for businesses because their share of this pie gets smaller and smaller.

But what if there was a way to not compete at all, yet still win? What if there was a way to make your competition irrelevant?

Enter: the Blue Ocean Strategy.

red ocean vs blue ocean

At its core, the Blue Ocean strategy is all about creating new, uncontested market space that bring profitable growth instead of competing with one another. If you haven’t read this book and you own a business or plan to start one, grab your copy now.

And as brands become more similar, people increasingly base purchase choices on price—Blue Ocean Strategy

The sentence above in the book summarizes the need to create blue oceans. The more you compete, the less there is for everyone. If you want to make your competition irrelevant, stop competing. Here’s one way to do that:

Find Hidden Opportunities in Your Industry Using the Buyer Utility Map

The buyer utility map is one of the tools of the Blue Ocean Strategy you need to understand if you want to stop competing. It allows you to visually see where the entire industry is focusing on during the entire buyer’s journey across six utility levers.

Here’s how the buyer utility map would look like for Teachable or other online learning platforms. It looks at the education industry as a whole, map out the factors they are focusing on, and see all the gaps everyone else is ignoring.

buyer utility map teachable

This tool is a starting point for your new offering. Because you can visually see the gaps, you can brainstorm ways how you can fill those in. Now, you have the potential for a blue ocean offering.

Validate Your New Business Idea Using the Stair Step Method

Once you identified your offer, whether that’s a new product line or a new business entirely, you don’t allocate money immediately, even if you have some to spare. Use the stair step validation method.

Here’s how it looks like:

  1. Ask for interest
  2. Get their commitment
  3. Go for the sale

The main point of the stair step validation is to reduce your risk of failure. Uncertainty is a given in any business. There are various ways you can do this and the stair step validation method is one of them.

How to Manage Innovation Risk and Budget 02 1

Take, for example, this image from Strategyzer. At the early stages, there is so much risk and uncertainty that you should spend your time validating your assumptions instead of spending money. As uncertainty goes down, that’s the time you invest heavily.

The stair step validation works in the same way. By asking for interest in the idea, you are reducing your uncertainty by getting feedback from other people. This allows you to refine your offering further.

As you progress, the next step will be getting commitment to support the idea. In essence, you are generating leads (or potential customers) even before developing anything. This will naturally involve more discussions internally and externally to refine your new offering.

After refining your idea and getting commitment, it’s time take the ultimate validation test: ask for the sale. If people are willing to give you their hard earned money even if the product or service or business has not yet been launched/developed, that’s a great sign that it’s a winning idea.

Double-Down on What’s Working

After identifying hidden opportunities in your industry and validating your assumptions, you’re now left with a potential winner. The only thing that’s left is execution, or to use a better term, iterative implementation.

You don’t separate planning from execution. The moment you think these two activities don’t go hand-in-hand, you’ll start to lose.

If you go back to the steps above, there is some level of planning involved but implementation is key. You get feedback, then improve. You can’t do that by spending all your time creating spreadsheets and reports.

Over to You

Starting a business is easy. Growing and making it successful is the hard part. If you’re like most businesses, you’re probably trying to find ways to get new customers and grow your revenues or your market share by outdoing your competitors. This leads everyone to compete on prices, which results to a smaller piece of the pie.

If you want to avoid this cycle, stop competing. Take the time to find hidden opportunities in your industry. Test your assumptions one by one. As your risk and uncertainty goes down, you can start pouring more money to your winning idea. From then on, it’s all about execution.

Netflix saw this opportunity, tested their assumptions, found out what works and what doesn’t, invested on those that work, and grew to where they are today.

They made their competitor irrelevant by not competing with them. Today, Blockbuster is no more. Copycats are playing catchup. But the fact remains you can succeed in business without competing.

Is there a new business offering that you’d like to launch? Or are you going to compete every day for the rest of your life for the market?

Either way, I’d love to hear your thoughts.