Organic traffic is a source of traffic that comes from search engines like Google and Bing.
It is one of the default sources of traffic your website gets. If you’re not familiar, below is a list of the default channel groupings as recorded by Google Analytics:
Organic
Direct
Referral
Social
Paid
Email
Others
Where does organic traffic come from?
Organic traffic comes from searches from search engines that leads to your website.
For example, when people type “email marketing statistics 2018” in Google, several results show up.
When people click on one of those searches — assuming it’s a post from your website — that’s when your analytics software records that specific traffic as an organic traffic.
Why is organic traffic important to digital marketers?
There are over 3.5 billion searches on Google per day. And that’s still growing.
And in the Philippines, there are over 67 million internet users. Imagine what a tiny slice of that traffic can bring for your organization.
Remember that the typical online conversion path starts with traffic. The traffic then become leads, then eventually customers.
All things being equal, the higher your website traffic, the more leads you can convert. And with more leads, you have more opportunities to sell to them.
Best Type of Traffic
Organic traffic is free.
In most cases, has both the highest conversion rates and return on investment. Assuming you continue to create quality content and not “game” the system, your organic traffic will just keep growing. These are the reasons why organic traffic is the holy grail of digital marketers.
Getting there, however, is another story. It is a mid- to long-term play — at least 6 months before you see some significant results. There is a lot of work involved. The only proven way to increase your organic traffic is to create content.
Google Analytics is a freemium web analytics service offered by Google that tracks and reports website traffic. Google Analytics is now the most widely used web analytics service on the Internet.
In other words, it allows you to measure your advertising ROI as well as track your Flash, video, and social networking sites and applications.
One of the things I don’t understand is marketers seem to be afraid of Google Analytics. Every time they are “in-charge” of a website, they don’t check if it is even installed.
Most of the times, these marketers jump right in the “exciting” parts of marketing — like changing the design, creating social media accounts and posting on them. Yet, they forget the fundamentals.
My Amateur Basketball Career
I used to play competitive basketball back in the day. I was never good at it. But I didn’t suck as well.
I was never athletic. I couldn’t jump as high as my teammates; nor run as fast as the other guy; nor be able to dribble my way out of three defenders.
One thing I’m known for is defence. I can still remember the games where I have a marked man on the court. Kind of like how Bruce Bowen would always defend Kobe Bryant in the early 2000s.
Anyway, with that reference aside showing my age, I can only attribute that gameplay to one thing: I know the basics.
I know how people move based on what they do, how to look at their bodies instead of the fakes and fancy dribbling.
Even until now, when I play games with other people, I can still play with them (in short sprints because my body can’t keep up anymore). Not because I am better than them. Mostly because these players grew up watching a lot of NBA but didn’t really spend time training and developing their fundamentals.
Like drills. Running plays over and over.
When you watch NBA games, you’d see the superstars doing all these fancy stuff. So, young players often try to emulate and practice those.
Can they do it? Sure.
But can they do it in the game itself? Rarely.
Because the chances of performing spinning shots to avoid being blocked or an alley-oop to yourself don’t come often. And when it does, there are 9 other players on the court. It’s very different when you’re practicing it alone.
That’s why great players all have the basics mastered.
What Does Basketball Have to Do with Marketing
The same goes for marketing.
You can’t perform all the advanced techniques properly if you are not grounded on a strong foundation.
Optimization, A/B testing, figuring out which channels to double-down, where are leads and customers coming from, what types of content are resonating well, and many more.
All these are nearly impossible without Google Analytics installed on your website.
It’s installed using Google Tag Manager (GTM). You can install Google Analytics directly by itself or through plugins. But to keep you sane, implementing it via Google Tag Manager is ideal. Check out that article to find out why this is the best way to install Google Analytics on your website.
If you don’t know how to create goals for your website, you are not being effective. Creating goals in Google Analytics is one of the basics every marketer should know and implement.
Google Analytics is a free tool that allows you to track visits and behaviors people do on your website.
Before we get to the actual guide, there are two preparatory points I’d like to go over.
First, this would only work if you have Google Analytics installed on your website. It’s worth noting this because I’ve encountered a lot of people who still don’t have Google Analytics installed on their websites, especially small and medium enterprises (SMEs).
I also noticed that organizations using Shopify and SquareSpace don’t have this configured as well — despite it being a one-step process.
The second and a very important one that needs to be discussed is you should know beforehand what you want to track.
Step-by-Step Guide on How to Create Goals in Google Analytics
As a quick overview, Google Analytics allows you to track 4 types of goals:
URL
Event
Time
Visit / Page
Among these, the most commonly used are the URL and event goals.
After this exercise, you can easily identify everything you need to focus on your implementation and measurement.
Now, on to the step-by-step guide…
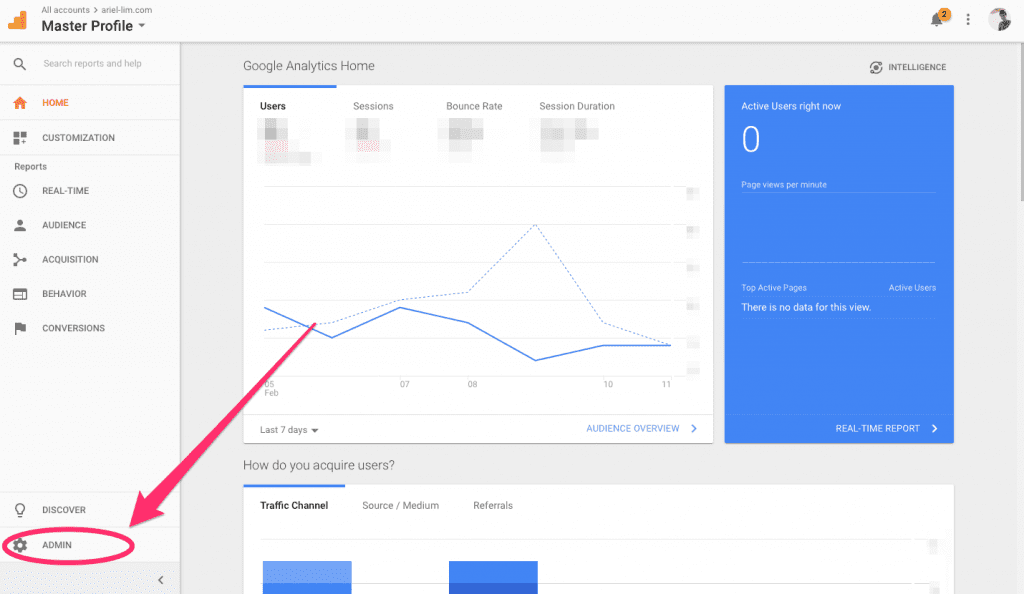
1. Go to the Google Analytics Admin Panel
This part is easy. Simply login to Google Analytics and go to the admin panel by clicking the gear icon at the lower-left portion of the screen.
How to Create Goals for Your Website Using Google Analytics Step 1: Go to the Admin Section
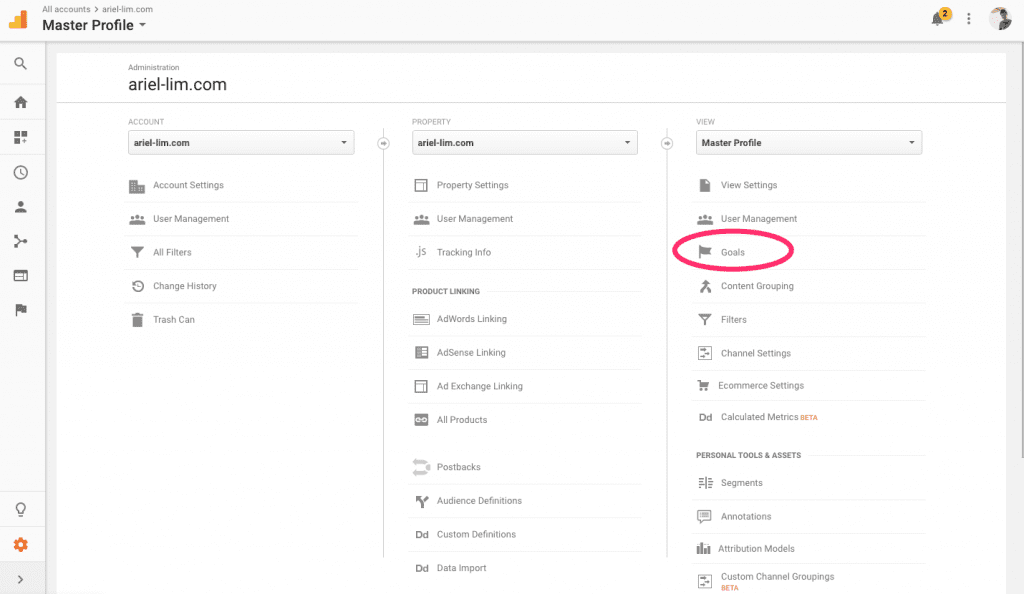
Then, navigate towards the Goals section.
How to Create Goals for Your Website Using Google Analytics Step 2: Click on Goals
Also, make sure you are creating goals for the right account. You don’t have to worry about this if you only have one, but in my case, I have access to multiple Google Analytics accounts.
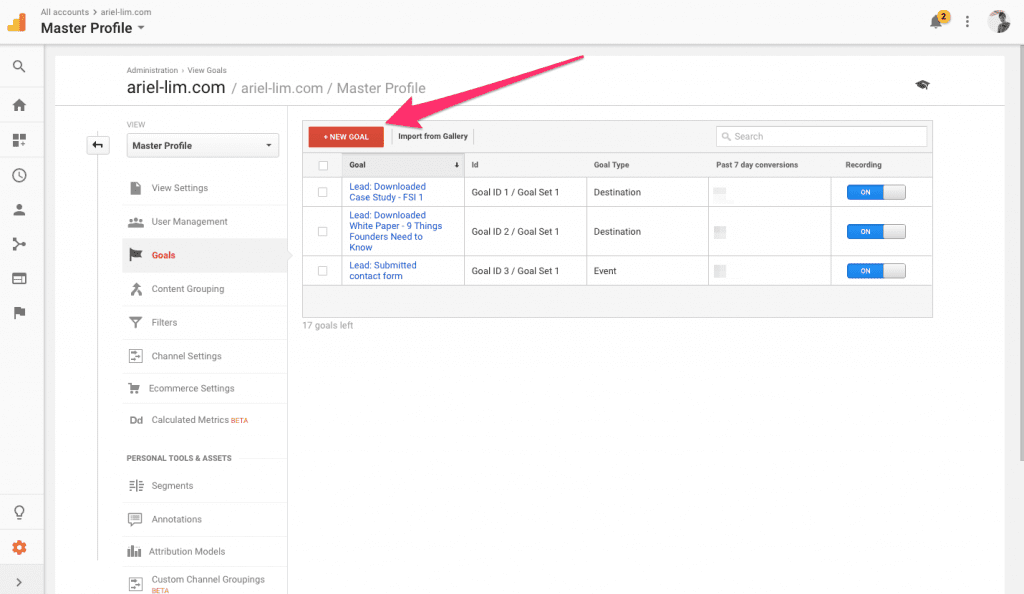
2. Create a Goal
For the purpose of this article, we’ll use the most common goal type used — the URL destination goal.
Start by clicking on that big red button…
How to Create Goals for Your Website Using Google Analytics Step 3: Click on Create Goal
Then, you’ll have to complete 3 steps:
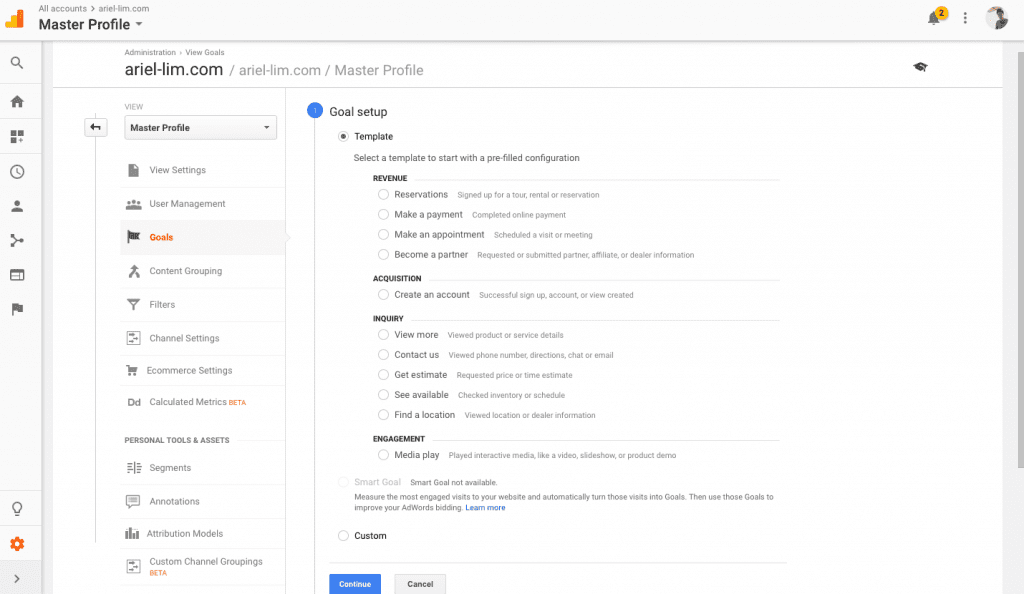
Goal setup. This is where you can choose from one of the templates or custom. I used the custom setup.
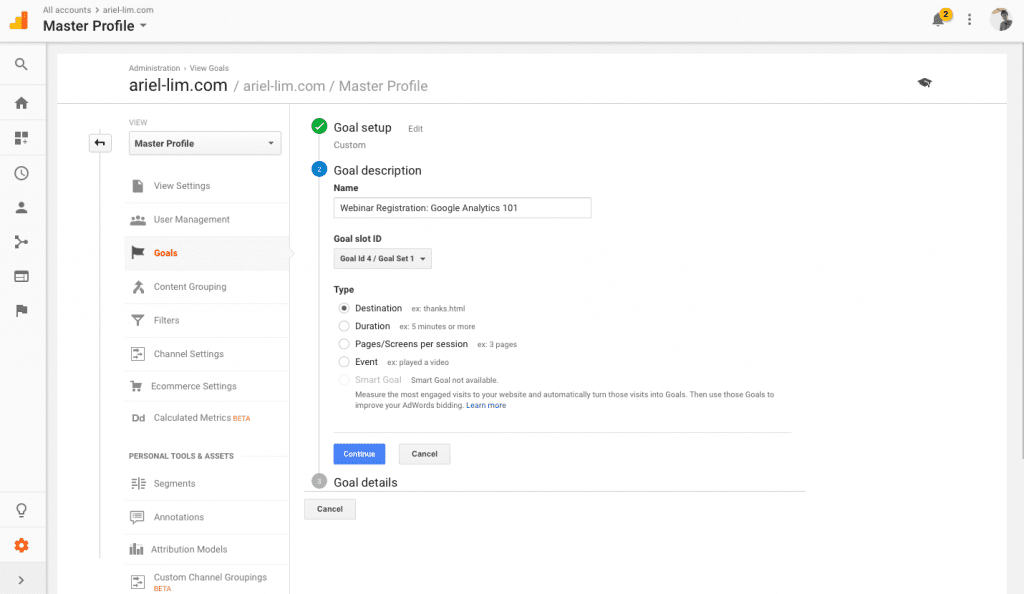
Goal description. This is where you include the name of the goal and the type of goal.
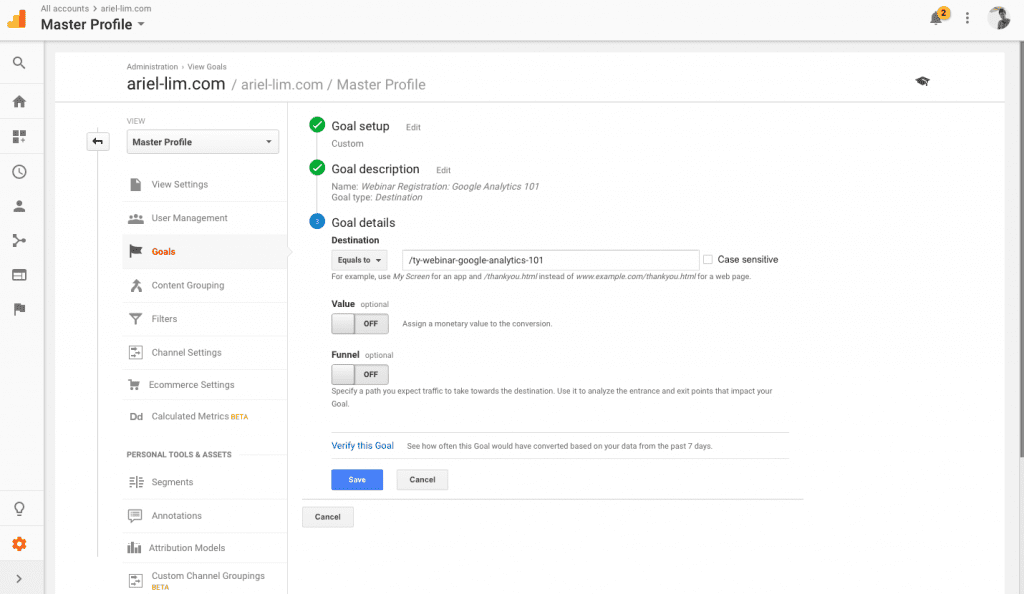
Goal Details. This is where you enter the criteria for the goal you chose. Options here differ depending on the goal type chosen in the previous step.
How to Create Goals for Your Website Using Google Analytics Step 4: Choose from Template or Custom
How to Create Goals for Your Website Using Google Analytics Step 5: Choose Goal Type
How to Create Goals for Your Website Using Google Analytics Step 6: Complete Criteria for Goal
As a refresher, this goal type uses a URL as a goal. What that means is when that URL “loads,” the goal is achieved. Let’s call this a thank you page. In this example, I made up a fake URL. Just replace this with the URL of your thank you page.
There are 3 fields you can tinker here. Only 1 of them is required, and that is the URL itself. The others simply add more data for analysis later on. We’ll tackle this in another post, but for now, just enter the URL then hit Save.
Now, you may be thinking, “what if someone opens the page or URL, won’t that mess my reports later on?”
That is a valid concern. That is why there are four best practices for using this type of goal:
Don’t link to this thank you page anywhere; except
Have a unique form that redirects to this page after successful submission
Once these 4 conditions are met, it is almost impossible to get to the thank you page (our URL destination goal).
I explained this in detail in another article called the typical online conversion path. With this checks in place, you are almost guaranteed that the only way people get to your thank you page is after a successful form submission. Then, your goal will only trigger after successful form submission.
3. Check if the Goal Is Working Properly
This step is very important. If you do not test your goal/s, don’t complain if it’s not working later on.
Testing your goal is also very easy.
Just open the URL in another tab, then
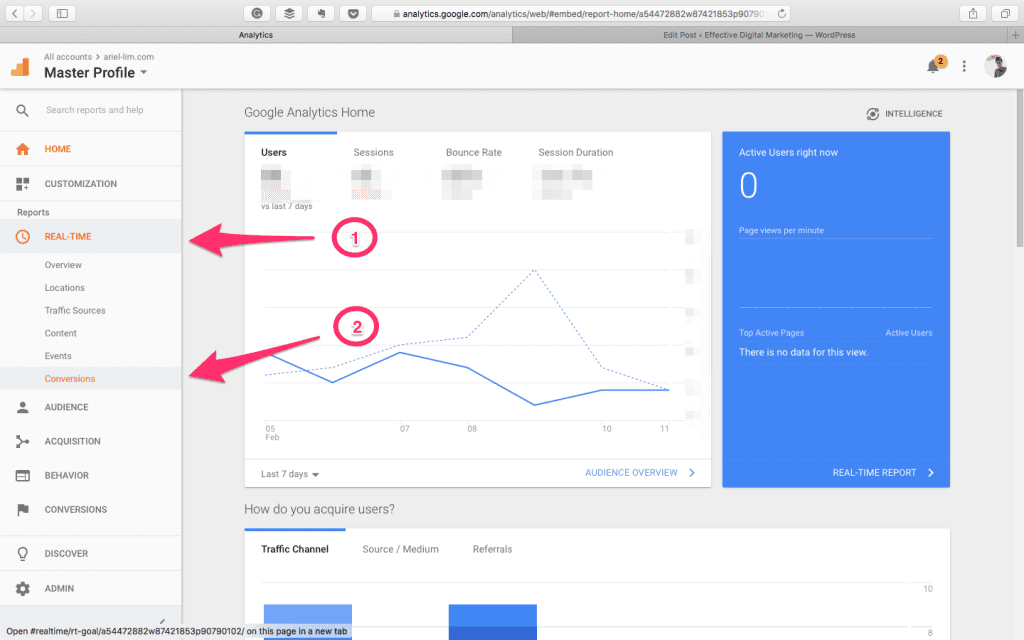
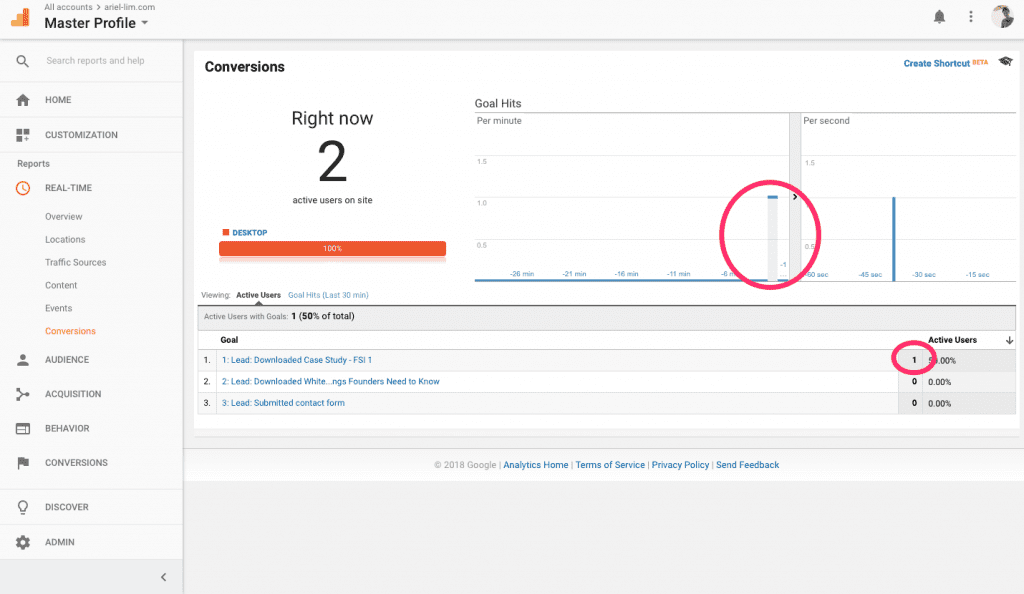
Check the real-time analytics portion in Google Analytics to see if it triggered the goal you just set up.
How to Create Goals for Your Website Using Google Analytics Step 7: Go to Real-Time Reports
If it did, it should look something like this. You should see numbers pop up here.
How to Create Goals for Your Website Using Google Analytics Step 8: Check for Conversions
If not, then there’s something wrong.
The usual culprits are these four:
Plug-ins blocking traffic (for example if you’re using Chrome and have the GA output plugin, you can use an incognito mode to test this or use another)
Typo errors in the URLs (/thankyou vs /thank-you vs /thank_you)
URLs not matching (contains /thank-you vs exact /thankyou)
Included the domain/subdomains (ariel-lim.com/thank-you vs just /thank-you)
So it’s really important to test and make sure the goals you set up ate working properly.
So, What Are You Going to Do Now
The last step after you create goals for your website, which should be a given but worth noting, is you have to execute your strategies.
That means creating campaigns with awesome content and making sure you’re targeting the right audience.
One those numbers start coming in, you’ll be able to analyze and improve on it using the goals you just created.
As a word of caution, don’t get stuck in creating the “perfect” content or, in this case, the “perfect” goals.
It is always — I repeat, ALWAYS — better to implement/execute than to spend all your time planning. You get real customer feedback instead of assumptions. You learn what the market actually want and don’t want.
Companies want to earn profits, not just revenues. With more profits, the company can further create value-adding products and services and reach other markets. This cycle creates more customers. Digital marketing is not effective if it does not contribute to the bottomline.
This can only happen when you continuously add more value — which is rewarded by the customer with a purchase. A concrete sign of success in this happens when you get repeat purchases and referrals from that customer.
Profits, if you break it down to its components, is made up of revenues and expenses. The more revenues you make and the less expenses you have at any given period, the higher profits you earn.
A lot of marketing managers and CEOs still do not understand how digital marketing works. They have not yet realized that the internet has become a two-way street of communication. Marketing managers and CEOs often waste their resources by blindly spending on ads or hiring more people without having a proper knowledge on its effect and the return on investment.
This lack of understanding is the main reason why these managers often don’t achieve the results they intend to do. And if they do, they often go over-budget.
Google Analytics is the most well-known analytics program for digital marketing. The best part? It is absolutely FREE!
Digital marketing without using analytics is like driving a car in the night without any lights and your dashboard is not working. You do not know where you are going. You do not know how fast you are going. You do not know if you are heading in the right direction or not.
It is not any better than traditional marketing. Think of billboard ads and tv commercials. You invest a lot in producing them in terms of money and time. Then, you do not have a direct way of measuring their impact to your business.
It does not have to be that way. Google Analytics is fairly simple to setup (and use for that matter).
There are three phases in setting up Google Analytics properly. Each phase is also broken into two parts.
Table of Contents Click on any of these to jump straight to that topic
Setting up Google Analytics can be divided into three (3) phases:
Creation of the necessary accounts
Installing the code to your website
Checking (and troubleshooting, if necessary) the data
Phase 1: Creation of Accounts
Creating the necessary accounts is the first step.
You will need to create (or login to) a Gmail account. From there, head on over to the Google Analytics (GA) and Google Tag Manager (GTM) websites.
You need both GA and GTM accounts because the former allows you to analyze your website while the latter allows you to make changes to your website without having to learn code; thus, future-proofing your website.
Before editing or making any changes — whether that’s adding or updating a plugin, or editing the code directly— it’s best practice to create a backup of your website first.
Installing the code involves two parts as well.
First, you setup Google Analytics inside Google Tag Manager. Next, you install the GTM code on your website.
Again, the primary reason why you should setup your analytics this way is because GTM allows you to change settings or add other code in your website without having to tinker with code. You just install the GTM code and add/edit/delete codes inside GTM. To learn more about how you can do this, check out my article on Google Tag Manager.
Step 1: Install Google Analytics code in Google Tag Manager
Option 2: Install via the functions.php file (Genesis Framework)
Before editing or making any changes — whether that’s adding or updating a plugin, or editing the code directly— it’s best practice to create a backup of your website first.
This second option is what I recommend, especially if you are using the Genesis Framework.
Go to your theme’s editor and add it to the functions.php file.
Login to your WordPress account.
Go to Appearance > Editor.
At the right-hand portion, click on the functions.php.
Scroll down until you see the end of the lines of code there. Remember to not touch anything else. A single mistake there can break your entire site.
Add your code
Hit save
Copy this entire code and paste it there, then replace the GTM-ABCDEF section with your own container ID.
// Add Google Tag Manager code in <head>
add_action( 'wp_head', 'google_tag_manager_head' );
function google_tag_manager_head() { ?>

//Replace this entire line with the first part of the code <head>

<?php }


// Add Google Tag Manager code immediately below opening <body> tag
add_action( 'genesis_before', 'google_tag_manager_body' );
function google_tag_manager_body() { ?>

//Replace this entire line with the second part of the code <body>

<?php }
You’ll then have something that looks like this…
// Add Google Tag Manager code in <head>
add_action( 'wp_head', 'google_tag_manager_head' );
function google_tag_manager_head() { ?>

    <! – Google Tag Manager – >
<script>(function(w,d,s,l,i){w[l]=w[l]||[];w[l].push({'gtm.start':
new Date().getTime(),event:'gtm.js'});var f=d.getElementsByTagName(s)[0],
j=d.createElement(s),dl=l!='dataLayer'?'&l='+l:'';j.async=true;j.src=
'https://www.googletagmanager.com/gtm.js?id='+i+dl;f.parentNode.insertBefore(j,f);
})(window,document,'script','dataLayer','GTM-ABCDEF');</script>
<! – End Google Tag Manager – >

<?php }


// Add Google Tag Manager code immediately below opening <body> tag
add_action( 'genesis_before', 'google_tag_manager_body' );
function google_tag_manager_body() { ?>

<! – Google Tag Manager (noscript) – >
<noscript><iframe src="https://www.googletagmanager.com/ns.html?id=GTM-ABCDEF"
height="0" width="0" style="display:none;visibility:hidden"></iframe></noscript>
<! – End Google Tag Manager (noscript) – >

<?php }
Phase 3: Checking the Data
Just like the rest of this post, this is divided into two parts as well:
Click on preview inside Google Tag Manager.
Check real-time data in Google Analytics
If it’s working, then hit publish
Step 1: Preview Your Container in GTM
Go to your GTM account
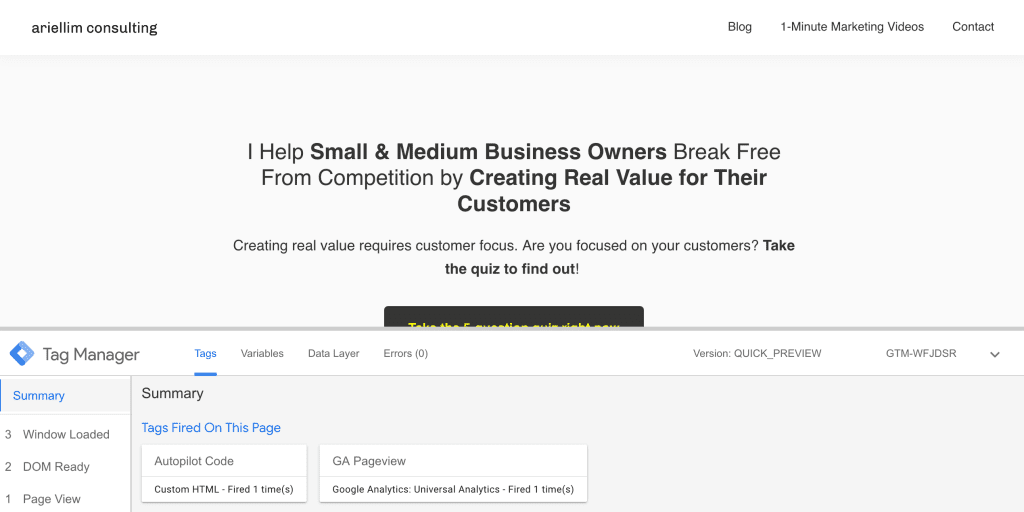
Click on preview at the top-right portion. The page will reload.
Open a new tab and open your website.
You should see the “tags” firing at the bottom of the screen
If the tag is present, it’s working properly.
Step 2: Look at Real-Time Data in GA
Go to your Google Analytics account
Make sure you are in the Reports tab
Click Real-Time
Click Overview
Open another tab in your browser and load any page on your website
Go back to GA to see if it is working
If it’s working, go back to GTM and click on “leave preview mode”
If it’s not, it’s either you configured it wrong, or a plugin is preventing it from loading. Usually, ad blockers from your browser are the culprit.
Step 3: Publish Your Container
After verifying the data is coming in correctly, head back to Google Tag Manager and click on the submit button at the right-hand side.
You’ll be asked a few details to help you remember the changes you did. Once you’re done, click on Publish.
And that’s it.
You have now installed Google Analytics properly on your website using Google Tag Manager. Again, this is the ideal setup for adding code and apps to your website. That way, you don’t have to go through this setup again.
The next time you want to add code to your website, like the Facebook Pixel or your email marketing tracking code, or an A/B optimization software, you only have to add it via Google Tag Manager.
The internet allowed marketers to, finally, quantitatively measure all their activities. Marketers can now stop guessing whether their campaign was successful or not. If you want to practice effective digital marketing, this one’s for you.
Before, the closest way to measure if what they were doing was effective or not was onlythrough correlation. Take, for example, a clothing retail company. They executed a new campaign that includes ads on, say, both TV and billboard, then they waited. After a few weeks, their sales increased. Hmm.
Was it an effective campaign?
Maybe. We’ll never know for sure.
But that was before. Now, you can measure and track literally everything.
I read an article before that Facebook and Google were tracking eye movements from their users to determine where to place their ads more effectively (creepy huh?).
Figuring out what to measure and where to start is a problem in of itself, but that’s not what this article is about. This article focuses on what you should do with those data to drive your business decisions.
Of course, the assumption here is that you already have an analytics software installed on your website (you do have it, right? I have always been a fan of Google Analytics primarily because it’s free and answers my needs).
3 Methods to Use Data to Achieve Results
Set Up Goals on Your Website
Goals can be “hard goals” or “soft goals.” Hard goals are revenue targets, number of leads generated. They have a direct impact on the business. Soft goals are those proxies we use to determine what success looks like. Some of these are engagement, playing a video, downloading a PDF, etc.
Setting this up differs for every company and industry.
I follow a framework when I start any digital marketing effort. It is called the Digital Marketing and Measurement Model. It has five basic steps. It sounds very simple, yet I found that many marketers are fond of vanity metrics that doesn’t contribute to the business’ bottom line. Here are the five steps from Avinash Kaushik:
Identify the business objectives
Identify goals for each objective
Identify the key performance indicators (KPI)
Identify the targets for each KPI
Identify valuable segments for analysis Learn the basics.
Apply it to your company right now, then present it to your boss. I’m pretty sure she’ll be impressed. This should drive your marketing campaigns. Once you set this up properly, everything you do will be aligned. You’re guaranteed that everything you do moving forward should only contribute towards achieving the goals and objectives.
A/B Test or Optimize Everything
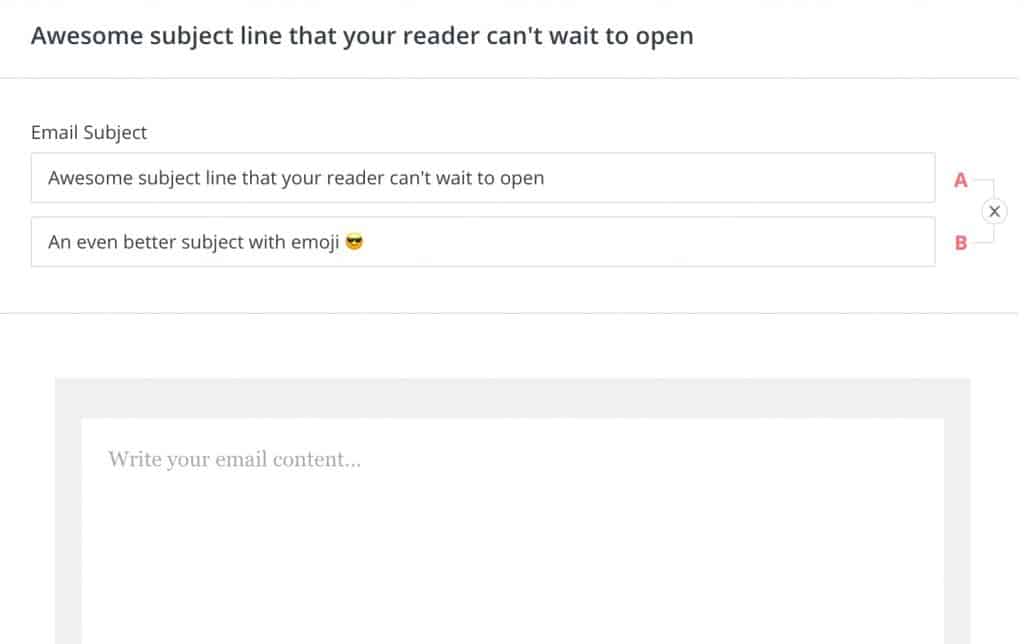
I recently came from a roundtable discussion facilitated by eConsultancy. A phrase that stuck with me was “moving from I think to I know.” The easiest way to do this is to perform A/B Tests across all your marketing activities.
You are using email to send out newsletters or updates to your leads, right? One of the best email marketing software out in the market today is ConvertKit. It allows you to A/B test your subject lines.
You need two other elements to do this: (1) a goal that will determine the winner, and (2) another variation of the content. Of course, this goes without saying that you need the original page as well.
Then, for the A/B test to work, you need to have another variation of the page you are testing. It should be live and public as well. For example the URL of the original content is …/original-page/ then the variation is …/variation-page/.
Segment Your Data
One of the most common mistake I see is not segmenting your data. Before I read Avinash’s blog, I was also a victim of this. No school or certification that I know of teaches this.
The reason why this is important is not everyone who visits your site is valuable to you. Cutting the long story short, your customers are more valuable than people who are just planning to buy from you (aka potential customers). The people who are planning to buy from you are also more valuable than those who accidentally came by your site.
In analytics, you do this by looking at the different groups who visit your site. Use segments to place your traffic into buckets. For example, During your DMMM, you identified that Goal 1 is triggered by people who requested a free product demonstration. You determined that they are high-value leads. So, looking only at their behavior on your website will provide you more insight than the entire blob of data.
Here’s how it might work in real-life. The segment who requested for a free product demonstration all came from social media traffic. Drilling further, you found out it was from the post you published on LinkedIn. You also found out that, on average, they looked at 4 pages on your site. The last page, where they all converted was the About Us page. Usually, this behavior is different from “all” traffic. It does not give you that level of insight.
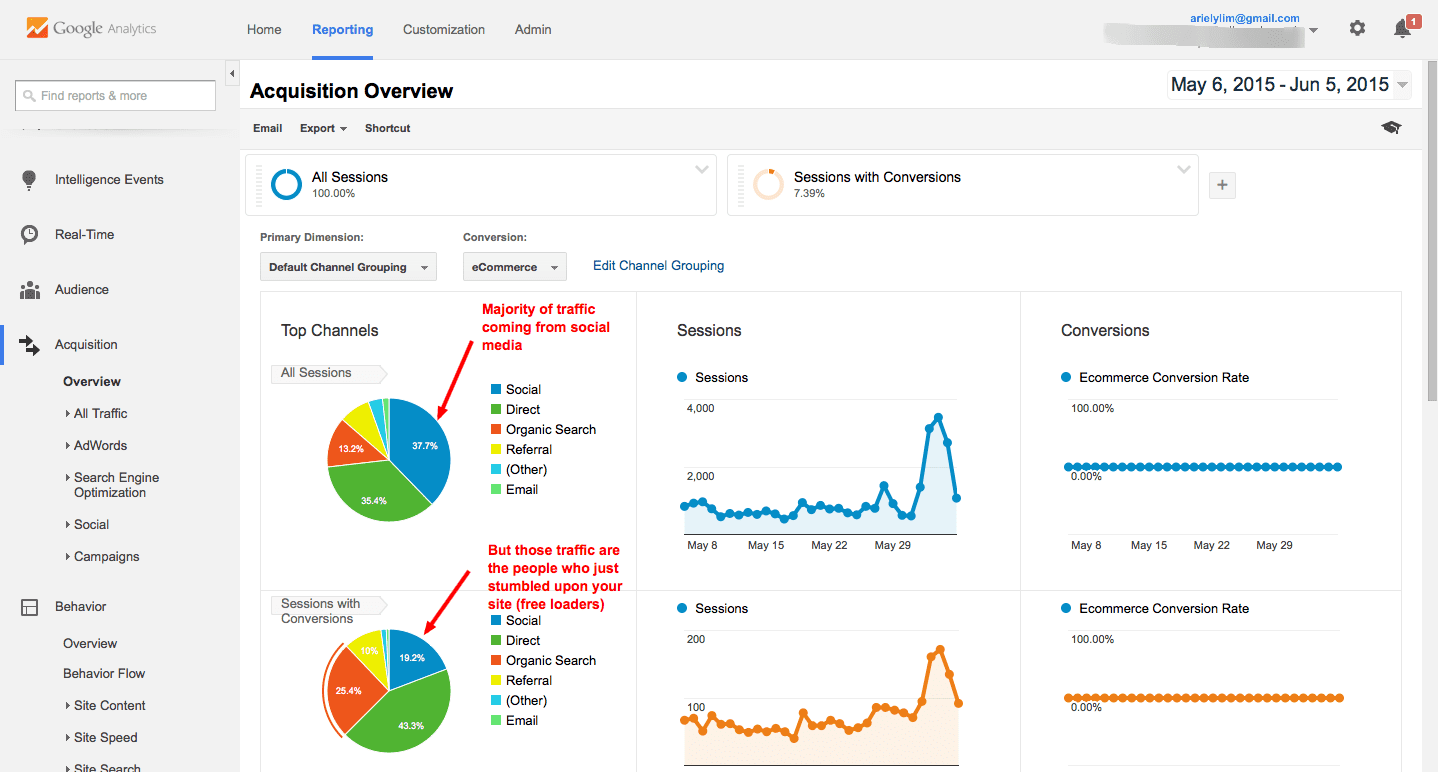
Here is another example. If you look at the image below, you will see that majority of the traffic comes from social media (if you don’t look into segments). However, some marketers already stop at this level.
What you will now think is that social media is the best driver of traffic for your company. However, if you look at the sessions with conversions (i.e. the visits that matter more), then you will see that social media is actually one of the lowest sources of these important visits.
Google Analytics Traffic with Segments
So if you did not drill down further and assumed that Social is where you should spend your money, then you’d be wasting money there.
Marketers can now stop guessing and move from “I think to I know.” With all these free tools available, there is no excuse not to use them to your advantage.
Have something to add? Let me know in the comments section below.