
One of the primary functions of search engines like Google is to provide answers to users’ questions and problems. That’s why it’s important to create content that is helpful and valuable to them, rather than promote your products and services. And frankly, that’s the best way to future proof your business — by focusing on creating value for other people.
This is also the reason why Google loves fresh content. Fresh content doesn’t necessarily have to be new content. Rather, it can be and “old” content, but updated to reflect certain changes; therefore, making it relevant and useful.
And that’s what we’re going to be talking about in this article.
Let me ask you a question.
If you were looking for some resources about how you can install Google Analytics to your website and you came across this one I wrote. What comes to mind?
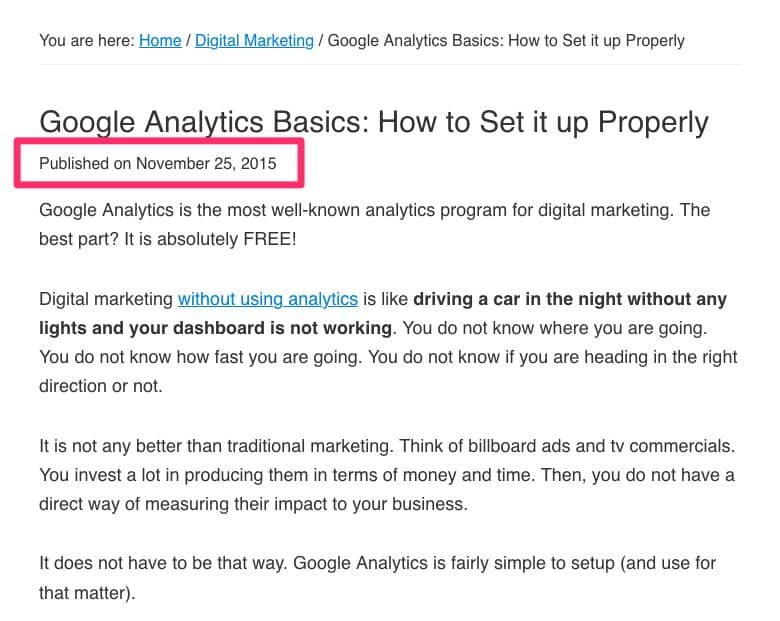
If I saw that, I’d probably take a look, but I’ll search for a more updated one. Because the contents of that page might not be relevant anymore. Depending on the topic, my leeway would probably be between six months to a year. If it’s older than that, unless it’s the only resource out there, I will probably not take it seriously.
And I believe it goes the same for you. You want something relevant and updated. You don’t want to spend your time reading and following some instructions only to find out later that it’s no longer applicable.
Now, what if you saw the same article and it looks like this…

Now, we’re talking.
Despite it being published a couple of years ago, you see that the date was recently updated.
If you’re using a WordPress website, whether you’re running on the Genesis Framework or another theme, then you can easily make this change yourself. You can do this using a plugin, but I’m biased towards not relying on them, especially if you want to speed up your website and get high 90s score on Google PageSpeed Insights for both mobile and desktop.
Preparatory Points
But before getting into it, I’d like to go through a couple of things.
First, you can simply remove the published date and only show the modified date. In fact, that’s what’s most of the resources out there. They simply tell you how to replace the published date with the modified date. If that’s what you want, there’s absolutely nothing wrong with that approach.
But that’s not what I’m going to here.
As you noticed in the examples above, the dates will be displayed depending on whether or not you actually updated the article. I also included a time element to it.
For example, I published an article on January 1, 2020. The article will display “Published on January 1, 2020.”
A year goes by and I haven’t updated the same article. It will still show the same thing. But if I edited it 6 months after, it will display both dates (or only the modified date which I’ll share below).
But there’s another problem here. Let’s say I noticed a typographical error the day after. I went in and edited the article. The modified date has changed. So, if I don’t include the time element, it will display it both. Again, there’s nothing wrong with that. It’s just weird.
Published on January 1, 2020 • Last Updated January 2, 20120.
Personally, I’d only want to display the modified date only if 30 days or so have passed.
Finally, make sure you make a backup of your site first. While this is relatively simple, a single mistake can make your site inaccessible.
Now that that’s out of the way, let’s dive right in.
How to Show Modified Date Instead of Published Date
There are two variations of this that I will show you.
First, as you saw in the example above, the published date and the modified/last updated date is displayed together.
The other option is to only show the modified/last updated date. Just like this one.
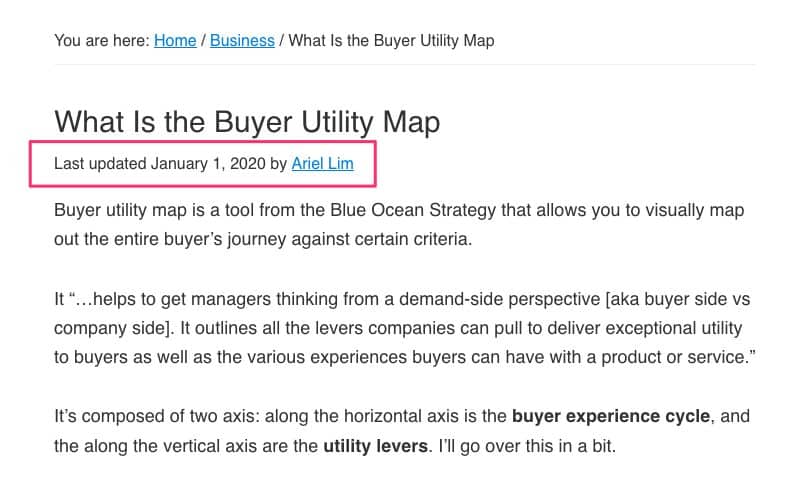
This is actually how it looks like on my website right now. This is option two below.
I’ll show you the code you need to add to your functions.php file for each, then I’ll explain parts of the code in case you want to modify it yourself.
First, login to your WordPress website. Go to Appearance then Theme Editor. Click on the functions.php file then scroll all the way down.

Option 1: Display BOTH Original Published Date and Modified Date
Add this code at the bottom of your functions.php file if you want both the published date and modified date to appear on your posts.
// Published & Modified Date
function be_published_modified_date() {
	$date = get_the_date( 'U' );
	$updated = get_the_modified_date( 'U' );

	$output = '<span class="entry-date"><span class="label">Published on</span> ' . get_the_date( 'F j, Y' ) . '</span>';
	if( $updated > ( $date + MONTH_IN_SECONDS ) )
		$output .= ' <span class="entry-date-modified"><span class="label">• Last updated</span> ' . get_the_modified_date( 'F j, Y' ) . '</span>';

	return $output;
}
add_shortcode( 'be_published_modified_date', 'be_published_modified_date' );
You can edit the text you want by changing the “published on” and “last updated” to whichever you want. Hit save. Then check a post you recently updated but have been originally published a month ago.
Option 2: Display ONLY Modified Date
Add this code at the bottom of your functions.php file if you want only the modified date to appear on your posts.
// Published & Modified Date
function be_published_modified_date() {
	$date = get_the_date( 'U' );
	$updated = get_the_modified_date( 'U' );

	if( $updated > ( $date + MONTH_IN_SECONDS ) )
		$output .= ' <span class="entry-date-modified"><span class="label">Last updated</span> ' . get_the_modified_date( 'F j, Y' ) . '</span>';
	else {
		$output = '<span class="entry-date"><span class="label">Published on</span> ' . get_the_date( 'F j, Y' ) . '</span>';
	}

		return $output;
}
add_shortcode( 'be_published_modified_date', 'be_published_modified_date' );
Same as above, you can edit the text you want by changing the “published on” and “last updated” to whichever you want. Hit save. Then check a post you recently updated but have been originally published a month ago.
How the Code Works
The code is pretty simple to understand.
For option 1 — display both dates — here’s how to read the code:
- Show original published date
- If the updated date is greater than the original published date + 30, show last updated date.
For option 2 — display only modified date:
- If the updated date is greater than the original published date + 30, show last updated date.
- Else, show original published date
It’s that simple.
Over to You
By displaying the last modified date instead or together with the original published date, you show to your visitors (and Google) that you value them.
You avoid giving them a poor experience by showing them outdated content.
Did you find this helpful? Let me know in the comments below!