Email Marketing Metrics: What to Track, What They Mean, and How to Improve

EC0A149A 4E0B 4A03 ACEB BF3CA0B381FE

Email marketing is a marketing tactic that almost all businesses use—whether they are incorporating best practices, ineffective tactics, or even malpractices.

That’s only natural because it’s the most-used medium of communication in business. It’s something people expect and accept as a necessary evil.

But not a lot of businesses analyze their email marketing campaigns. And that’s not because they don’t care (well, some don’t), rather the reason they don’t analyze their campaigns is there are so many metrics available:

  • Delivery rate
  • Open rate
  • Hard bounce
  • Soft bounce
  • Number of clicks
  • Click-through rate
  • Unique opens
  • Number of opens
  • Open rate
  • Spam score
  • Unsubscribe rate

And a while lot more.

So, if you’re busy running your own business, who’d have time to analyze each of these metrics, right?

That’s what this article is about. I’m going to share the only 3 metrics you need to keep an eye on, why, and what they mean. I’ll also include how you can improve on them.

Preparatory Points

But first, let’s get this out of the way.

The only reason why I will look over the other metrics is you are building your email list the right way.

And that means you collect email addresses through a form on your site (or ads or through social media). You are doing it by exchanging something of value to them like a PDF download, an email course, a free consultation, or a sample product.

You are not buying lists, so that makes all the leads you capture interested in your brand (more or less). They are valid and explicitly gave their contact information.

If you do that, then you obviously don’t have to worry about delivery rates and spam traps among others.

Lastly, if you are applying proper segmentation and sending only relevant content to them, then you’re not at risk of having your content deemed irrelevant or marked as spam.

But if you are buying lists, or getting then from other sources apart from form submissions on your website (e.g. newsletter signup) or on your ads (e.g. Facebook Lead Ads), and if you aren’t segmenting your list and sending relevant content, then you definitely have to watch out for all those other metrics. Or, another approach is to stop doing that altogether and use email marketing properly.

This brings us to the next step—which metrics should you actually care about.

The Only 3 Email Marketing Metrics You Need to Track

Open Rate

Open rate is the percentage of people who opened your email. It is calculated by dividing the number of opens by the number of emails delivered. What that means is if there are bounces, like incorrect emails or email no longer exists, they are subtracted from the final number.

Email Open Rate = Number of Opens / Number of Delivered Emails x 100%

Here’s an example. Let’s say you have a list of 1,000 emails. You send an email campaign to them. 20 were recorded as bounced, making only 980 as delivered. Out of those, 500 opened their emails. Using the formula, 500/980, that’s a 51% open rate for that particular email campaign.

What It Means

High open rates indicate an engaged list. You can find averages for your industry from other email marketing software provider to benchmark if your open rates are good. But just remember that those are averages.

When people open your email, it means it’s relevant to them, or at least, the subject line is.

This is actually the first hurdle you need to overcome in email marketing— getting people to open your email.

And going back to my notes earlier, the reason for this is you don’t have to worry about delivery rates and high bounces because you got the email in your database ethically.

How to Improve

If you are starting out, benchmarking your open rate with the industry is good. But over time, the best way to determine if you’re email marketing is improving or not is by benchmarking with your own average open rates.

To improve your open rates, you can use the built-in A/B testing feature in your email marketing software. Normally, the way this works is you come up with two (or more) different subject lines. Then, the software automatically takes 20-30% of your list and send the different variations equally.

After 4 hours (or more depending on the setting), the variation with the better open rate gets sent to the rest of your list.

Some tips you can use to improve your open rates are as follows:

  • Add emojis 👌 where appropriate
  • Ask a question, instead of a statement
  • Lead them on and foster their curiosity

The best way to increase open rates is to make sure you are sending relevant content to each segment in your list. Also, practicing good list hygiene, like the one I described in the preparatory points, will definitely increase your open rates.

Important Notes About Open Rates

There is one thing you do need to remember about open rates—it’s only an estimate.

Open rates are calculated by your email marketing software when one of these two things happen:

  1. Your recipient enabled images to be viewed (manually or automatically)
  2. They clicked on a link in the email

The reason for #1 is that most email marketing software add an image in the email that get sent. If it’s downloaded, that marks as an open. So, if they have images blocked/not download by default (like Outlook), then even if they opened your email, it won’t count as an open. For that to happen, they have to click on a link in the email.

Open rates mean people deemed your subject worthy for their time. They open it and read it. So, once you get pas this barrier, your email contents (both copy and design) have to work to bring them to the next step that you want— a click.

Click-Through Rate

Click-through rate (CTR) is the percentage of people who click your email. It is calculated by dividing the total number of clicks by the total number of emails delivered.

CTR = Number of clicks / number of emails delivered x 100%

Some use another version of this which is the click-to-open rate (CTOR), where the clicks is divided by the number of people who opened your email.

CTOR = Number of clicks / number of emails opened

Continuing from the example earlier:

  • 1,000 emails sent
  • 20 bounced
  • 980 delivered
  • 500 opened (51% open rate)

Let’s say 75 people clicked on your email.

Using the formula, the CTR for this particular email is 7.6%. Then if you look into CTOR, it’s going to be 15%.

What It Means

Click-through rates (CTRs) indicate the highest level of engagement in your email campaigns because both your copy and design compelled the reader to take action — which is to click on a link.

If people are clicking on your email, that means your email is relevant to them. So, that higher this number is, the more engaged your audience is.

How to Improve

If you want to improve your CTRs, the first thing you need to do is check against benchmarks in your industry or your previous click-through rates.

Next, make sure that you are sending relevant email to your audience. Remember, proper segmentation is key here.

If you’re following all those best practices, and your CTRs are still low, then you can try following these tips:

  • Change the design of your email
  • Add more links (add a link to images, the copy, and some buttons)
  • Ask your list about different topics or frequency —> this will allow you more segmentation options.

Remember that you are not limited to linking to your website only. You can use this to link to other sources your reader will find valuable.

Let’s say you came across a particular forecast by an expert in the industry, or a new technology that might affect you or your customers. That is definitely something you would want to include in your email.

Important Notes About Click-Through Rates

There’s another way to measure CTRs — that’s using unique link clicks as opposed to total clicks. Normally, the total link clicks are used. But whatever you decide, make sure you keep it consistent so you know if you are improving.

CTRs mean people are taking action on your email. Once you get them to click, it’s up to the next part to do their thing. In the case of your website, you want them to take action. You want them to convert.

Which brings us to the final metric you should track in your email marketing campaigns…

Conversion Rate

Conversion rate is the ultimate email marketing metric you should be tracking. It represents the percentage of people who performed an action you want (a conversion). It is calculated by dividing the total number of people who performed the desired action by the number of emails delivered.

Conversion rate = Number of people who converted / Number of emails delivered

The conversion action can be different for different industries:

  • eCommerce — purchase
  • Agency — consultation or avail a package
  • Real estate — quotation or reservation

Regardless of what your conversion is, what matters is you don’t focus on this solely. Remember, that you should be sending multiple types of marketing email. If all you send is to drive a sale or a booking or something else, it will irritate your readers.

What It Means

Conversion rates matter because it is directly related to your business goals. The more people who take action, aka convert, the better it is for your business.

But, like I mentioned earlier, don’t make your every email focus on conversion. There are a lot of things you can do like share your company’s history, how you got started, what you think will happen in the next couple of years, etc.

Don’t over optimize for conversion. Focus on providing value.

How to Improve

The basic premise is to follow all the best practices for email marketing. Once you have that down, the next area you can look into is align your copy or call-to-action with the stage in the buyer’s journey.

If the person is still researching (consideration stage), then sending them to download a comparison or to watch a video detailing the comparison between product A and product B, then that would increase the likelihood of them converting. If you send them to a product page where they can buy, then most likely they won’t buy it because they are not yet ready.

Another area you can look into is to align your copy with the page you are sending them to (message match). For example, in your email, you want them to purchase an email course from you. If you direct them to your homepage, then there’s a high chance that they will not convert. But if you lead them to a specific landing page for that particular offer, then there’s a higher chance of them converting.

Conclusion

There are a lot of email marketing metrics that you can analyze. But if you are using email marketing best practices like segmenting your list and providing educational content via lead nurturing campaigns, then you only need to worry about improving your open rates, click-through rates, and conversion rates.

If you want to improve your email marketing, you can apply these 5 email marketing strategies and 9 different tactics that you can use ala carte or together.

What do you think? Are you tracking other metrics in your email marketing? Or do you think these three are enough? Let me know in the comments below.

4 Must-Have Capabilities of Your Website: The Rest Are Just Fluff

someone browsing a website on a laptop

A website is necessary if you want to compete in today’s business environment. It gets you to the starting line. Without it, you don’t even get to be in the race. 

Without it, you don’t exist.

But another problem with websites is a lot of people tend to focus on fluff — the pretty things. Instead of focusing on the core functionality and the must-haves, they focus on shiny things. 

That’s why in this article, I’ll list down the essential functionalities of a website. This post is not an SEO article. Rather, it’s focused on the needs of your business. 

4 Essential Elements of a Business Website

1. Information About You or Your Business

The first quality a business website needs is basic information about you and your business. It’s important that you communicate your unique value proposition so that your visitors will:

  1. Understand what you offer
  2. Differentiate you from your competitors
  3. Find a reason to trust you (and eventually do business with you)

Your website should also contain the most basic information about the business like the following: 

  1. Your name (especially if it’s different from the “brand” and domain you are using)
  2. Address
  3. Contact information

It’s also recommended that you include details about key people (or everyone) in your organization. This is one of the trends in modern websites that makes the business more human

2. Ability to Generate Leads

As a business, you need leads. Otherwise, you will not have anyone to sell to (customers). And if you don’t have customers who are willing to pay for what you offer, you’ll eventually go out of business.

There are two common ways businesses generate leads from their websites: 

  1. Contact Us Page
  2. Newsletter Subscription

Both have variations of forms that allow visitors to enter their information. This information then goes to whomever is in-charge (usually marketing or sales). Ideally, it should go directly to a CRM or an email marketing software.

The second lead generation source most websites have is a newsletter subscription form. For example, my own website a form like this on every article — which you’d also notice at the side if you’re reading this from a computer.

Sample Newsletter Form

Bottom line: you need to have the ability to generate leads in your website. 

Social fans and followers aren’t leads

In another article, I listed three criteria for what makes up a lead:

  1. Available
  2. Valid
  3. Reachable

Together, these criteria will help you determine what really matters. Take a look at Facebook Page likes or Twitter followers. 

While they may be available and valid, they are not reachable. Meaning, you can’t contact them in a proper way. That’s why you keep hearing that these numbers are vanity metrics. They don’t add value to your business. 

More offers equal more leads

One concept I’d like to highlight is that the more landing pages you have on your website, the more leads you can generate.

The contact us page is an example of a landing page. At its essence, a landing page is a page on your site that allows you to generate leads. In other words, it’s a page on your website with a form that visitors can fill-out. 

According to a survey of more than 7,000 businesses, companies see a 55% increase in leads when their landing pages increase from 10 to 15. The same report also found that those with over 40 landing pages increase conversions by 500%. 

Ask yourself this question, how many landing pages does your website have? 

One contact us form? One newsletter subscription form? 

Quick calculation

Here’s another interesting statistic to consider: the conversion rates for landing pages is between 1-3%. 

If you only have one contact us page as your landing page, how many visits to that page do you need to generate 50 leads? 

The answer is 1,667 visits at a 3% conversion. Or 5,000 visits at 1% conversion rate. 

How many visits does your contact us page get on a monthly basis? Is it even that close? 

The solution is to create more marketing offers.

3. Analytics and Performance Tracking

The next key capability of your business website is performance tracking. After all, if you don’t measure what you do, you can’t improve. 

It’s already 2020 and I still see websites without tracking installed. 

Google Analytics is one of the most well-known analytics software for your website. I’ve written a couple of articles about it already, so I won’t repeat it here again. If your website still doesn’t have Google Analytics, here’s how you can install Google Analytics properly

Oh, and did I mention it’s also free? All you need is a Google account (Gmail). 

4. Communication/Messaging

Another key component your website needs is the ability to communicate or send messages to your leads. Technically, this isn’t part of the website itself. Rather, it’s often another system like an email marketing software.

Nonetheless, it is vital that you have the ability to communicate to your leads and customers. Without it, it’s as if you are a business without humans.

One thing to note, though, is that your communication has to be helpful

And no, your sales and promos and discounts aren’t helpful. They may be helpful for you to increase your revenues, but not for the recipient. 

Lastly, if you send those types of email, please, don’t call them newsletters. I’ve written a lot about email marketing. So, familiarize yourself with the three pillars of effective email marketing first. 

Then, start sending out these 12 different types of email instead of your promos.

5. Revenue Generation (Bonus)

This is a bonus criterion. 

Why? 

Because not all businesses “sell” online. But if you do, having the ability to generate revenues is definitely something you need to have. 

There are tons of ways you can add this functionality. The simplest one is to add a PayPal buy now button, or use some other provider like Stripe. 

If you sell products, you’d more likely have a complete eCommerce website where you can add products, set prices, different SKUs, manage inventory and order fulfilment. 

Frequently Asked Questions

Over to You

Like I said at the beginning, this article isn’t meant for SEO. This shows the basic requirements any business should have on their website. 

If you’re more advanced in this area, you might notice I didn’t talk about chatbots, or videos, or social media. That’s intentional. Because most often, people tend to focus on those shiny, new things instead of the fundamentals. 

Your website is the most basic requirement for any business today. Without it, it’s as if you don’t exist. 

If you’re missing some key capabilities listed here, go talk to your IT guy, or outsourced provider, or shop around. It’s essential that you have all these if you want to compete in the same arena as your competitors. 

What do you think? Did I miss any must-have functionality of websites? Let me know in the comments below.
Email Traffic: Why It’s Important (+9 Tips)

what is email traffic and how to increase email traffic

Email traffic in digital marketing is the kind of traffic that comes from your email marketing campaigns. It’s one of the most valuable sources of traffic to your website because it comes from existing leads and customers.

Take note that not all links in your emails go to this traffic. To make sure it appears properly under this channel grouping, you have to integrate your email marketing software with Google Analytics or manually tag your links with UTM parameters — and make sure the medium parameter is exactly “email.”

If neither one of those two options is met, the link will be tagged under direct traffic. Also, UTM tags are case-sensitive. So use “email” without the quotes as small case.

Importance of Email Traffic

Traffic coming from your email campaigns is one of the most valuable traffic you can get.

Why?

Because this traffic comes from your existing leads and/or customers. After all, they would’t receive any emails from you if they didn’t opt in your email list, right?

These people behave differently than cold traffic primarily because they are further along the buyer’s journey.

They are more invested in you and your company. They know you more than people who are hearing from you for the first time.

This is the main reason why email marketing remains the favorite channel among marketers — it brings the highest ROI across different channels.

Uses of Email Traffic

Email traffic tells you how engaged your current leads and customers are.

It’s a great indication of which messaging is working in your email marketing.

If you are using different marketing emails and tracking them properly, you can see the performance of them in your Google Analytics account.

As you already know, there are two primary metrics to look at when it comes to email marketing: open rate and click-through rate (CTR).

Open rate indicates your subject line convinced your reader to open it; while CTR tells whether your copy/messaging itself is relevant and compelling for the reader to take action — click the link and do whatever you want them to do.

How to Increase Email Traffic

Below are some tips to increase your email traffic. While this list is not exhaustive, these should be enough to get you started.

1. Continuously build your email list

Email lists naturally decay at ~22.5% per year. What that means is a contact in your email list will be practically useless in 4 years.

This could be for a number of reasons. People change jobs and with that change, their email addresses. Your content might become irrelevant to them for no fault of your own. And many more.

Make sure that you continuously generate new leads so you replenish your email list. Here’s a simple 7-step process to generate leads online.

2. Don’t rely on newsletter signups as your lead generation

First, email marketing is not limited to newsletters.

Newsletters are the worst kind of lead generation tactic you can use on your website.

Why?

Because it doesn’t add any value to your readers. They don’t benefit from it. Most businesses only use this to continuously send discounts and promos.

Sample marketing offer to increase email traffic

Instead, create marketing offers. Distribute them on social media and use them in ads to reach a wider audience (like the image above).

3. Use a lead management strategy

As part of the 3 pillars of email marketing, a lead management strategy allows you to segment your email list allowing you to personalize your messaging later on.

Segmentation is what separates successful marketers from the annoying ones.

4. Send relevant email

This builds on the lead management strategy above. What this means is once you are able to segment people coming in your list, send only relevant email to those people.

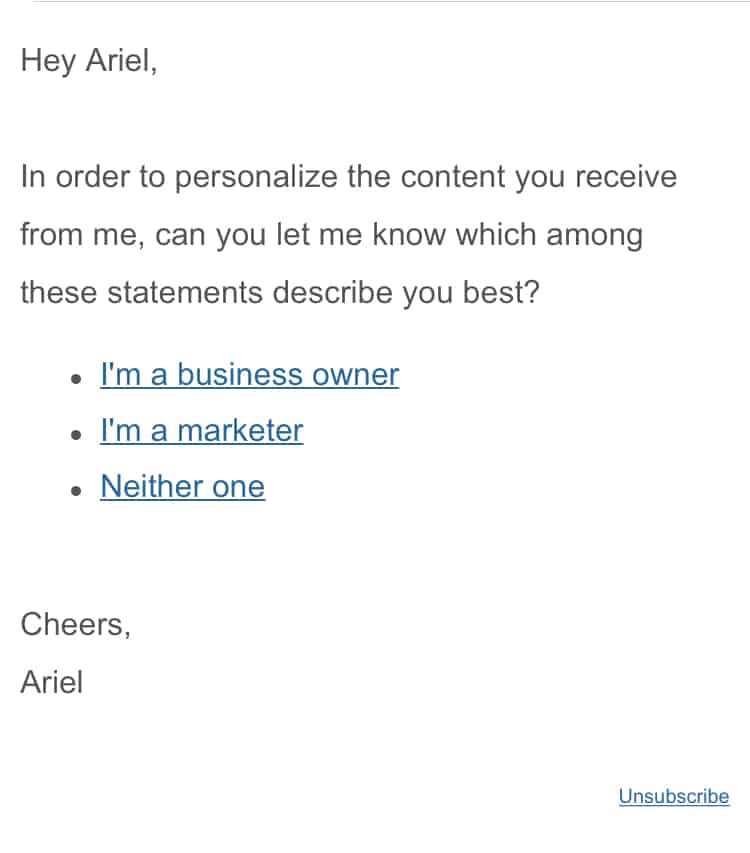
For example, in my own lead management strategy, I determine if the person coming in my email list is a business owner, a marketer, or others.

Sample email for persona segmentation

Once I know who they are, they follow the next tip…

5. Create lead nurturing campaigns per segment

I create lead nurturing campaigns per segment. This way, I only send them relevant emails.

Let’s go back to my example in the previous point.

When people tell me they are a business owner, they are enrolled in a ‘business owner nurturing campaign’ and if they tell me they are a marketer, they enter a ‘marketer nurturing campaign.’

This can be as simple or as complicated you like. You can start with only one lead nurturing campaign. Then, once you build that out, create another one. This way, future leads will then enter nurturing campaign A and some will enter nurturing campaign B.

lead management and segmentation

I wrote a step-by-step guide on how to create your own lead nurturing campaign here.

Feel free to bookmark that page as I’m sure you’re going to go back to it a couple of times.

6. Don’t forget to add UTM tags

As I mentioned above, don’t forget to add the proper UTM tags in the links in your email. Otherwise, when people click on links to it, they will not be tracked under email traffic.

If your email marketing software has an integration with Google Analytics, use that. This ensures all links you are using are tagged automatically.

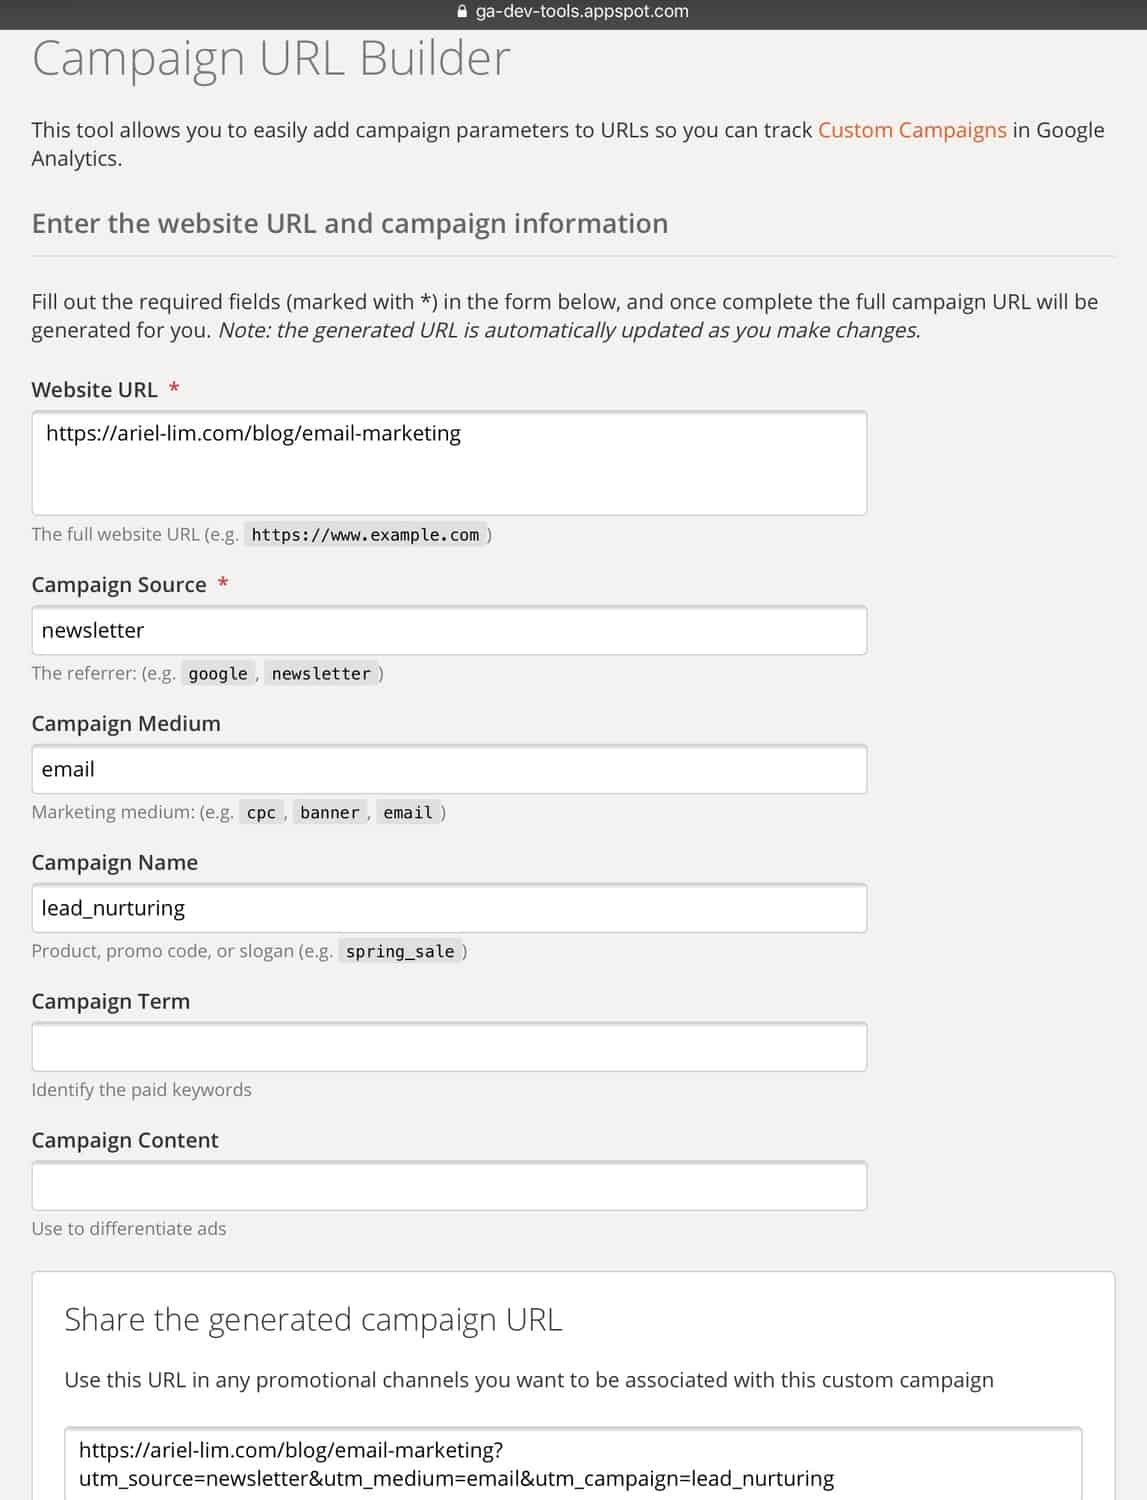
But if not, you can use the URL Campaign Builder by Google. You fill out the fields then copy the link it provides.

Google's Campaign URL Builder

7. Add links to your email

While this may seem natural, there are some people I’ve spoken with who don’t include links in their email.

And make sure they are working, too!

If you’re sending a simple blog article summary/roundup, that email usually has two things: copy and an image.

For example, here’s Pocket’s daily digest email…

Pocket Email with Links

For each blog article, there are 3 links to it: the image, the title, and the save to pocket.

Bottomline: Add links wherever you can.

8. Include links to your articles in your email signature

One other tactic you can use is to add the links to your website in the email signature.

If your marketing and sales teams are aligned, this can be the campaign priority for the quarter. Or maybe a big event coming up soon.

What will happen is all your marketing and sales team’s email signature use the same copy and link to the registration page.

Just make sure you add the proper UTM tags so they get tagged under Email Traffic in Google Analytics. Of course, this can be easily done through an email signature manager, but if you don’t have one, it’s best to create a template then send it out to the rest of the team. That way, they just copy and paste it instead of re-creating it themselves.

9. Link to your articles in 1:1 email conversations

You use email every day to communicate with your customers, vendors and suppliers, contractors, and many more.

If your company is truly creating helpful content, you shouldn’t hesitate to link to them and include them in your email communications.

It’s as simple as, “hey, we recently published a an article on lead nurturing. I remember that you mentioned you were having trouble creating a lead nurturing campaign a few weeks ago. Hope this helps. (Insert link here)

So, What Are You Going to Do Next

Your email list is one of your most valuable assets. It’s the only one you actually own (vs Facebook or any other social media).

Increasing your email traffic gives you a high chance of succeeding because it’s an indication of a highly engaged audience.

A highly engaged audience is more likely to buy from you. And that means sales for you so you can grow, expand, and deliver more value for them.

Are you using any of these tips? Let me know in the comments below.

What Is Organic Traffic

What Is Organic Traffic

Organic traffic is a source of traffic that comes from search engines like Google and Bing.

It is one of the default sources of traffic your website gets. If you’re not familiar, below is a list of the default channel groupings as recorded by Google Analytics:

  1. Organic
  2. Direct
  3. Referral
  4. Social
  5. Paid
  6. Email
  7. Others

Where does organic traffic come from?

Organic traffic comes from searches from search engines that leads to your website.

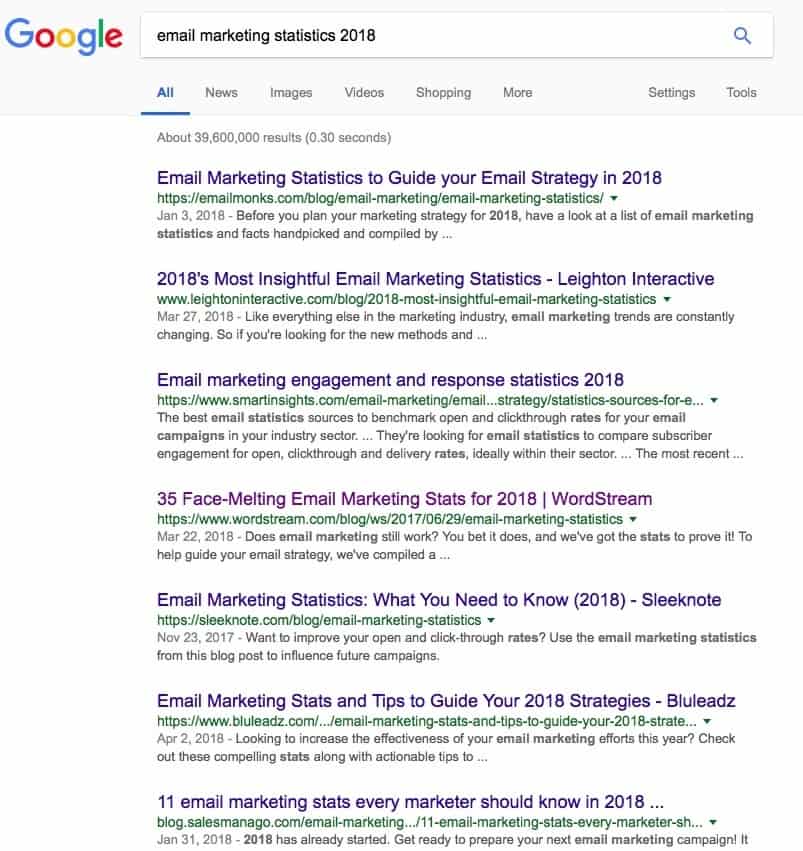
For example, when people type “email marketing statistics 2018” in Google, several results show up.

Google Search Email Marketing Statistics 2018

When people click on one of those searches — assuming it’s a post from your website — that’s when your analytics software records that specific traffic as an organic traffic.

Why is organic traffic important to digital marketers?

There are over 3.5 billion searches on Google per day. And that’s still growing.

And in the Philippines, there are over 67 million internet users. Imagine what a tiny slice of that traffic can bring for your organization.

Remember that the typical online conversion path starts with traffic. The traffic then become leads, then eventually customers.

All things being equal, the higher your website traffic, the more leads you can convert. And with more leads, you have more opportunities to sell to them.

Best Type of Traffic

Organic traffic is free.

In most cases, has both the highest conversion rates and return on investment. Assuming you continue to create quality content and not “game” the system, your organic traffic will just keep growing. These are the reasons why organic traffic is the holy grail of digital marketers.

Getting there, however, is another story. It is a mid- to long-term play — at least 6 months before you see some significant results. There is a lot of work involved. The only proven way to increase your organic traffic is to create content.

So, what are you waiting for?

Commandment 7: Stop Wasting Resources

img 0926

Companies want to earn profits, not just revenues. With more profits, the company can further create value-adding products and services and reach other markets. This cycle creates more customers. Digital marketing is not effective if it does not contribute to the bottomline.

This can only happen when you continuously add more value — which is rewarded by the customer with a purchase. A concrete sign of success in this happens when you get repeat purchases and referrals from that customer.

Profits, if you break it down to its components, is made up of revenues and expenses. The more revenues you make and the less expenses you have at any given period, the higher profits you earn.

A lot of marketing managers and CEOs still do not understand how digital marketing works. They have not yet realized that the internet has become a two-way street of communication. Marketing managers and CEOs often waste their resources by blindly spending on ads or hiring more people without having a proper knowledge on its effect and the return on investment.

This lack of understanding is the main reason why these managers often don’t achieve the results they intend to do. And if they do, they often go over-budget.

Read more

Google Analytics Basics: How to Set it up Properly

img 0915

Google Analytics is the most well-known analytics program for digital marketing. The best part? It is absolutely FREE!

Digital marketing without using analytics is like driving a car in the night without any lights and your dashboard is not working. You do not know where you are going. You do not know how fast you are going. You do not know if you are heading in the right direction or not.

It is not any better than traditional marketing. Think of billboard ads and tv commercials. You invest a lot in producing them in terms of money and time. Then, you do not have a direct way of measuring their impact to your business.

It does not have to be that way. Google Analytics is fairly simple to setup (and use for that matter).

There are three phases in setting up Google Analytics properly. Each phase is also broken into two parts.

How to Setup Google Analytics

Setting up Google Analytics can be divided into three (3) phases:

  1. Creation of the necessary accounts
  2. Installing the code to your website
  3. Checking (and troubleshooting, if necessary) the data

Phase 1: Creation of Accounts

Creating the necessary accounts is the first step.

You will need to create (or login to) a Gmail account. From there, head on over to the Google Analytics (GA) and Google Tag Manager (GTM) websites.

You need both GA and GTM accounts because the former allows you to analyze your website while the latter allows you to make changes to your website without having to learn code; thus, future-proofing your website.

Step 1: Create a Google Analytics Account

  1. Go to analytics.google.com
  2. Login to your Gmail account
  3. Sign up for a Google Analytics account
  4. Choose Website
  5. Input Basic Information About Your Company and Website
  6. Scroll Down and Get Tracking ID
  7. Accept Terms of Service
  8. Take note of your Tracking ID.

Step 2: Create a Google Tag Manager Account

  1. Go to tagmanager.google.com
  2. Login to your Gmail account
  3. Enter your company name (account)
  4. Enter your website’s domain (container)
  5. Choose Web
  6. Accept Terms of Service
  7. Copy the two sets of code given

Phase 2: Installing the Code

Before editing or making any changes — whether that’s adding or updating a plugin, or editing the code directly— it’s best practice to create a backup of your website first.

Installing the code involves two parts as well.

First, you setup Google Analytics inside Google Tag Manager. Next, you install the GTM code on your website.

Again, the primary reason why you should setup your analytics this way is because GTM allows you to change settings or add other code in your website without having to tinker with code. You just install the GTM code and add/edit/delete codes inside GTM. To learn more about how you can do this, check out my article on Google Tag Manager.

Step 1: Install Google Analytics code in Google Tag Manager

  1. Get your Google Analytics Tracking ID
  2. Login to Google Tag Manager
  3. Choose the container name you just created
  4. Add a new tag
  5. Name the tag as “GA Pageview”
  6. Choose Google Analytics
  7. Choose Universal Analytics as a tag type
  8. Create a new variable
  9. Name the variable as “gaProperty”
  10. Choose constant
  11. Enter your GA Tracking ID (Phase 1, Step 1)
  12. Click continue
  13. Choose to fire tag on “All Pages”
  14. Create Tag

Step 2: Install the Google Tag Manager code on your WordPress website

This part assumes you are using a WordPress-hosted website. Earlier, there are two sets of code you have to install.

I have provided here two separate options for you to take:

Option 1: Install via header.php file
  1. Login to Google Tag Manager
  2. Choose the container name you want to use
  3. Go to Admin
  4. Choose Install Google Tag Manager
  5. Copy the code
  6. Login your WordPress dashboard
  7. Go to Appearance, then Editor
  8. Search for the header.php file
  9. Paste the code immediately after the opening body tag
  10. Update the File
Option 2: Install via the functions.php file (Genesis Framework)

Before editing or making any changes — whether that’s adding or updating a plugin, or editing the code directly— it’s best practice to create a backup of your website first.

This second option is what I recommend, especially if you are using the Genesis Framework.

  1. Go to your theme’s editor and add it to the functions.php file.
  2. Login to your WordPress account.
  3. Go to Appearance > Editor.
  4. At the right-hand portion, click on the functions.php.
  5. Scroll down until you see the end of the lines of code there. Remember to not touch anything else. A single mistake there can break your entire site.
  6. Add your code
  7. Hit save

Copy this entire code and paste it there, then replace the GTM-ABCDEF section with your own container ID.

// Add Google Tag Manager code in <head>
add_action( 'wp_head', 'google_tag_manager_head' );
function google_tag_manager_head() { ?>
	
//Replace this entire line with the first part of the code <head>

<?php }


// Add Google Tag Manager code immediately below opening <body> tag
add_action( 'genesis_before', 'google_tag_manager_body' );
function google_tag_manager_body() { ?>
	
//Replace this entire line with the second part of the code <body>

<?php }

You’ll then have something that looks like this…

// Add Google Tag Manager code in <head>
add_action( 'wp_head', 'google_tag_manager_head' );
function google_tag_manager_head() { ?>
	
    <! – Google Tag Manager – >
<script>(function(w,d,s,l,i){w[l]=w[l]||[];w[l].push({'gtm.start':
new Date().getTime(),event:'gtm.js'});var f=d.getElementsByTagName(s)[0],
j=d.createElement(s),dl=l!='dataLayer'?'&l='+l:'';j.async=true;j.src=
'https://www.googletagmanager.com/gtm.js?id='+i+dl;f.parentNode.insertBefore(j,f);
})(window,document,'script','dataLayer','GTM-ABCDEF');</script>
<! – End Google Tag Manager – >

<?php }


// Add Google Tag Manager code immediately below opening <body> tag
add_action( 'genesis_before', 'google_tag_manager_body' );
function google_tag_manager_body() { ?>
	
<! – Google Tag Manager (noscript) – >
<noscript><iframe src="https://www.googletagmanager.com/ns.html?id=GTM-ABCDEF"
height="0" width="0" style="display:none;visibility:hidden"></iframe></noscript>
<! – End Google Tag Manager (noscript) – >

<?php }

Phase 3: Checking the Data

Just like the rest of this post, this is divided into two parts as well:

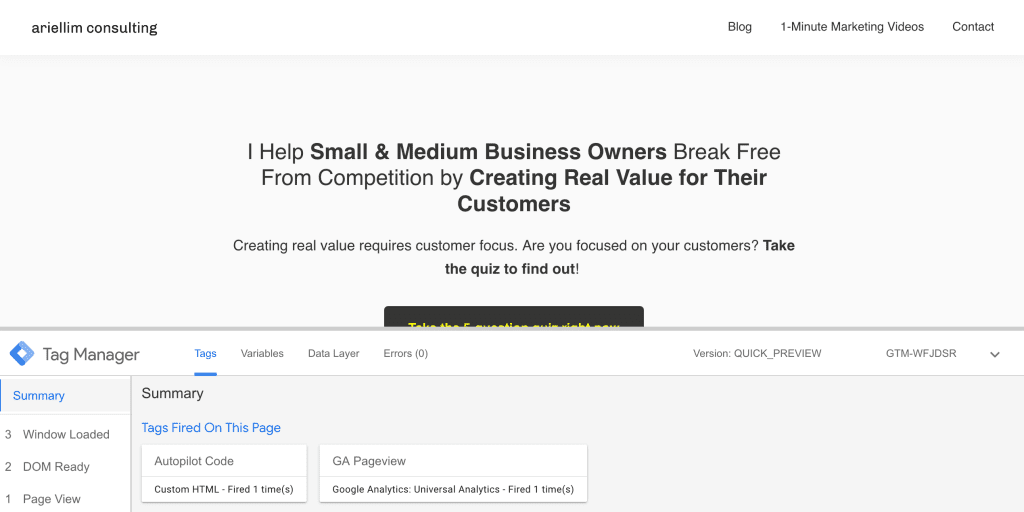
  1. Click on preview inside Google Tag Manager.
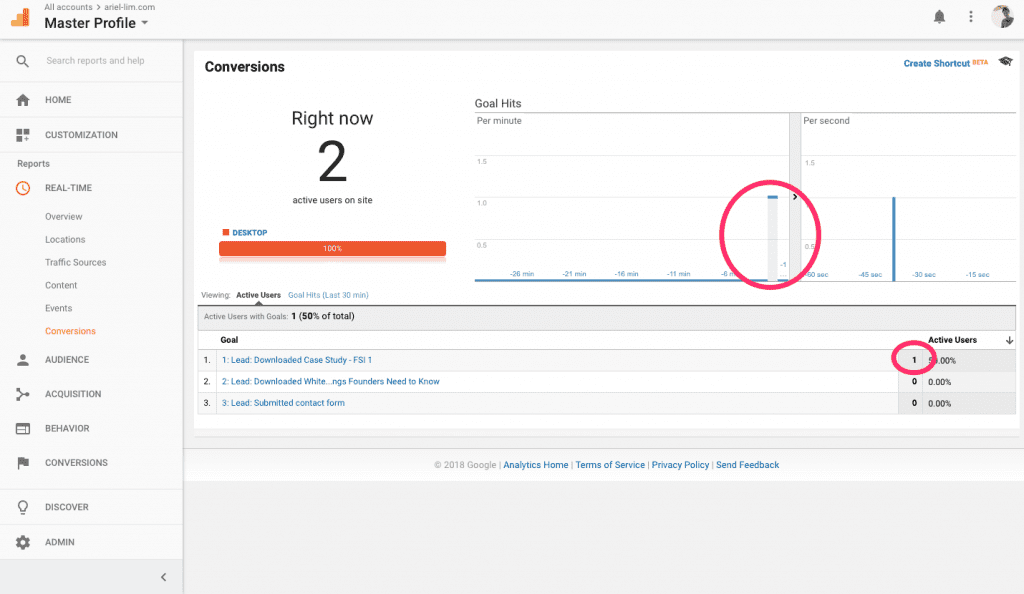
  2. Check real-time data in Google Analytics
  3. If it’s working, then hit publish

Step 1: Preview Your Container in GTM

  1. Go to your GTM account
  2. Click on preview at the top-right portion. The page will reload.
  3. Open a new tab and open your website.
  4. You should see the “tags” firing at the bottom of the screen
  5. If the tag is present, it’s working properly.
Google Tag Manager - Preview Tags Firing on Your Website

Step 2: Look at Real-Time Data in GA

  1. Go to your Google Analytics account
  2. Make sure you are in the Reports tab
  3. Click Real-Time
  4. Click Overview
  5. Open another tab in your browser and load any page on your website
  6. Go back to GA to see if it is working
    1. If it’s working, go back to GTM and click on “leave preview mode”
    2. If it’s not, it’s either you configured it wrong, or a plugin is preventing it from loading. Usually, ad blockers from your browser are the culprit.
Google Analytics Real-Time

Step 3: Publish Your Container

After verifying the data is coming in correctly, head back to Google Tag Manager and click on the submit button at the right-hand side.

You’ll be asked a few details to help you remember the changes you did. Once you’re done, click on Publish.

And that’s it.

You have now installed Google Analytics properly on your website using Google Tag Manager. Again, this is the ideal setup for adding code and apps to your website. That way, you don’t have to go through this setup again.

The next time you want to add code to your website, like the Facebook Pixel or your email marketing tracking code, or an A/B optimization software, you only have to add it via Google Tag Manager.