Creating lead nurturing campaigns is one of the things you need to master if you want to succeed in email marketing. In this post, I’ll show you how you can create a lead nurturing campaign.
So be warned, this will be a very long post.
For the purpose of this post, let’s use a local pet store with an e-commerce site as the hero in this story.
Also, this is just one way to setup a lead nurturing campaign.
Quick Recap: What Is Lead Nurturing
Lead nurturing is the process of moving your leads down the funnel until they become a customer by sending them non-salesy and educational content – usually through email.
It is marketing’s way of supplementing the sales process but works at the subconscious level — meaning, if done right, people won’t know they’ve been nurtured into buying something.
Another way to think about lead nurturing is it’s the process of giving and giving and giving with the hopes of getting something later on.
That giving is the valuable and helpful content delivered via emails and the getting is the sale that happens later on.
Preparatory Points
Before we go into detail on how to create a lead nurturing campaign, let’s go through a couple of preparatory points. That way, we are on the same page.
1. Lead nurturing is not another tactic you do to sell
Let’s get this out of the way — if you plan to use email marketing to sell your products/services, you’ll most likely fail.
And by selling here, I mean what most Philippine organizations do — talk solely about their products/services thinking that that is valuable in of itself.
People don’t buy something because they want to buy it.
They buy stuff to solve their problems and/or get something out of it. Keep this in mind as we go through the article.
Also, if you want to learn more about solving problems, make sure you read commandment 1 of the 10 Commandments for Effective Digital Marketing.
2. Lead nurturing is commonly done through email
You can use other contact information apart from email, but remember choosing other contact information might require some specialized software.
For example, you can use phone numbers (like how messaging apps require you to enter your mobile numbers) or social account logins (like login in via Facebook, Google, etc.)
Email marketing software is more common as compared to messenger bots.
Using other types require some form of software development as well.
3. To gather email addresses, you need to give away something of value first
This article won’t matter if you don’t have any leads to nurture in the first place. Research more on lead generation strategies and tactics.
Learn more about what goes into a typical online conversion path — marketing offer, landing pages, and thank you pages. Then, come back here to create your lead nurturing campaign.
How to Create a Lead Nurturing Campaign
Step 1: Decide on What to Sell
The first step in creating a lead nurturing campaign is to decide on what specific product/service that you want to sell.
This is the easiest part.
Just choose one then move to the next step.
For our example, we’ll choose to sell the Royal Canin Dog Food.
Step 2: List FAQs / Common Objections
The next step is to list down frequently asked questions and common objections from your customers for the product/service you chose. Then, write a 1-2 sentence answer to it.
Go straight to the point.
Don’t be clever here.
If you are removed from the operations or don’t have customers yet, this will be a little bit difficult. But try not to spend too much time here.
I wrote about this in a previous post saying that you can create content in as little as 30 minutes. For our pet store, some FAQs for the Royal Canin Dog Food are as follows:
- Costs — How much does it cost? Why does it cost that much?
- Value — Is this worth my money?
- Objections — What makes this different from the other dog food that only costs 50% less?
Write out the answers to these questions and objections.
Step 3: Determine Your Audience
This next step is to determine who the product/service you chose is for. Every organization has different products/services to offer. Not all of them are for everybody.
In this step, just list down who do you think the product/service is for. No need to get technical here nor spend a lot of time.
For our example, the targeted audience for pet parents who wants only the best for their dog in terms of nutrition and a balanced diet.
Step 4: Segment Your Audience
Segmentation is key to email marketing success.
What are the different stages, goals, budgets, industries, or frustrations these people have?
In the previous step, you defined your audience. Now, think of the different stages they go through, or what different goals they might have.
Below are two ways you can apply this step. Remember, our audience is a pet parent who wants the best food in terms of nutrition for their dogs:
Example 1: Different Stages Within the Audience
- Puppy
- Before you get the puppy
- After you get the puppy
- Growth
- Maturity
Example 2: Different Goals Within the Audience
- Switch to a better, higher quality dog food
- Due to allergies
- More nutrition for active dogs
- Special diet
From the two examples above, I’m pretty sure you realized that at each stage/goal, there are multiple ways the pet store can address these problems.
For example, before getting the puppy, there are countless questions you can answer:
- What do you have to do to prepare your house?
- What do you need to know beforehand?
When you have the puppy…
- How do you introduce it to other members?
- What if you have another dog?
- What if you have a baby?
When you do this exercise for your organization, you don’t need to answer all of them right now, nor address all of them at this point.
Just take note of them so you can create content for them in the future.
Step 5: What Related Content Can You Giveaway
The final step is to decide what related content you can give away in exchange for their email address.
Remember, lead nurturing campaigns are usually sent via emails. In order for you to build your email list, you need something to offer that is valuable to them.
And let’s be clear, your “signup for my newsletter to receive exciting offers” isn’t really valuable. This is what marketers rely on, and one of the most ineffective tactics in email marketing.
Using the information we already have, you can come up with these content to giveaway:
- Dog Food Wars: Pros and Cons of Popular Food Diets
- How to Switch Dog Foods / How to Transition Your Dog to Another Dog Food
No need to come up with an elaborate process here.
Open up Pages/Word/Google Doc, include your logo in the header, then start typing away.
A one-page checklist is enough.
Once you’re done, export it as a PDF and you have your marketing offer.
The trick here is to cast a wide enough net that you don’t exclude a lot of people.
Pro Tip #1: Since we’re starting out, we are targeting people here who are at the top of the funnel. These are the people who are in stage 1 or 2 of the 5 stages of awareness.
And if I haven’t repeated this enough, lead nurturing campaigns are designed to move the lead down to the next stage in your marketing and sales funnel.
This may take a while or may take a combination of multiple campaigns. So, don’t expect immediate results.
Putting them all together
Here’s the cool part about the exercise you went through a while ago. Every step you took in the previous section comes into play here.
To recap, here’s what you did:
- Decide what to sell
- List FAQs / common objections
- Determine your audience
- Segment your audience
- Decide what related content to give away
The exciting part here is that everything you need to create the lead nurturing campaign is already done. You’re just now going to set it up — starting from the bottom.
You already have your marketing offer created. Now, all you need to do is to enable your leads to download them. Here’s what you do.
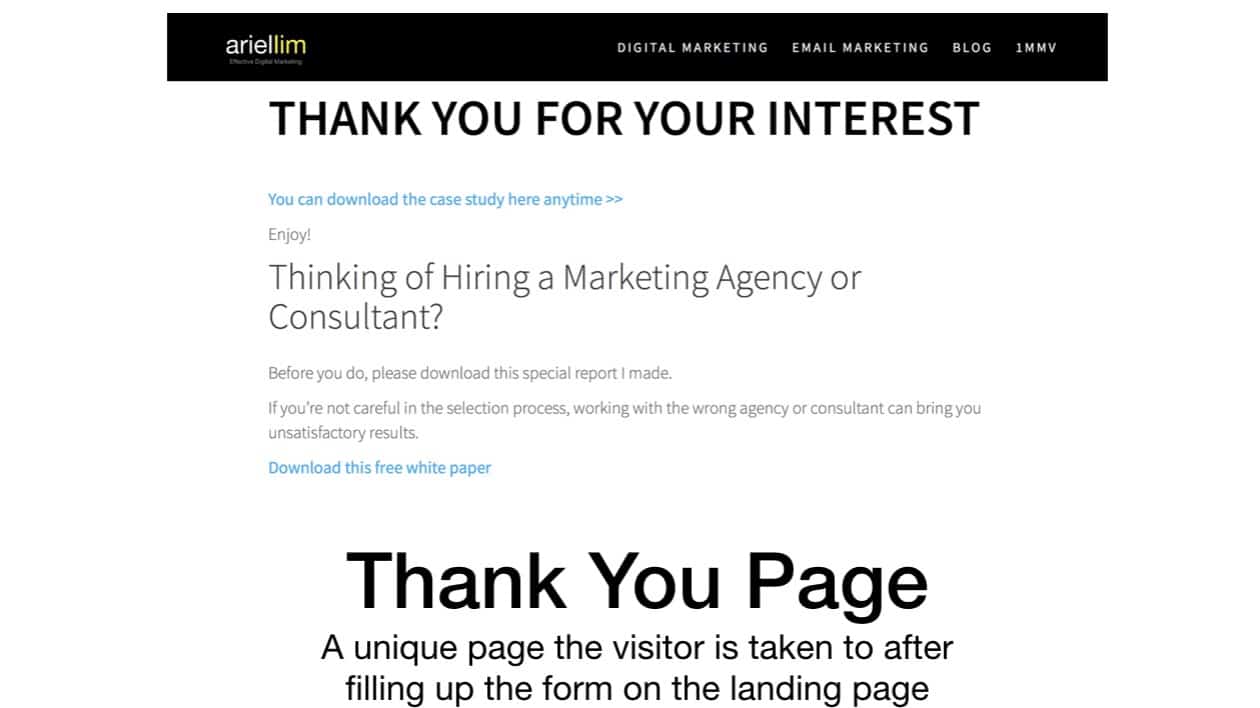
1. Create a Thank You Page
Now that you have your PDF offer, it’s time to create a thank you page.
A thank you page is a special type of page on your website where people can access your marketing offers. That’s why this is the first step in our lead nurturing process. You can read more about thank you pages in my previous article.
How you create them differs depending on what you use or plan to use. In my case, I’m using Thrive Themes. It’s a conversion-focused theme that allows me to create and design landing pages/thank you pages with ease.
You can also use standalone landing page builders like Instapage.
Or if your email marketing software already offers it, use the built-in landing page builder. For example, if you are using ConvertKit, you can do it there without the need for any special software.
Keep this simple for now. Add a link or button to enable download of your PDF. That way, when people click on it, they can download the PDF you just made.
Here’s an example of a simple thank you page I made…
After publishing this page, take note of its URL. You’re going to use it in the next steps.
Pro Tip #2: Add a noindex tag to this page so that no one can accidentally stumble upon this page from search engines.
Pro Tip #3: When you have your next offer, add a call-to-action here to keep the user engaged. Think of it as the next logical step in your sales process. So if they downloaded a “checklist on pros and cons of the different dog food diets,” your next offer could be something like “the science behind dry dog food and why it’s the best diet for your dogs.” You create a call-to-action and put it in the thank you page so that they “keep converting” and engaging with you.
2. Create a Thank You Email
A thank you email is a supplement to the thank you page. It is basically a confirmation of the action that your user just took. For example, if it’s to download a checklist, it’s an email that does two things:
- Thank them for downloading the checklist; and,
- Allowing them to download the checklist
You can either use a direct download link in the email or use the URL for the thank you page instead. That way, people go back to your site again to download the offer.
I always go for the latter option because I can include a follow-up offer on my thank you page. We’ll talk about that in some future article.
3. Create a Landing Page
You can read more about landing pages here.
In that article, I shared the 9 key elements of an effective landing page and why landing pages are a must if you want to start generating more leads.
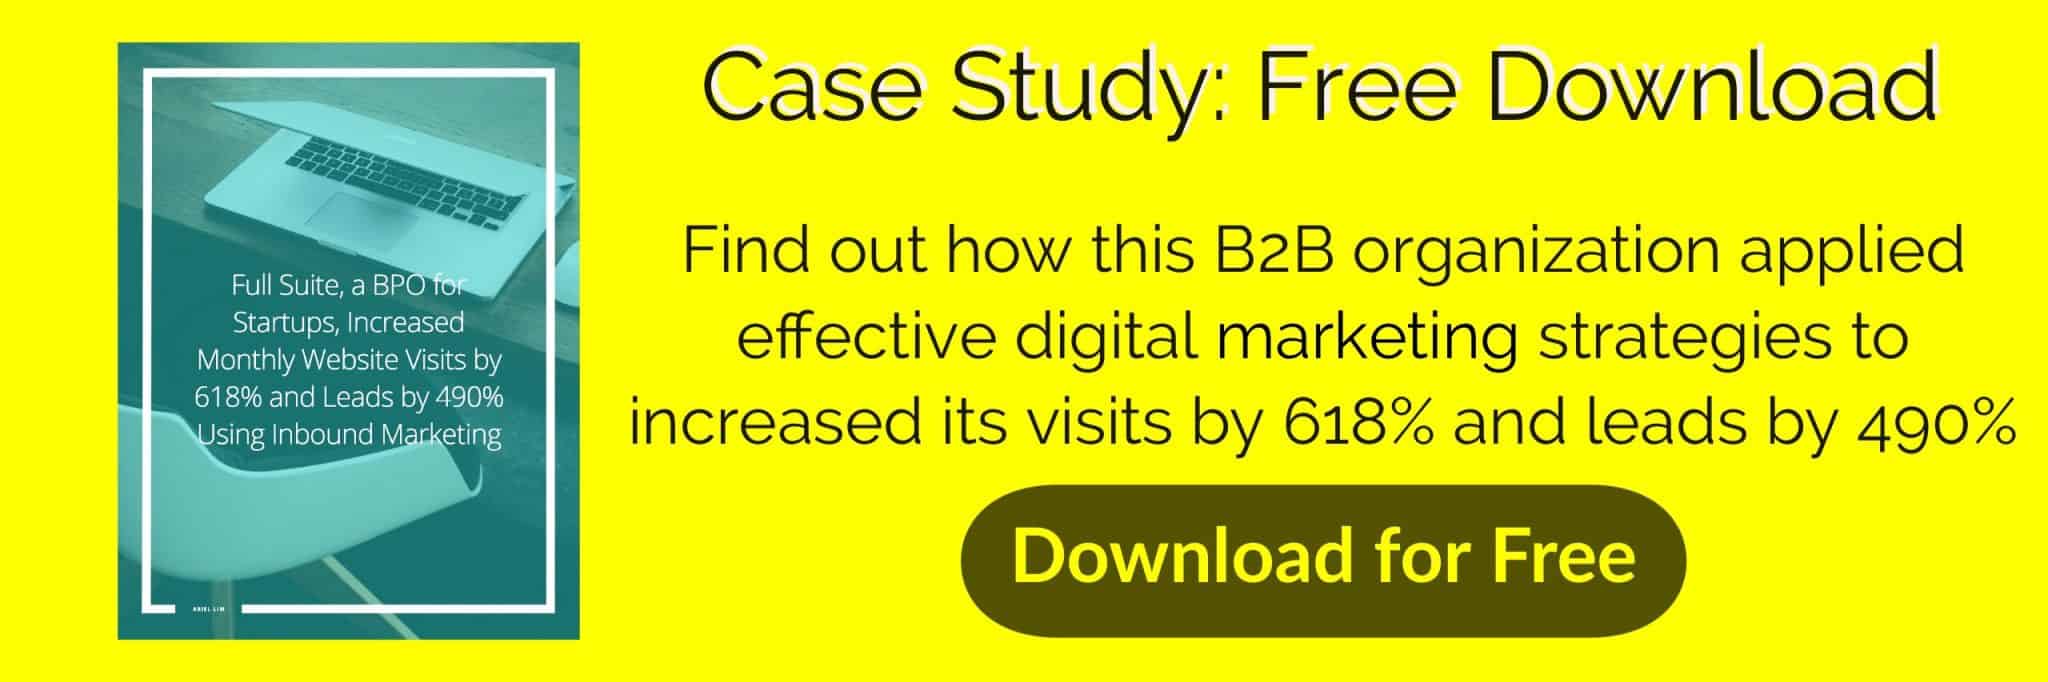
4. Create a Call-to-Action (CTA)
A call-to-action in digital marketing is a way for marketers to link to their marketing offers. Essentially, it’s a link that points to a landing page.
It can be as simple as “subscribe now” or “download this eBook.”
There are best practices for crafting the copy of CTAs and there are multiple variations you can use — from plain-text links to images, or placements like sidebar, homepage, within the blog posts, etc.
Here’s an example of an image CTA…
I just add this to relevant blog posts (like this one you’re reading), add a link, and you’re good to go.
Go ahead, try clicking on it to see how it works. You’ll be redirected to a landing page.
5. Distribute
Distribution is a step that is often neglected by marketers. After all, you cannot nurture any leads if you don’t get any leads in the first place.
For some, this is what they do.
They create an awesome marketing offer, they post it once on their social media accounts and forget about it.
Just remember this: not everyone can and will see what you post today. 10 weeks from now, your offer would still be valuable (I hope). But by then, no one has seen/heard about you and your offer.
Don’t forget to keep sharing / posting about the offer you worked so hard to create.
Another way to distribute your marketing offer is to put them all over your website. For example, if you browse different pages of my site, I have placed multiple CTAs for the Case Study I made.
You can also go back to your previous blog posts and add them there as links, like what I did above.
Just keep in mind that it has to be natural.
6. Create Your Lead Nurturing Emails
This step depends on your email marketing software of choice.
I currently use ConvertKit. There are other alternatives out there from simple ones like MailChimp and the ones packed with features like InfusionSoft or HubSpot.
All you do is write the emails.
You can either be fancy — use the templates or create your own — or be simple and just write it out in plain text and add minimal formatting like bold, bullets, and headers.
Let’s say you created a PDF checklist for 10 signs you need to change your dog food now.
Here’s how your emails might look like…
Email 1: Thank you email
Thank the person for downloading your checklist. Ask them if they have questions to simply reply to the email, call you, visit your store, or follow you on social media.
Email 2: Segmentation email
Ask them how they find the checklist, whether it’s valuable or not. Then, ask your segmenting question with a couple of options.
For example: Do you own a…?
- puppy
- adult
- mature dog.
When they click on one, now you know which ones they have.
Email 3-5: FAQ email
Since you segmented people in the previous step, now you can easily send targeted content to them.
In the earlier step, you listed down your FAQs. Now, it’s time to tailor that depending on which segment they fall under.
For example, a puppy owner would have different needs, wants, and problems than an owner of a mature dog.
So, create 3 sets of FAQs that send when people click on the segment they are in. Meaning, if they indicated they are a puppy owner, you send them FAQs that might include “is it time to feed my puppy dry food?” or something like that.
But if it’s a mature dog owner, your FAQ email might include information about diets and what older dogs need that may not have crossed their mind.
Pro Tip: Use the one or two sentence answers you made to cover this section. Then, link back to your other articles where you answered the questions more thoroughly. This way, your email won’t be too long. And if people wants to read more, they can simply click through it.
Which brings me to the next step…
BONUS: Create Supplemental Content
This is an optional step since it isn’t part of the lead nurturing campaign itself. This is, however, an important step for more effective distribution.
The more places you can showcase your marketing offer, the better.
Basically, this step is to create more blog posts related to the topic so you have more chances of linking the landing page of your PDF.
If you noticed, throughout this article, I have tons of links to my other articles. If I don’t write blog posts like this, then I won’t be able to link to my other articles — or in your case, the marketing offer.
So, what are you going to do next
In this article, you’ve learned a step-by-step process on how to create a simple lead nurturing campaign using tools you are most probably already using.
“Subscribe to my newsletter” is a lousy call-to-action that no longer works. It is also often used ineffectively. If you want to increase your email list, aka generate new leads, it’s time to offer something of real value.
If you have any questions, let me know in the comments below.