If you’re like most people, the first time you’ve heard the name Cloudflare is when you’re trying to speed up your website using a content delivery network (CDN). That’s the same thing for me. And that’s what I’m going to talk about in this article—how can you use Cloudflare to make your website faster through its CDN.
As a side note, Cloudflare do offer a lot more than just providing CDNs. In fact, once you setup your website with Clourdlare, you’ll automatically be protected from malicious activities like DDoS attacks, bots, and other intrusions. They have different plans that you can choose from. But for the purposes of using their CDN to make your website faster, their free plan is all you need.
But before diving right in, let’s answer some of the most common questions:
Use Cloudflare as Your CDN in 5 Simple Steps
One of the biggest names in CDN is Cloudflare. Another name that usually comes up is StackPath (formerly MaxCDN). And because I’ve never used StackPath, I’ll be focusing on Cloudflare.
If you want to use Cloudflare as your CDN and speed up your website, follow these 5 steps.
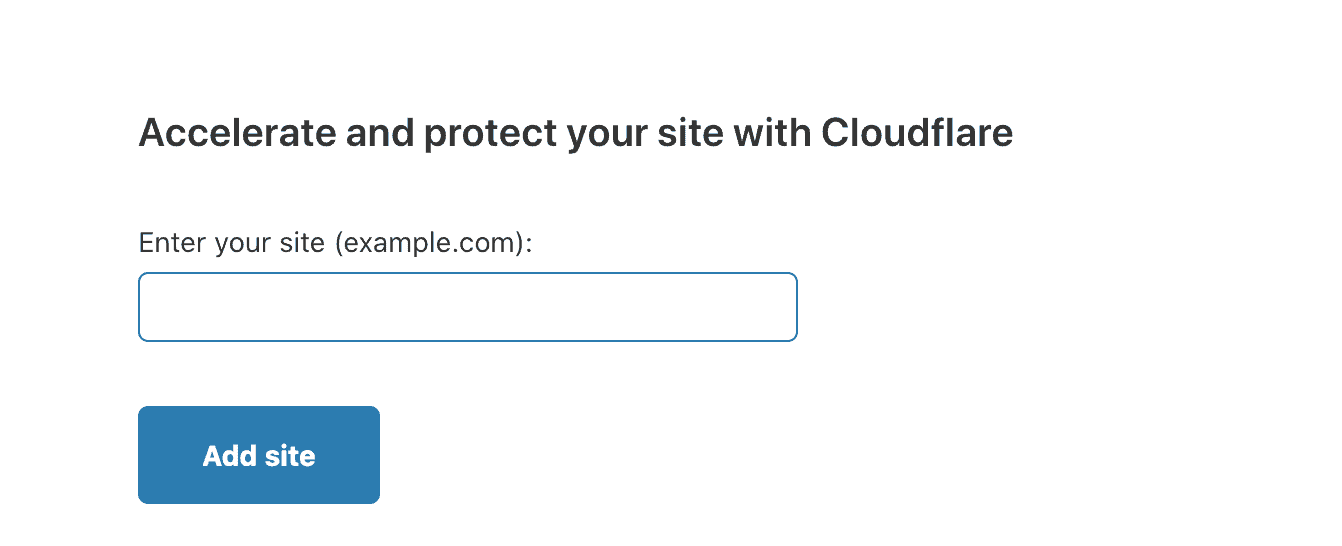
Once you logged in successfully, the first thing you need to do is add your website.
Just enter your domain here.
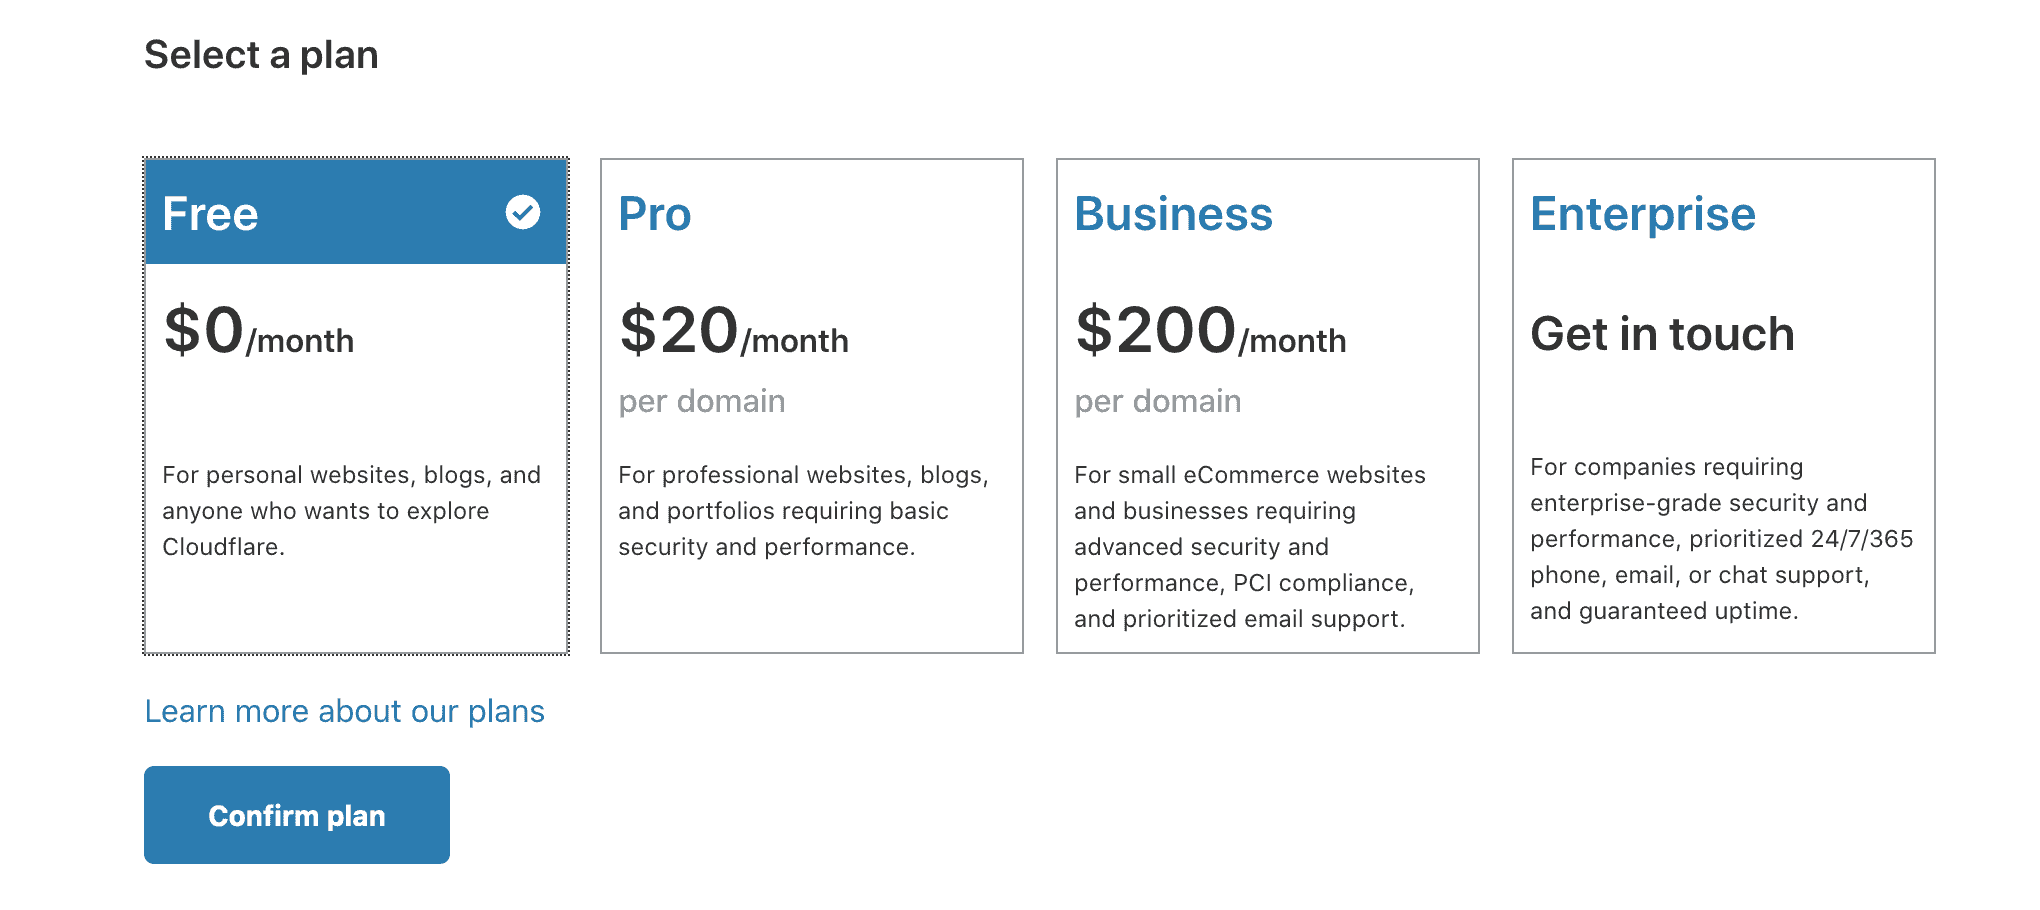
3. Choose the free plan
In the next screen, you’ll be ask to choose one of their plans. Like I said earlier, Cloudflare offers a lot of things. You can explore this for yourself later on.
For now, choose the free plan.
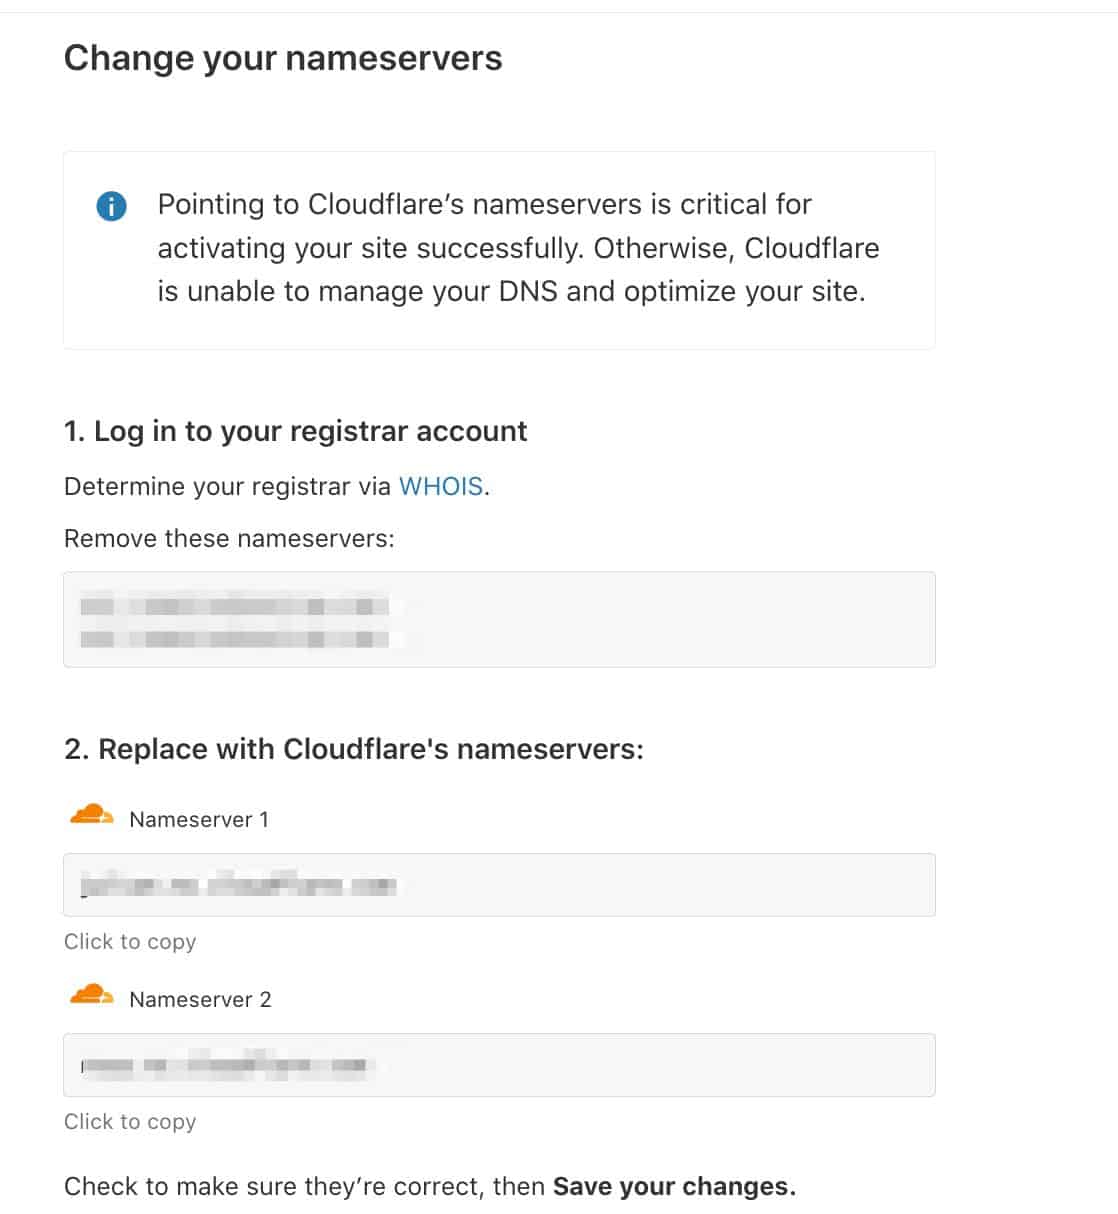
4. Change your nameservers
The next step can be a little scary if you’re not familiar with the process. But don’t worry. I’ll walk you through this.
Basically, what you need to do is follow the instructions in this screen to change your nameservers.
You can find your nameservers from your domain provider—where did you buy your domain?
I bought mine from GoDaddy. You might have a different provider, but the process should be similar.
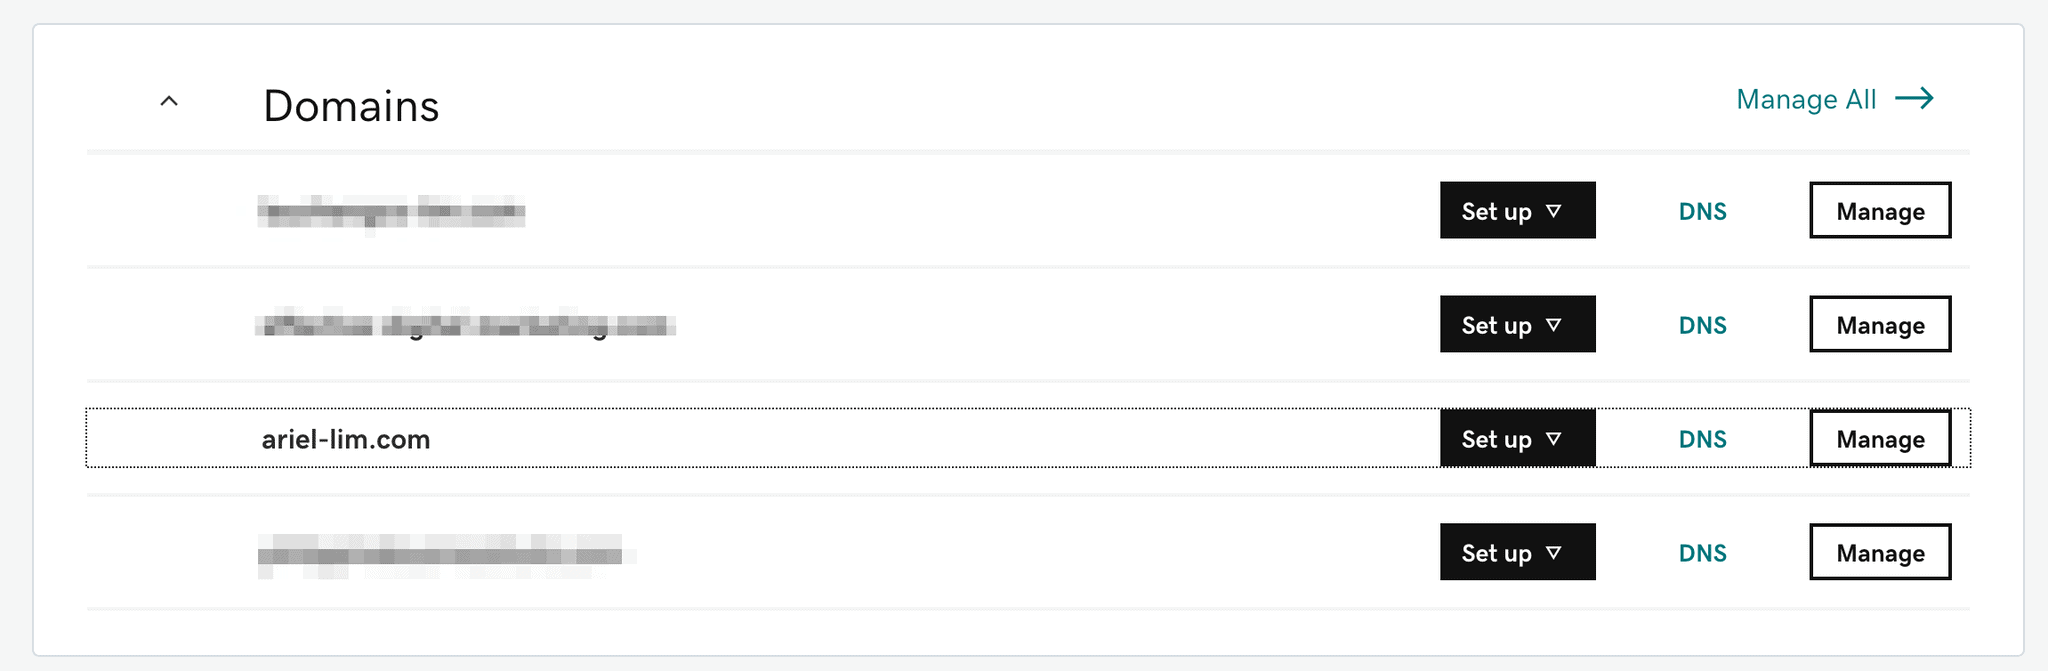
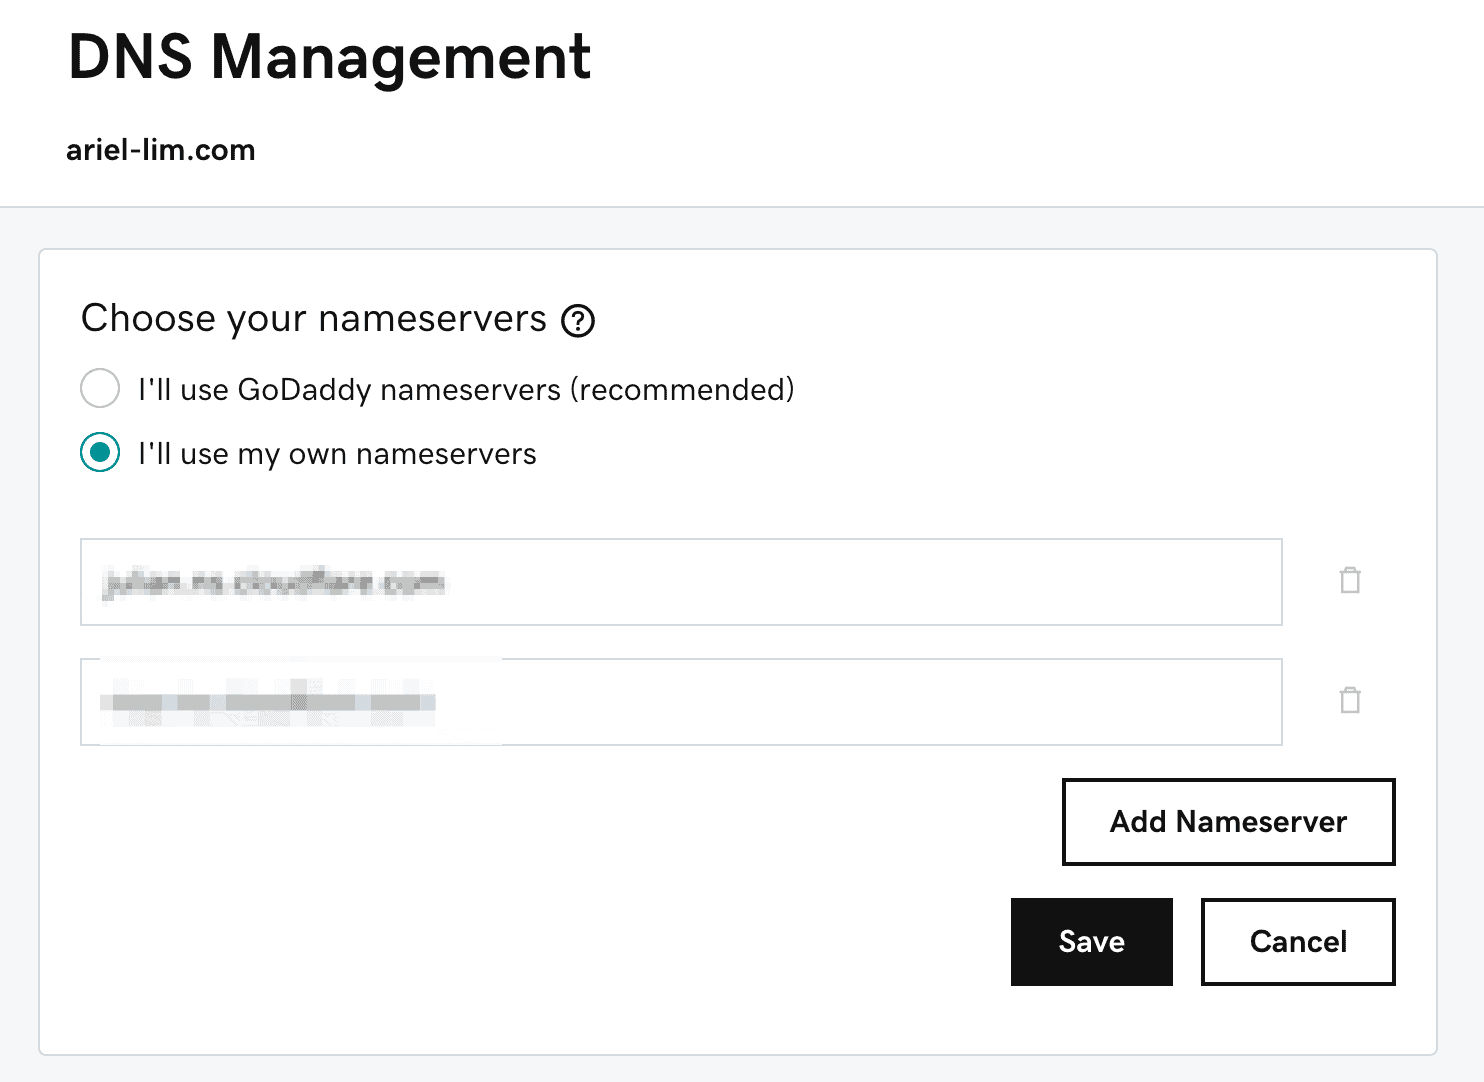
Here’s it looks like inside GoDaddy.
After logging in, I see the domains I have on my account. Click on the DNS button to enter the DNS settings of that particular domain.
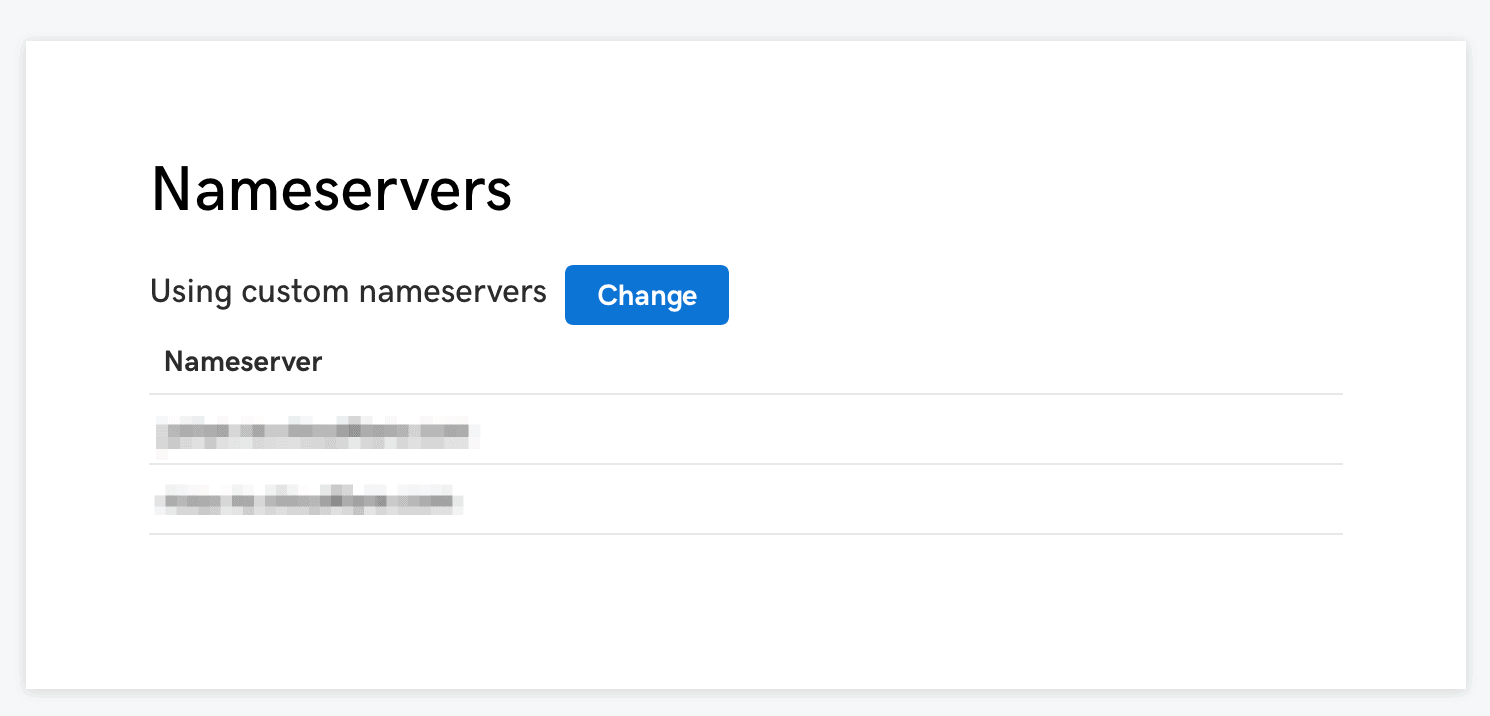
Once you’re in, find the section on Nameservers. You’ll want to click on change to edit it.
Lastly, copy and paste the nameservers from Cloudflare to this section.
Hit save and you’re done.
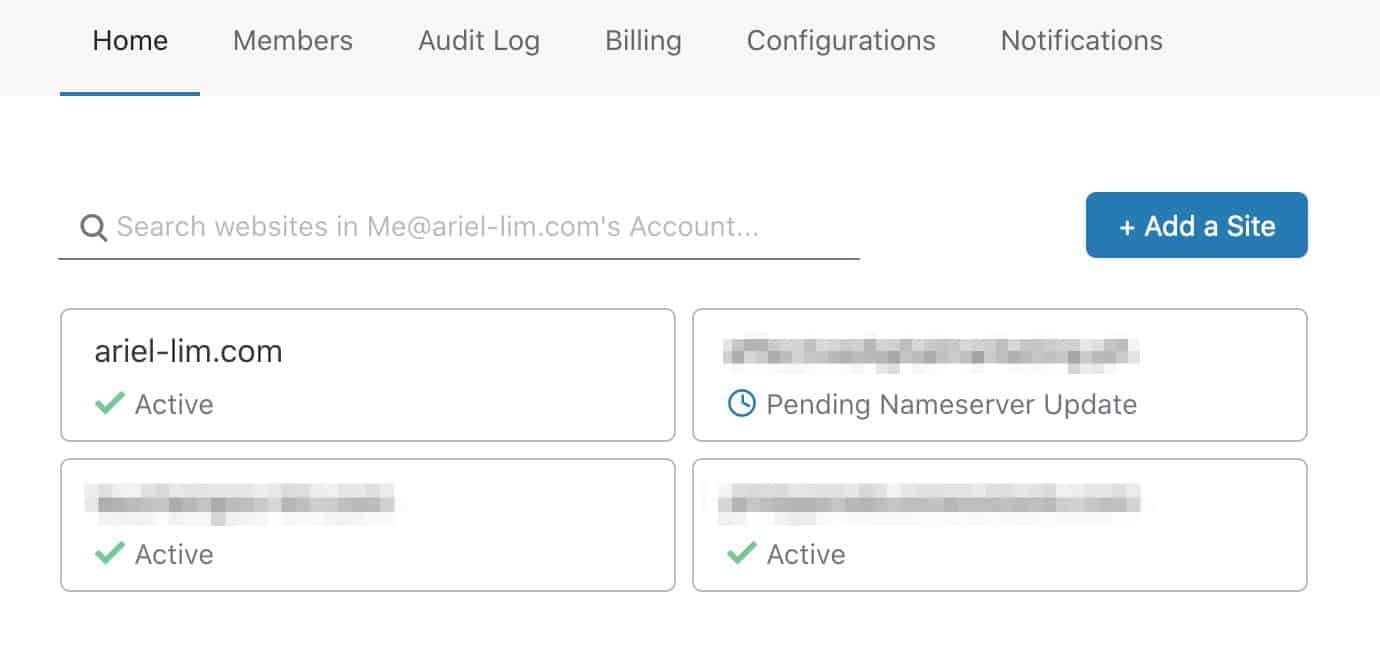
5. Go back to Cloudflare and check the records
If you did everything correctly, you should see your domain saying that it’s active, just like the one shown in this image.
If it’s not, you should see the status there as well.
And that’s it. You have now configured Cloudflare as your website’s CDN.
Conclusion
Depending on your plan, traffic volume, and other factors, you should see your images (and other content) being served from Cloudflare. Once you’re done, feel free to explore the different sections of your account in Cloudflare.
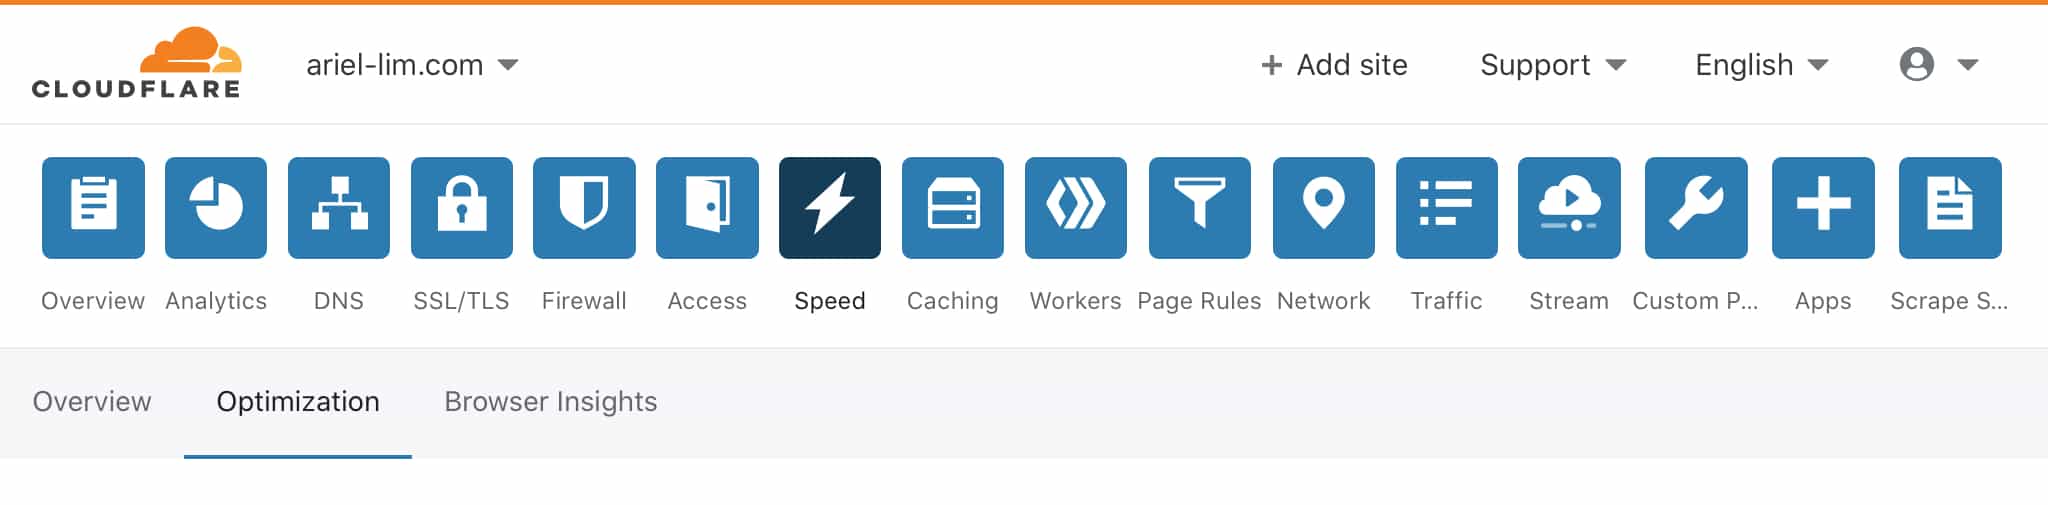
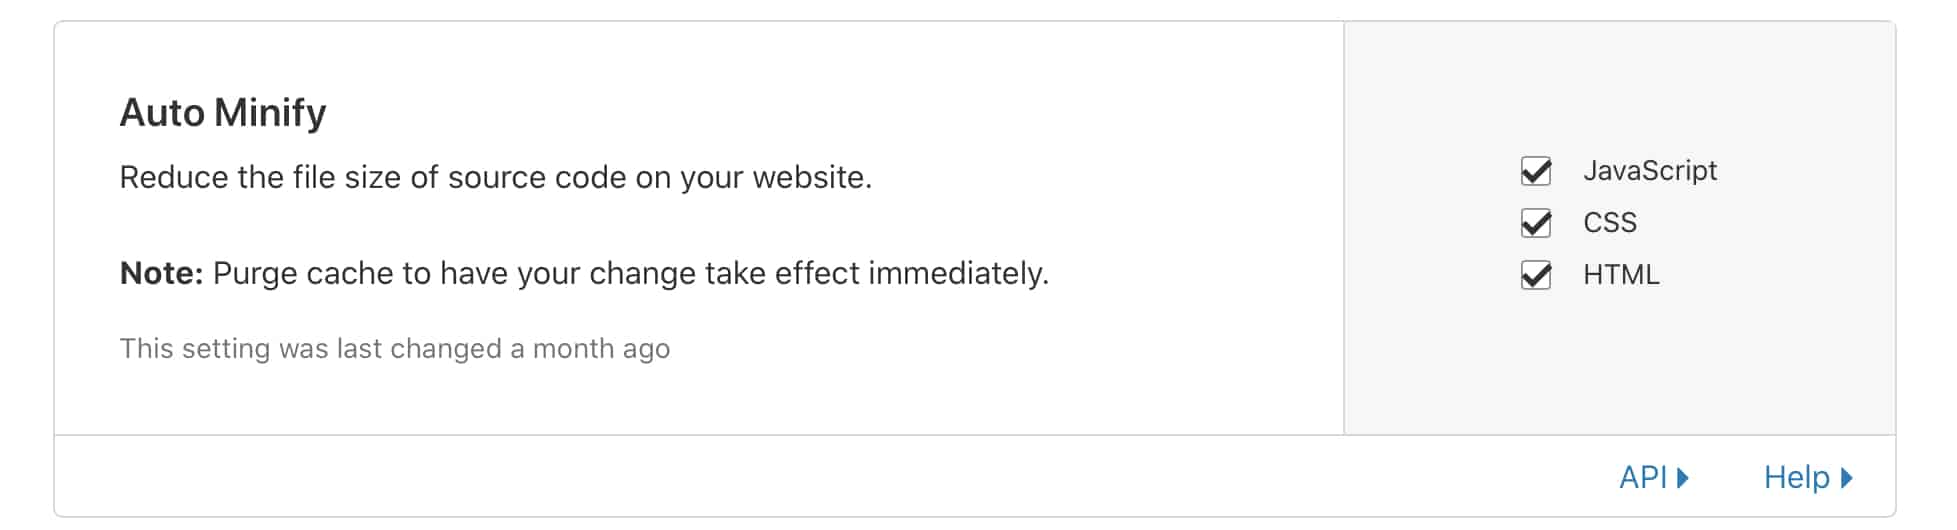
One thing I do recommend doing right now is to make sure your pages are minified. Go to the Speed tab, then select Optimization.
Once you’re there, make sure you check all the boxes in that section.
What it does is it automatically reduce the file size of your code—particularly the three ones you checked: JavaScript, CSS, and HTML.
After a couple of days, feel free to check the Analytics tab so you can see how Cloudflare has helped your site in terms of traffic, security, and performance.
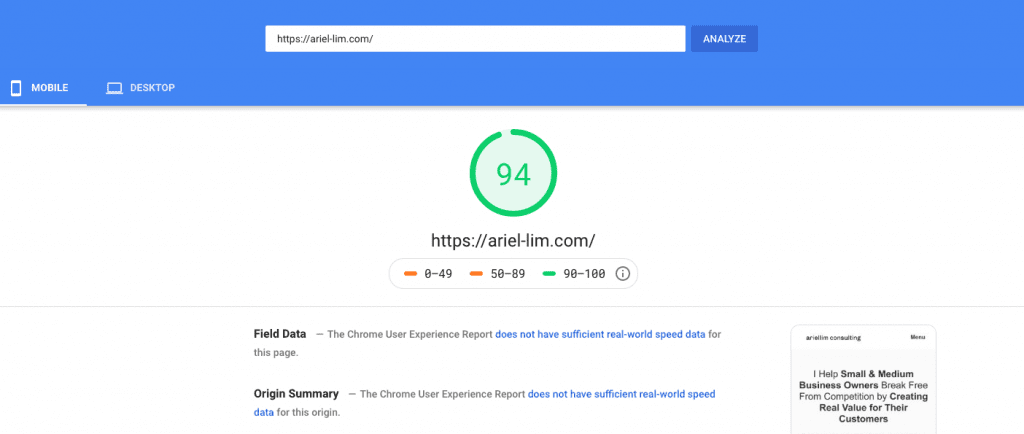
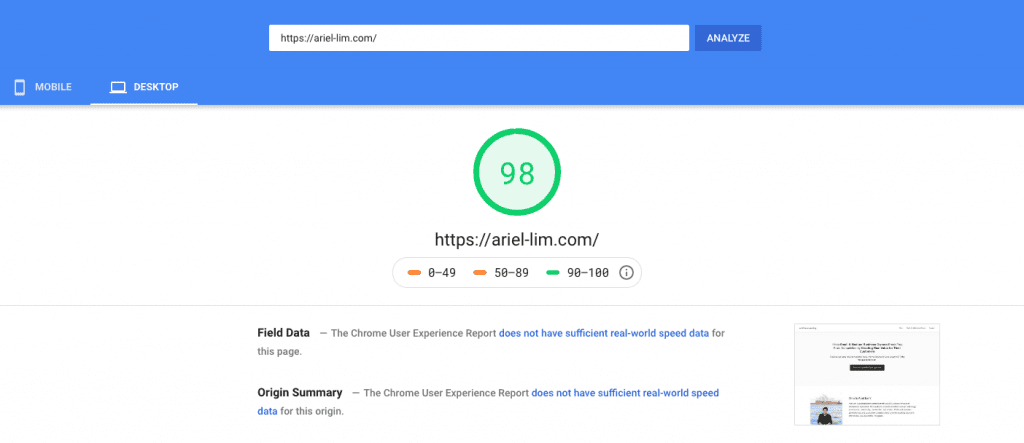
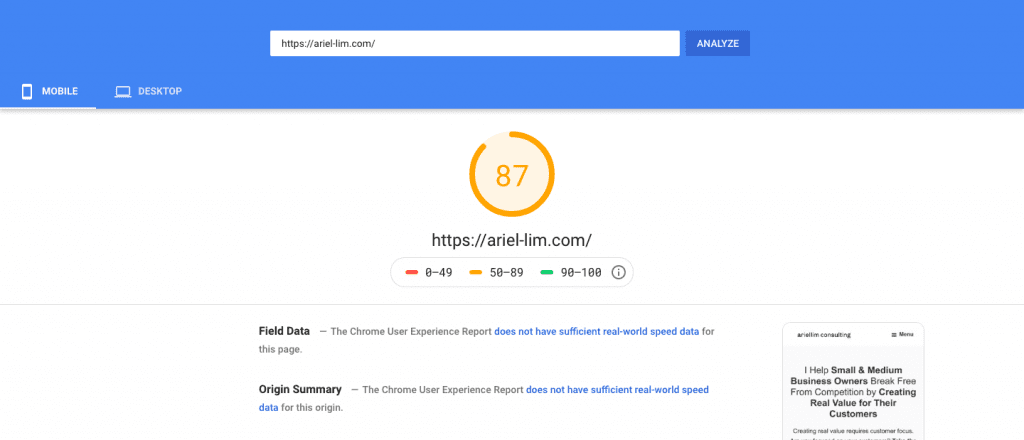
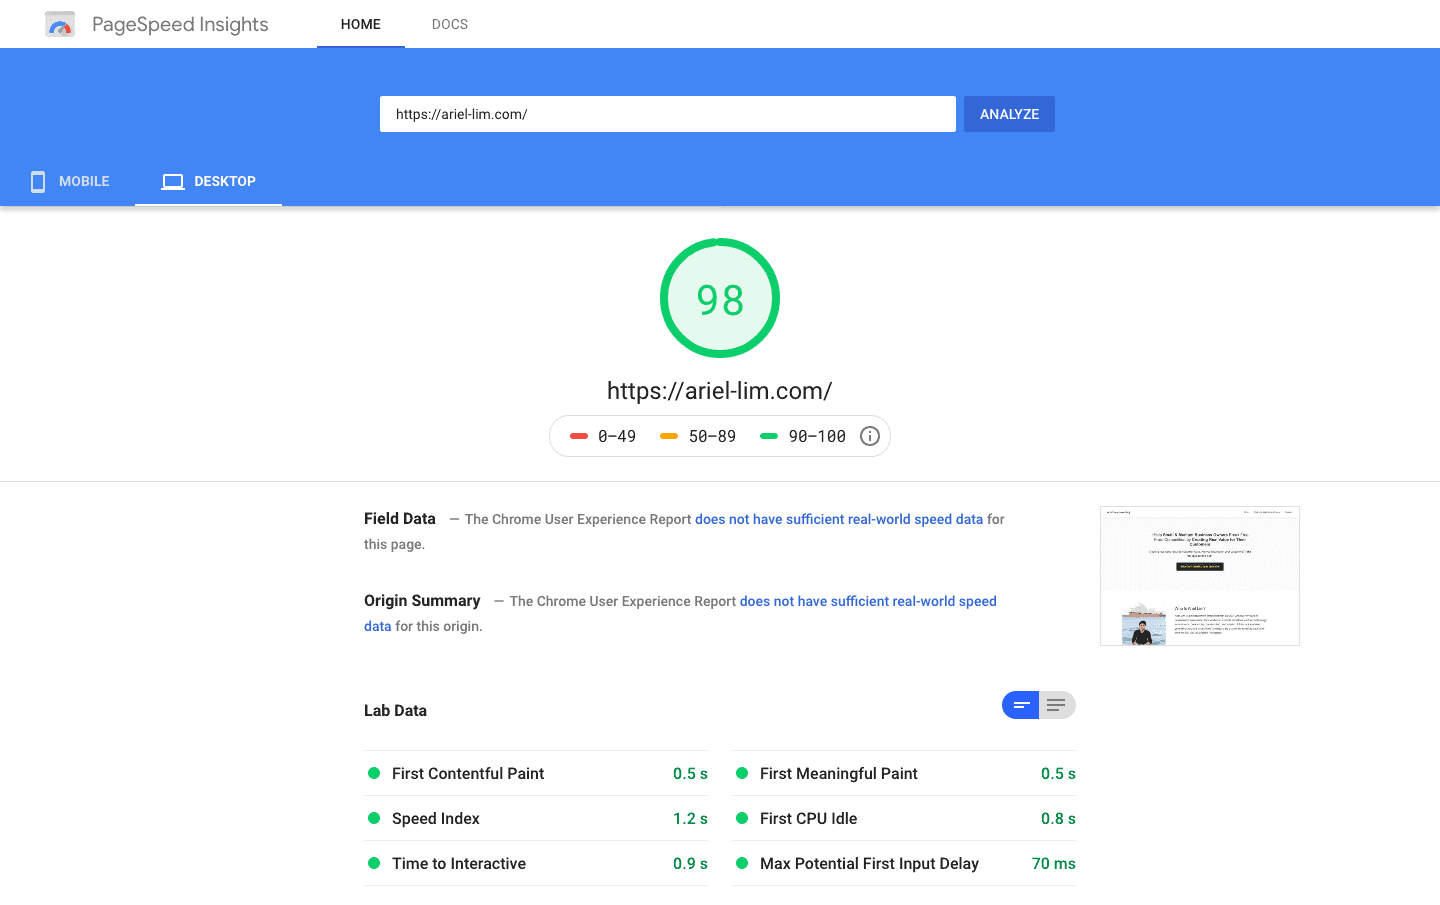
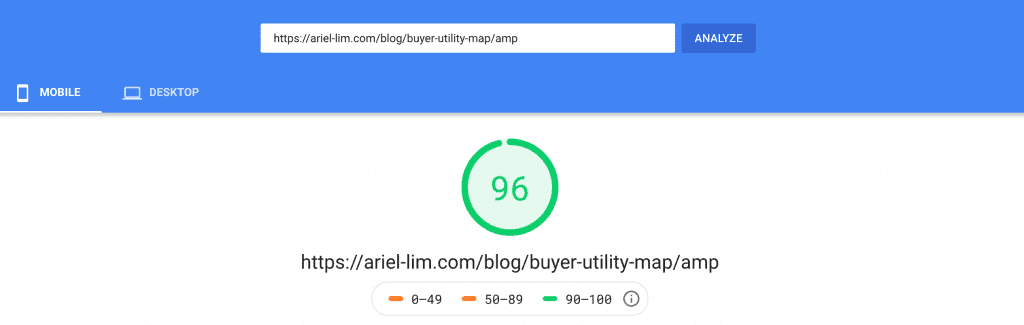
Over the holidays, I have spent countless hours trying to speed up my website. And that experience was very challenging. But right now, it was well worth it. Take a look at the Google PageSpeed Insights scores of my website — mobile AND desktop.
After spending a lot of time (possibly 100+ hours) tweaking my site to improve user experience, I finally made it. I saw the green light. 90+ scores on both mobile and desktop version in the Google PageSpeed Insights. And my optimizations haven’t even finished yet.
Table of Contents Click on any of these to jump straight to that topic
I started this website in 2014. I was working in corporate doing digital marketing. I was already writing articles and managing the website for the company. I also previously started a website in 2011 for a company I started but had to close down. So I somehow knew what I was doing.
Over the years, I wrote about different topics. Finally, in mid-2019 I decided what I wanted to do.
The problem was I was spending a lot of time working with clients so I didn’t have spare time to work on my own website. Of course, this was not ideal. But in my case, it still works. I get my clients from a different channel so even if I neglected it for a while, I can still make it work.
But during the holidays, I had some downtime. I sat down, visualized what I wanted, thought about how to execute, and just did it.
This led me to this version of my website. If I remember it correctly, this is the 4th iteration already. So that would make it like I change my website once every year.
The one thing I didn’t pay attention to back then is website speed and how it affected user experience.
Working primarily from the Philippines, my internet speed sucks. Not only is it slow, but it’s also unstable. So, I really didn’t know how fast looks like. Plus, I’m only writing stuff about my own experiences and not getting any traffic, why bother right?
But after some research on the topic, I’m convinced that speed plays a very important factor, especially if you want to grow your traffic and rank your website higher.
And that’s what I’ll be sharing in this article.
Prerequisites and Warnings
A word of caution.
I am not a developer. I’m just someone who knows a little bit of code because it is essential to know them for my line of work.
Also, what I’m sharing are my experiences only. So, it might not work for your specific circumstance.
Lastly, before making any changes, make sure you perform a backup of your website. Sometimes technology fails us. So, if you’re making tweaks to your website, especially with the code and plugins, it’s best to create a backup before making the changes. That way, if something got messed up and you can’t fix it, you can quickly restore that backup.
Technology Stack
With that out of the way, I’d like to share my entire tech stack. And no, these are not affiliate links.
1. Domain
I bought my domain using GoDaddy. They don’t need any introduction on domain names.
If you’re getting a new one, I suggest going for the longer-term (2+ years instead of 1 year) to get a better rate.
I also recommend including a private registration in your purchase to protect your privacy.
2. Web Host
I’ve been using InMotion Hosting as my web host from the beginning. I’m also on the shared hosting plan and have just moved up from the most basic plan (called Launch) to the current Pro plan.
This is important to get it right because your web host is where your website is stored. What that means is how fast your website depends largely on them.
3. WordPress
I’m currently using the latest WordPress version 5.3.2.
It’s also worth noting that i’m using the self-hosted WordPress setup, more specifically the WordPress.org version. This is entirely different from the WordPress.com version.
As a quick explanation, your WordPress website needs a theme. This theme dictates how your website looks like. That is your main theme or the parent theme.
But sometimes, you want to tweak the design of your website. You want to add a certain functionality or make it brand-specific. That’s where child themes come in. You make the changes in the child theme instead of the parent theme. Why? Because if you update the parent theme, most often, your customizations won’t transfer over.
Here’s a great resource to help you understand this topic more.
Speed Up Your Website with These Optimization Tweaks
Generally speaking, the best way to make your website fast is to focus on the must-have’s rather than the nice-to-have’s. Most people obsess about the graphics — or how the website looks like —but sacrifice the functionality of the site.
Oftentimes, when you add pretty things like animation, custom fonts, and all those stuff, your website takes longer to load. And if you want to add these functionalities yourself to a WordPress website, that’s usually done through a plugin.
Unless you can hire an awesome developer, or want to spend a lot of time tweaking and testing, follow these tweaks and let’s make slow websites a thing of the past.
Which two plugins to install that will immediately make your website fast
Showed you the comparison between another popular set of optimization plugins and their results
And yes, the new ones I recommended are faster and easier to install
The settings for the new plugins
I highly recommend you start there and follow the step-by-step process I outlined. Once you’re done there, come back here.
And now for the ironic part…
Reduce Plugin Usage
As much as possible avoid using plugins. Why?
Because they make your website load slow. Generally.
Now, there are hundreds of thousands of plugins you can use. And they have different functionalities. Some load the front-end (like page builders) while some are focused on the back-end (like automatic backups).
But it really depends on your business. The most important part is you take the time to really assess if you need it.
Unless it’s absolutely necessary, don’t add or use one. And don’t just deactivate them. Delete them.
Finally, if there is a way to add several lines of code to achieve the same functionality as a plugin, I recommend you do that instead.
And that’s what’s going to be the focus below—to help each of your web pages load faster.
Install Google Tag Manager on Your Website
Adding Google Tag Manager to your website is one of the first things you need to do on your website. You can do this via a plugin, but if it’s relatively easy to add the code than to rely on a plugin. Go that route instead.
Before anything else, this actually won’t directly speed up your website. Rather, it will help later on once you add several software to your site by making them load asynchronously. This is very important because when you do website speed tests, you will often see a portion called eliminate render-blocking resources. The way to overcome that is to remove what is causing it. If you can’t, load it later or load it asynchronously.
The tools and apps available today that allow you to do awesome things on your website is done by adding a tracking code (or code snippet) on your website. Here’s a list of the popular software used on websites today:
Analytics and Performance Tracking
Google Analytics
Facebook Pixel
Ads and Remarketing
Facebook Pixel
Google Ads
A/B Optimization
HotJar
CrazyEgg
Google Optimize
VWO
CRM and Email Marketing
HubSpot
MailChimp
Autopilot
Live Chat and Chat Bots
ManyChat
Intercom
Mobile Monkey
And a whole lot more.
If you are not technically-savvy, you wouldn’t want to keep editing your website’s code and hope nothing will get messed up. Of course, you can have a developer/programmer do it for you, but it might take time and cost you money. Just follow these 3 simple steps to adding GTM to your website and you’ll be on your way.
If you know what you’re doing, just copy-paste the code below on your functions.php file, then replace the GTM-ABCDEF with your own GTM ID. If you need specific step-by-step instructions, check out the article above.
// Add Google Tag Manager code in <head>
add_action( 'wp_head', 'google_tag_manager_head' );
function google_tag_manager_head() { ?>

    <! – Google Tag Manager -->
<script>(function(w,d,s,l,i){w[l]=w[l]||[];w[l].push({'gtm.start':
new Date().getTime(),event:'gtm.js'});var f=d.getElementsByTagName(s)[0],
j=d.createElement(s),dl=l!='dataLayer'?'&l='+l:'';j.async=true;j.src=
'https://www.googletagmanager.com/gtm.js?id='+i+dl;f.parentNode.insertBefore(j,f);
})(window,document,'script','dataLayer','GTM-ABCDEF');</script>
<! – End Google Tag Manager -->

<?php }


// Add Google Tag Manager code immediately below opening <body> tag
add_action( 'genesis_before', 'google_tag_manager_body' );
function google_tag_manager_body() { ?>

<! – Google Tag Manager (noscript) -->
<noscript><iframe src="https://www.googletagmanager.com/ns.html?id=GTM-ABCDEF"
height="0" width="0" style="display:none;visibility:hidden"></iframe></noscript>
<! – End Google Tag Manager (noscript) -->

<?php }
Remove Emojis if You’re Not Using Them
Unless you are using emojis on your website, you don’t need them.
But if you’re not using them, there’s nothing to remove, right?
Not necessarily.
Every website is made up of three parts: html, css, and javascript. You don’t need to know these things, but it’s helpful if you do. A very simple explanation for what they are is this: html makes up the text, css determines how they are displayed, and javascript controls the special effects.
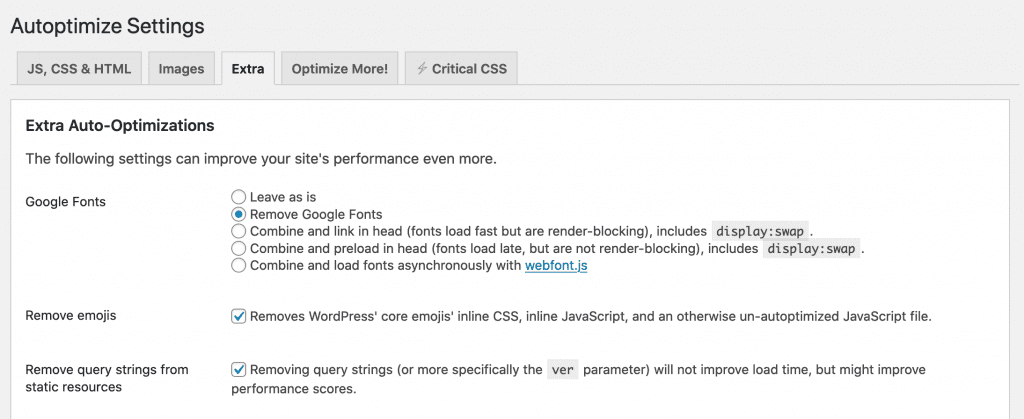
If you are using WordPress, some of those files loaded automatically, including emoji support. And that adds up to your load time. In order to prevent them from loading, login to your WordPress account and disable them via Autoptimize. If you followed the article I shared about getting the 98 score initially on desktop, you should already have this plugin installed.
Go to Settings > Autoptimize > Extra.
Then, just check the box for remove emojis.
Remove Query Strings from Static Resources
And while you’re in there, check the box for remove query strings for static resources too. While it may not affect your website speed directly, sometimes it affects website speed scores.
Hit save and clear your cache.
Using Google Fonts?
Lastly, are you using custom Google fonts? If not, prevent them from loading too.
All these small changes can help your site load faster.
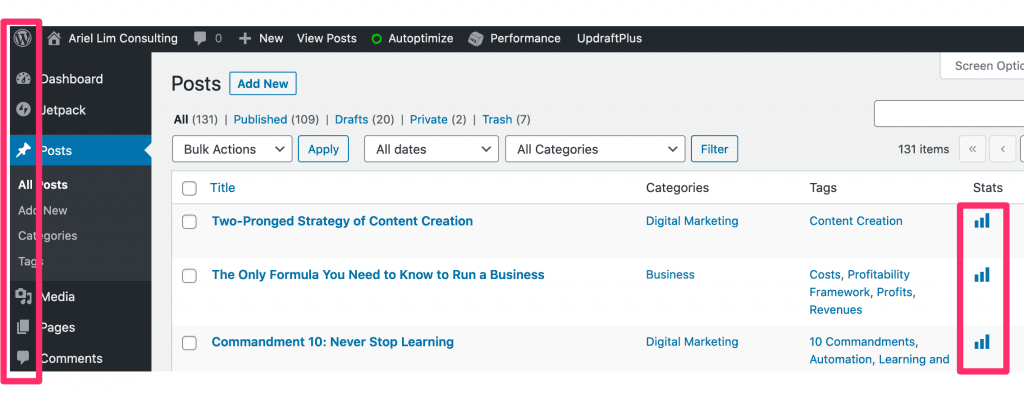
Prevent Dashicons from Loading on Your Website’s Front End
Dashicons are similar to the emojis. These are the icons you see when you login to your WordPress site. Here’s what they look like…
Some websites use them to add some styling on the front-end, like this one.
Again, this goes back to my earlier point. Do you absolutely need it?
If you are not displaying them to your website visitors and only using it on the backend, you should also prevent them from loading.
Go to your themes editor and add this code in the functions.php file.
Go to Appearance > Theme Editor
On the right-hand side, click on the Theme Functions (functions.php). Scroll to the bottom and paste this code. Once you’re done, hit save.
// Disable dash icons on front end

function wpdocs_dequeue_dashicon() {
        if (current_user_can( 'update_core' )) {
            return;
        }
        wp_deregister_style('dashicons');
}
add_action( 'wp_enqueue_scripts', 'wpdocs_dequeue_dashicon' );
This will remove dashicons from the front-end of your website.
Use a CDN
I’m sure you’ve encountered CDNs in your quest to make your website faster. CDN stands for Content Delivery Network. There’s a lot of technicality involved here. But the only thing you need to understand is that it makes your site load faster.
One of the most well-known CDN providers is Cloudflare.
Just follow these 5 simple steps:
Sign up for a free account at Cloudflare
Add your website domain
Choose the free plan
Change your nameservers (from your domain provider)
Check if it’s working
I went through this process of setting up Cloudflare as your CDN here step-by-step with images. Feel free to check it out if you feel a bit lost.
But don’t exit Cloudflare yet. Now that you’ve enabled CDN, and you are also using ShortPixel Adaptive Images (SPAI), follow the instructions below.
Configure ShortPixel Adaptive Images with Cloudflare
Inside your Cloudflare account, click on the DNS tag from the menu. Then, add a new record. Here’s what mine looks like.
Step 2: Change the API URL inside WordPress
Go back to your WordPress account. Then, make the following change to the API URL but change it to your actual domain name. You can find it in Settings > ShortPixel AI > Advanced.
Feel free to create an account on ShortPixel. Use this link so you can get an extra 100 images that you can use to optimize your website. The free account only gives you credits for 100 images/month.
Additional Configurations in Autoptimize
If you followed along and tried testing your website speed along the way, you should see some improvements in your score already.
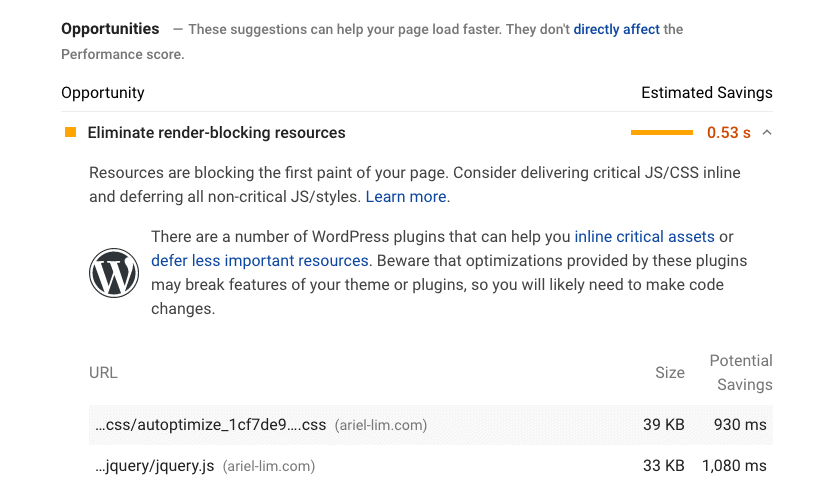
One of the last few things that affected my scores negatively during the Google PageSpeed Insights test was that the aggregated CSS from Autoptimize is “render-blocking.” You will also notice that another file called jquery will also be present as render-blocking.
To resolve both of these, follow these steps.
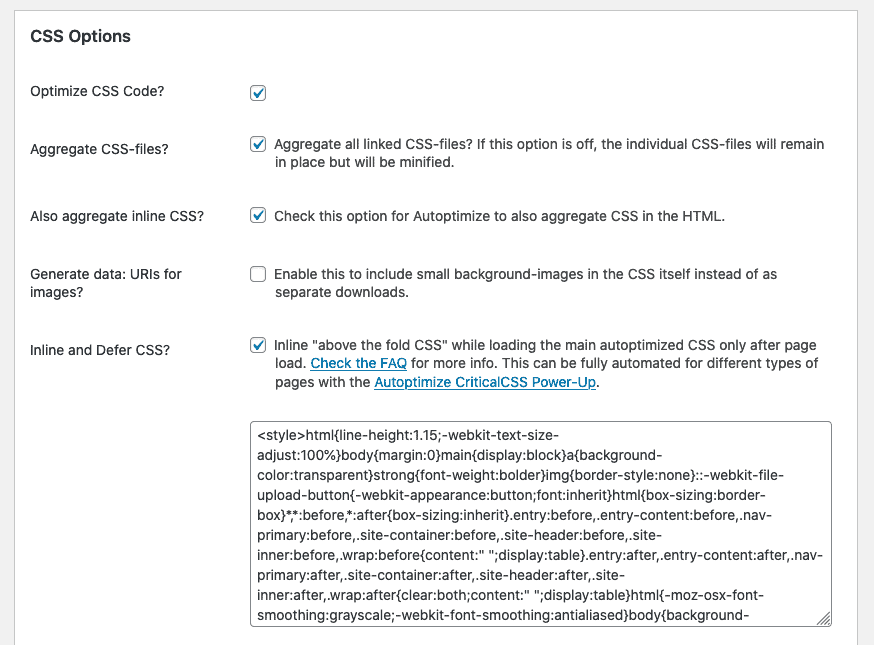
Step 1: Check the box for Inline and Defer CSS
You can find this in Settings > Autoptimize > JS, CSS & HTML tab.
Scroll down and you should see a section that looks like this.
Step 2: Generate your CSS critical path
Head on over to this website and generate your critical path CSS. Enter your domain name and copy the code generated.
Step 3: Paste the code inside the text box inside Autoptimize
Paste the critical path CSS in the section provided inside Autoptimize.
Scroll all the way down. Click the button for Save changes and empty cache.
This should help remove the CSS from being render-blocking.
Now, the final step…
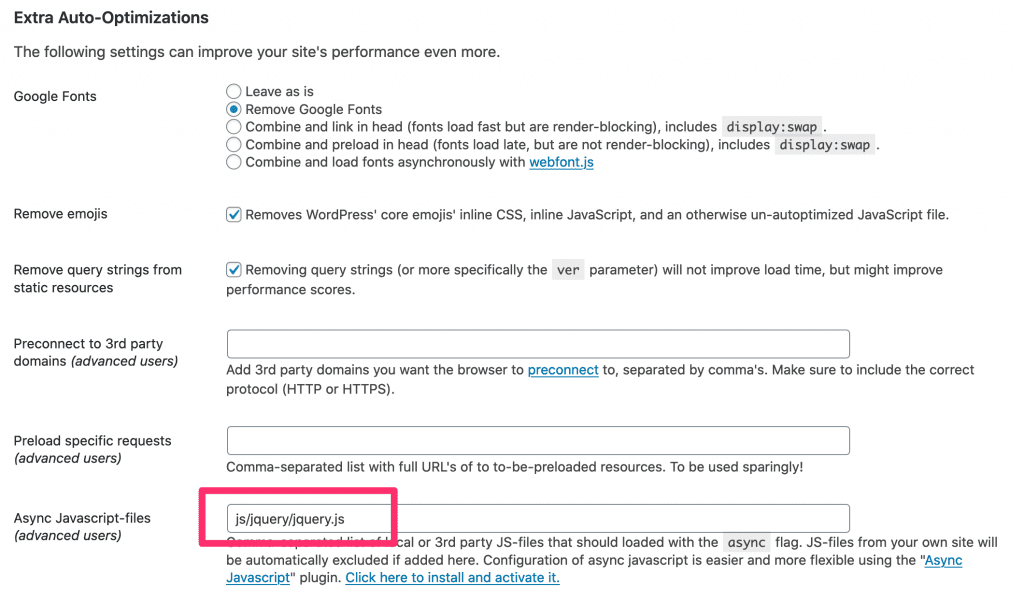
Step 4: Make the jquery load asynchronously
You can do this by going to the Extra tab. Scroll down a bit until you find the Async Javascript-files section.
Paste this code then hit save.
js/jquery/jquery.js
Over to You
After following everything, hit save. Clear your cache.
Run the Google PageSpeed Insights test again and you should see the results in the 90s just like mine.
I hope that these instructions will help you speed up your website without spending too much time nor spend money to achieve it.
If not, then there’s probably some special configuration on your site. Let me know in the comments below and I’ll try to help to the best of my ability.
Your website is the most valuable asset when it comes to your business. It’s one of the first places people will check to determine if they will trust you and buy from you.
I’ve said it once and I’ll say it again, if you’re not found online, you do not exist.
If you’ve been following digital marketing best practices, the first thing that is often recommended is to speed up your website. That comes first before spending your time on search engine optimization (SEO). Why?
Because SEO can only do so much.
Take a look at this research from Google regarding page speed on mobile.
Once people get to your website, if your site doesn’t load in 3 seconds or less, more than half of your mobile site visits will leave the page. Put another way, for every second of impatient agony you’re causing visitors with slow load times, you’re losing conversions and profit.
Now, obviously you don’t want people to just abandon your site without it ever loading first. You don’t even get a chance to make an impression.
That is why website speed — both desktop and mobile — is very important to fix first before you do any optimization for search engines.
Is This for You?
I’m not going to talk about the technical details of making websites faster. And frankly, you don’t need to learn about html, css, javascript, and all those mumbo jumbo.
The only thing you want is fast website speed. And we’ll define what fast means later on and how you can do that without going crazy nor spending a lot of money.
Table of Contents Click on any of these to jump straight to that topic
For now, if you meet these criteria, keep on reading:
Using a custom WordPress site (wordpress.org instead of wordpress.com)
That means you have a web host provider
Struggling to get a high score on Google PageSpeed Insights
Want to provide the best experience for your customers
Planning to create a WordPress website that’s fast
Don’t want to hire developers or pay for expensive tools
8 Steps to Speed Up Your Website
1. Check your website speed to establish a benchmark
The first step is to get an objective view of your website’s speed. There are a bunch of free tools to test your website speed. Here’s a list of the most popular ones:
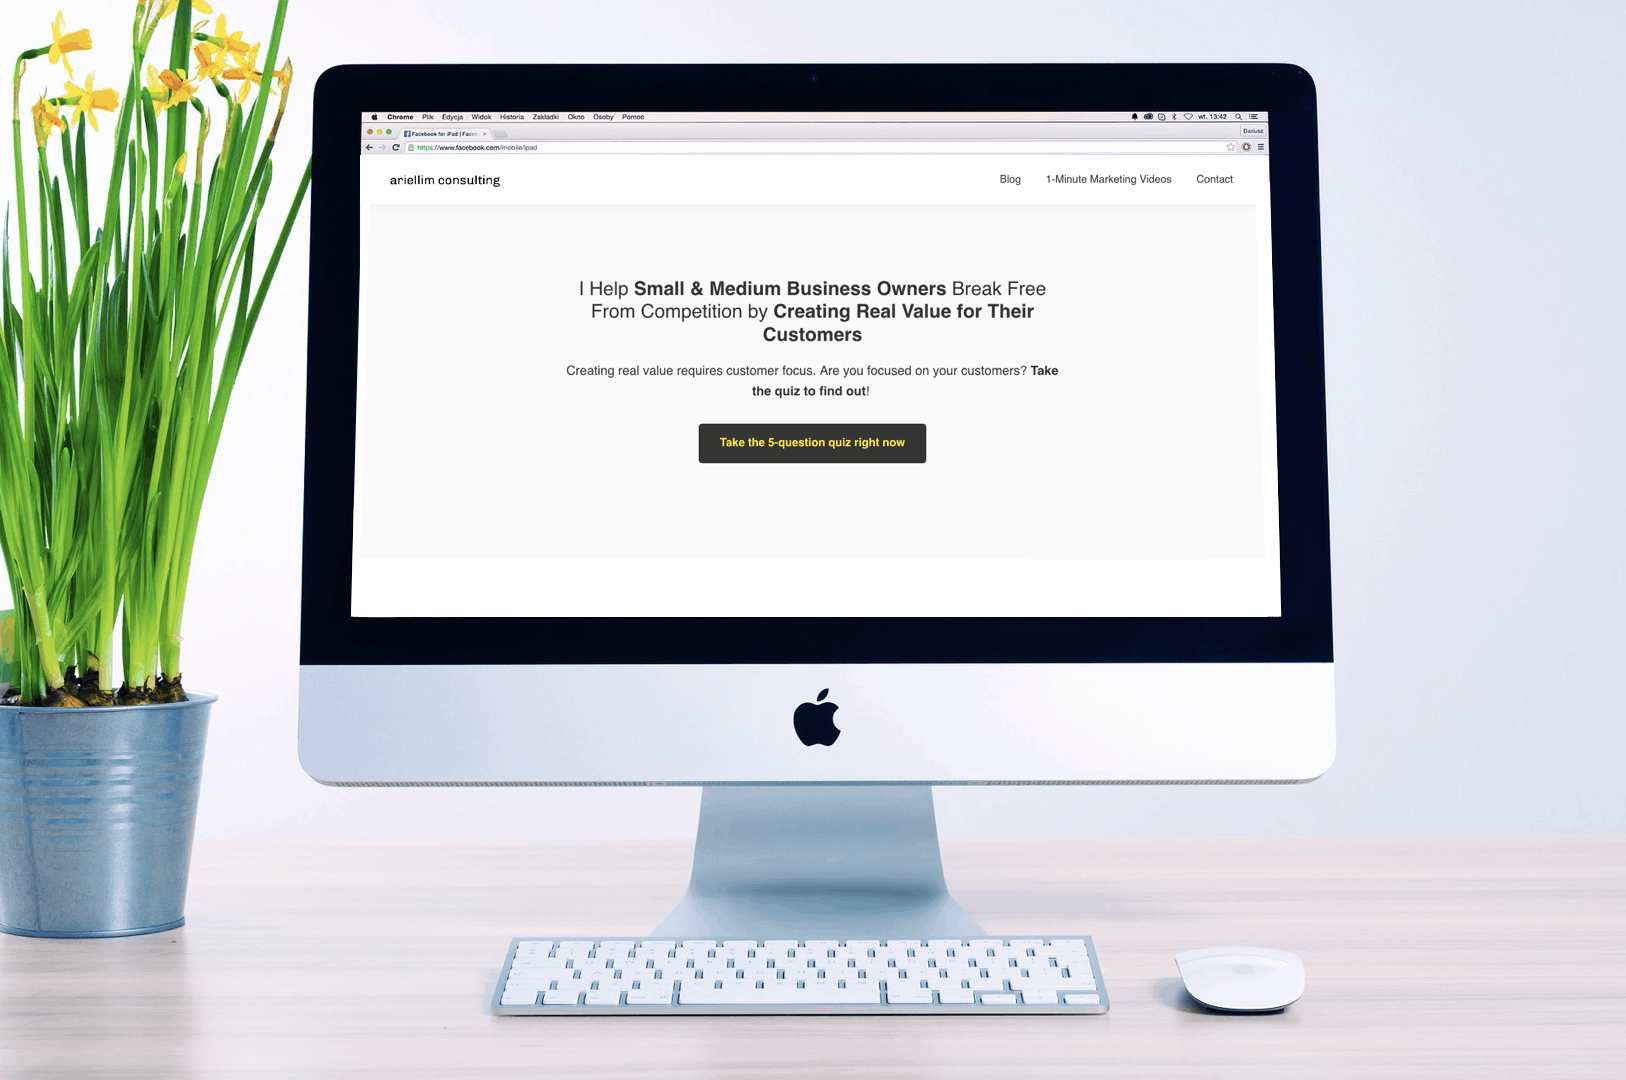
Just type in your homepage URL first to get started. Here’s what it looks on Google PageSpeed Insights.
You can toggle between desktop and mobile tests there as well. Towards the bottom, you will see the actual results and recommendations.
If your website is like most website, you will see the following areas to improve on:
Eliminate render-blocking resources
Remove unused CSS
Properly size images
Defer offscreen images
Serve images in next-gen formats
And a whole lot more. But like I said earlier, you don’t need to know every detail about this because I will show you how to get rid of them — making your website faster — without going crazy.
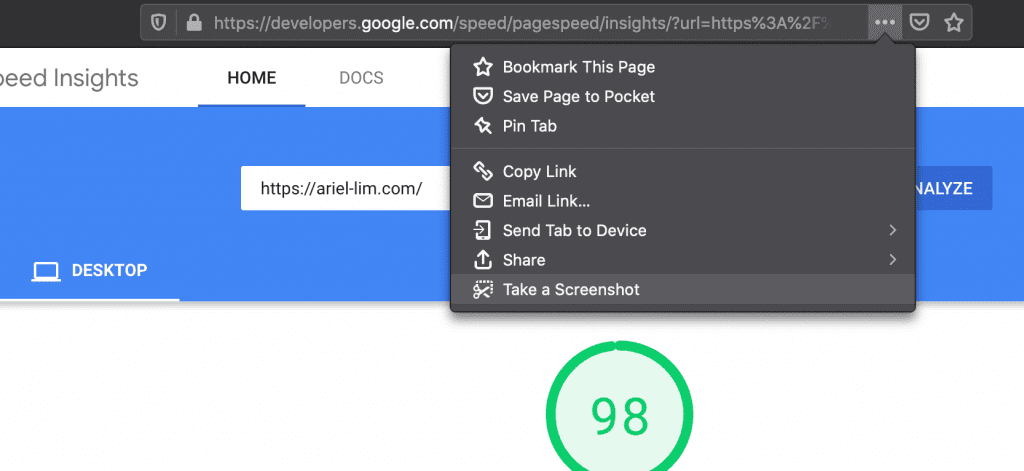
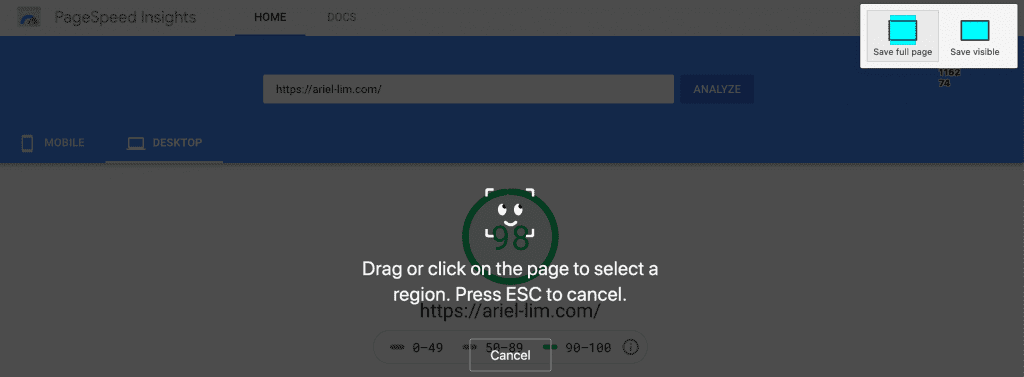
For now, save your results. I use Firefox as my main browser. There is a built-in screenshot option that allows you to take the entire page, that way have a copy of the entire test.
2. Choose a fast theme and web host provider
The next step is to take account of your theme and web hosting provider. The two questions to ask yourself are the following:
Are you using a fast and light-weight theme?
Is your website hosted on a reputable web host?
Now, I won’t get into the details of which themes or web hosts are better than the other. There are already tons of resources out there about those topics. For example, this article describes different WordPress frameworks. They also have this graphic that shows you the breakdown of WordPress sites using different themes.
Oftentimes, you’ll hear great recommendations for the Genesis framework. Then, for web hosts, the most popular and reputable ones are WP Engine and SiteGround. But those may not be for you, so you have to do a bit of research here.
I’ll leave you with this.
Generally, drag-and-drop builders (ThriveThemes, Elementor, Divi, OptimizePress, etc) load a webpage slower because of all the stuff they add to the page. But, if you know what you’re doing, this won’t be an issue. In fact, some websites built on these page builders might even be faster than yours if done right.
3. Determine what functionality you need
The next step you need to figure out to make your website speed super fast is to determine which core functionality you need on your website. Separate the must-have’s from the nice-to-have’s.
I discussed the 4 key capabilities or features every website must have before (plus a bonus one). If you have other features that you want to add to your website, this is a great time to question whether or not you really need it.
For a quick recap, here are the key features you need on your website — the rest are just fluff and you can safely discard them:
Information about you and your business
Ability to generate leads
Analytics and performance tracking
Communication or a way to send messages
Revenue generation (bonus item)
Now, since I don’t sell anything online, I don’t need the revenue generation feature. For 90% of businesses, the first 4 items are all you need. But if your entire business is eCommerce, then generating revenues from the site is a necessity.
If your current website has more than what I listed above, like fancy graphics and animation, then most likely your website has terrible speed. Take them out and your site will speed up immediately.
4. Limit your plugin usage
Now comes the actual changes you can do to speed up your WordPress website.
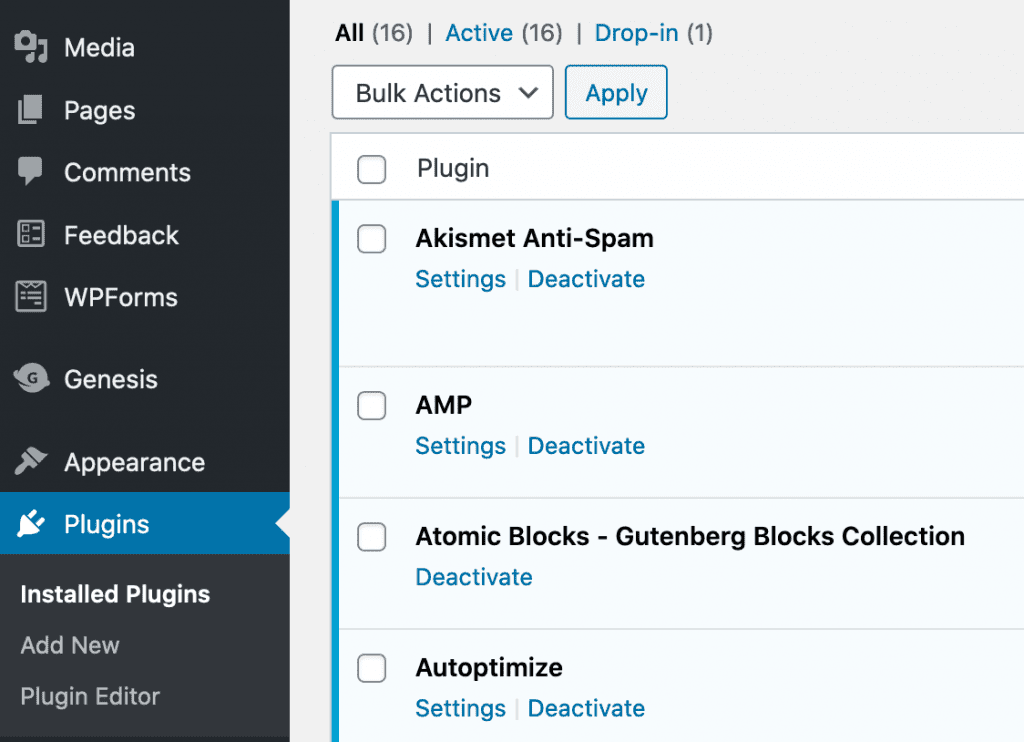
First, if you have plugins that don’t fall into the items above, then you don’t need them. Deactivate and delete the plugins.
Login to your WordPress CMS, then under Plugins, click on Installed Plugins. Then deactivate and delete those that you don’t need.
Once you’re done pruning your plugin list, update the plugins that need to be updated.
5. Install Autoptimize and ShortPixel Adaptive Images plugins
The next step is to install two plugins that will drastically speed up your website:
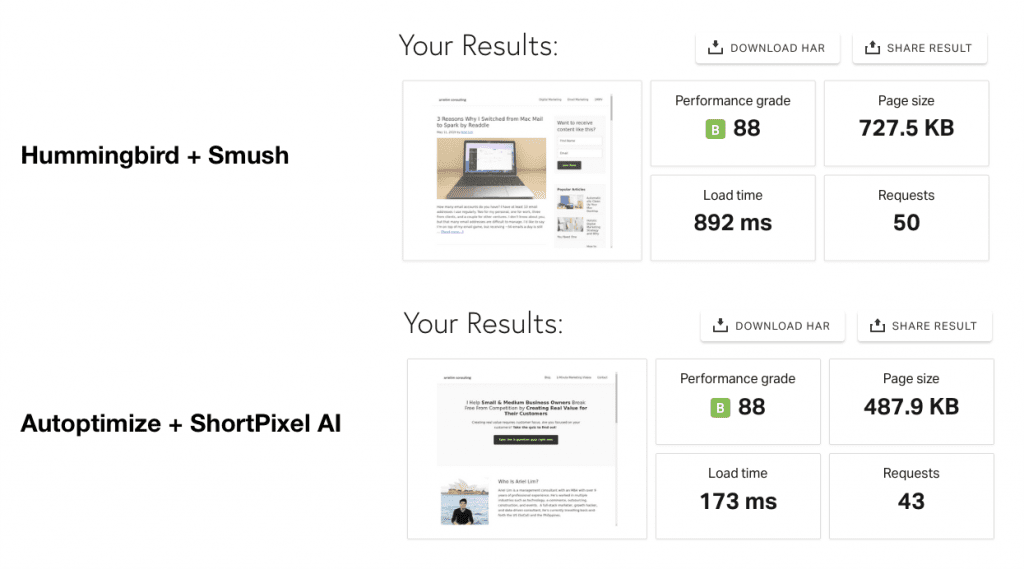
Now, there are other plugins that allow you to speed up your website. The most popular is the Hummingbird + Smush combination. But after spending hours testing multiple configurations, I ended up with Autoptimize + ShortPixel.
Why?
Because it made my numbers go up on all the three website speed testing tools I share earlier.
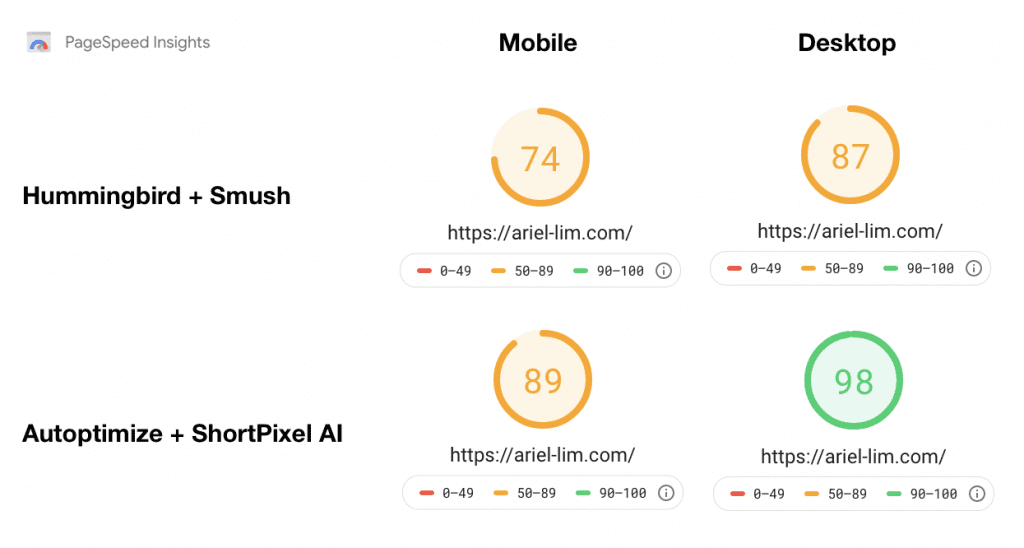
Google PageSpeed Insights
As you can see, by simply changing some of my plugins, I was able to jump a few points for both my mobile and desktop versions in Google PageSpeed Insights.
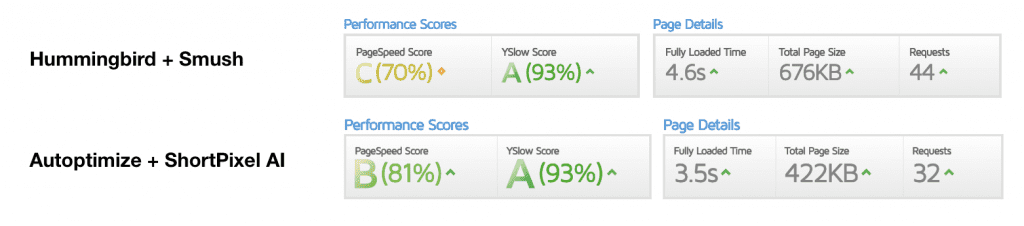
GTMetrix
This goes the same for my scores in GTMetrix and Pingdom. Apart from the score, take note of the fully-loaded time and the number of requests.
Pingdom
If you already have other optimization plugins on your site, it’s best that you only use one. That means you have to deactivate the others.
Caveats
As additional background, the tests aren’t completely 100% controlled. Towards the end of my optimization project, I revamped my homepage. Originally, my homepage displays my blog posts. So, this may have an effect.
I was using the free version of Hummingbird and Smush as well. They have a premium (paid) version that helps with further optimizations. But since my comparison with Autoptimize and ShortPixel is also free, this is still a good comparison.
Lastly, I’m using the free version of ShortPixel which only allows for optimizing 100 images per month. You can opt to pay for a plan, or for a specific number of images, or you can refer people to signup to get more images. Or, if you’re like me, just wait out the month until the counter resets. It will optimize the images remaining in your website. That’s where I’m currently at. I just implemented this a couple of days ago, so not all my images have been optimized. After a few more weeks, without me doing anything, I’m pretty sure my scores will go up especially on mobile. I’ll update this again once that happens.
6. Configure Autoptimize and ShortPixel
Again, I won’t go into details here because really, you don’t have to do anything else.
I’ll just highlight a couple of things here:
Autoptimize
Under the Images tab, check the box for Optimize Images if you aren’t using a CDN (Content Delivery Network). If this is the first time you’re hearing this, then you’re probably not using it. So, enable this setting.
Personally, I’m using Cloudflare. My settings are configured differently and the reason why I don’t have this turned on.
The other setting I want you to make sure that’s turned off is the Lazy-load images. The ShortPixel Adaptive Images will handle this automatically for you.
After making the changes, hit save.
Feel free to create an account on ShortPixel. Use this link so you can get an extra 100 images that you can use to optimize your website. The free account only gives you credits for 100 images/month.
ShortPixel Adaptive Images
Under the General tab, you can select the type of compression level for your images. I’m using Lossy because it results in a smaller file size. I don’t need better quality photos. Most of the images I have are screenshots or demos. Plus, to my eyes, the lossy setting doesn’t differ from the original one.
The best way is to make a few tests yourself and determine which setting is for you.
Then, just follow the rest of my settings here. Make sure you turn on the following:
WebP Support
Fade-in effect
Now, depending on the type of your business, you might want to crop your images by yourself (e.g. products with a background, you want to make sure your product stays in the middle), so don’t turn on smart crop.
Also, the Remove EXIF information is something you also have to consider. I’m wary of my privacy. So in case I forget to remove it myself, this guarantees that I don’t accidentally share my information.
Wondering what EXIF info is? Take out your phone and look at your photos album. I’m using an iPhone. I just took a photo of my dog. When I swipe up, all the EXIF info shows up. So, if I don’t remove that, people could see my address along with other details like time, date, camera model, etc.
I obviously don’t want to publicly share my address. But, that’s me. I value my privacy highly.
But if your business is photography and you want to showcase your location, the aperture, ISO, and other settings, then you might not want to remove those.
7. Optionally Install W3 Total Cache
This step is optional but recommended as well. You can move on to the next and final step, or spend a few more minutes downloading W3 Total Cache and setting it up.
Caching, in a nutshell, “really means is that your web server has to do less work and can, therefore, serve up your content faster.”1
And that’s something that you want, because that’s what Google wants.
The best part is that it’s also free. It can shave off a few more milliseconds on your site speed. And those matter greatly to reaching a high score in the tests.
I followed the instructions for configuring W3 Total Cache here. Of course, some settings are different for me, so take that into consideration.
I estimate around 90% of the settings are the same.
8. Test Your Website Speed Again
Once you’re done with everything, the next step is for you to save all your settings, clear your cache, then run the tests again for the three tools.
If you did everything correctly and your website didn’t break (LOL), you should see a drastic improvement in your website speed.
Over to You
After spending hours reading how to speed up my website and playing around with the settings, I decided to write this article so you avoid going through the rabbit hole as I did.
Of course, it wouldn’t hurt if you do your own research and understand the technicality of what goes into website speeds. But the easiest is to just follow the steps I shared. To recap:
Benchmark your current website speed
Consider switching to a faster theme and web host
Determine what functionality you need on your website
Keep the plugins that support those functionalities and cut the rest
Install these two plugins: Autoptimize and ShortPixel Adaptive Images
Configure them properly
(Optional) Install W3 Total Cache plugin and set it up
Re-test your website speed scores
If you noticed, I don’t have the perfect scores on all the tools. And I don’t have to. Remember, I’m not paying for anything here. I didn’t pay any of the tools nor hired a premium developer to speed up my website. I did all those stuff by myself and achieved these results.
My mobile version is only faster than approximately 25% of the web.
And that’s okay for the time being.
Why? Because I post content regularly. And the ones that get visited often are my blog pages. My blog pages are AMP-optimized — which is another topic by itself. And AMP pages load super fast right out of the box…
Website speed is important if you want to rank on search engines. But before you do any SEO stuff, make sure you have a strong foundation — and that is your website speed.
Have you been trying to improve your site speed? Did you improve your website speed after following these steps? How long did that take? If you have questions, feel free to ask them in the comments below.