Email is the most effective marketing channel and most preferred medium of business communication. This is why it’s imperative that your organization is collecting email addresses if you want to grow and succeed.
Let’s face it—compared to social media sites like Facebook, Instagram, or YouTube, email seems old, antiquated, and irrelevant.
But, when you step back from the glitter of social media and focus on what’s best for your organization in the long-run, you’d realize that email is better. Why?
Because email marketing has higher ROI, more people are using it, and even expected when dealing with businesses. Take a look at these statistics on email marketing to find out why it’s still better than social media.
But that’s if you’re talking about a zero-sum game. Honestly, if you’re looking at growing your business, you have to use them together to get better results. Here are five strategies for how you can grow your email list.
If you don’t have a strategy to make up for these lost contacts, the performance of your email marketing campaigns will naturally decline.
Some marketers compensate for this natural decay by buying lists (or similar activities like getting the list from a colleague, or a sister company, etc).
This is one of the biggest mistakes you’ll ever do as a marketer. Not only will this hurt your analytics, it will eventually create animosity for your brand.
With the General Data Protection Regulation (GDPR) taking effect last May 2018, the Facebook-Cambridge Analytica controversy, and many more — acquiring data from 3rd parties are quickly becoming less viable options.
2. Categorize Your Email
56% of email users unsubscribe from a business or nonprofit email subscription because the content is no longer relevant to them.
These people joined your list willingly at some point because they found value in the emails they receive. But because you keep sending irrelevant messages, they unsubscribe.
This happens when there is a mismatch of expectations.
Someone who recently bought an item from your eCommerce store may expect some emails about warranties, product-related content (like tutorials, how-to’s, FAQs), or even some feedback survey.
But surely, they won’t appreciate receiving more promotional offers, or worse, getting a discount offer for the same product they just purchased at a full price.
3. Segment Your List
Think of your email list as a big database. Not everyone got in it for the same reasons, nor do they have the same problems. Some are leads while some are customers. There are some who will never buy from you.
All these are examples of segments within your email list. It’s a way of grouping people together based on similarities and/or differences.
If you’re like most organizations, your email marketing activities only revolve around sending a newsletter to everyone in your list.
And if you’re sending that email to everyone in your list, you might as well call what you’re doing spamming.
As an added note, the GDPR clearly forbids this type of behavior. If they signed up for product updates, then you send them a promotional sale, that already violates the use of their data.
All these examples are email addresses marketers typically use when sending newsletters. However, studies show that adding a face behind your organization can improve open and click-through rates.
When you receive an email from a person, you’re more inclined to open it, read it, and take action.
Compare that when receiving an email from an organization— an entity you know nothing about; where you haven’t built any relationships.
There are pros and cons to this approach. But the benefits outweigh the costs every single time.
5. Work with Other Departments
Email marketing works best when all departments that “talk” to prospects and customers are involved.
Prospects and customers only see one entity — your organization. They don’t see separate departments such as marketing, sales, customer service, and IT.
But, most of the time, email marketing is solely handled by the marketing department.
Instead of getting the information your customers need at the right time, they have to actively look for it — which means more work for them.
This results to poor customer experience.
And when they contact your organization, they get passed around from one person to another.
This is something that you’re familiar with and probably experienced yourself. Now that you’re in the position to effect change, why not change it?
So, What Are You Going to Do Next?
Email marketing remains one of the most effective activities marketers can implement. It has the highest ROI across other channels. It also is the most preferred medium of business communications.
If you need help with your email marketing, or have questions about how you can implement these strategies, feel free to get in touch or leave a comment below.
I recently bought a 21-inch monitor online for my home office. I was so excited when I received the unit. But something was wrong. And that’s why I’m writing about it here.
There was nothing wrong with the monitor and how it looks like. No dead pixels, no dents. The power supply is working. HDMI connection is displaying properly.
The problem was one of the screws for the vesa mount wasn’t working. I don’t know the exact term for it, but the inside thread (the part where the screws should attach) was loose or missing in one of the holes. The vesa mounts have a 4-screw attachment for a reason. It’s more stable you’d have less risk of it falling down. Plus, over time, 3 screws will put an uneven weight on the monitor and that might cause some other problems in the future. I don’t want to risk it.
So, I ended up contacting their customer service.
And it was very disappointing.
It seems like I can only chat with them for a few lines a day and I’d have to wait another 24 hours before I get a response. Because of my frustration, I even offered to bring the unit back to their physical shop to have it replaced or fixed. Not them. I offered to bring it.
All they said was I used the wrong screws — which was totally nonsense since I used the same screws on the other three and they were working properly. Then I apparently used the wrong one on this hole.
Disappointing.
Anyway, the customer service rep said okay and asked me when I can bring the unit over. I said later today (that was in the morning. I had to finish some work and can leave around lunch time). Great.
I brought the monitor in. And more issues come up.
Apparently the branch nearest me moved to another spot for quite some time now. Their website didn’t reflect this change of address. Waze and Google Maps didn’t reflect this as well. The customer rep didn’t mention that they moved to another spot.
I was really getting frustrated.
By the time I got to the store, I was faced with parking issues. This is quite understandable. The rest, not so much.
I got in the store, spoke with one of the technicians there and looked at it. After a while, someone came in and told me that I had to leave the monitor and wait for a new replacement unit to be delivered.
That’s it.
They won’t replace it. They won’t fix it. They won’t do anything about it.
Note that I bought the unit from the same seller, but from a different channel (online marketplace instead of directly from that store branch).
I ended up leaving there cursing.
I don’t have my money. I don’t have my monitor. I wasted an hour or so of my life. I couldn’t work properly because of my frustration.
Fuck.
To remove this vent up anger, I walked around my village for a while. My health app counted 4.5 km in total. So, I’m guessing I walked an additional 2.5 km since my average for a day is around 2 km.
As I looked back at this experience, one thing came to mind— be a company that people want to do business with, rather than because customers don’t have a choice.
I came up with a couple of tips for how to do just that.
5 Tips to Be a Company Your Customer Loves
1. Put the customer at the center of everything
What ended up happening to me was very frustrating. Not enough communication. Not enough effort. Overall a terrible experience.
Put your customers at the heart of every strategy and tactic that you do and everything will fall into place.
To that company, I wasn’t the focus.
The customer service rep could have told me that their process is this or that. The store could have easily replaced my unit. They do have stocks for the same one I purchased but they said it was a different inventory and that their price is different.
If you’ve been reading the business section of my website, I’ve been continuously writing about value creation. That the purpose of a business is to create a customer. And to create a customer means to create value for them.
Unfortunately, that wasn’t the case.
2. Communication is key
The buying experience doesn’t start and end at the point of purchase. It stretches long before people get in touch with your company, and it spans even until the product has lived its useful life. Remember, you are a company, not a product.
What people remember is always how you make them feel.
In my case, I’ll have this article to remind me of them. And I’m pretty sure I will never buy nor recommend them to anyone ever again. They just got added to the list of companies I never go back to.
Creating content that addresses the different stages of the buyer’s journey is important because it shows that you are focused on your customers. In fact, that’s one of the key questions I have on the quiz I created to gauge whether you’re focused on your customers or on yourself.
3. Growth is achieved through repeat purchases
I have never seen an industry that grows solely through single purchases. If there are, please point them to me so I can learn more about them. Business growth is always achieved through repeat purchases and referrals from those happy customers.
Even real estate or housing shows that the industry’s first-time buyers only make up a third of the business. Those with physical locations like restaurants need much more higher percentage of repeat purchases (or higher average order value) in order to survive.
Treating customers like trash, just like they did to me, is not a great way to do business. Heck, I could simply namedrop them here and people will see this review online.
Guess you already know I won’t be buying from them again.
4. Don’t just sell products/services
This still falls under value creation for customers. But the idea here is to stop thinking that you’re there to sell products or services. Think of your company, and more specifically your role as a representative of the company, to help other people. To solve their problems.
Go beyond the sale.
People buy things not because they want to buy it. Rather, it solves a particular problem/want/need. We all attach value to things.
In my case, I needed a bigger monitor so I can work properly. I would have a bigger screen and I don’t have to sit close to my 12-inch MacBook. It helps with eye strain. But the bigger reason I bought a monitor is to help my back and shoulders. I sit in front of my computer for hours in my line of work. Hunching down on my Mac isn’t helping.
In fact, I’ve recently completed a 12-session rehab for my upper trapezius muscles — the ones running from the base of the neck to your shoulder blades to the lower back. I don’t want to go through that again.
Continuously looking down exerts great pressure on these muscles just to keep it in place. Did you know the average human head weighs 5 kgs or 11 pounds? Try holding that weight in front of you using one hand for 1 minute. That’s difficult. That’s what our traps are doing every time we look down.
Apart from my big monitor, I also got a desk mount. That way, I don’t have to look down on my screen and just look straight.
That’s why I bought a monitor. To help me with my health problems. That’s the value I’m looking for.
And now I’m back to my laptop, looking down, and my muscles are all tight again from the stress of everything that’s happened so far.
No value created.
5. Expect the unexpected
No product is perfect. Hardware of software, there will always be some form of problem that will come up. And that’s understandable.
Even that happens to big brands.
Two years ago, after coming back from the US where I bought a new MacBook, my keyboard suddenly stopped working properly. If I remember correctly, every time I press the “s” button, it either won’t work or continue producing a string of “sssss” on one click. And this was just within 3-4 months of buying that new MacBook. But upon taking it to the store, they told me they had to replace the keyboard which was coming from overseas. So I can either leave the unit there for a couple of days, or bring it back again when they get the new keyboard. Then once I leave it back, it would take 1-3 days to finish because part of their process is to check for other issues as well.
This is very different from my experience with the seller of the monitor.
The seller for my monitor didn’t tell me anything about the process. In my chat conversation, I offered to bring it to the shop to have it replaced or fixed. They said okay and even notified the branch I’m coming. Naturally, that’s what I’m going to expect when I get there— to get it fixed or replaced. But I experienced a different shitty process altogether.
Contrast that with my experience with Apple. They told me the timeframes and what to expect. They even gave me an option so I can still use my laptop.
Conclusion
If you want your business to stay in business, put your customers at the heart of everything you do. Redefine your roles, processes, and operations around the customer experience.
You already know that selling to an existing customer is easier than selling to a new one. It also costs way less to do that as well. And the other benefit is you can get more revenues through referrals as long as you provide your customers with a great experience.
And during times when you experience issues or complaints, again, put your customers first. Don’t pass them around, nor make it harder for them to do business with you.
Communicate early. Communicate often.
Don’t wait until some new company comes along and takes away all your customers. The key to growth is making customers want to do business with you and not just because they have no choice.
“The question should be: ‘Would the roof cave in if we stopped doing this work altogether?'” Drucker explained. “And if the answer is ‘probably not,’ one eliminates the operation. It is always amazing how many of the things we do will never be missed.”
The Danger of Managing Costs Instead of Cutting Costs
You might have probably guessed by now that I love Peter Drucker. He is arguably the most brilliant management consultant of our time. That’s also why he is revered as the father of modern management.
That aside, the approach to managing costs is finding ways to make things more efficient; while the approach to cutting costs is completely different.
Allow me to explain further.
Managing or controlling costs—becoming more efficient— doesn’t change the way you look at things. You accept the status quo and just improve on it, or at least find a way to improve the situation. This is why every time you do this exercise, it is very difficult to reduce the expenses.
On the other hand, to cut costs means you have to first “identify the activities that are productive, that should be strengthened, promoted and expanded,” said Drucker.
So, after identifying these value-adding activities, those that don’t add value, you cut them altogether. I included some guidelines on how to do that below.
This way of looking at cost is radically different than traditional methods of efficiency. Instead of simply looking for cheaper alternatives or putting pressure on suppliers to lower their prices, you re-evaluate everything.
Two Simple Examples in Businesses
Before that, here are two examples where the two perspectives differ:
Example 1: Monthly Events
Your organization conducts monthly recurring events. This can be anything from sales rallies to parties to general assemblies. If you wanted to only reduce your costs, most of the time, you look at alternative venues, cheaper food, or negotiate with the speaker, etc.
But if you are looking at cutting costs, you’d start looking at the results that these events bring in (if any). Or, if it’s even worth doing these events.
Example 2: Annual Conferences or Leadership Training
You frequently go or send people to conferences or training. If you want to manage your costs, you look for cheaper alternatives like different speakers, or maybe invite them to your office instead.
But if you look at cutting costs, you question the value of these conferences. Or figure out if they provide value at all.
Change before you have to.
Jack Welch
This shift in perspective is vital if you want change to really happen.
What’s important, Drucker said, is to make this a routine exercise — not something that happens only during downturns: “Businesses that actually succeed in cutting costs don’t wait until they have to cut costs.”
4 Key Questions to Ask and Answer
Ask “what is our mission?”
Ask “Is it still the right mission?”
Ask “Is it still worth doing?”
Ask “If we were not already doing this, would we now go into it?
How do you fit in the bigger picture? How is your business creating value in society?
The reason why this is so important is that without customers, your organization will cease to exist. If you are not able to create customers and keep them, you are not creating value.
The second question forces you to rethink the value you are delivering.
Put this in another way, are you delivering any value at all? Remember, the more technology is involved in your organization, the higher the tendency to believe that you are creating real value to your customers.
They have become leaders in their own markets and provided a lot of value. But over time, they think that their market leader status was unmovable.
3. Is It Still Worth Doing
This next question can mean two things: (1) it can refer to the mission, or (2) it can mean about this activity that you want to look at. Basically, you ask if this “thing” that you are doing worth it?
Going back to my example above, if the events were being conducted but aren’t really adding value, then why do it?
Because it’s tradition
We’ve always done it this way.
I can tell you now that these are terrible answers.
One specific example comes to mind every time I ask this question to myself. Back when I was working in one of the subsidiaries of a company with over 700+ employees, I noticed some reports that took a few hours a month to make weren’t being used. No one was actually reading them. They were redundant reports that were a small subset of a bigger report which was the one being used.
Obviously, this was a big waste of time for the people doing it. But, until I have pointed it out, they were doing it just because that’s the way it has always been.
4. If We Weren’t Already Doing This, Would We Now Go Into It
Finally, this question makes you rethink about things you want to do or change. Most of the time, we feel that what we are doing isn’t enough. By asking this question, you’d know if introducing this activity (usually accompanied by costs) is worth even trying.
“The overall answer” Drucker added, “…is almost never ‘This is fine as it stands; let’s keep on.’ But in some – indeed a good many – areas the answer is, ‘Yes, we would go into it again, but with some changes. We have learned a few things.’”
The definition of insanity is doing the same thing over and over again, but expecting different results.
Albert Einstein
Bonus Example
Earlier I shared two examples without going into the details of cutting costs. Now that you’ve understood the 4 questions you can ask, here’s another example where you can apply those questions: perks.
Perks can range from free meals to higher benefits, to sports programs. Anything under the sun that the company provides for its employees.
Oftentimes, these are argued to increase productivity and foster camaraderie, and as part of employee engagement. That’s why businesses have budgets for them.
The key point here is determining what value are they adding? Are they really making your people more productive and motivated? Do the perks attract more potential hires and retain current employees? Does it really help collaboration across different teams? The list goes on.
Conclusion
Managing costs is different from cutting costs.
If you’ve followed the works of Drucker, and I suggest you do especially if you are in a leadership position in your organization, he always puts things into a bigger perspective. It’s not just about making money. It’s not just about your company. It’s always the customer and how you are creating value for them.
These four questions allow you to evaluate which activities are value-adding and which are not. You “double-down” on these value-adding activities and cut the ones that don’t.
Force yourself to ask these questions over and over to make sure you are still doing the right things. Or put it in another way, to make sure that you are still delivering value to your customers.
Google Analytics (GA) is a very powerful analytics tool that can help you grow your business. It allows you to track your website traffic, as well as integrate with eCommerce purchases. GA allows you to analyze your users’ interaction on your website, tell you which pages are driving traffic, and let you see which channels are generating more conversions and revenues for your business.
Unfortunately, a lot of Google Analytics accounts aren’t configured properly. This results to bad data. And using bad data in your analysis can have negative consequences.
But don’t take my word for it. Data scientists all face this problem and it’s always the first thing they tackle—making sure the data you’re using is accurate.
So, let’s make sure the inputs you get from Google Analytics are accurate.
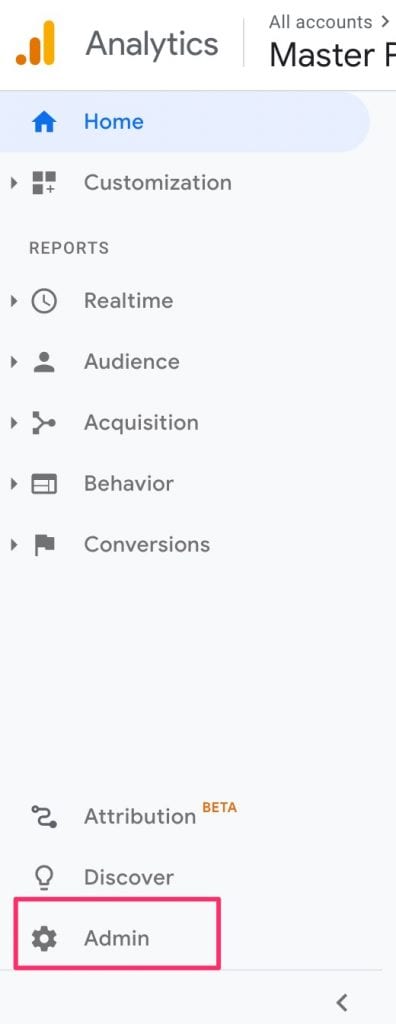
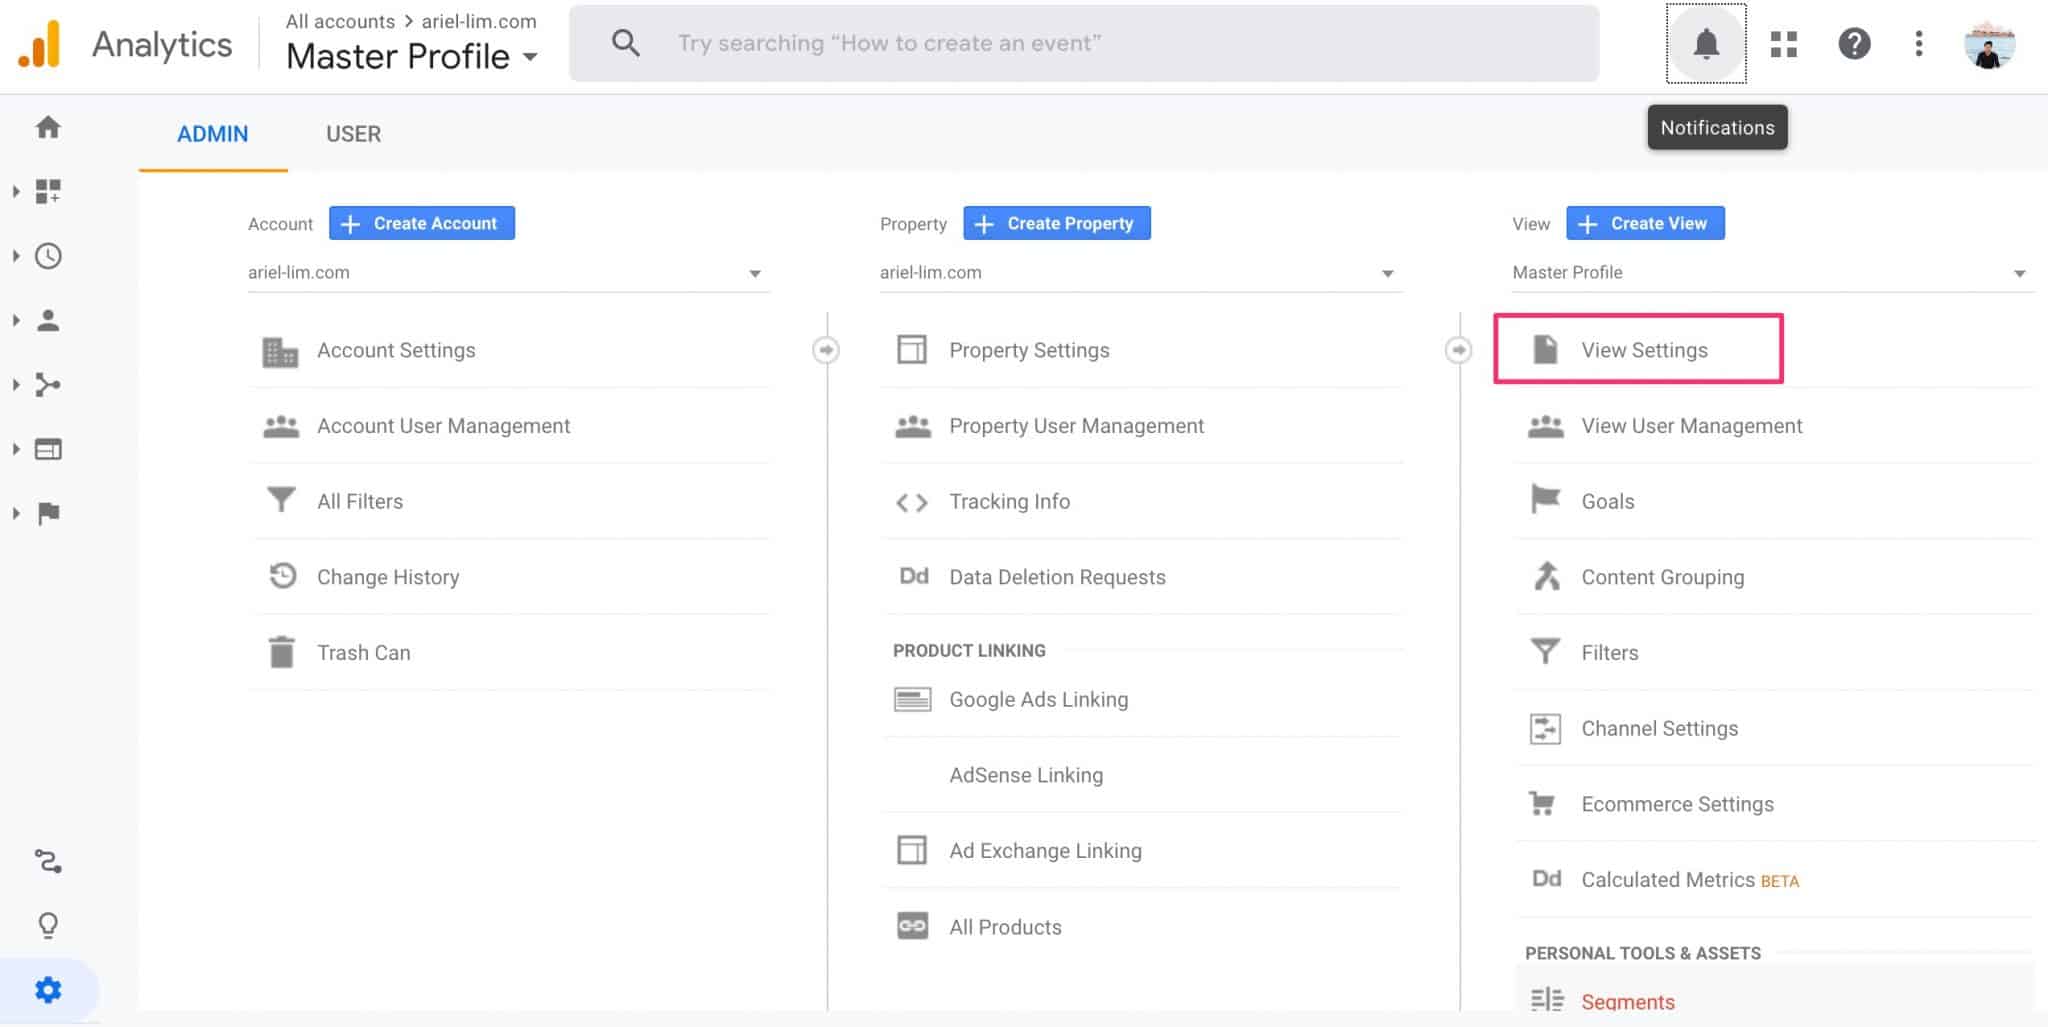
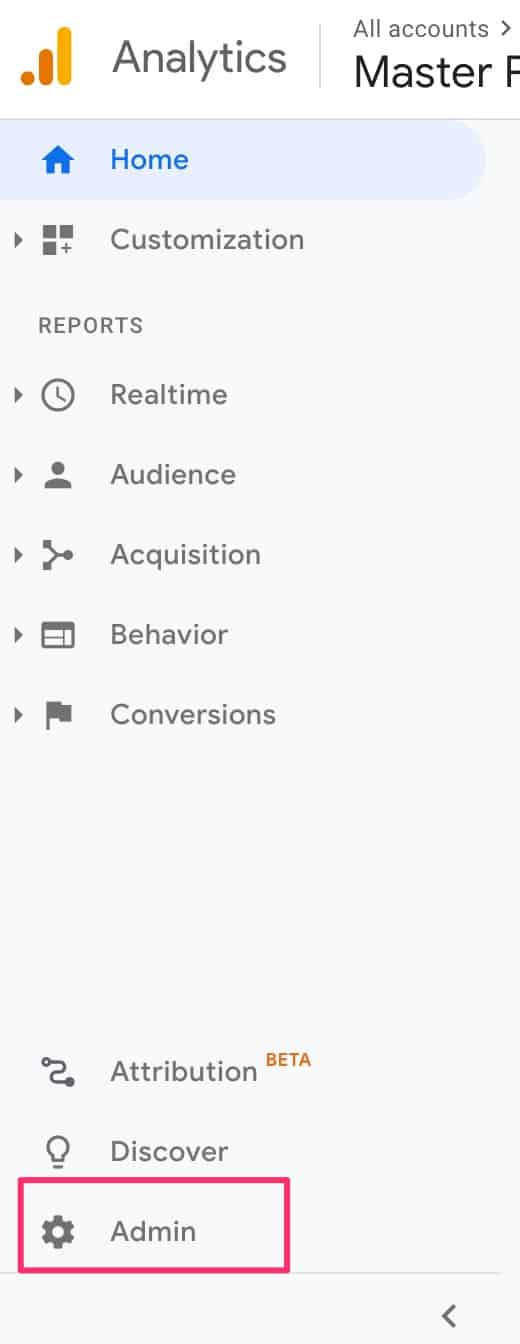
Start by logging in to your Google Analytics account. Then head on over to the admin section of your account.
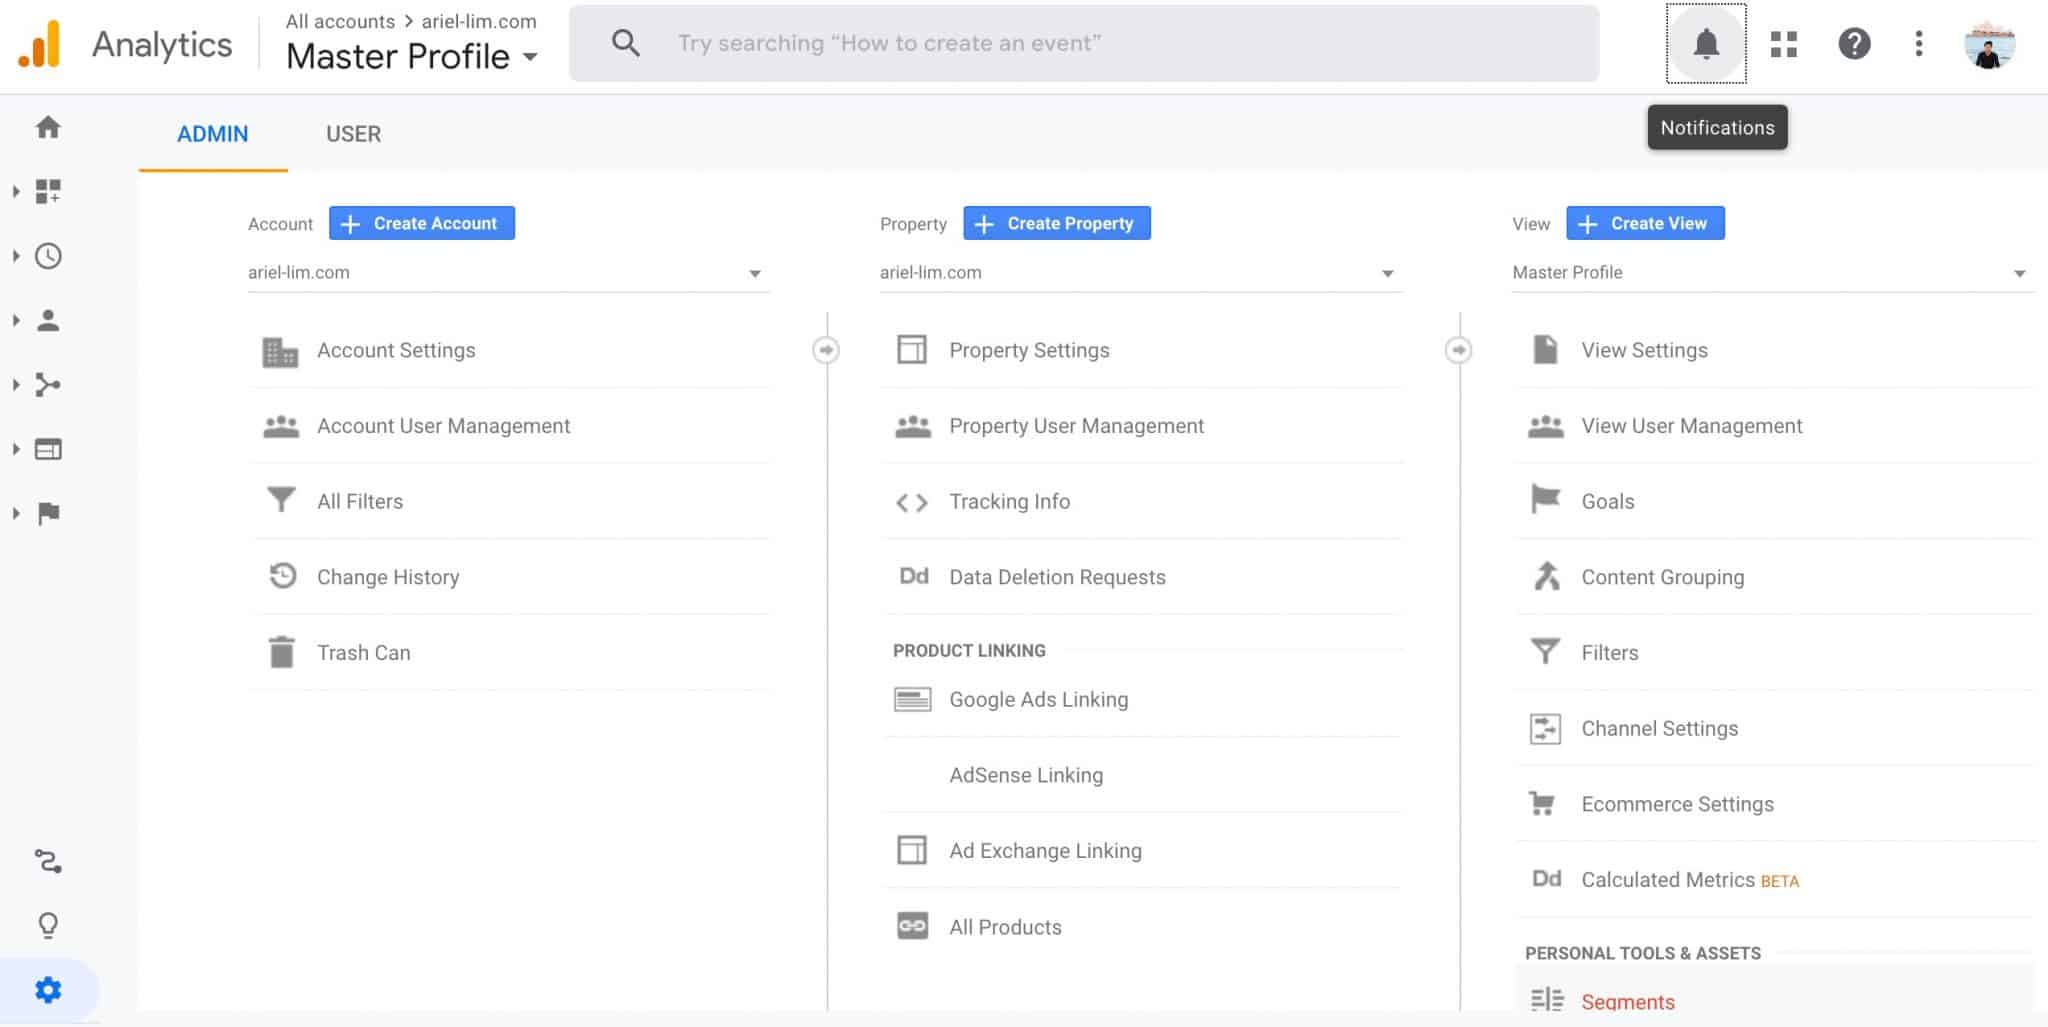
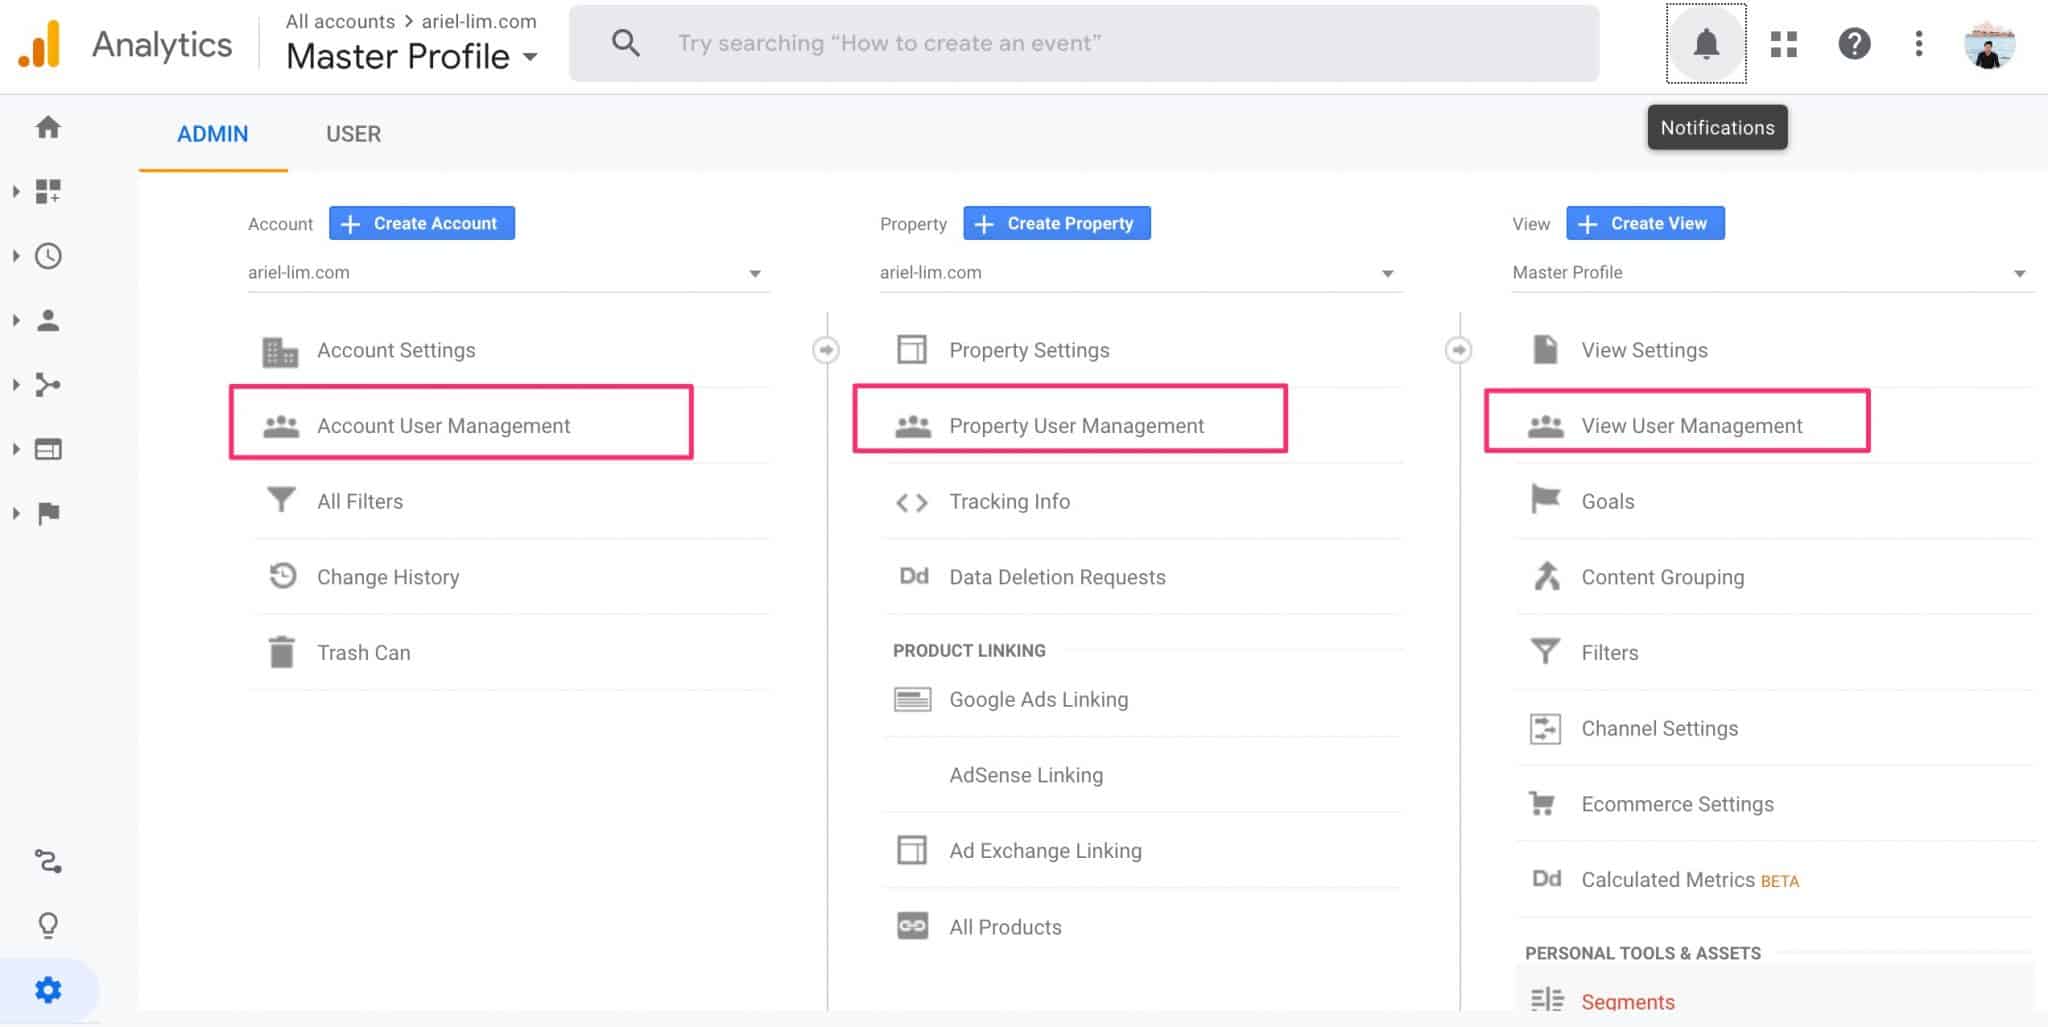
Once you get to the admin section, you will see a screen with three columns. Here’s a quick overview starting from the left:
Account —> this section handles the settings for your entire account. Usually, that’s associated with your email.
Property —> this is where you’ll find the different online properties that you want to track (website and/or apps). E.g. in a single account, you can have multiple websites.
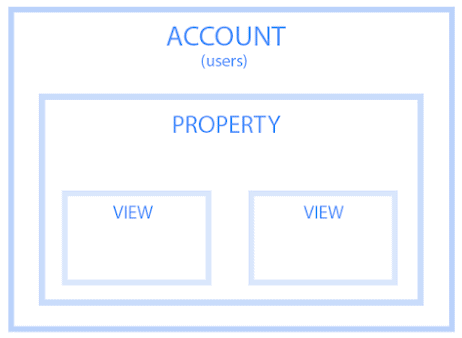
Views —> this area controls the settings of a particular property. E.g. in one website (property), you can have multiple views.
Here’s how it looks like to help you understand how the three work together.
Basic Google Analytics Settings Every Website Must Have/Follow
1. Create 3 Views or Profiles
The first thing you’d want to do is create multiple views. Google Analytics creates only one when you create an account. This will be named All Web Site Data by default.
Since I’m demonstrating from my account, you will see that I changed the name to something else which I explained further below.
The main reason you create three views is two-fold:
Prevent you from using inaccurate data in your reports
Capture all data just in case something happens
Let me elaborate on that.
Why Creating Multiple Views in Google Analytics Is Important
When you visit your own website, that is recorded in Google Analytics. If you keep on visiting your site multiple times a day, all those are recorded too. If anyone else in your business do that, they are also recorded in GA.
This naturally skews your data. It won’t reflect how actual users are behaving.
If you add some filters or special configurations (which we’ll get to below), the view which you applied those settings will be irreversible. Meaning, if you accidentally filter out your own traffic, nothing will get recorded in that view.
That said, if you only have one view in your GA account and add these filters/change their settings, you risk losing valuable data. On the other hand, if you don’t add these configurations, you might end up with bad data.
The solution? Create multiple views.
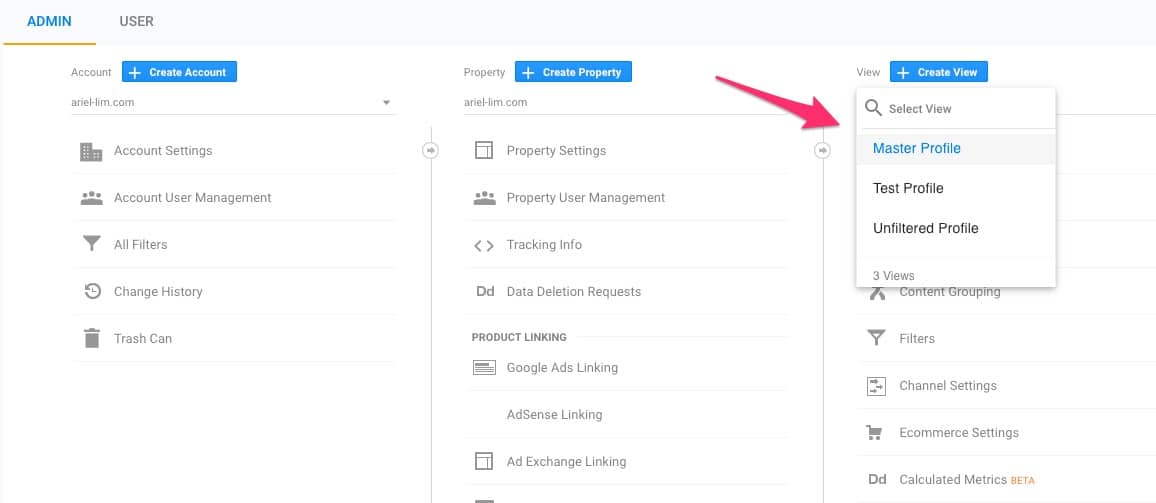
The end goal is to have at least these 3 views in your property. Here’s how it looks like on my own GA account:
Unfiltered —> This is the original view that Google Analytics created. No filters, no special configurations. All data is recorded here. By default, it’s called All Web Site Data. I used to called this the Raw View.
Test —> As the name suggests, this is a view where you apply initial configurations to test if they are working properly or not. If whatever you did is working properly, that’s when you apply it to the next view.
Master —> This is the main view where you make your decisions and analysis. Because you tested the configurations in the test view and not here, you are guaranteed that all data here are accurate.
You can use your own naming convention, of course. For example, you can leave the All Website Data view instead of renaming it to Unfiltered. Just make sure it’s meaningful and easily understood. Using View 1, View 2, etc. is a terrible idea.
Step 1: Click the view settings in the default view
To get started, click on View Settings.
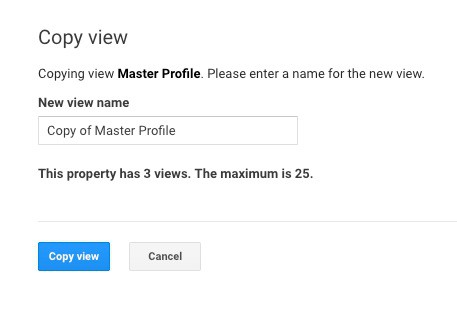
Step 2: Duplicate the View
Once you’re inside, you duplicate it by clicking on Copy View.
Step 3: Rename to Main Profile
You’ll be prompted to rename the view. Again, feel free to use any naming convention here. In my case, I use Master View so there’s no confusion. Then, click on Copy View.
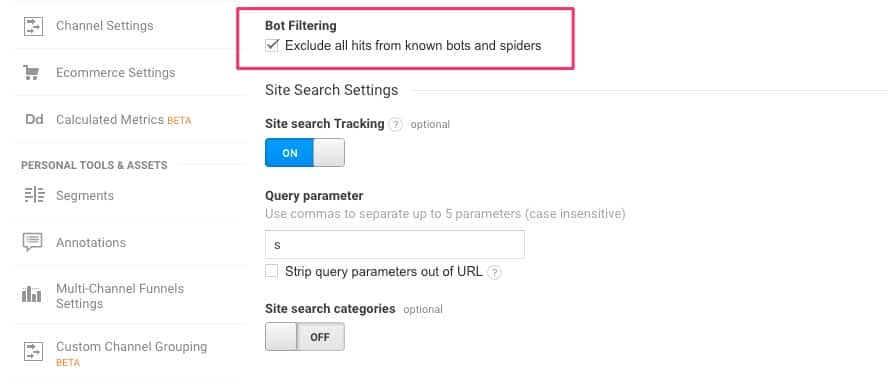
Step 4: Filter out known bots
You’ll be taken back to the admin page again. Enter the settings again by clicking on View Settings of your newly created view.
Now, scroll a bit down and tick the box for Bot Filtering.
This is important so that you don’t get inflated views and inaccurate data.
Step 5: Save
Once you’re done, hit Save at the bottom of the page.
Step 6: Repeat for Test Profile/View
Then, repeat the same process and create another view for your Test View/Profile.
At the end of this, you should have three different views. You’ll use the main view for your reporting. If you want to apply certain filters and configurations, use the test view first. Once you are confident everything is working properly, you then apply that to the main view. Use the unfiltered view as a backup so that all traffic is still recorded.
2. Exclude Internal Traffic: Filter Out Internal Traffic
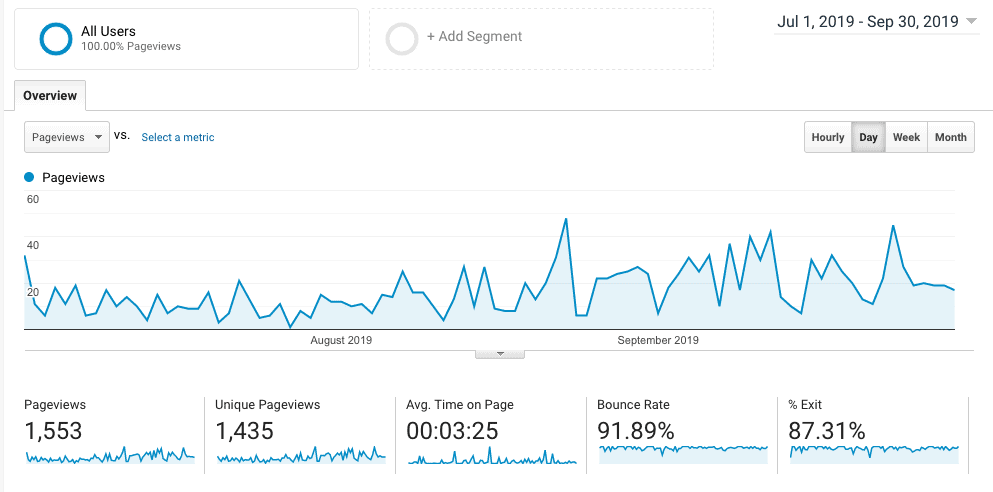
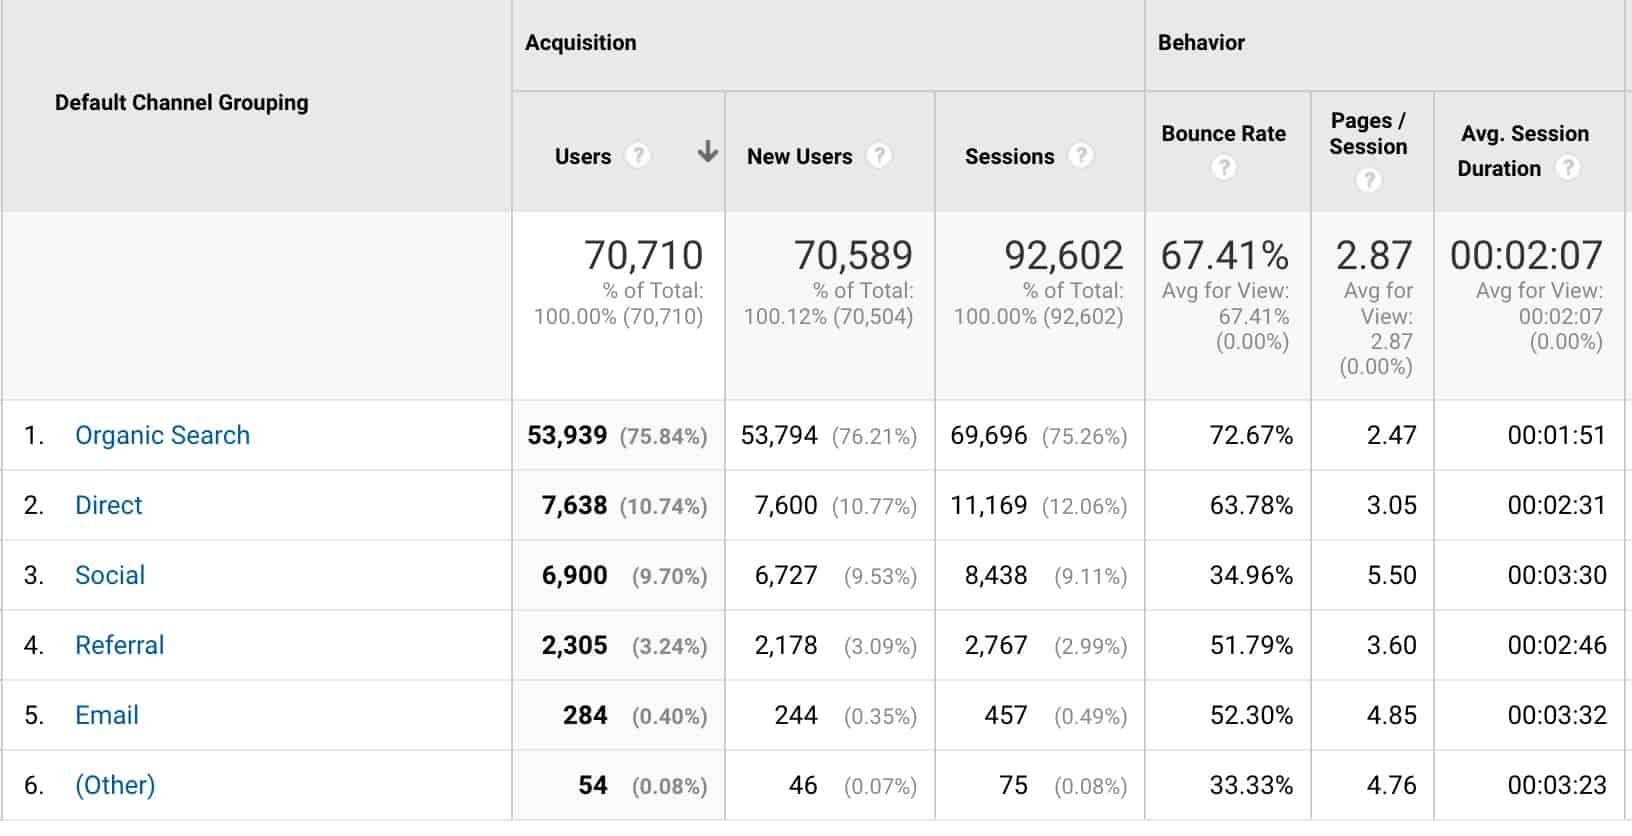
Now that you have three different views, as you get traffic on your website, what will happen is all data will be tracked/recorded in your Unfiltered View. But when you look at your Test or Main View, you should see a smaller number because it filters out known bots/crawlers and whatever filters you add to them.
Here’s an example comparing the Unfiltered View with the Master View:
Unfiltered View – Q3
Main View – Q3
You’ll notice that the Unfiltered View has more page views than the Main View. I explained more about this in another post where I noticed stats from JetPack spiked, but my traffic in Google Analytics remained relatively low. This traffic most likely came from website crawlers.
And this is something you want to do because those inflated traffic might give you misleading insights later on.
Having said that, if you (or anyone from your company) visits your website, Google Analytics counts that towards your traffic. Do this enough, you would end up skewing your data.
Head on over to the admin section again and select the Test View (or whatever you named it).
Step 2: Enter the Filters Settings
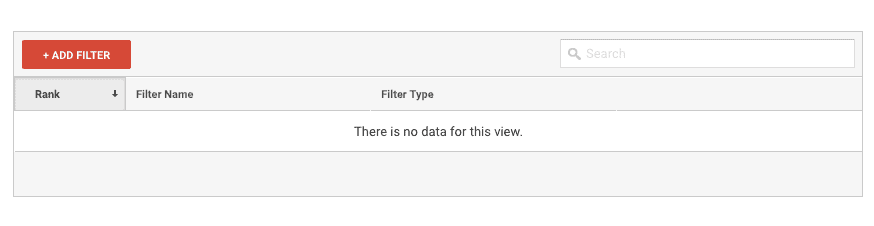
Next, click on Filters. You should see something like this.
Note that if you (or someone else) have created filters before, they will show up here.
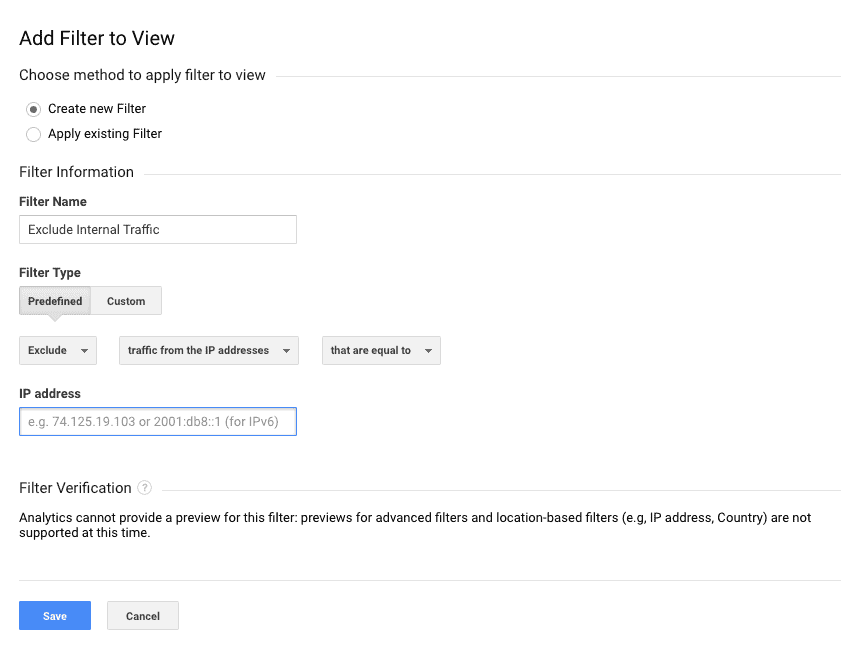
Step 3: Add an IP Exclude Filter
Click on the red button to add a new filter. Then, just follow what’s on this image:
Get Your IP address
To get your IP address, you can type “what is my ip” in Google, or head on over here to get your IP address. Then, add that to the field above.
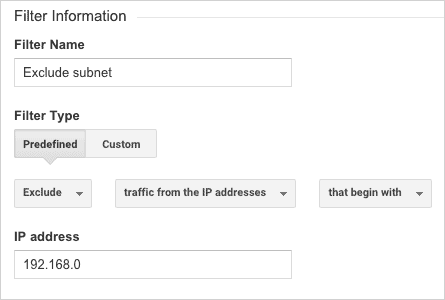
Important Notes About this IP Filter
This only works for static IP addresses. You may have a certain range of IP addresses if you’re working in the office or at home. You can ask your ISP about it. If that’s the case, you can configure the settings to look like this…
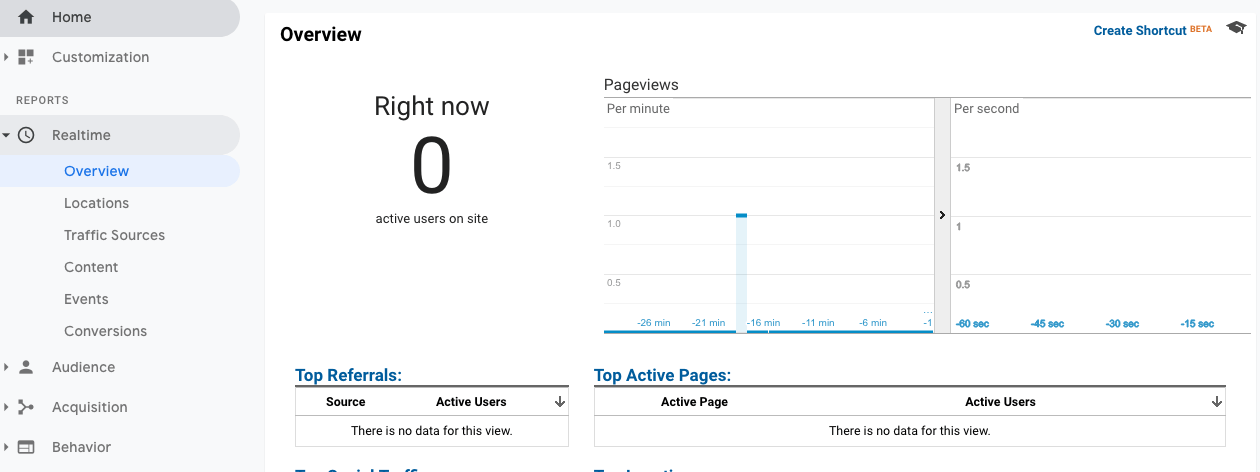
After applying your filter, you have to make sure it works properly before you add it to your Main View. To do that, head to the reporting section of Google Analytics.
Reports > Realtime > Overview
Then, open a new tab or window. Visit any page on your website.
If you don’t see any movements or hits on real-time reporting, you have configured this properly. Of course, if you have existing traffic, this might not be the case. What you can do to make sure you configured your filter properly is visit a page that is not often visited, say the terms and conditions page, or a privacy page. If it gets recorded, then you didn’t configure this filter properly.
Step 5: Apply the settings to your Main View
If, on the other hand, the filter is working properly, switch to your Main View and apply the filter.
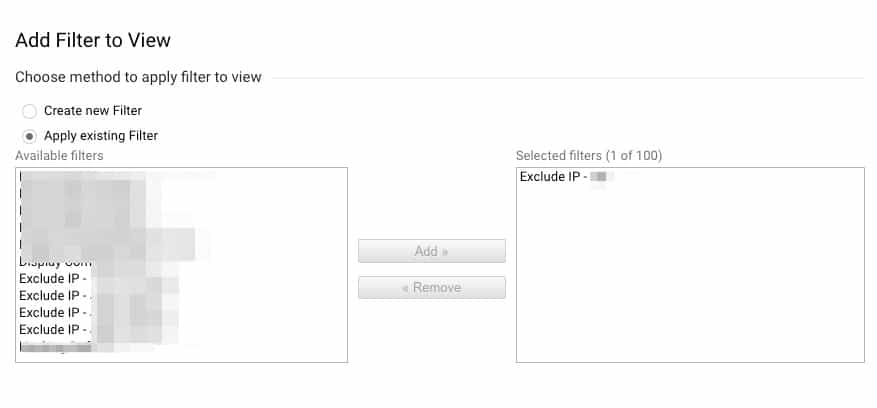
Select theapply existing filter and all filters you created will be listed here.
Select the filter you want to apply, click Add, then hit Save.
Noticed how I walked you through the process of applying configurations on your Test View first. Then, once you verified that the data is behaving properly, that’s the only time you apply it your Main View. Depending on the settings you apply, it might take a few minutes to verify the accuracy (like above), or it might take days. Follow this process always to ensure the quality of data in your Main View.
3. Add Goals to Track Important Business Metrics
Next, head on over to the Goals section. Again, try this out on your Test View first, before applying it to the Main View.
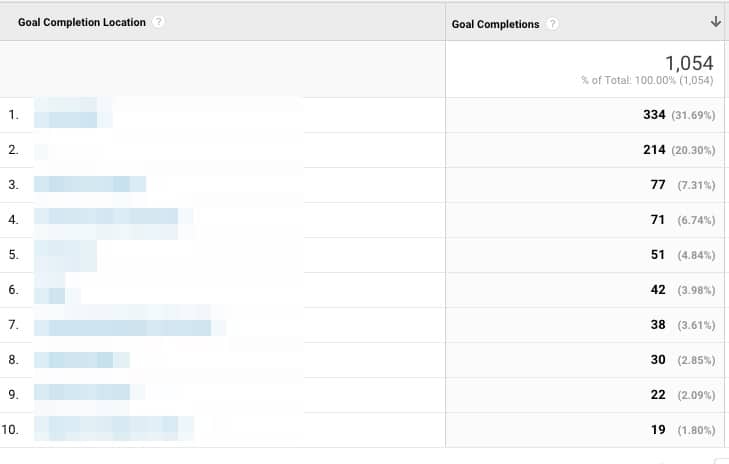
Creating goals in your Google Analytics account is the single, biggest action you can take to make your GA reporting relevant. Why? Because you have just linked it to important business metrics.
You would then be able to find out which pages are more important than others. Instead of simply looking at which pages/channels are driving you more traffic, you can proceed to the next level— which pages/channels are driving more conversions.
Now, you have something more meaningful. Now, you can analyze those pages and optimize them further.
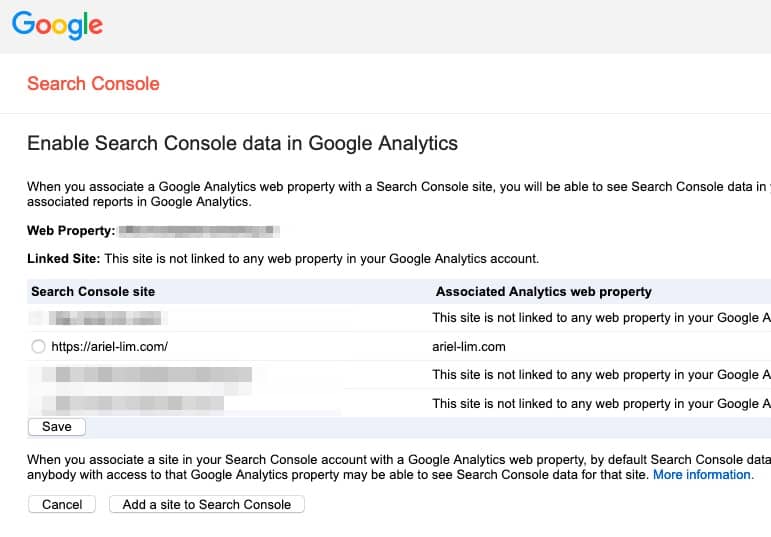
4. Link Google Analytics to Google Search Console
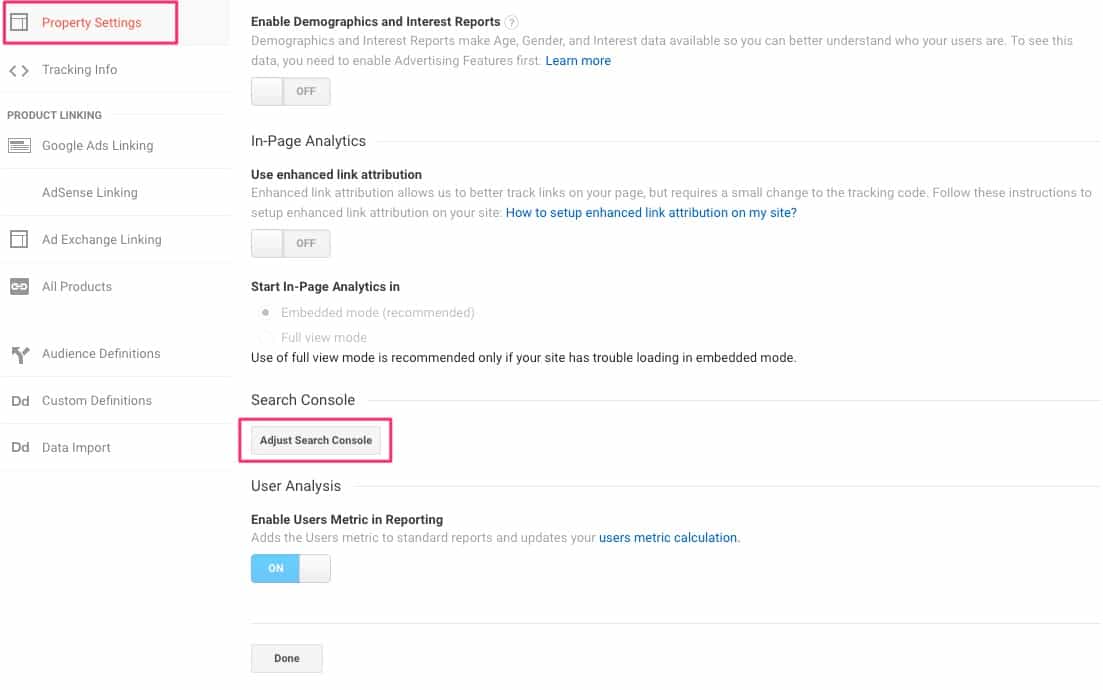
Head back to the admin section of Google analytics then click on Property Settings. That would be the middle column.
Scroll a bit further down and look for Search Console. Click on the button there and link your Google Search Console (GSC) account. If you aren’t familiar with GSC, I recommend reading more about it here. Think of it as a power-up to Google Analytics.
Here’s what you have to do.
Step 1: Add Google Search Console
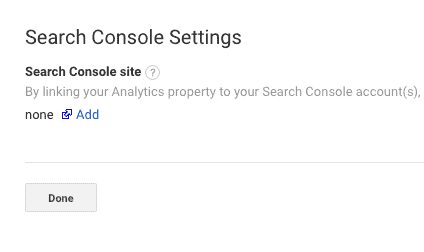
Once you’re inside the Property settings, click on the Adjust Search Console and you should see something like this. Click Add. This will open up a new window/tab and into your Google Search Console account.
Step 2: Choose the correct account
If you have multiple accounts connected, you will see something like this. Just make sure you are connected it to the correct one. Hit save.
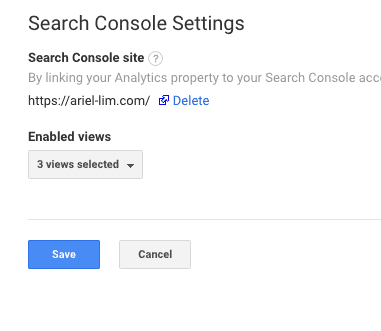
Step 3: Confirm settings
Go back to Google Analytics and check the settings again. It should say that it’s connected to your account just like the image below.
I’ll explain more about how you can use GSC with GA in some other post. But if you don’t know what it is or don’t have one, create one immediately.
5. [Special Mention] Filter Out Known Bots
I mentioned this in the first configuration because I included it in another step. But for the sake of being thorough, I’ll repeat this again here.
In your Test and Main Views, you should filter out known bots and spiders.
If you don’t, you might end up inflating your numbers. Unfortunately, by default, Google Analytics tracks the traffic coming from them. So, if you test your website speed using Google PageSpeed Insights or some other tools, each time you check your speed, it gets counted to your traffic.
Again, you don’t want that to happen.
Conclusion
Congratulations! You have now configured your Google Analytics properly. Your account is ready for more insightful analysis because the data that is coming in is clean and accurate.
I’ll write more about how you can analyze your data inside Google Analytics. For now, give yourself a pat in the back because starting today, you’ll be in a position to really learn about your users and how they behave on your website.
Of course, that’s just the first part of the battle. You have to maintain the quality of the data coming in — like when adding more filters and goals, you do that in the test view before applying the main view, etc.
You can then proceed with adding custom dimensions, add more goals, experiment with events, and perform A/B tests. You can also look into attribution reports and analyzing funnels.
There’s a lot of exciting things you can do and it all boils down to the work you did today—ensuring your GA account is setup properly and your data is accurate.
Have you configured your Google Analytics properly? If you have questions, or need help, please don’t hesitate to reach out.
UTM tags are a string of text added to a website URL that gives you the ability to track your website traffic and where it’s coming from exactly.
It’s also known as UTM tags, UTM parameters, or simply UTM.
In this article, I’ll discuss the main use of UTM tags, the benefits and downsides of using it. I’ll also tackle how to create them, and more importantly, show you examples.
Table of Contents Click on any of these to jump straight to that topic
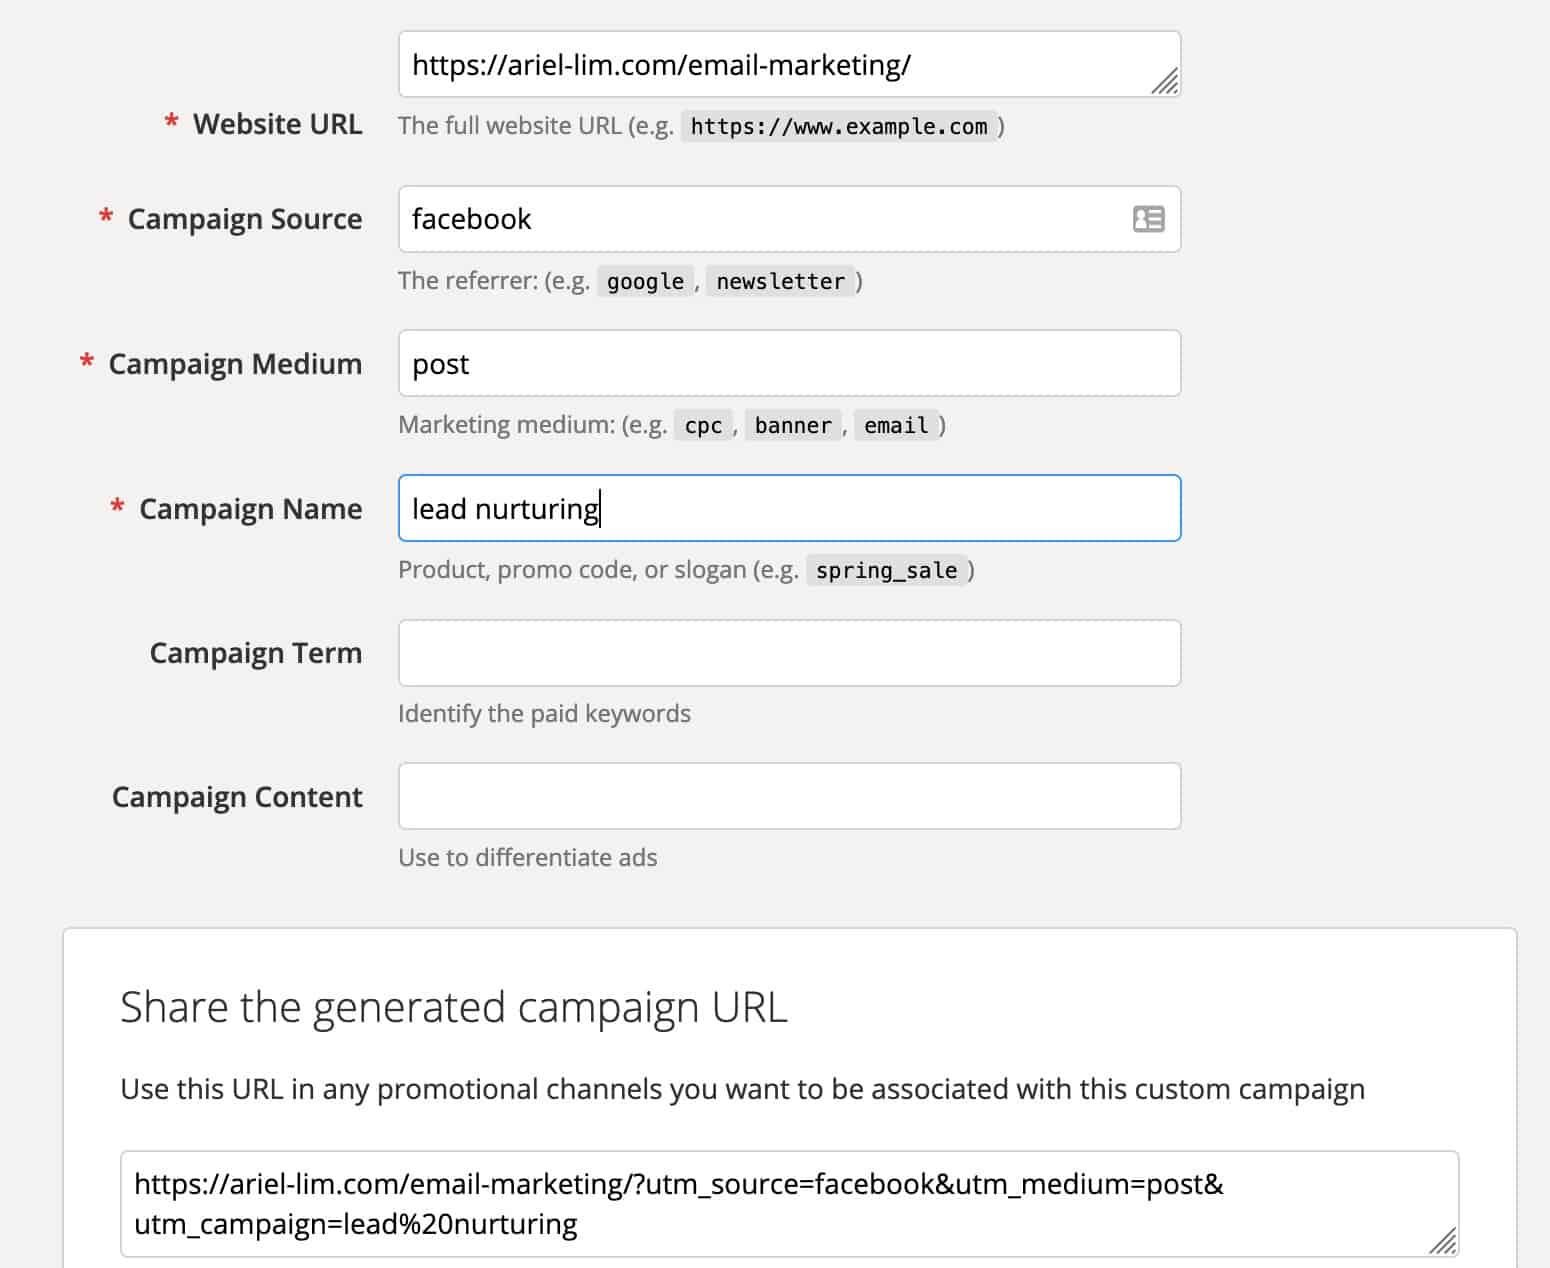
If you look at the URL above with UTM parameters, you can somehow read and understand them. Let’s say I posted something on Facebook with and used that link. It reads like this:
The URL is about email marketing.
The source is coming from Facebook
Medium is social media
It’s about a lead nurturing campaign
As you can see, it’s easy to understand what UTM tags are and how it’s used.
Primary Use of UTM Tags
But its usage goes beyond that. There are actually 5 different parameters of UTM tags that you can set, which I’ll go over in detail below.
The primary use of UTM tags really helps you understand in granular detail which parts of your campaign are performing better than the rest.
Let’s continue with the Lead Nurturing Campaign example. As you already know, it’s best to distribute that content across different marketing channels. You go to where your potential customers and users are, instead of waiting for them to find you.
So, your distribution strategy might look something like this:
Website
Social Media
Facebook
Twitter
Instagram
Email
Ads
Facebook
Google Ads
If you simply go through the motions — wrote 5 different articles, posted them on your website, social media accounts, email, and run some ads — how will you be able to analyze the performance and ROI of your campaign?
Then, if you want to drill down further, you can see which parts of the campaign are doing well.
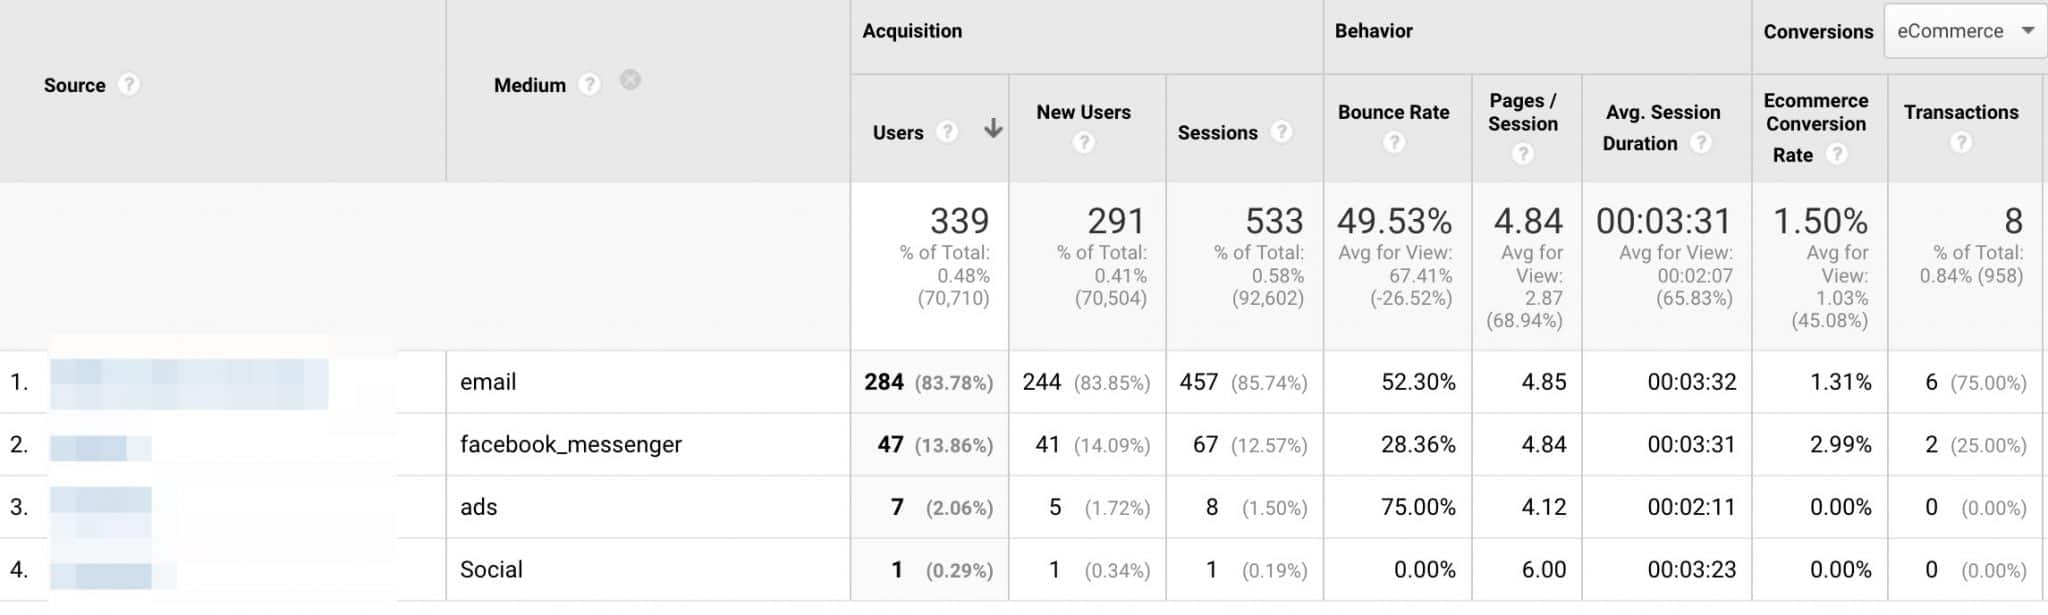
Acquisitions > Campaigns > All Campaigns: Use Source as Primary Dimension, Add Medium as Secondary Dimension
All that granularity is done by UTM tags.
In the example above, you can see that inside a particular campaign, email, messenger, ads, and the generic social posting are used. If you look to the right, you would notice that for the period, email resulted to more transactions — sales.
This is just a very simple example of how powerful UTM tags are. If you advertise heavily, for example on Facebook, you can even differentiate which ads are running on the news feed, stories, instant articles, etc. If you advertise on Google, you can also determine which exact keywords are driving you traffic and conversions.
I know those will show up on those specific platforms, but wouldn’t it be great (and easier for you) if all those data show up in one place— in this case, in Google Analytics?
Parameters of UTM Tags
As mentioned earlier, UTM tags have multiple parameters that you can use. The first 3 of them are required, while the rest are optional.
The first requirement is the link. This is the URL that you will be using. It’s not included in the list because, well, it’s a link not a UTM parameter.
Example URL: https://ariel-lim.com/email-marketing/
The way this works is a question mark ? is appended to the end of the URL. This signifies that the UTM parameters will start after. Then, the ampersand & is used to separate the different UTM parameters. You’ll see this in action below. I just want to highlight this here because this sometimes cause errors in reporting.
1. Campaign Source
Source means the referrer or where you will share the link. This is used to identify a search engine, newsletter name, or other sources (like another website).
The naming convention for the source is utm_source.
Here’s what it looks like: https://ariel-lim.com/email-marketing/?utm_source=facebook
2. Campaign Medium
The medium parameter its used to identify a specific marketing medium. I discussed this in the default channel groupings in Google Analytics. To get started, I strongly recommend following that instead of creating your own. This will make analysis easier later on.
The naming convention for the source is utm_medium.
Here’s what it looks like: https://ariel-lim.com/email-marketing/?utm_source=facebook&utm_medium=social
Take note of the question mark ? placement. It’s only used once—to separate the URL from the UTM parameters. You will also notice the ampersand & is used to separate the different UTM parameters.
In the example above, I used social as the medium because I’m posting on Facebook, which is a social network. I want it to appear on my default channel groupings so I can easily see if social is paying off. Otherwise, it will show up in a group called (Other) and will make your reports a little bit more difficult to understand.
If you send email marketing campaigns, I recommend setting the medium as email that way it will show up under email traffic in Google Analytics, not in the Other area. After all, email marketing falls under email, right?
If you don’t add UTM tags to your email blasts and haven’t integrated Google Analytics with your email marketing provider, visits to your website from that email will show up under the direct traffic instead. I discussed the importance of this in my article on email traffic.
3. Campaign Name
Now, the campaign name is obviously the name of your campaign. This can be anything you want. But it’s best to follow these additional guidelines (plus the ones I listed down below) to make it easy to find and analyze your campaigns later:
Make it easy to understand what the campaign is about
if you use dates, use year-month instead of month-year
2019-Q4-brand-awareness, or 2019_december_newsletter; instead of the following:
Q4-2019-brand-awareness, or december_2019_newsletter
Decide on a pattern and use that throughout
The naming convention for the campaign name is utm_campaign.
Here’s how it looks like: https://ariel-lim.com/email-marketing/?utm_source=facebook&utm_medium=social&utm_campaign=lead-nurturing
Again, note the use of ? and & in the links.
These three UTM parameters are the required fields. The next two are optional and used for additional granularity.
4. Campaign Term (or Keyword)
The term or keyword is primarily used for which keywords you used for the ad. Let’s say you use Google Ads where you will need to bid on certain keywords. This is where this comes in.
The naming convention for the source is utm_term.
Here’s how it looks like: https://ariel-lim.com/email-marketing/?utm_source=google&utm_medium=ppc&utm_campaign=lead-nurturing&utm_term=email+marketing
Notice I changed my source and medium in this example to match how the link would look like if I were to advertise in Google Ads. But you actually don’t have to do this manually. Google Ads has a feature called Auto-tagging.
5. Campaign Content
The last parameter is the campaign content. This is used for A/B testing and determining which ad/link is performing better.
A good example of this is using Facebook Ads.
On Facebook, you have options to display your ads to the Facebook news feed, Instagram news feed, Facebook right column, etc. For each ad placement, you can use a different content. That way, when you analyze them on Google Analytics, you will determine which are driving you traffic or conversions, and which ones are just wasting your money.
The naming convention for the source is utm_content.
Here’s how it looks like for ads I want to display primarily on the Facebook newsfeed: https://ariel-lim.com/email-marketing/?utm_source=facebook&utm_medium=social&utm_campaign=lead-nurturing&utm_term=email+marketing&utm_content=fb_news_feed
Then if I want to run that same ad on the right column, here’s how that may look like: https://ariel-lim.com/email-marketing/?utm_source=facebook&utm_medium=social&utm_campaign=lead-nurturing&utm_term=email+marketing&utm_content=fb_column
As you can see, from the examples above, you can find a lot of use for UTM tags. While UTM tags are very flexible, if you want to make your analysis easier (which is the whole point of adding UTM parameters) you have to understand how it works.
In the example above, I warned about using the medium email or social. If you don’t it will still show up on your GA reports, but you will need to do some extra clicking to find what you’re looking for.
Good thing you don’t have to remember all these conventions. It’s good to know, but there are tools that can help you generate links with UTM tags. The most popular, of course, comes from Google.
How to Create UTM Tags
You can find all these information including how to create them on Google’s Campaign URL Builder. Here’s how it looks like…
All you have to do is enter the URL you want to share, then fill-out the rest of the fields. Again, the required fields are the URL itself, the source, medium, and campaign name. The rest are optional.
Important Notes to Remember When Creating UTM Tags
1. UTM tags are case sensitive
UTM tags are case sensitive. If you noticed in the examples I used, I stick with lower case. It’s easier to remember because you don’t have to do anything else. Just start typing.
Using ‘CamelCase’ or ‘Capitalizing the first word’ is an extra effort and you or someone else might forget to follow that. Then, you will end up with complicated results on your Google Analytics account.
All the following examples will show up differently on Google Analytics:
utm_campaign=LeadNurturing
utm_campaign=Leadnurturing
utm_campaign=Lead_Nurturing
utm_campaign=leadnurturing
utm_campaign=lead_nurturing
So, in order to avoid confusion, just use small letters in everything.
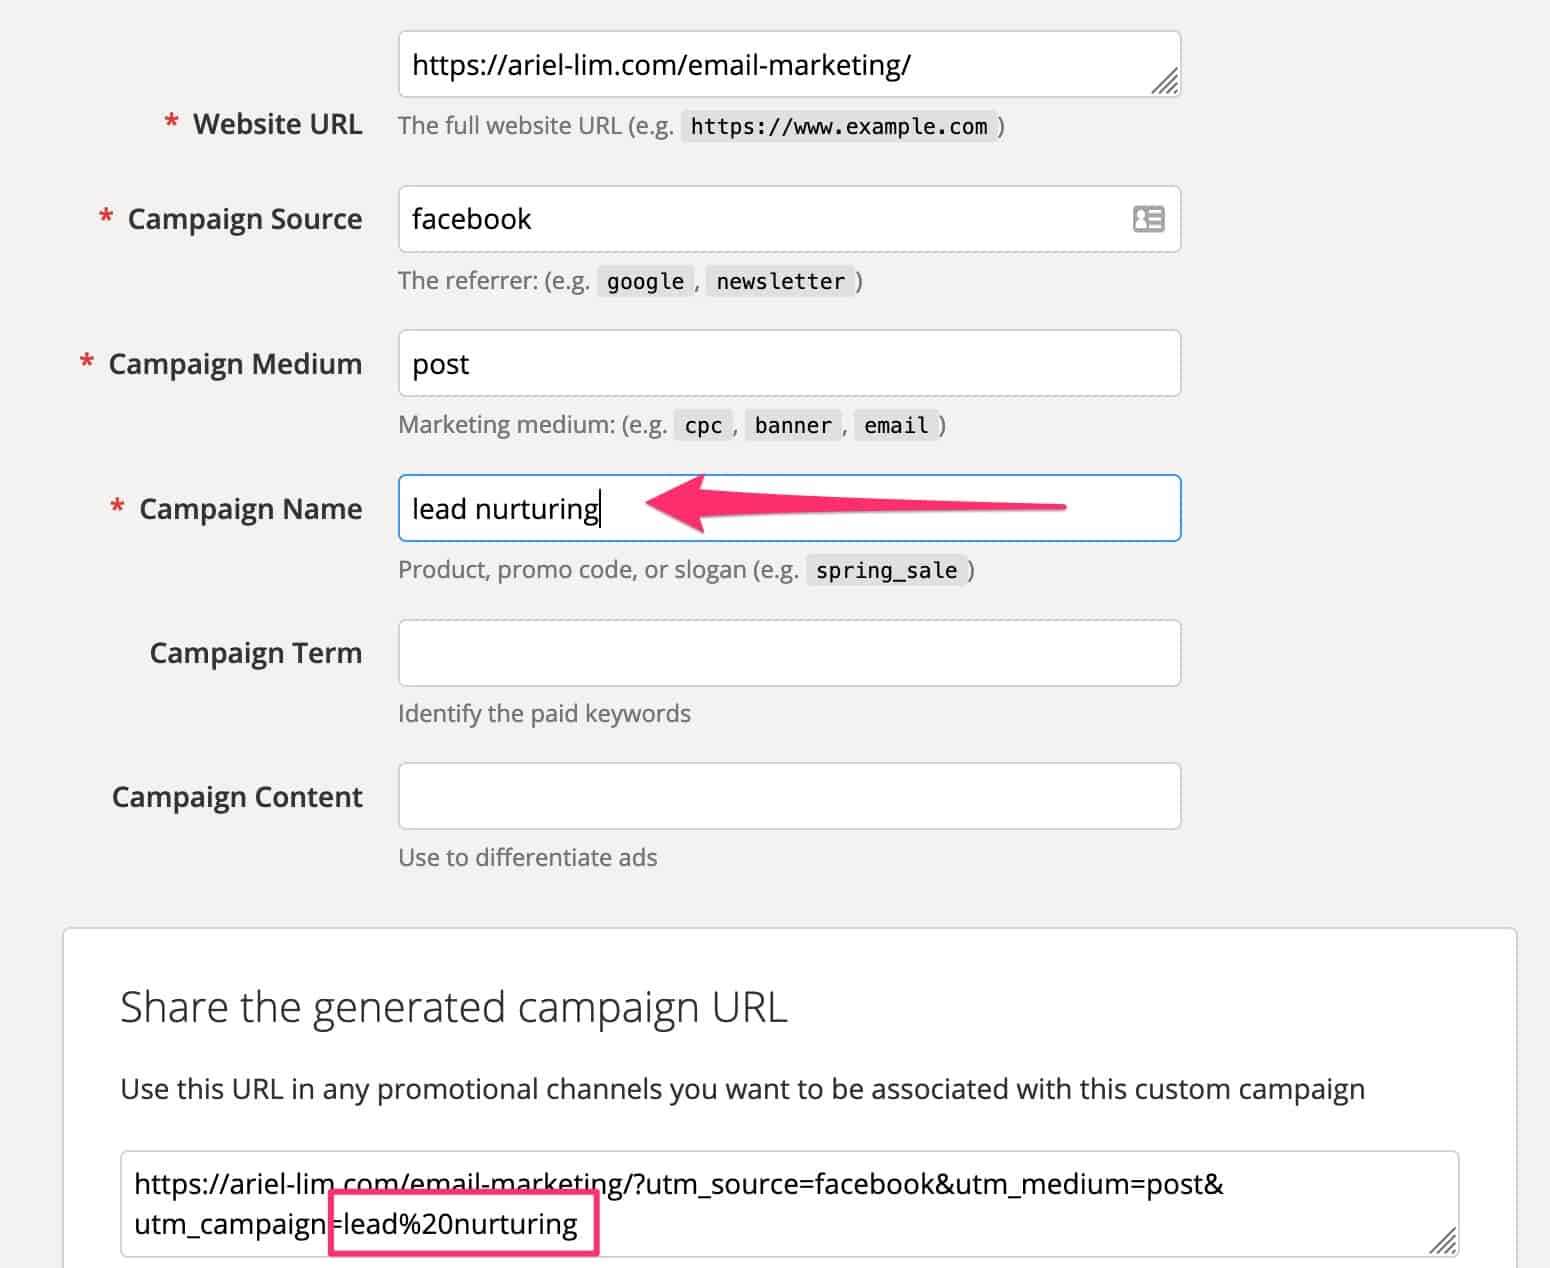
2. Spaces also affect the result
You might also notice that I used underscores _ or plus sign + above. There’s a reason for that. If you use spaces, Google will automatically convert that into %20 on your links. Again, this will only make your analysis later on complicated.
You can use underscores or dashes to simplify everything. Add them after every word, like in the example I used earlier: lead_nurturing.
Pick one. Stick with it.
3. Don’t use UTM tags on internal links (links on your own website)
One common mistake I find people do after discovering UTM tags is they want to know which links on their own website are people clicking on.
If you want to track which links people are clicking on, there are other ways to do that. But the one thing that you should never do is use UTM tags on your internal links.
4. Persistent across social share/emails
One last note on UTM links.
When people re-share links to another social network or another platform, people typically copy-paste the URL. When that happens, you get attributed to whatever UTM tags were used.
For example, in the link https://ariel-lim.com/email-marketing/?utm_source=facebook&utm_medium=social&utm_campaign=lead-nurturing, someone saw that post, found it valuable and wanted to share it to her colleague via Messenger. When the other person opens that, it gets tracked using the original parameters of my post.
If the person decided to share that to Twitter and Pinterest, or send it via email, the same thing would happen. Unless they sanitize the URL themselves, traffic coming from those re-shared links will get attributed to Facebook.
Conclusion
Using UTM tags to track your campaigns is a great way to determine their effectiveness and measure their ROI. It allows you to know in detail which parts of your marketing are working, and which ones you need to improve on.
There are a couple of considerations you need to remember when using UTM parameters on your links, though. Make sure you don’t use them on internal links and follow the same naming conventions throughout in order to avoid complications in reporting later on.
Following these guidelines will help you analyze your digital marketing efforts faster and easier.
Do you use UTM tags on your campaigns? How are you using it to analyze your campaigns? Let me know in the comments below!
Outsourcing your digital marketing, or parts of it, to someone is the norm today. As a business owner, you can’t possibly know everything about digital marketing, nor have time to learn them to the level that takes years of practice. You have limited time. And that time is best spent on managing and growing your business.
So, what’s your option? Outsource your digital marketing.
Why You Should Quantify Your Outsourced Digital Marketing Projects
If this is the first time you’re outsourcing your digital marketing, I strongly recommended that you start small but project that’s easily quantifiable. That way, you’d know if they did a great job or not.
A website redesign might seem like a subjective project. But in the eyes of any digital marketing expert, this can be quantified easily. A website can’t just be pretty and nice to look at. It has to help you in any of the following:
Increase your traffic
Get your more leads
Have more paying customers
More revenues
A website redesign project should not be measured by how fast it was completed, nor if it was according to your specifications. It has to contribute to something tangible.
Biggest Mistake Business Owners Make When Outsourcing Their Digital Marketing
Once you have chosen the agency or individual who will handle your digital marketing, the first thing they will need to get started with their work is access to your online marketing assets.
These are accounts to whatever tools you are currently using, or plan to use in order to accomplish your business objectives.
From my experience working with dozens of businesses across the globe, this is the biggest mistake I often see owners do— they give their usernames and passwords to the people working on their accounts.
While it’s a great idea to trust them, it doesn’t mean that you have to give them full control of your online assets.
Just imagine the repercussions of this:
They can steal your data and use that for themselves
This is different depending on what data you have, but if you handle customer information like emails, credit card numbers, etc. This is a huge risk. How do you think your customer would feel if the received an email or a call pitching for services from your agency?
Or even use the tools for themselves that you paid for yourself
An even bigger risk, they can easily change the passwords and you will immediately lose access to them yourself.
Or someone from the agency’s staff will do that
This is especially true if you ended the relationship on negative terms
The solution? Give them (limited) access to your accounts.
How to Give Someone Access to Your Digital Marketing Tools
I’ll go over the most basic digital marketing tools here first and how you can give an outsourced agency or individual the proper access to your accounts.
Table of Contents Click on any of these to jump straight to that topic
The goal of granting access to your accounts is to allow other people to view the data, configure it properly, and create reports. Obviously, you don’t want them to have the ability to run away with the entire account where you end up losing access to everything. So, that’s what this article is all about—teaching you the step-by-step process on how you can give someone access to your online marketing tools and reducing the risk that you lose access to them yourself.
How to Give Access to Google Analytics to an Outsourced Agency or Consultant
First, head on over to analytics.google.com and log in. Once you’re there, you will see your default account.
Step 2: Go to the Admin Section
Next, click on the admin section on the left-hand menu.
Step 3: Determine the Level of User Access Needed
Google Analytics provides 3 levels of access:
Account
Property
View
I’m not going to dive in and discuss each of those three. But oftentimes, you would not want to give someone else access to your Google Analytics in the account level. In most cases, you would choose the property or view level and give access to those.
I typically request access at the property level because (1) most Google Analytics accounts aren’t setup properly, so I would need to gain access to info that’s only available at that level; and (2) you can create multiple views in one property. And it’s a best practice to have at least three different views for different purposes. I’ll discuss this more in some other post.
Step 4: Give the Appropriate User Permission
Once you’ve selected which level to grant your outsourced help the credentials, you would need to enter an email and determine which permissions they actually have.
In most cases, you would check the three boxes I highlighted:
Edit
Collaborate
Read & Analyze
This will give them the ability to create separate views, add filters, and goals. They will also be able to create custom reports and be able to help link Google Ads or Google Search Console.
If you only give them the Read & Analyze permission, most of the time, they will ask you to do a couple of things for them because their account is so limited that they can’t do anything.
If they have multiple people working, you can also allow them to manage other users. Going back to lowering your risks, this will only allow them to modify stuff related to your property and views, but not your account.
How to Give Access to Google Search Console to an Outsourced Agency or Consultant
The next tool you should be using is Google Search Console. If you are not using this, you’re missing out on a lot of analytics and data. To add a new user to your account, follow these steps.
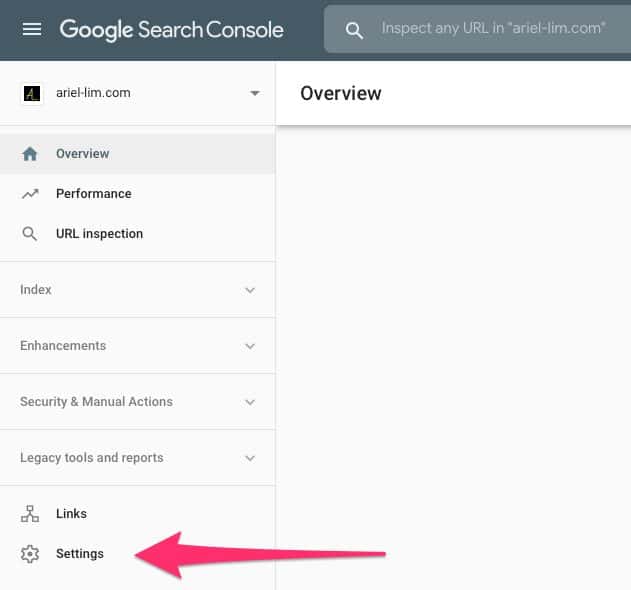
Step 1: Go to Settings
Of course, you have to make sure you are in the right account. Then, once you’re in, head to the lower-left section an click on settings.
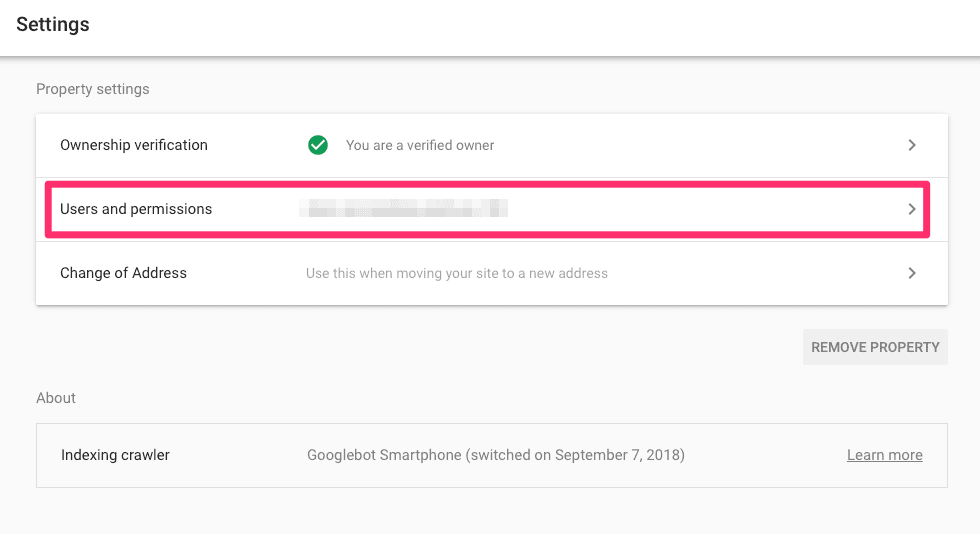
Step 2: Click on User Permissions
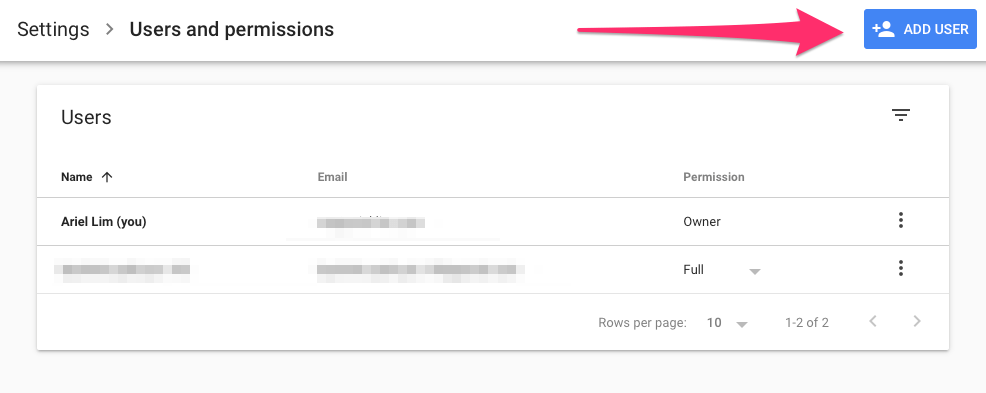
Step 3: Click on Add User
Here, you should see all accounts who have access to your Google Search Console. I couldn’t stress this enough, but you should never share your email credentials. Instead, add new users like the examples in this article.
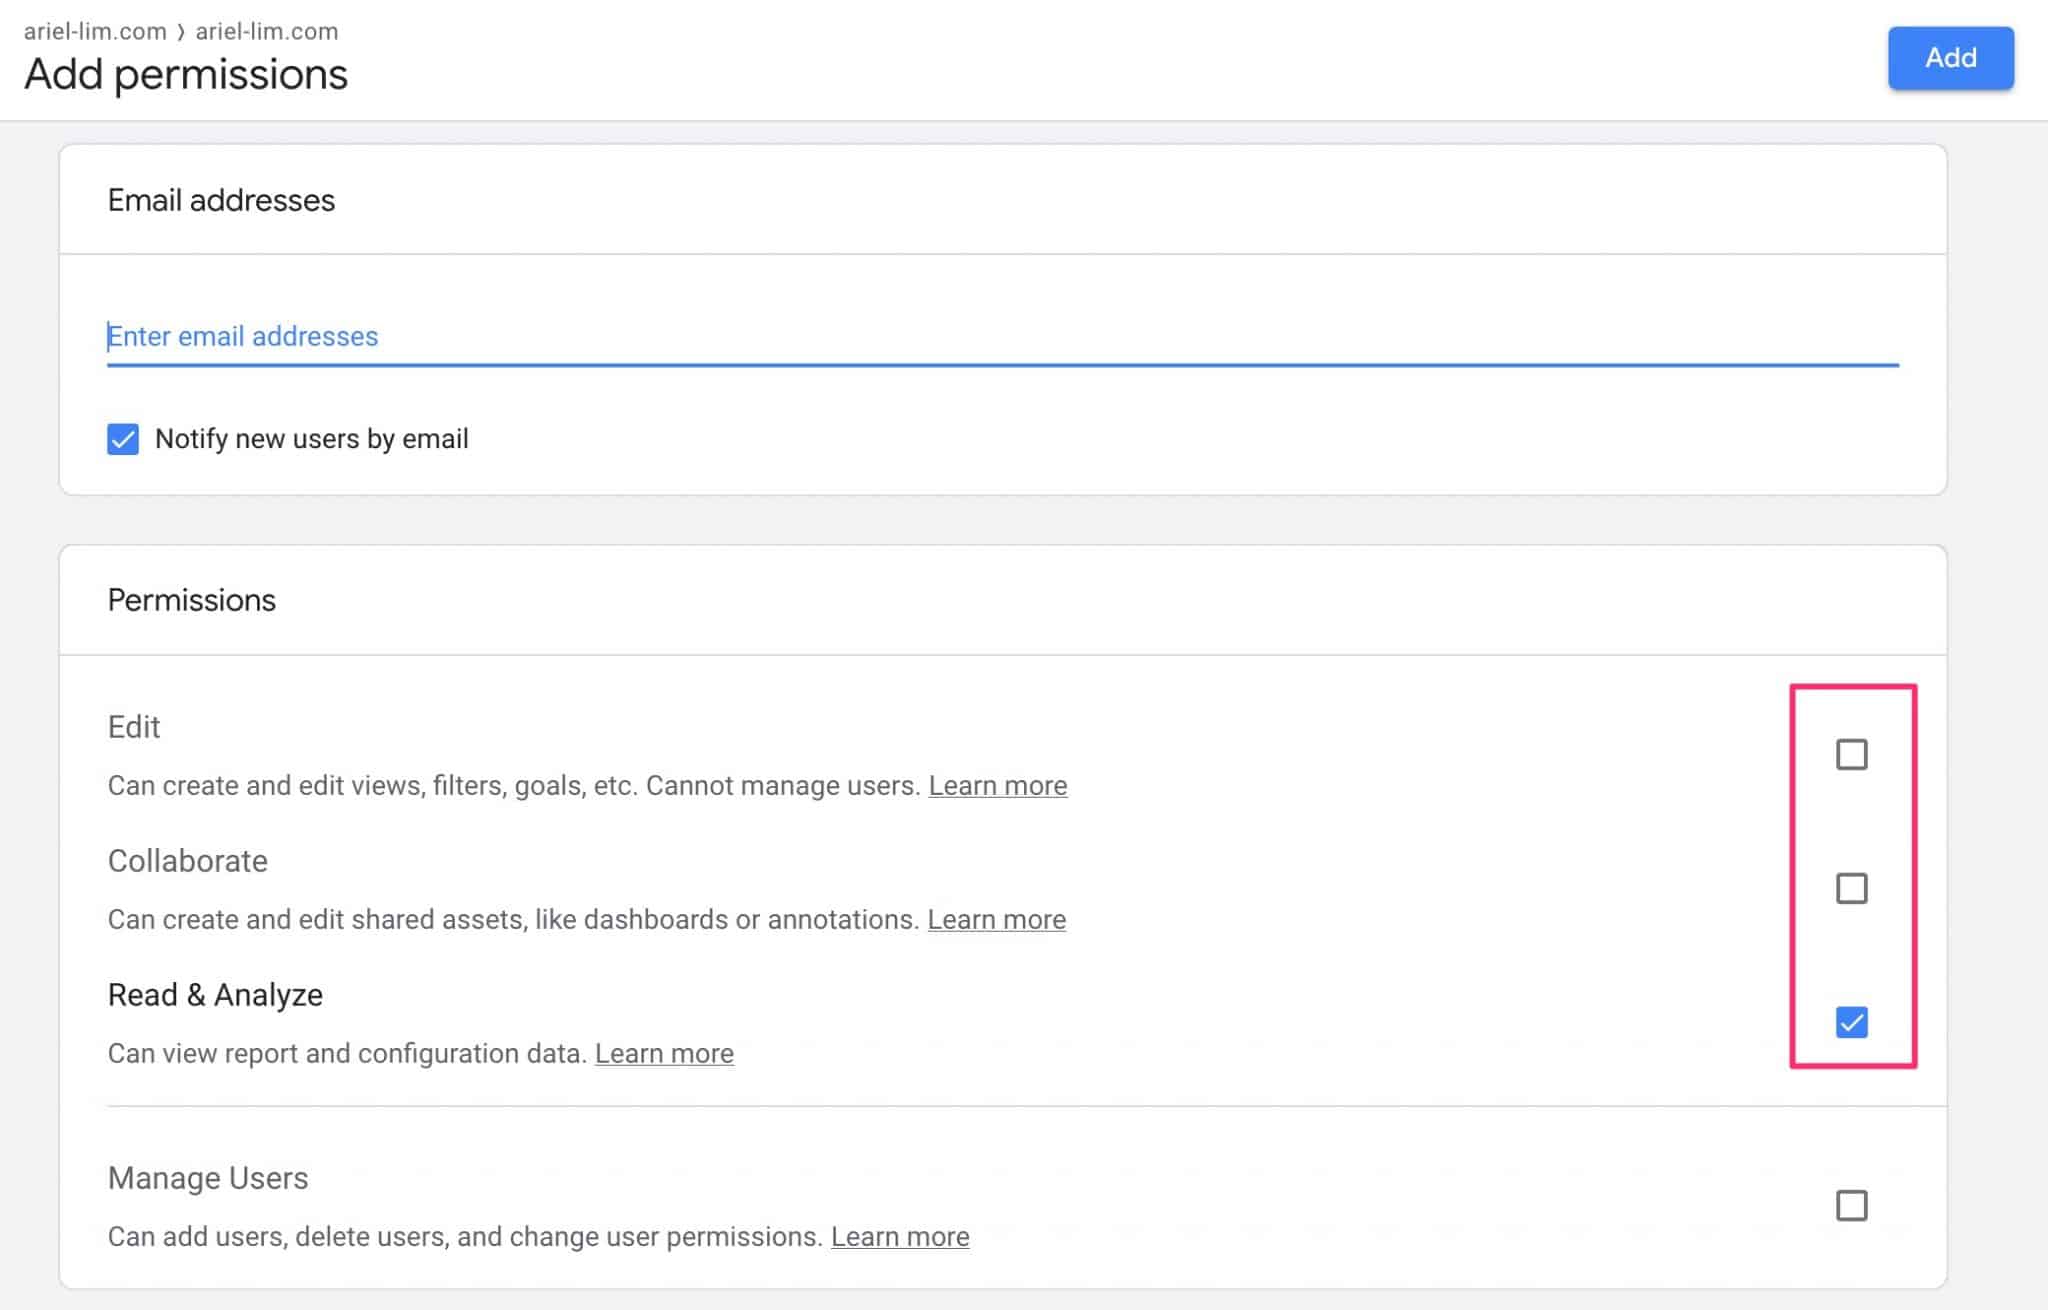
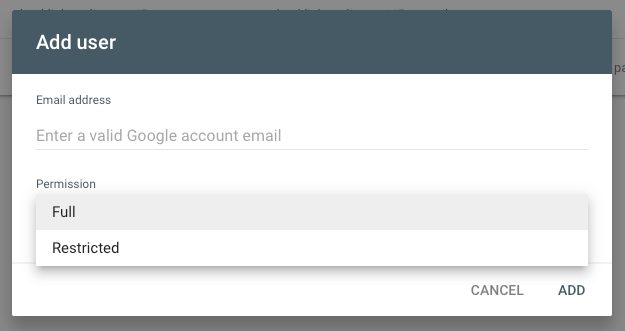
Step 4: Complete the Form
Simply enter the email address and the permission type.
Here’s a quick and dirty difference between the two:
Full user: Has view rights to all data and can take some actions.
Restricted user: Has simple view rights on most data.
How to Give Access to Google Tag Manager to an Outsourced Agency or Consultant
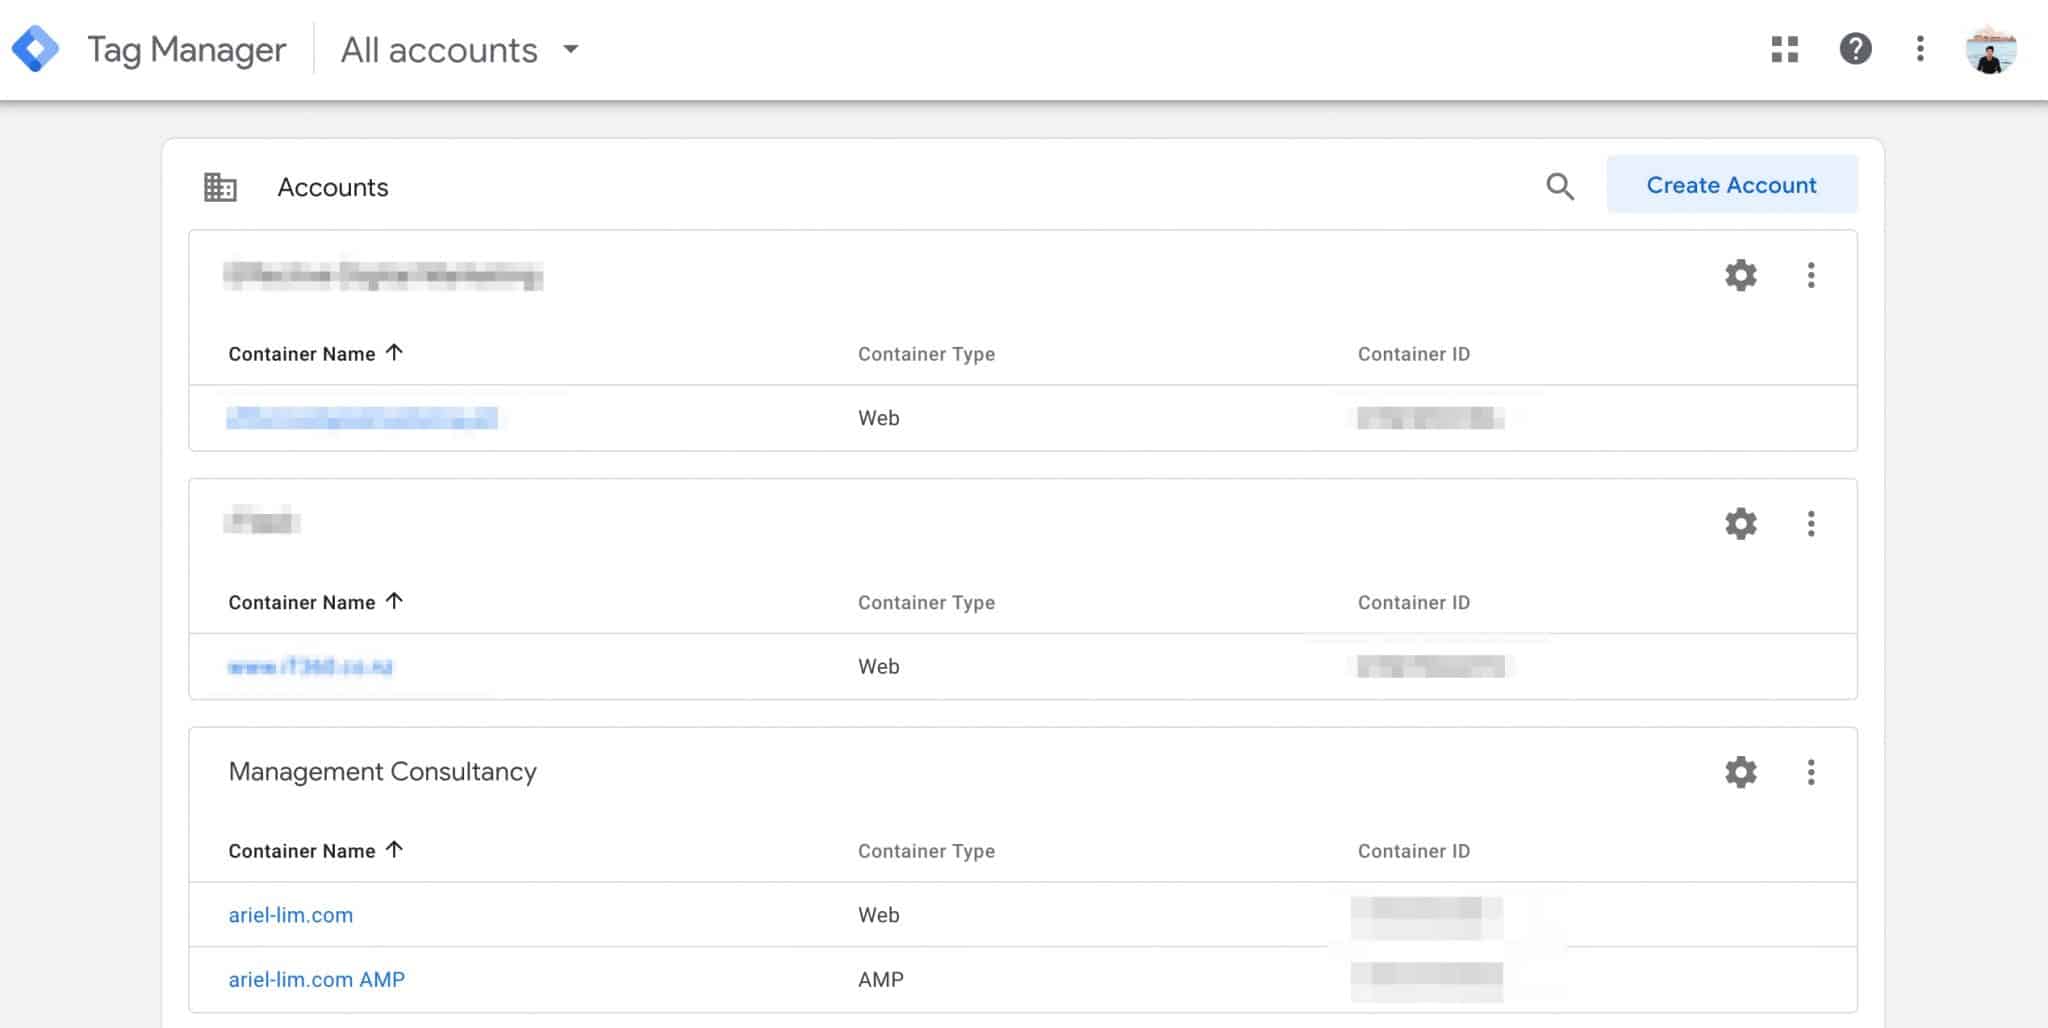
Head on over to tagmanager.google.com and log in to your account. You should see something like this (if you have multiple accounts in your account).
Choose the one you want to give permissions to.
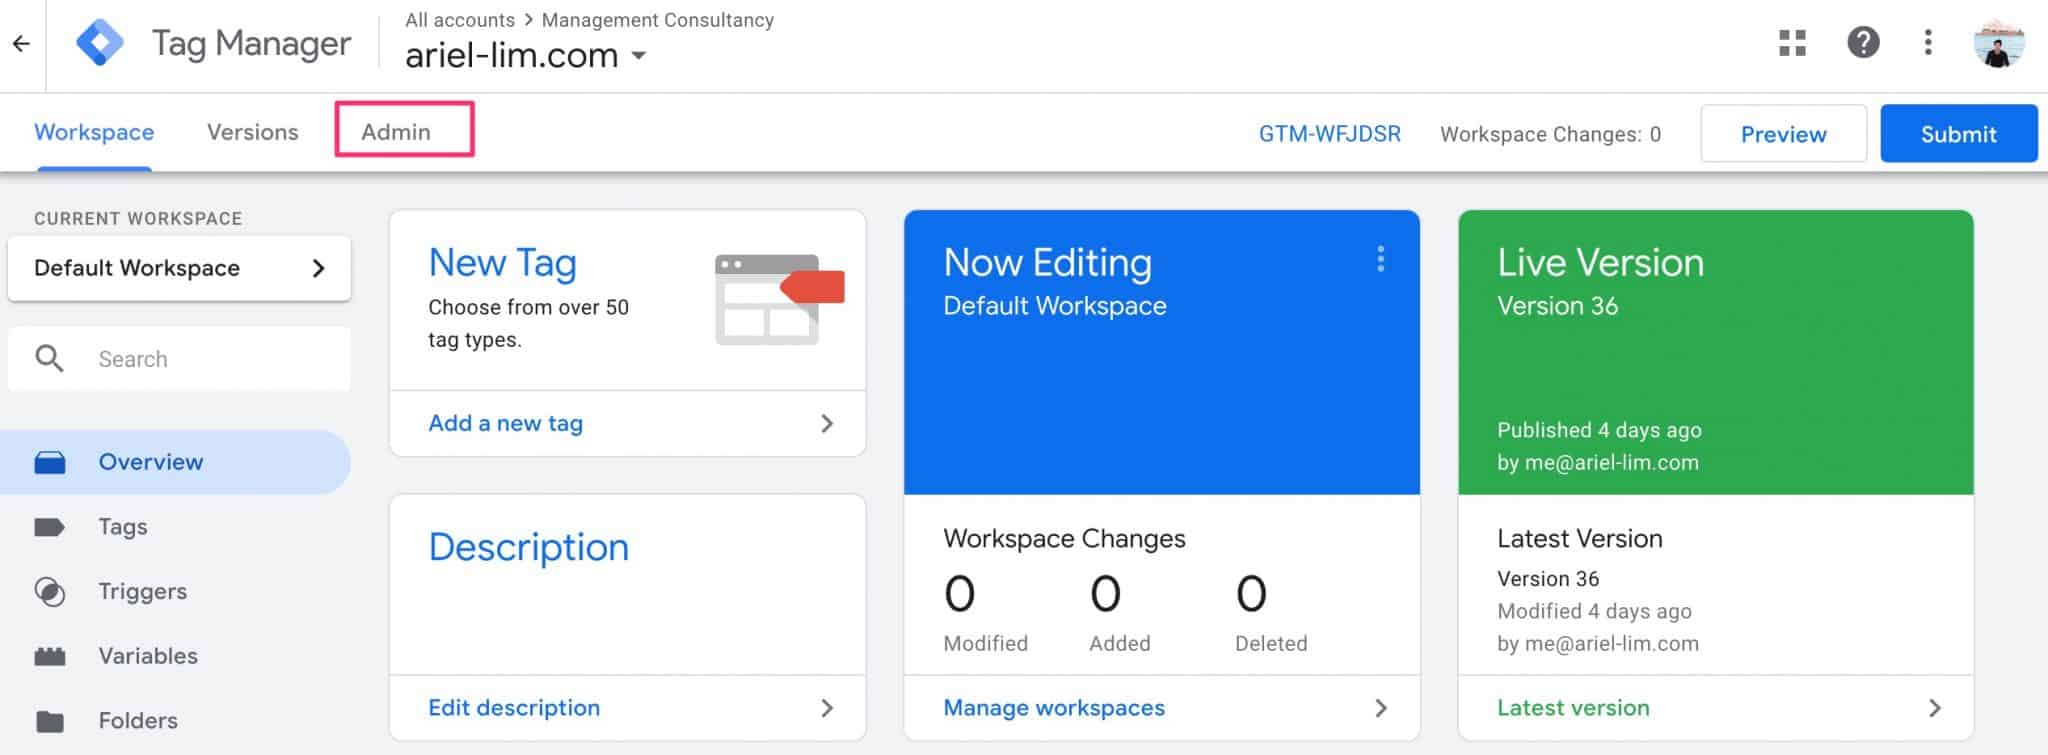
Step 2: Go to the Admin Section
Next, click on the admin tab at the top.
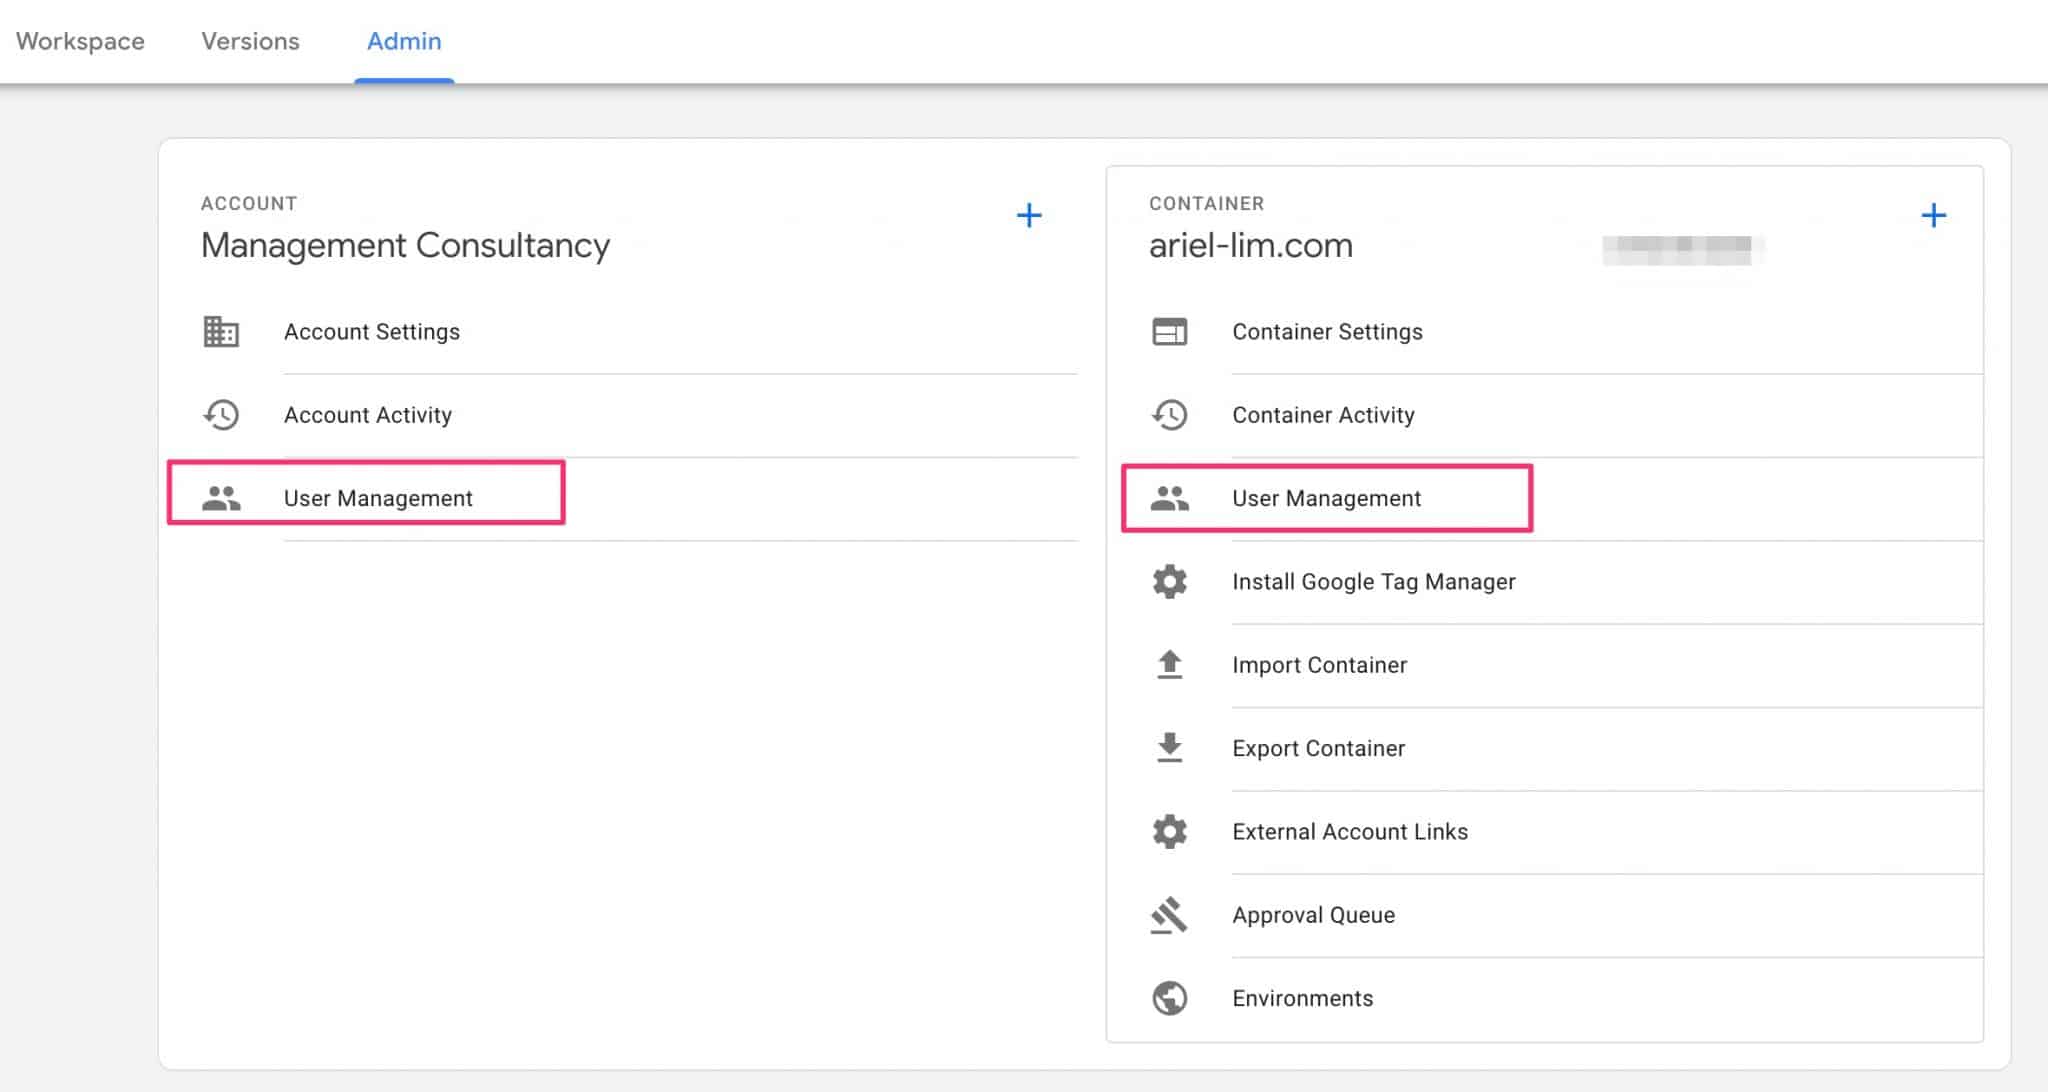
Step 3: Determine the Level of User Access Needed
This part is similar to Google Analytics, but GTM only has two levels:
Account
Container
Just like in GA, you’d most likely not give access to someone else at the account level. So, in this case, click on the User Management under the container section.
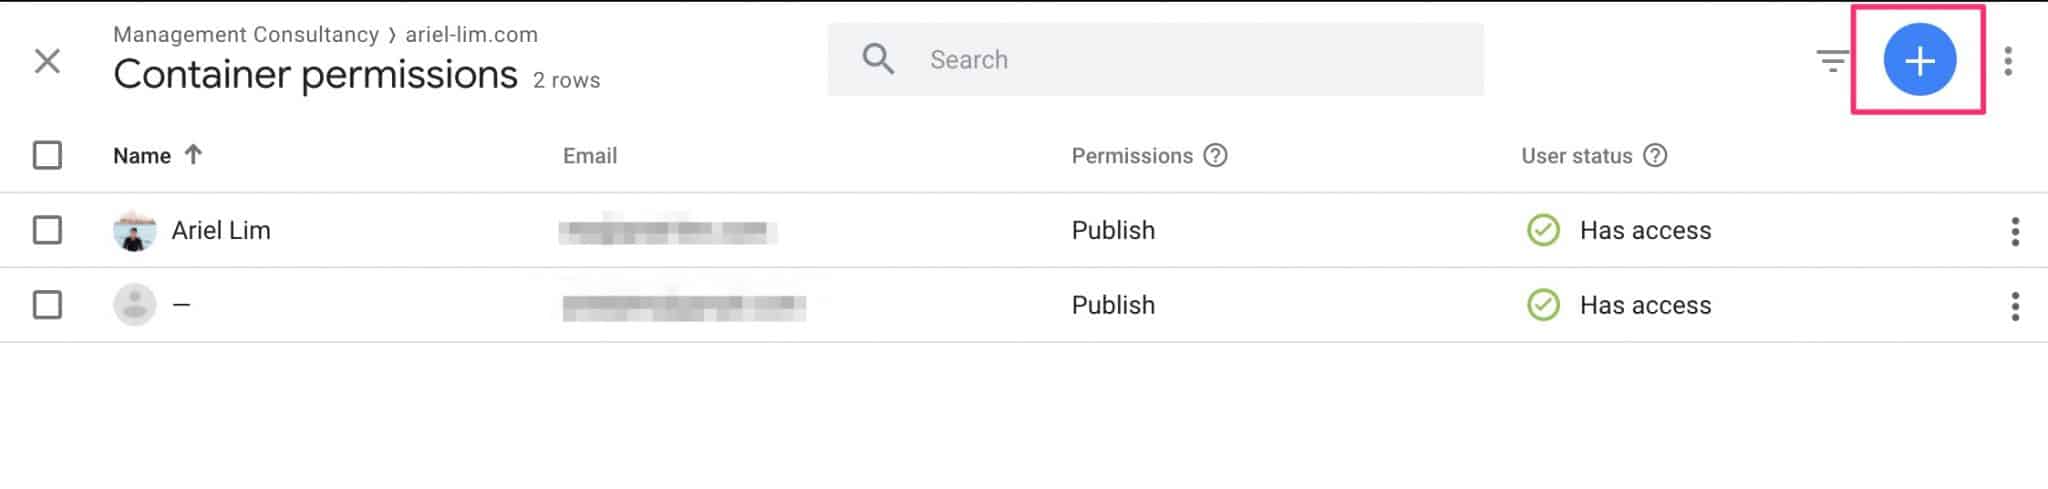
Step 4: Give the Appropriate User Permission
Next, you’ll see the current users with access to your container.
Click on the plus (+) sign to add a new user.
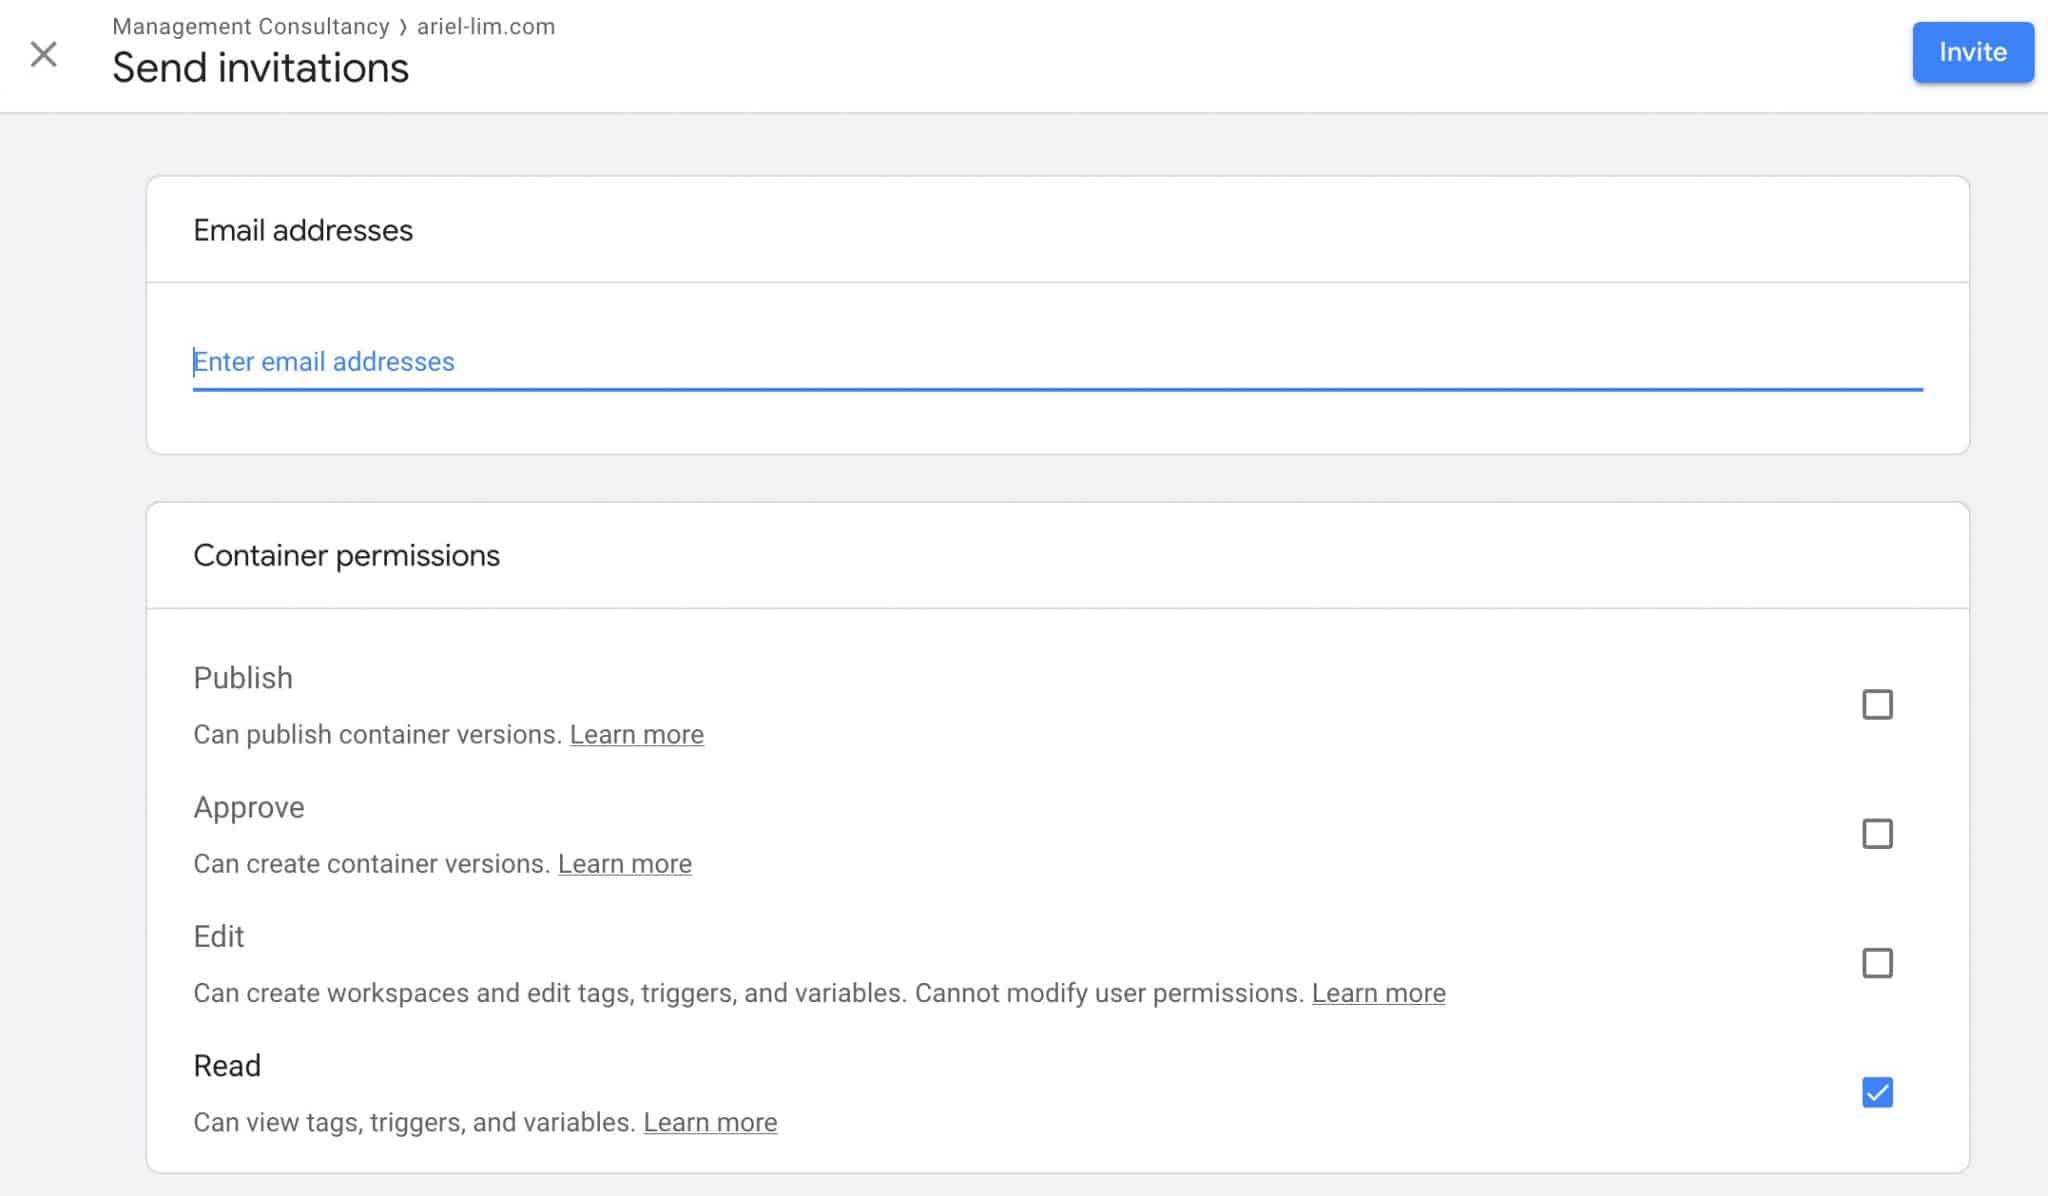
Now, selecting the permissions here will differ depending on a lot of factors and how you want to be involved.
Remember, Google Tag Manager allows you to deploy and install code directly to your website. For example, you want to try a messenger bot, you install the code via GTM by adding a tag, then publish the container. That messenger bot is now live on your website.
Take those factors into consideration when giving user access.
For me, I always request publish permission at the container level. The reason for this is I often implement new tech for my clients. For example, I configured Facebook Pixel, Google Ads, LinkedIn Ads for this one client. I also installed some heat mapping and A/B testing software. So, imagine how much time this would take if I can only set it up but can’t get them live (approve or edit).
If you want to be hands-on and only give them edit access, you would have to be the one to review and approve the changes yourself. This means you need to spend time and understand what the changes are all about. Otherwise, you will just end up causing more delays in getting your projects implemented.
Consider what your needs are and make sure you also stay on top of this because everything that you publish is automatically live on your website.
How to Give Access to Your WordPress Website to an Outsourced Agency or Consultant
The next thing you should learn is to give someone access to your website. Here are the steps you need to take.
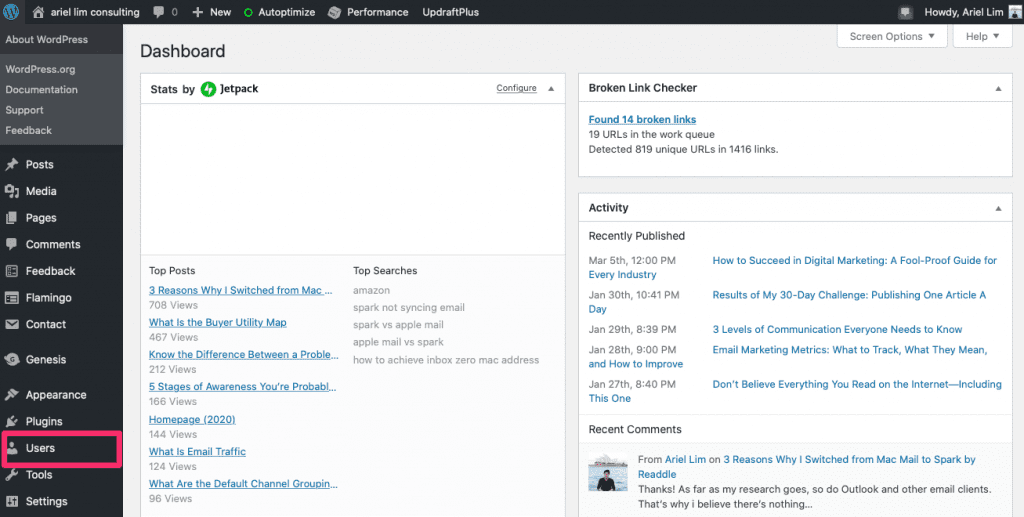
Step 1: Login to WordPress and Click on Users
Step 2: Click on Add New
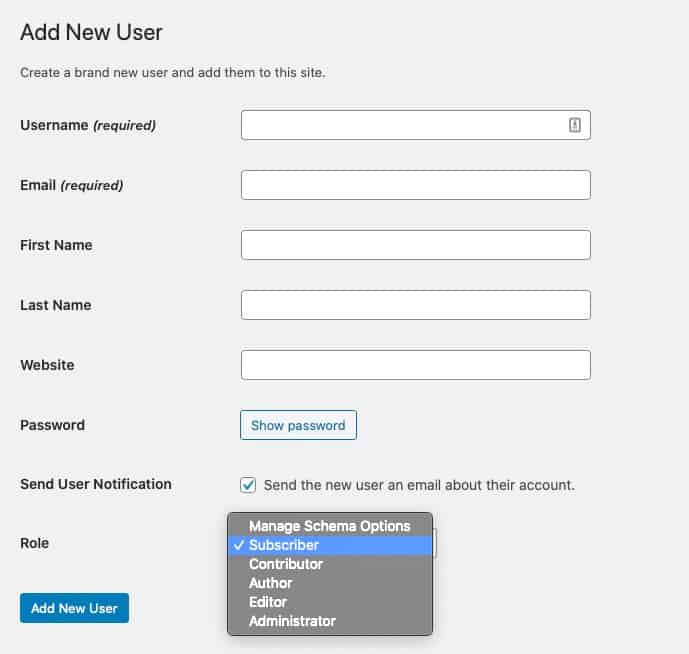
Step 3: Enter the Details
At this stage, all you need to do is enter the required information and you’re all set.
The most important detail I’d like to highlight here is the role settings.
I always request for an administrator role. That way, I can make modifications and edits easily. But that is not always the best practice.
Before you give someone admin access, make sure you trust the person because with that type of access, they can steal data or shut down your website. They can even remove you from the list of admins in some cases.
So, limit the number of administrators on your WordPress website. The other roles here are for different uses. For example, you have several writers. You can give them author or contributor access. You won’t have to worry about them messing up with your site. In most cases, they can only access the posts section. To learn more about the different roles, feel free to read WordPress’ documentation.
Over to You
Giving access to a 3rd party doesn’t have to be difficult. You just need to know what you are giving them access to.
Giving them your username and password is a terrible idea and can be used against you. If you give them your email address and password, which you use on all your accounts, people with malicious intent can easily change that password and extort you for money.
The same thing can happen when you grant outsourced digital marketing agencies and consultants with access to your account. The best way to prevent this is to give them limited access but doesn’t hinder them in their work. Just like what I discussed above.
I’ll be adding more to this list as time goes by. Do you have any tools that you want me to cover here? Let me know in the comments below.