If you want to grow your business, you have to use digital marketing. Period.
Sadly, a lot of businesses just create a Facebook account, sometimes a website, start posting pictures of their products, then call it a day. To the more tech-savvy ones, they have a nice-looking website that has a signup form that collects emails for them. Some dabble in advertising like Google Ads or Facebook. But that’s pretty much it. That’s what they call digital marketing.
While all these things fall under the realm of digital marketing, I’m sure you know that that approach is not effective. This is the biggest reason why they typically do not see any return on their investment nor see their business grow sustainably. And they blame digital marketing for this.
And that’s why they say, “Digital marketing won’t work for my business.”
Over the years, I’ve learned not to respond to this emotionally. I’ve learned that I can’t force people to believe in something they don’t want to believe in. As the saying goes, “when the student is ready, the teacher appears.”
If you’re serious about digital marketing and how it can help you grow your business sustainably, you have got to use these three FREE tools. And all you need is a Gmail account.
3 Digital Marketing Tools to Help You Grow Your Business
Google Analytics
You’ve no doubt have heard of Google Analytics (GA). It’s one of the most-used analytics/tracking software all around the world.
If you don’t have this installed on your website, you are wasting a lot of opportunities.
One of the most common excuses I hear from business owners on why they don’t have Google Analytics installed on their website is they just created a website. They don’t have much traffic anyway.
Well, how would you know you don’t have traffic in the first place?
Why Other Free Tools Don’t Match Up
Other software will give you basic analytics. But they are not as comprehensive as the one provided by GA. In fact, if you’re on the WordPress platform, you might have used or considered using JetPack. It offers site analytics plus some other cool features.
Unfortunately, it doesn’t give you an accurate report in terms of traffic.
I noticed this last month when I was optimizing my website for speed. I noticed that there are certain days where my traffic in JetPack spiked but remained low in Google Analytics.
When I asked WordPress support on this, they verified that they don’t block, nor have a way to block bots and crawlers.
To give you some background, what happened was every time I checked my speed on Google PageSpeed Insights or Pingdom, that traffic was counted by JetPack.
Using Bad Data Can Lead to Bad Results
Inaccurate data is misleading. If I use the data in JetPack to guide my plans and campaigns, that would have been disastrous. Granted, my current traffic isn’t that high, so it might not have an effect.
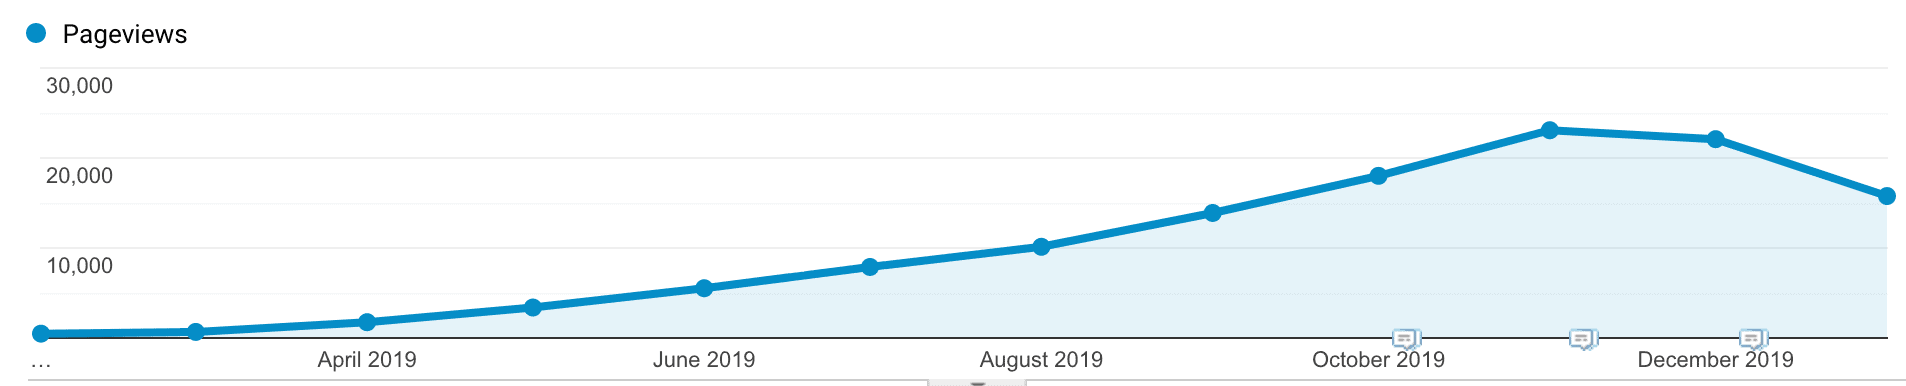
But imagine if you are getting 30k visits or more and when you dig in, more than half of that is coming from your own visits to your website. That’s definitely not something you want.
Regardless if your website is new or old, installing Google Analytics will only benefit you. Plus, if you install GA today and you only do very little digital marketing, in a year’s time, you would have gained a lot of data already from people visiting your website.
That data is priceless.
You can’t backtrack your data, meaning, if you only installed GA a year from now, you would only be able to capture data moving forward. All the data for the past year would have been lost. And that’s just an opportunity wasted.
Google Tag Manager
Google Tag Manager (GTM) is another free tool that allows you to implement new technologies on your website (or app). What I mean by that is you can easily add, remove, and modify code or tags without the need to learn how to code.
Allow me to explain.
If you want to add a chatbot on your website, you would only need to install a piece of code. Then, it will be live on your website. Or, let’s say you want to add a tracking software like Google Analytics…
<! – Global site tag (gtag.js) - Google Analytics -->
<script async src="https://www.googletagmanager.com/gtag/js?id=UA-12345678-9"></script>
<script>
  window.dataLayer = window.dataLayer || [];
  function gtag(){dataLayer.push(arguments);}
  gtag('js', new Date());

  gtag('config', 'UA-12345678-9');
</script>
You’d need to add that tracking tag on all your pages.
Why You Need to Use Google Tag Manager
Without GTM, the only way to add tags is to add them manually, or through plugins.
This presents a couple of issues I discussed in another article:
You’ll have to add them one-by-one to your website; or,
Have someone else (developer/programmer) add it for you
Which will take some time, especially, if you don’t have one in-house; so,
You’d have to coordinate with multiple people, instead of doing the work; and
Once you added Google Tag Manager, you can now add/implement new and cool stuff on your website without the need to rely on other people. It’s faster and simpler. You get to test if something is working or not right away.
Assuming you have someone who can tweak and add the codes for you, it’s still better to add them via GTM because it automatically loads them asynchronously—which is very important if you want to make your website load faster.
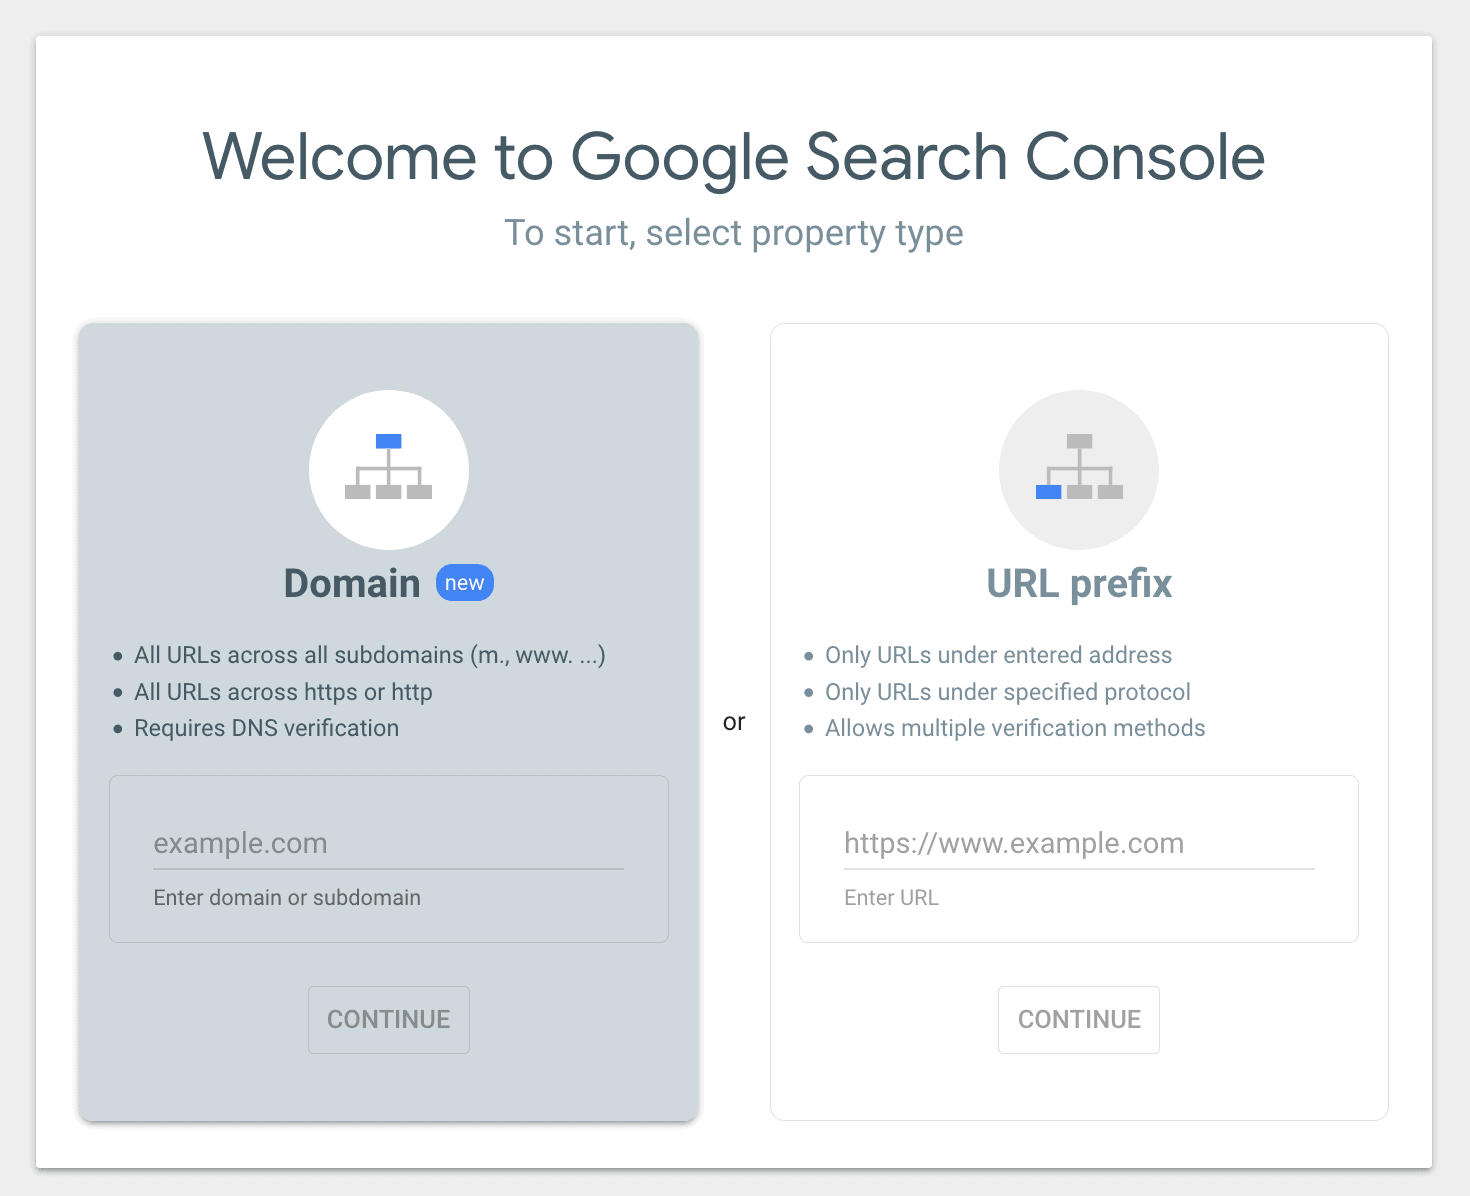
Google Search Console
The last tool in your digital marketing arsenal should be Google Search Console (GSC), formerly called Google Webmaster Tools. It’s also one of the least known and, consequently, the least-used tool.
But it offers a lot that Google Analytics can’t provide:
It tells you which pages are the most popular (which you can find in GA), but
It also tells you the exact keywords/phrases that people used to find you
Which among these keywords they clicked on; and
Its position on Google
When you combine this with Google Analytics, you get a very powerful combination at your disposal.
How to Use Google Search Console with Google Analytics
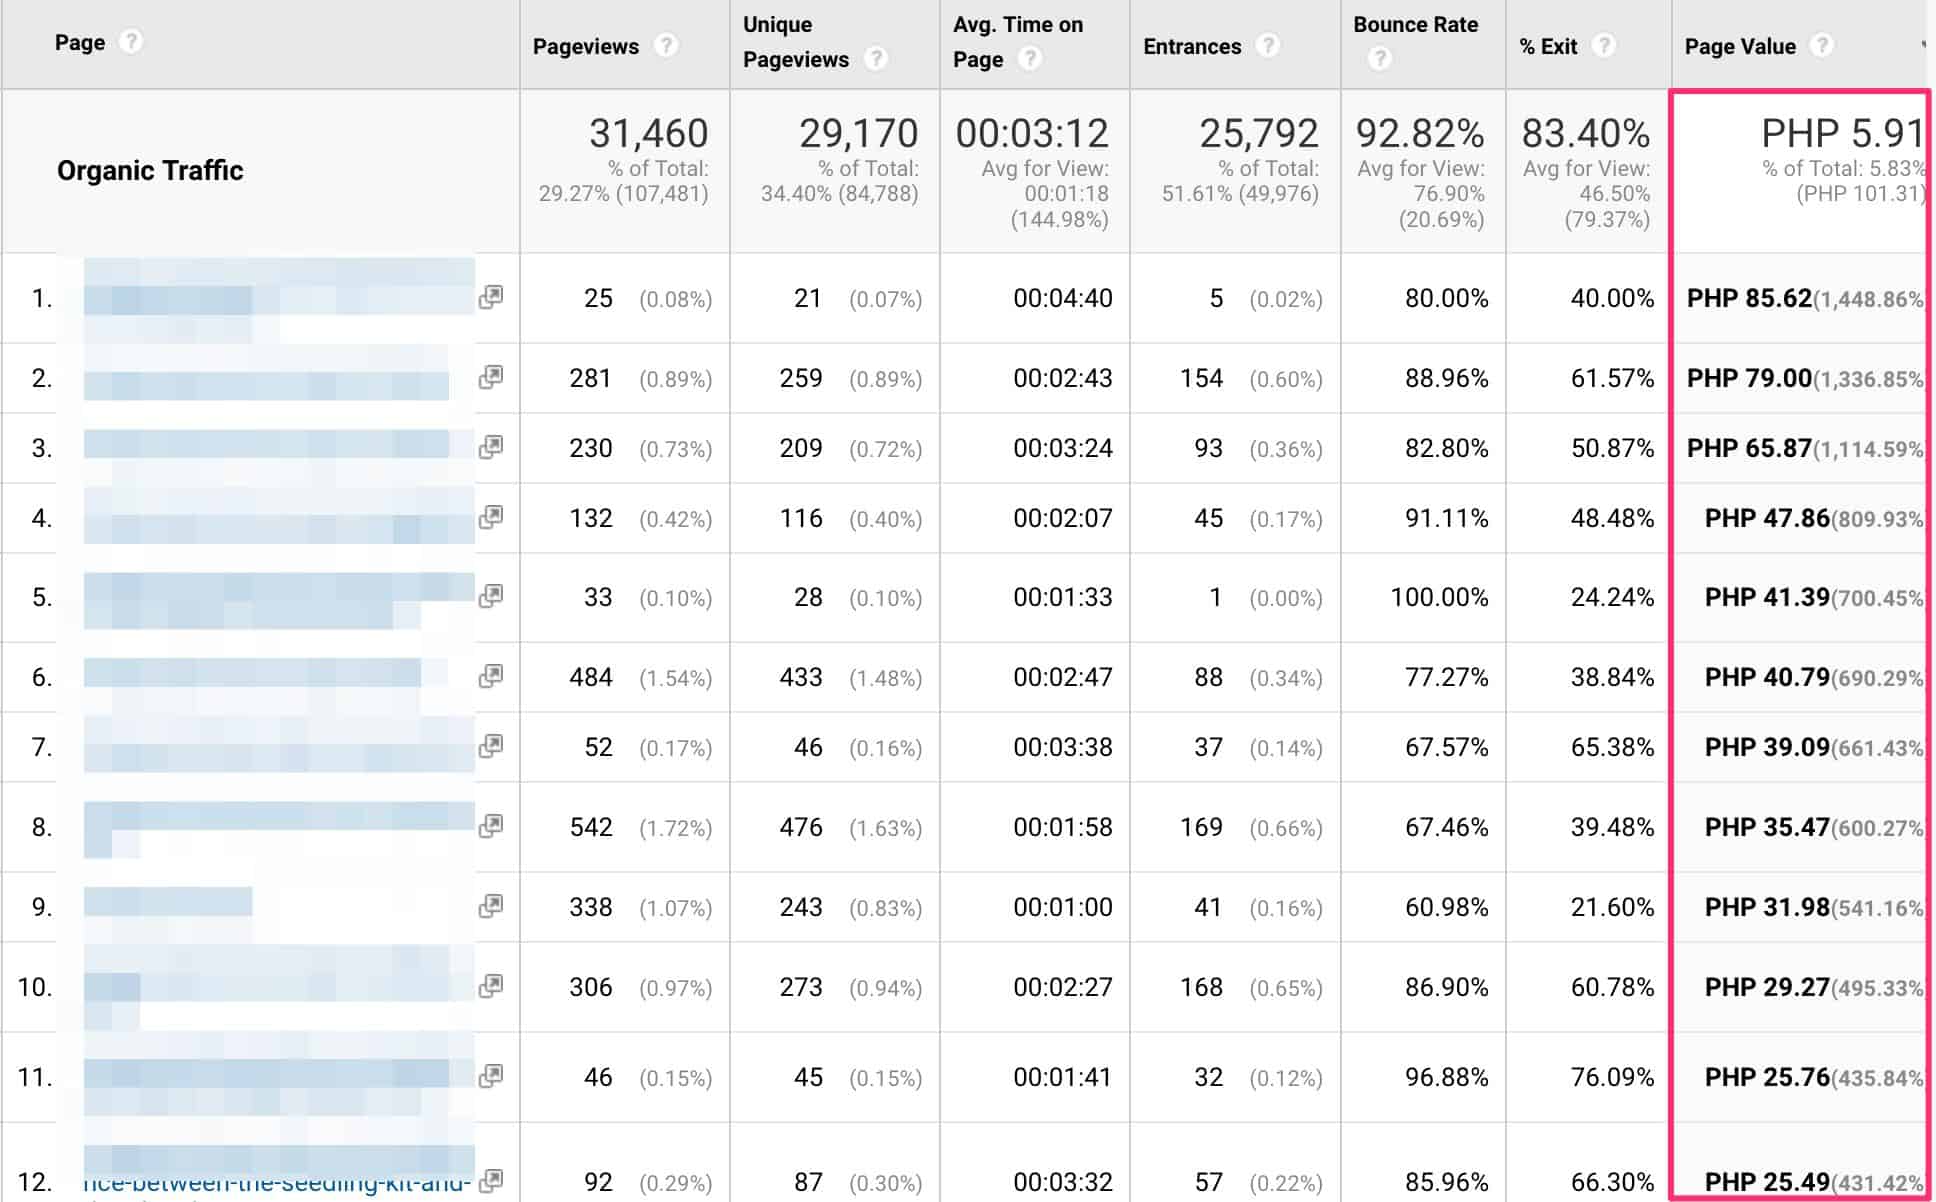
Let’s use this example of an eCommerce client. Obviously, they want to earn more revenues. But they don’t want to just keep selling. They want to provide educational materials for their customers.
So, the first thing I did (which I won’t cover here in detail) is to setup goals in Google Analytics. These goals have a corresponding value. What happens is when people convert on those goals you set up, the pages the contributed to that conversion gets some value. Since this is an eCommerce client, the goal is an actual conversion or purchase.
Here’s what the reports looks like in Google Analytics that shows the page values—how much each page is worth.
You can then filter which pages contributed more to the conversion then optimize that further so you can get more conversions.
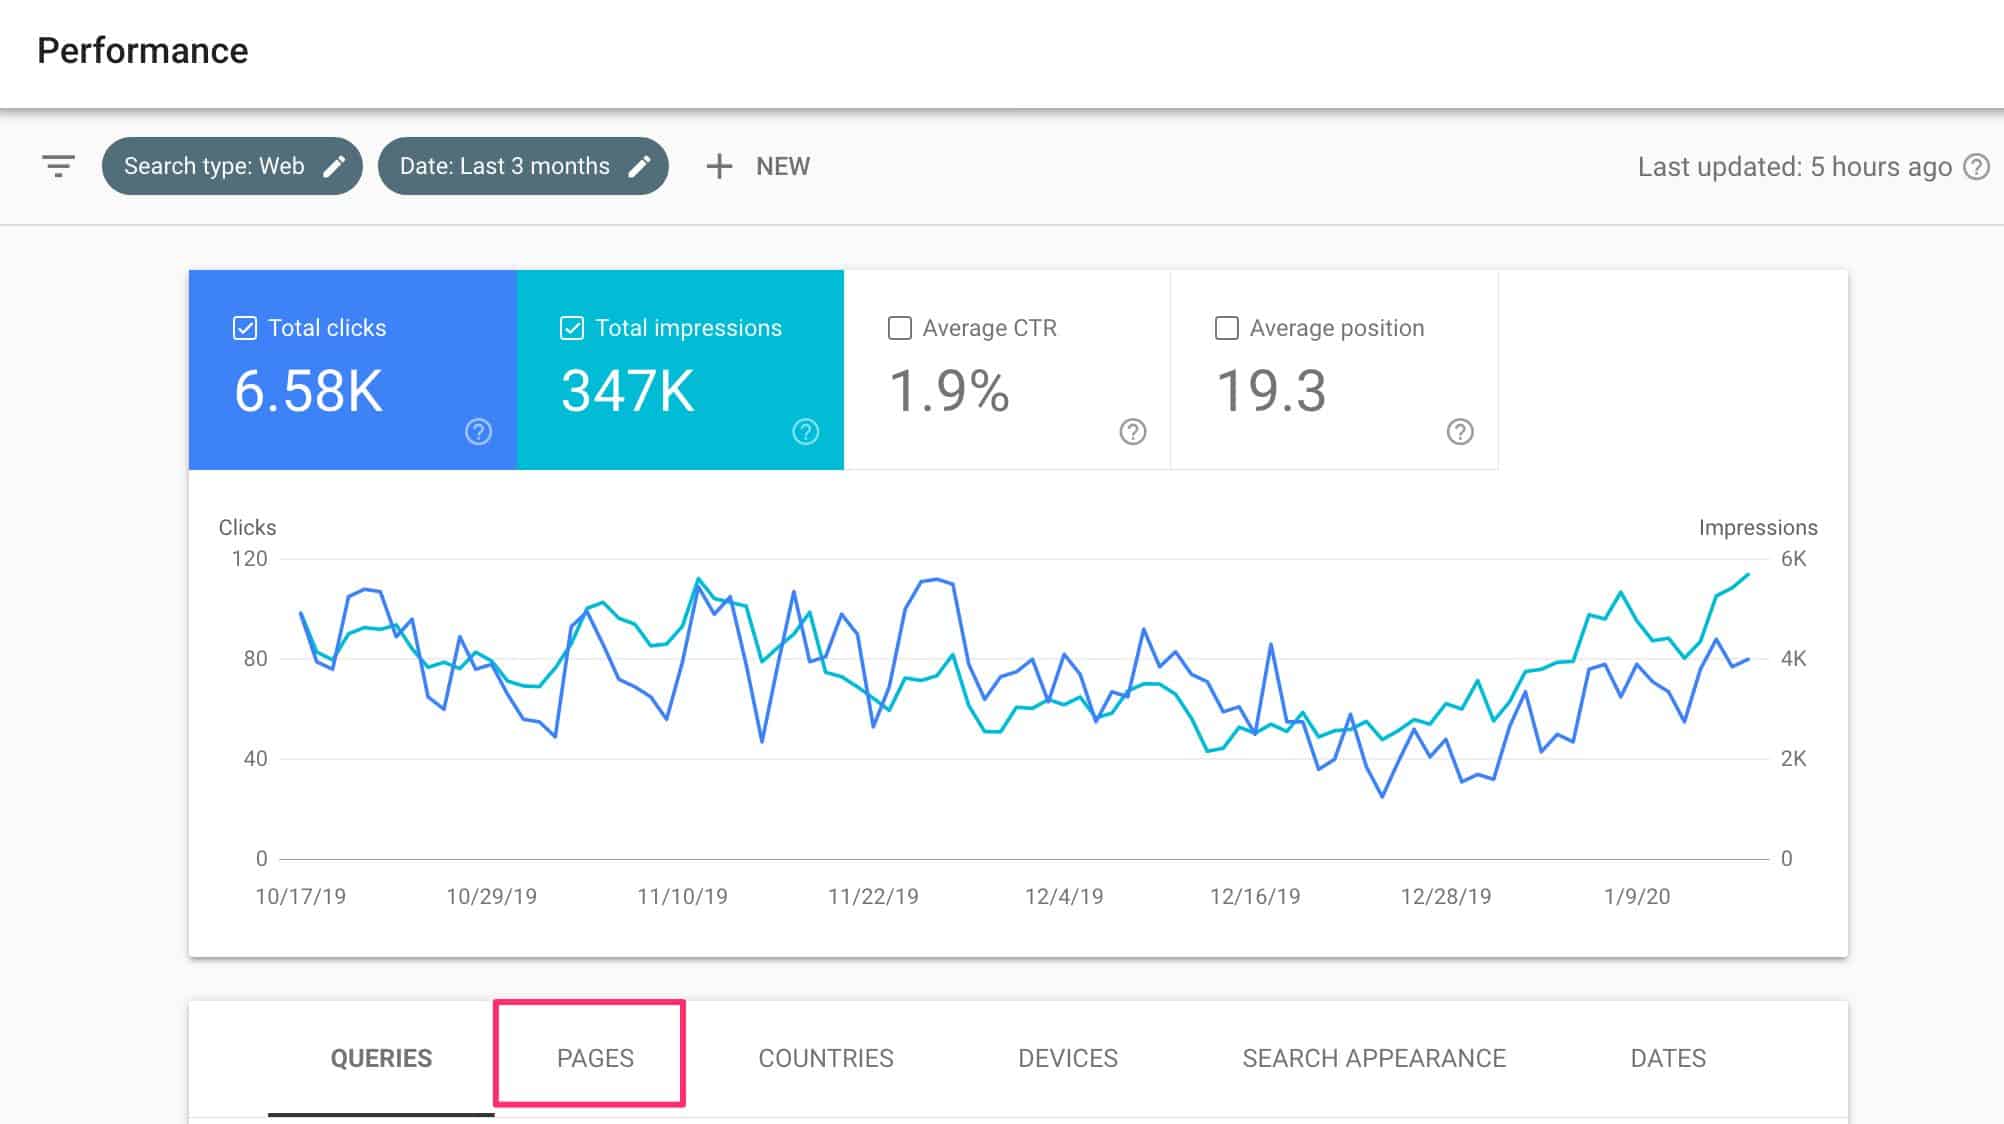
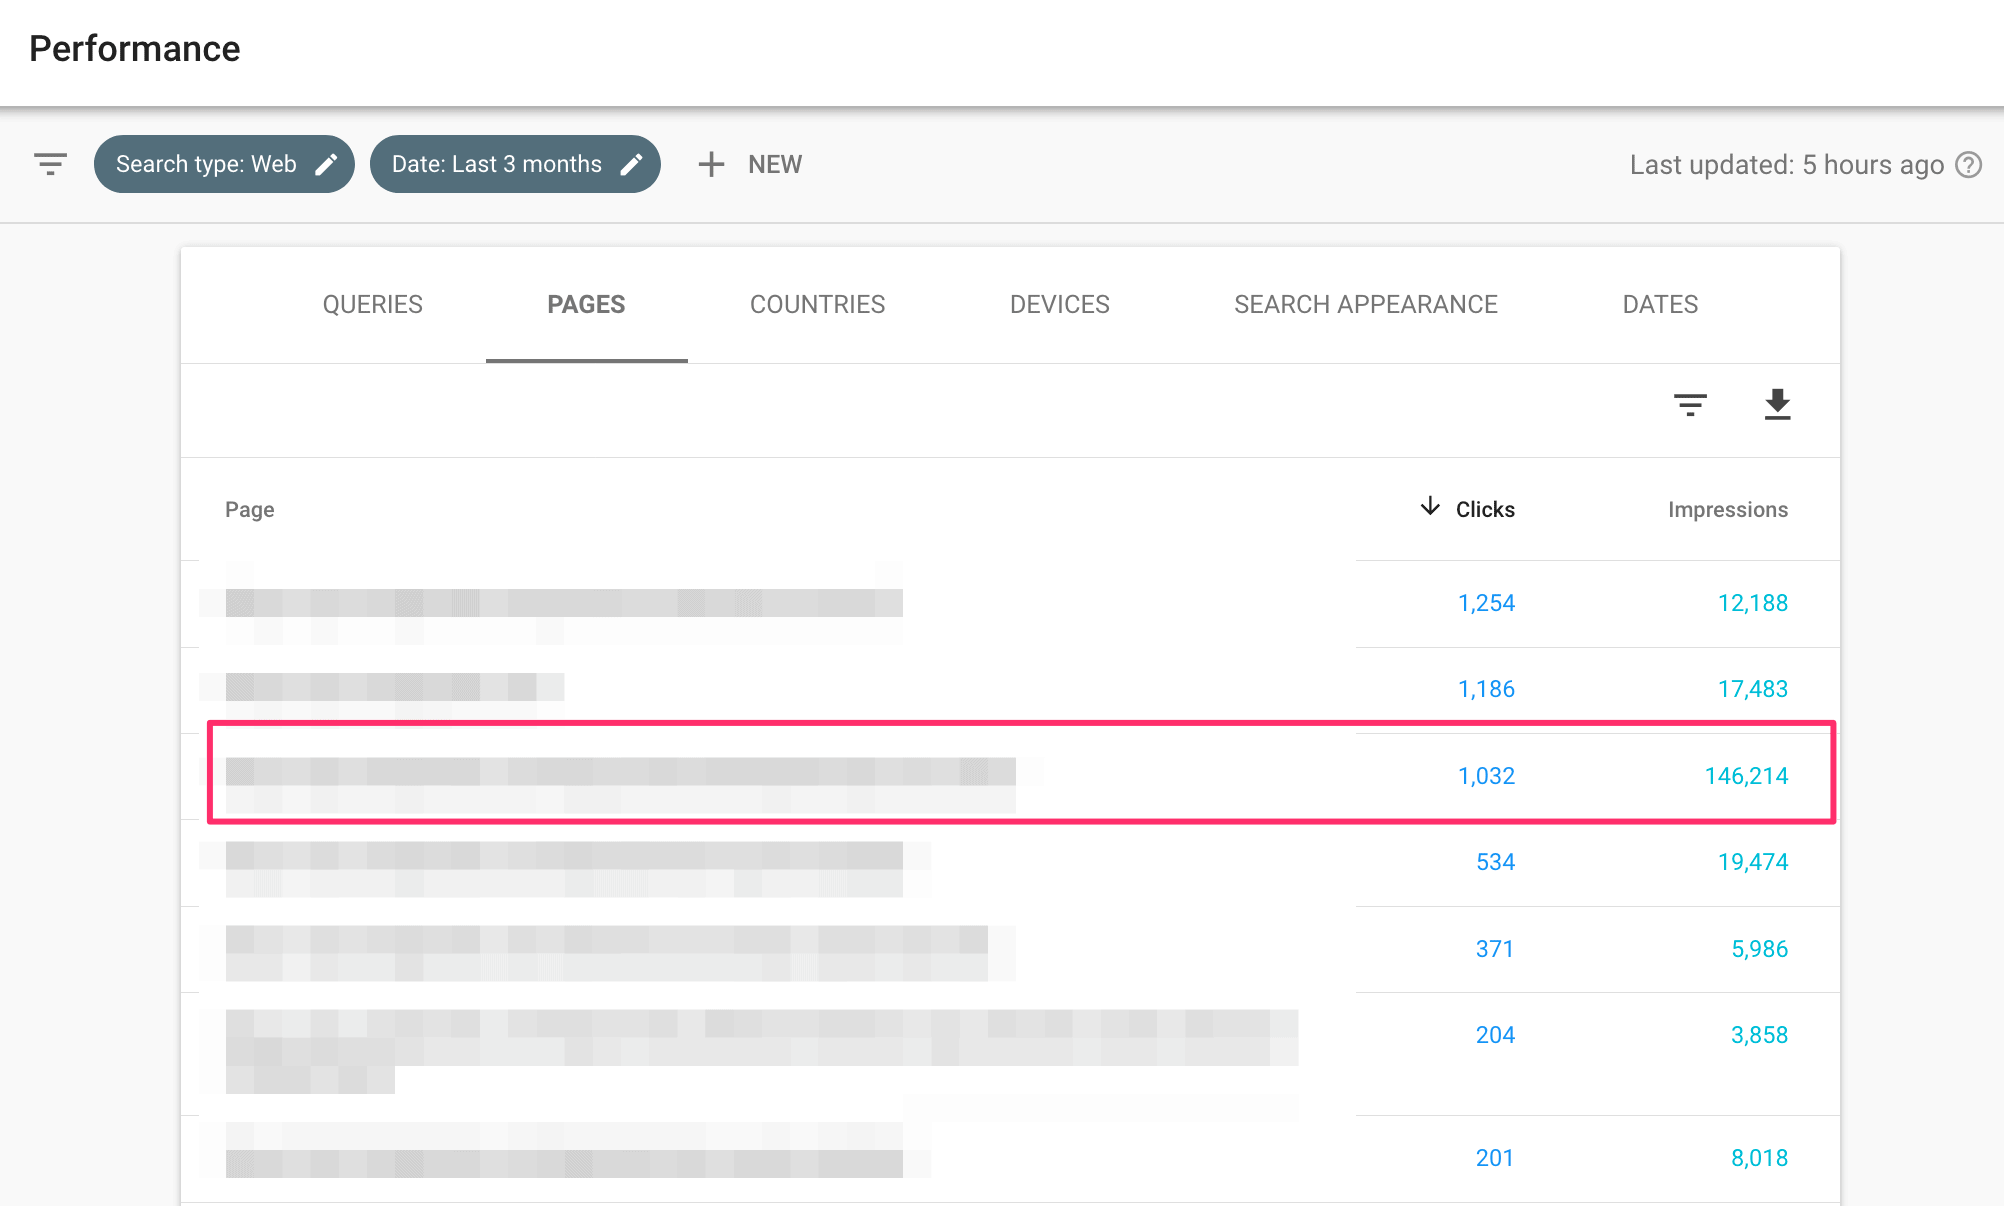
So, what I can do is take the highest converting page and look for that in Google Search Console. You can do that by logging in your account, then head over to the pages tab.
Then, you’ll see all the pages on your site. What you’ll want to do is look for that top-performing page (or any other page you’d like to optimize) and click on it.
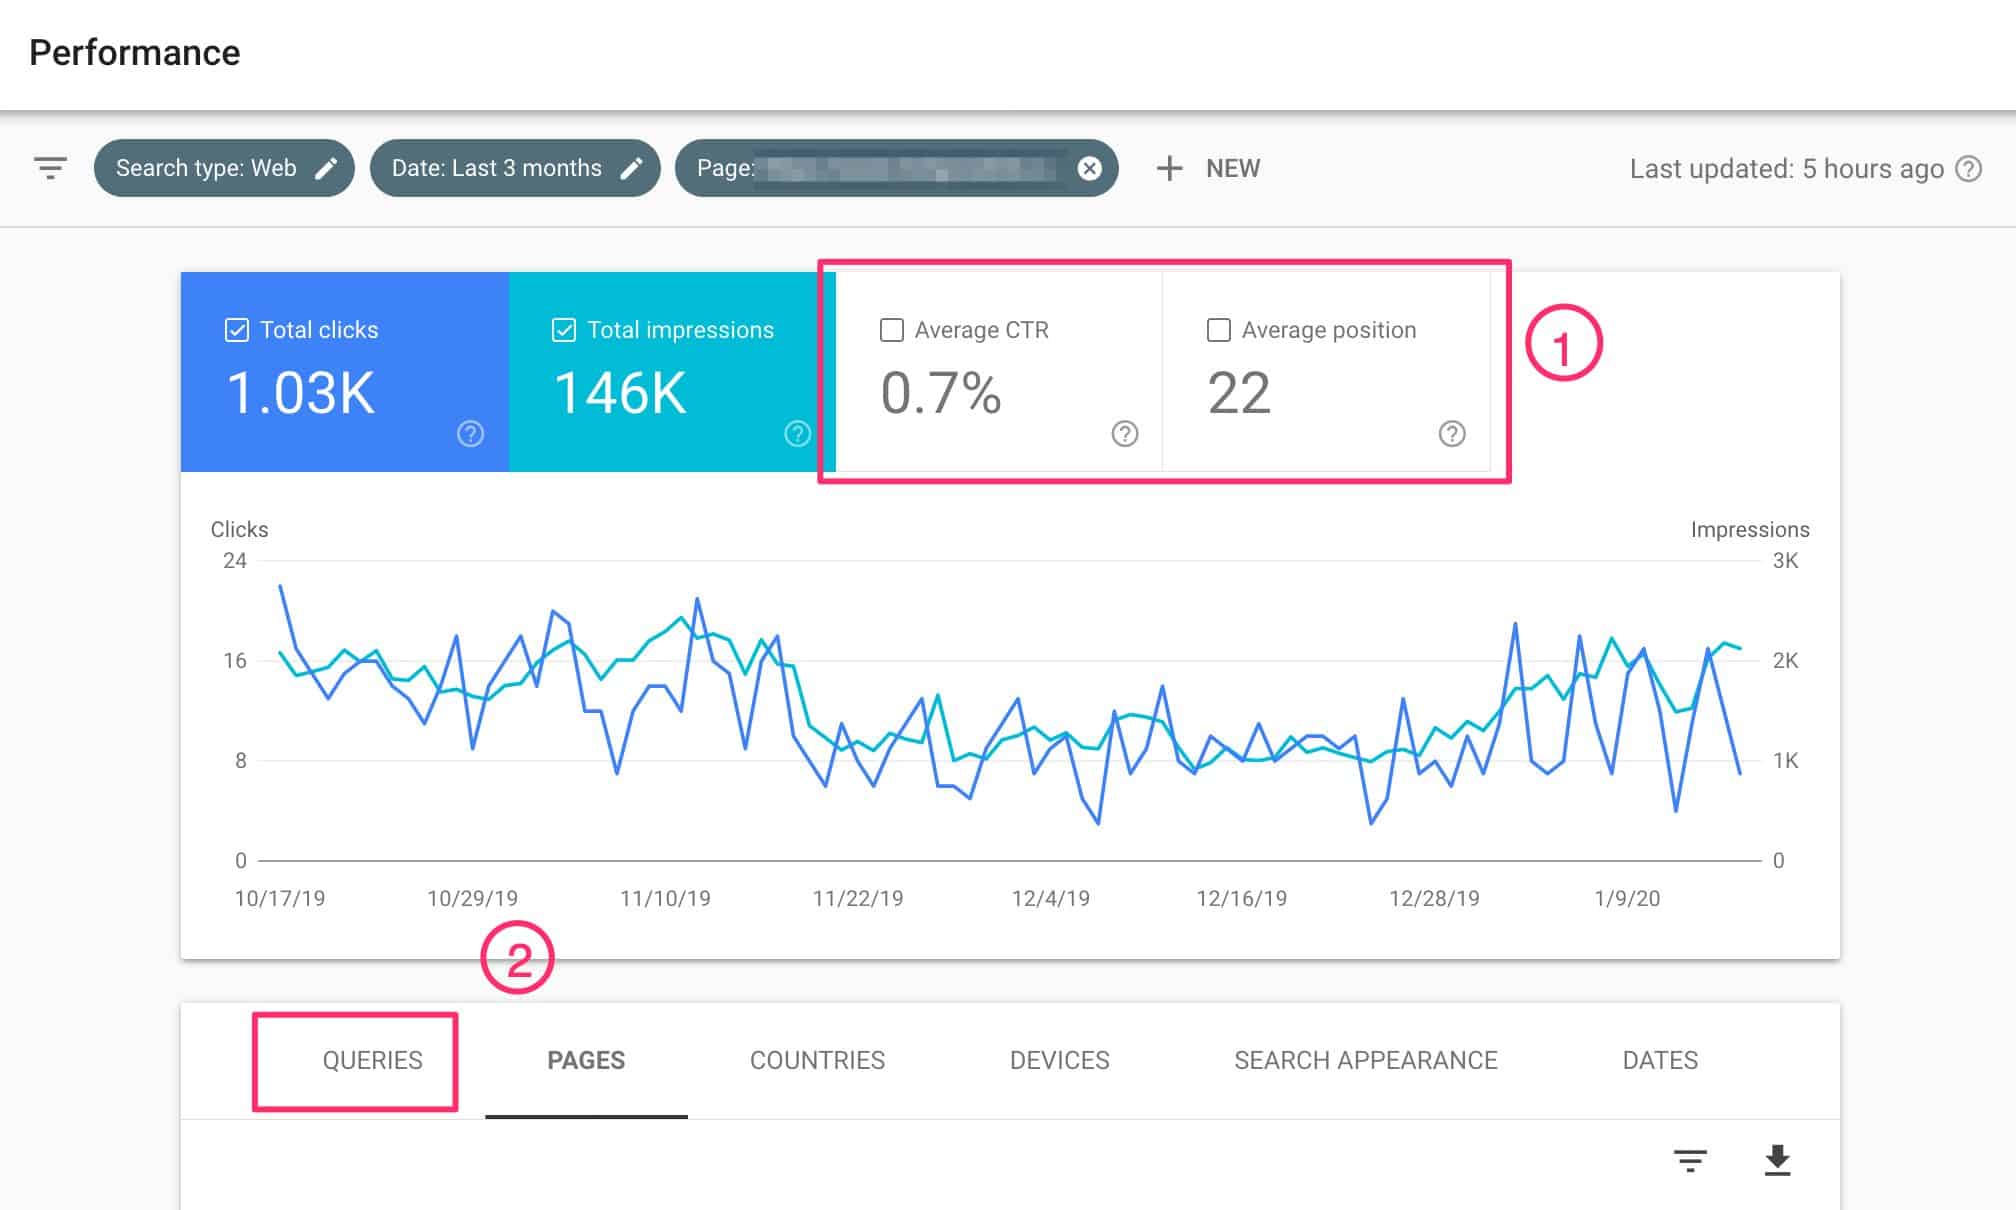
Once you selected that particular page, GSC will refresh to only show data for that particular page.
Next, you’ll want to click on the CTR and average position at the top, then click on the queries to find out exactly which keywords people used to search for you and which ones they clicked on. You’d find something that looks like this…
With that, you now know exactly which keywords and phrases people used to find your site. One thing you can do with this data is to find the keywords that have high impressions but low click-through rates (CTR). What that means is people are finding your content, but they aren’t clicking on them.
That might mean they don’t find it relevant or it’s not comprehensive enough. So, what you do is add these keywords and phrases to your page’s headers and content. You also add it to your title and meta description.
Do this for your top-performing pages and they will continue to rise, get more traffic, and perform better.
Over to You
These three tools are all free. So, it doesn’t make sense that you don’t take advantage of them. You don’t need to be an expert in everything, nor have to spend so much just to compete in the digital marketing arena.
In order to succeed and grow your business, you only need to have the right tools to guide you in your decision-making process. That way, you won’t make the wrong assumptions, nor use inaccurate data in your plans.
If you need help setting up these tools on your website, feel free to reach out in the comments below.
If you’re like most people, the first time you’ve heard the name Cloudflare is when you’re trying to speed up your website using a content delivery network (CDN). That’s the same thing for me. And that’s what I’m going to talk about in this article—how can you use Cloudflare to make your website faster through its CDN.
As a side note, Cloudflare do offer a lot more than just providing CDNs. In fact, once you setup your website with Clourdlare, you’ll automatically be protected from malicious activities like DDoS attacks, bots, and other intrusions. They have different plans that you can choose from. But for the purposes of using their CDN to make your website faster, their free plan is all you need.
But before diving right in, let’s answer some of the most common questions:
Use Cloudflare as Your CDN in 5 Simple Steps
One of the biggest names in CDN is Cloudflare. Another name that usually comes up is StackPath (formerly MaxCDN). And because I’ve never used StackPath, I’ll be focusing on Cloudflare.
If you want to use Cloudflare as your CDN and speed up your website, follow these 5 steps.
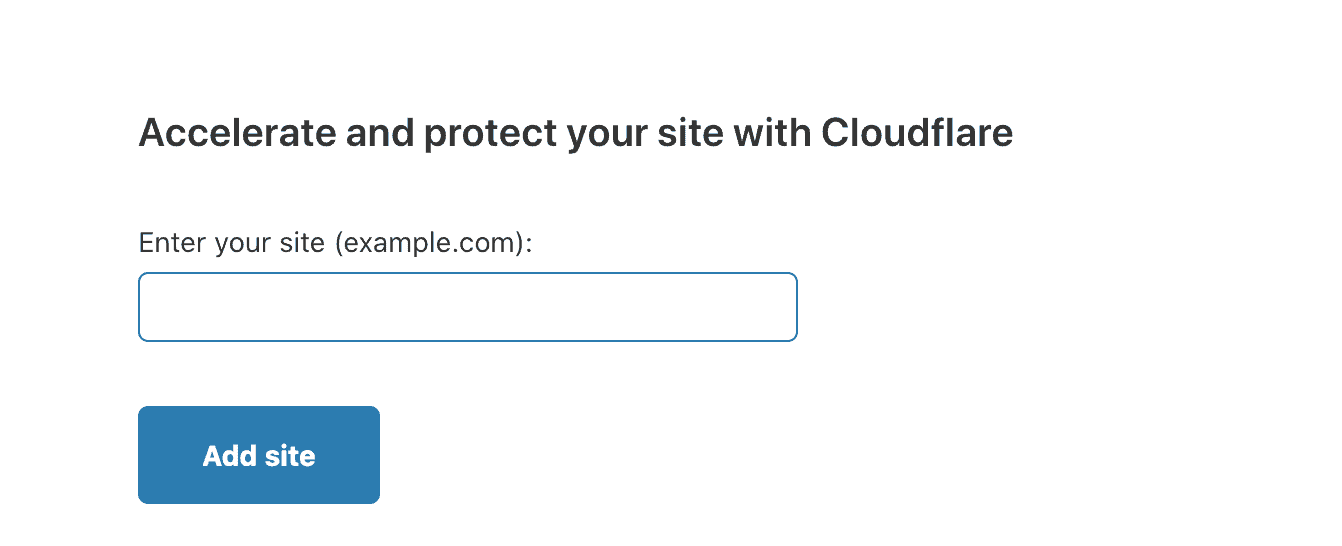
Once you logged in successfully, the first thing you need to do is add your website.
Just enter your domain here.
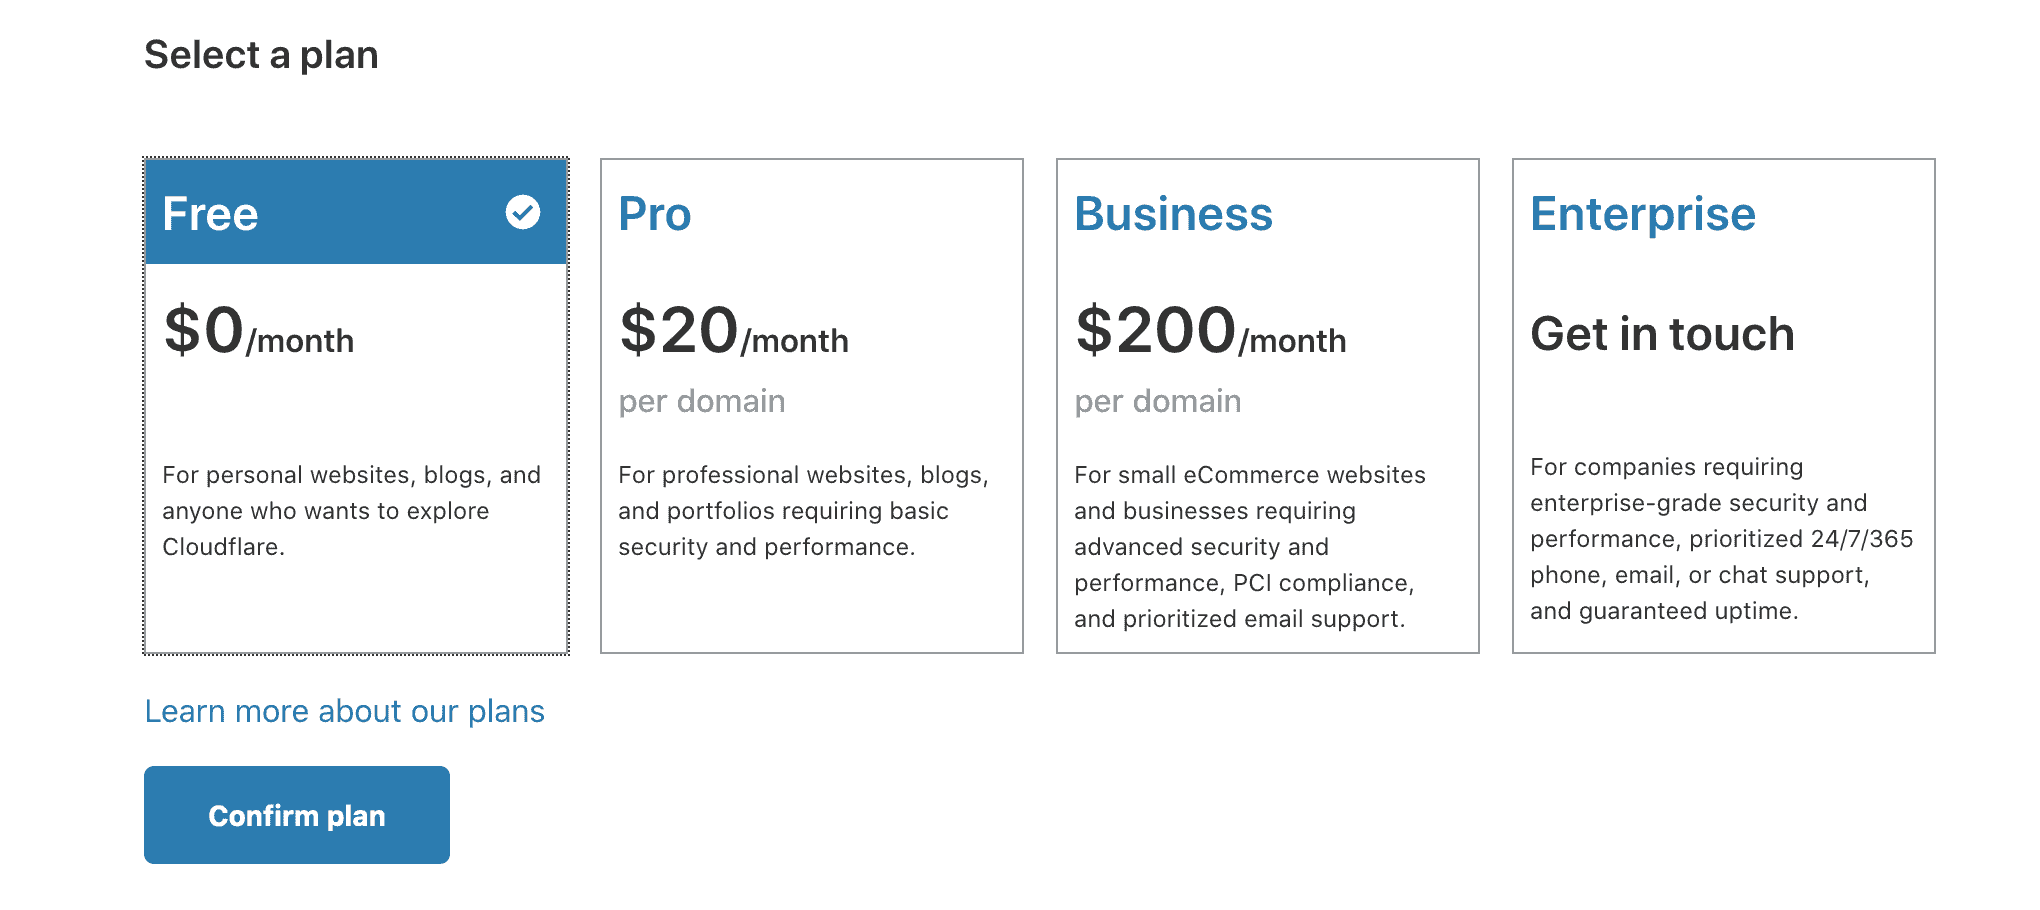
3. Choose the free plan
In the next screen, you’ll be ask to choose one of their plans. Like I said earlier, Cloudflare offers a lot of things. You can explore this for yourself later on.
For now, choose the free plan.
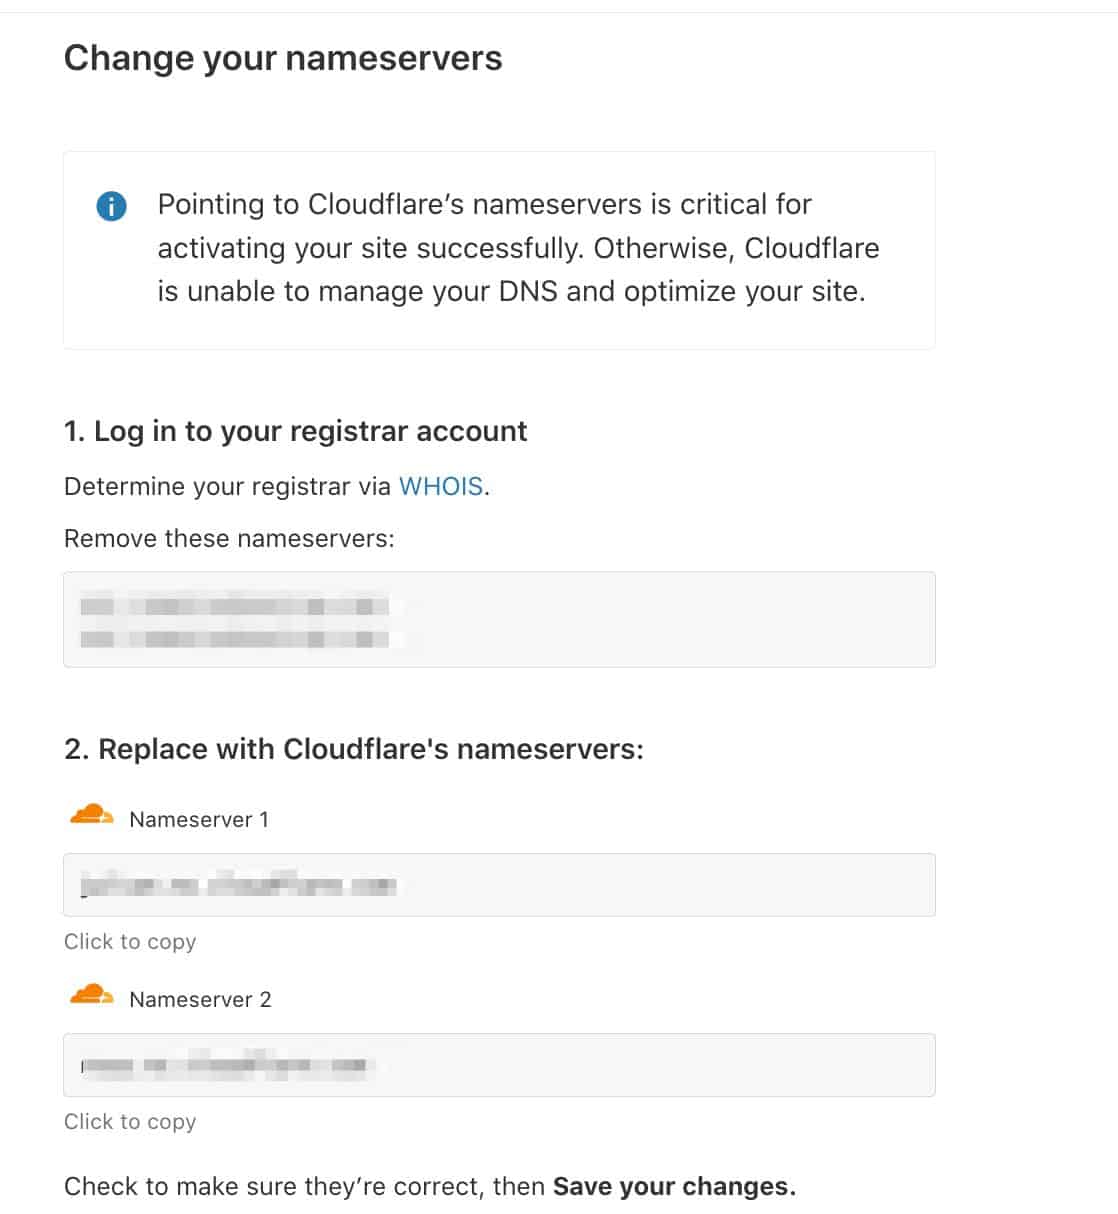
4. Change your nameservers
The next step can be a little scary if you’re not familiar with the process. But don’t worry. I’ll walk you through this.
Basically, what you need to do is follow the instructions in this screen to change your nameservers.
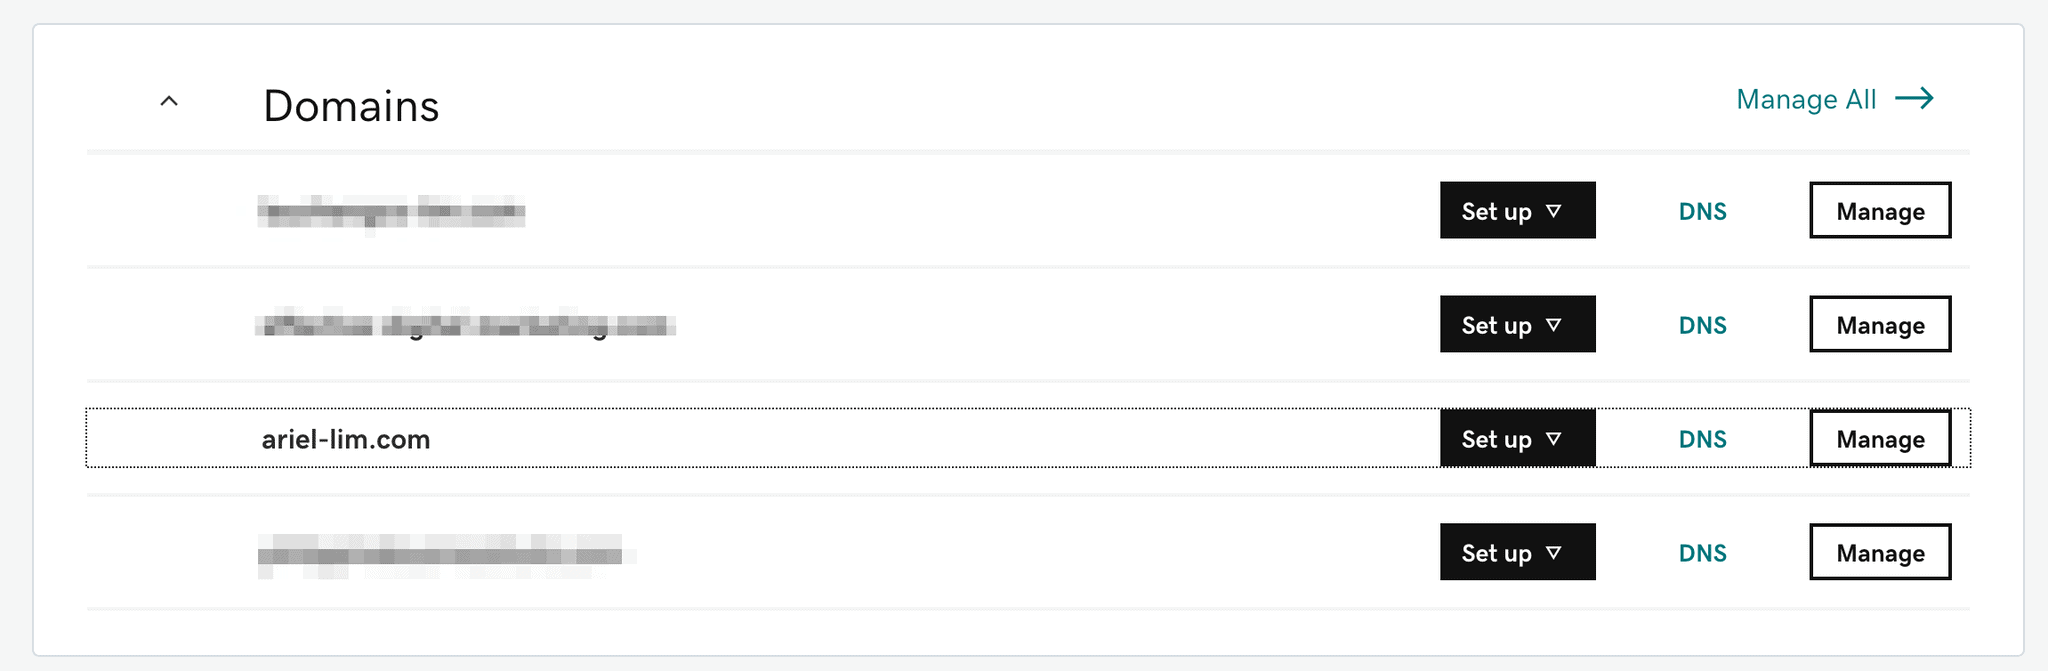
You can find your nameservers from your domain provider—where did you buy your domain?
I bought mine from GoDaddy. You might have a different provider, but the process should be similar.
Here’s it looks like inside GoDaddy.
After logging in, I see the domains I have on my account. Click on the DNS button to enter the DNS settings of that particular domain.
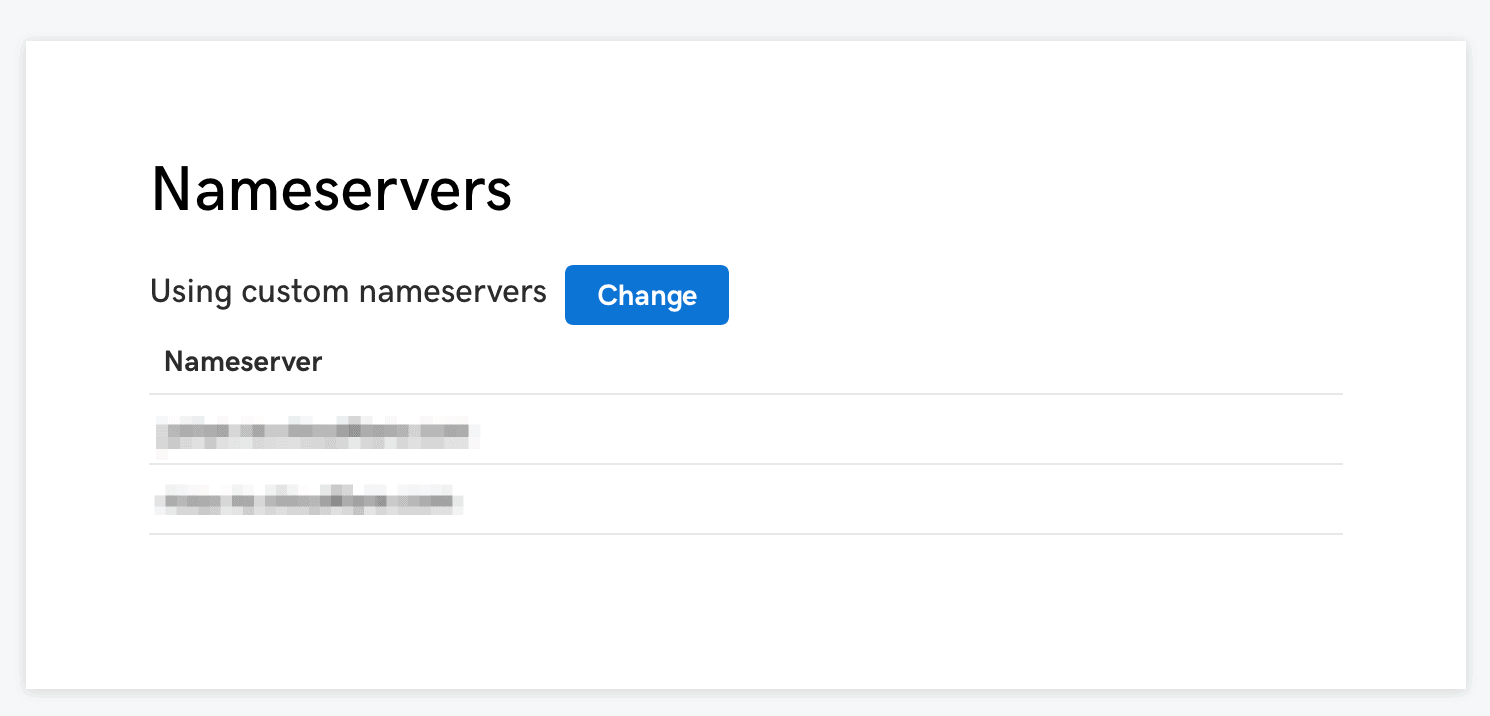
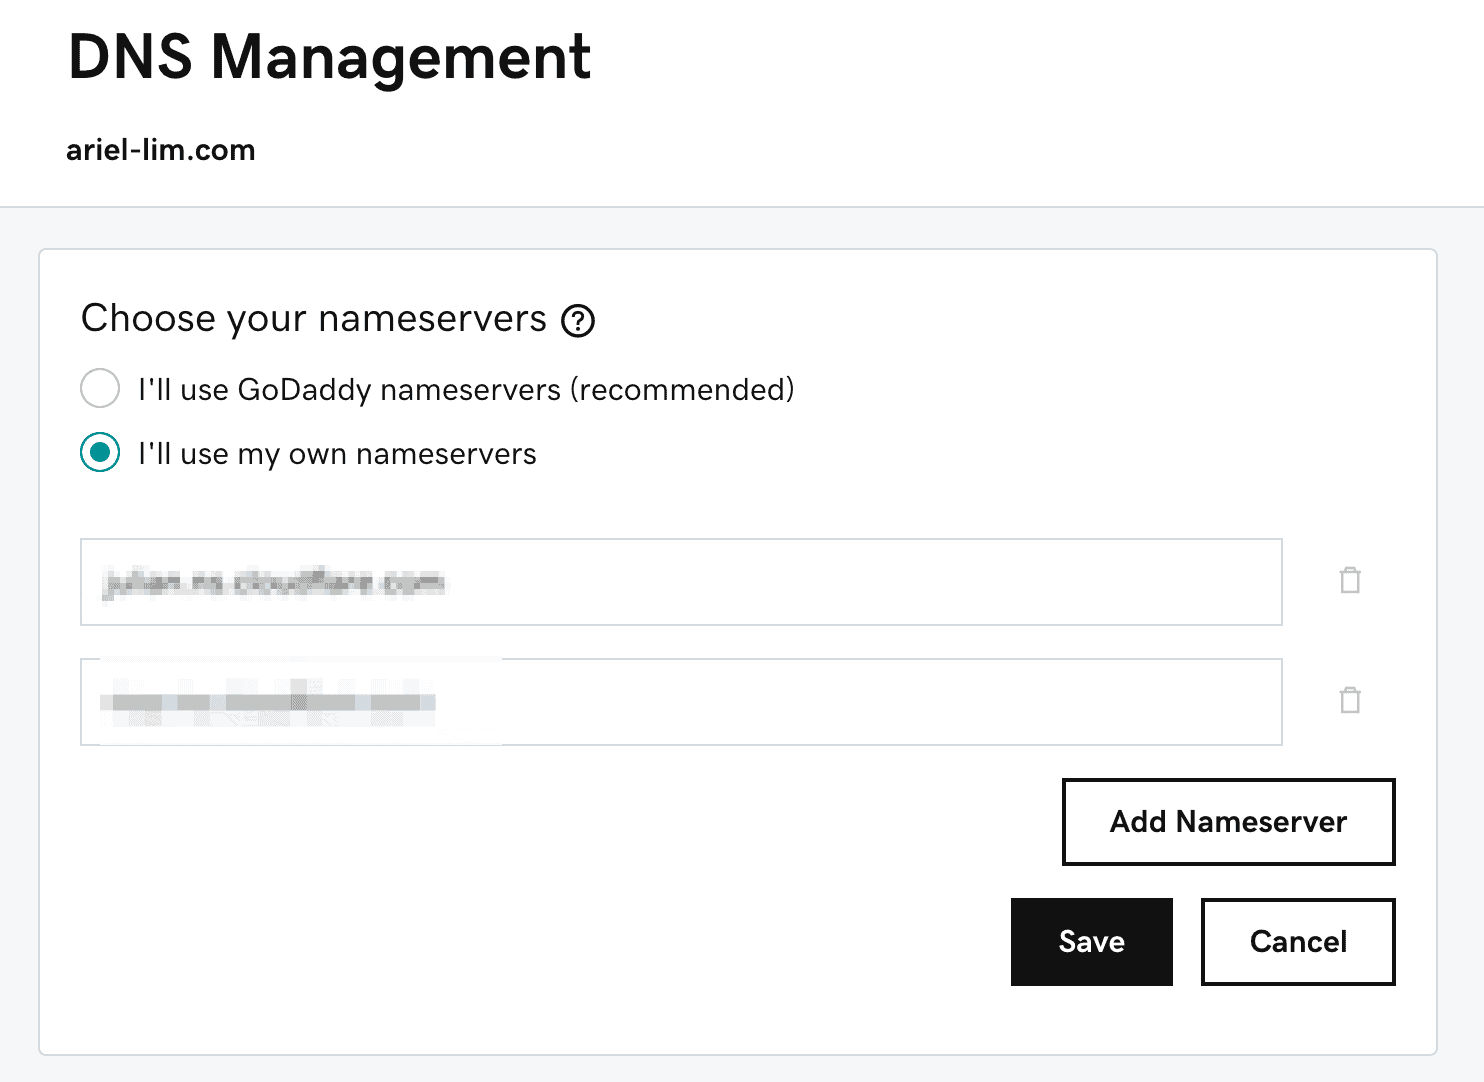
Once you’re in, find the section on Nameservers. You’ll want to click on change to edit it.
Lastly, copy and paste the nameservers from Cloudflare to this section.
Hit save and you’re done.
5. Go back to Cloudflare and check the records
If you did everything correctly, you should see your domain saying that it’s active, just like the one shown in this image.
If it’s not, you should see the status there as well.
And that’s it. You have now configured Cloudflare as your website’s CDN.
Conclusion
Depending on your plan, traffic volume, and other factors, you should see your images (and other content) being served from Cloudflare. Once you’re done, feel free to explore the different sections of your account in Cloudflare.
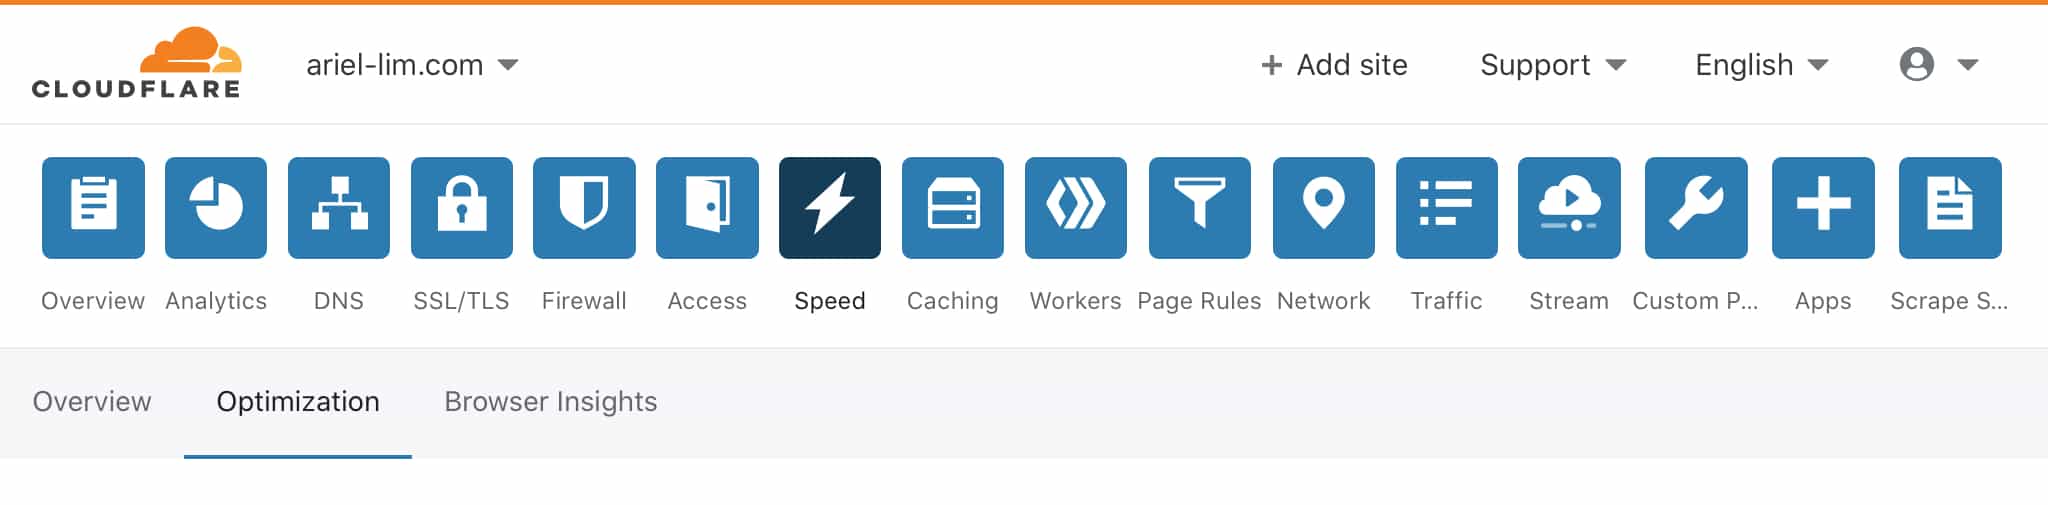
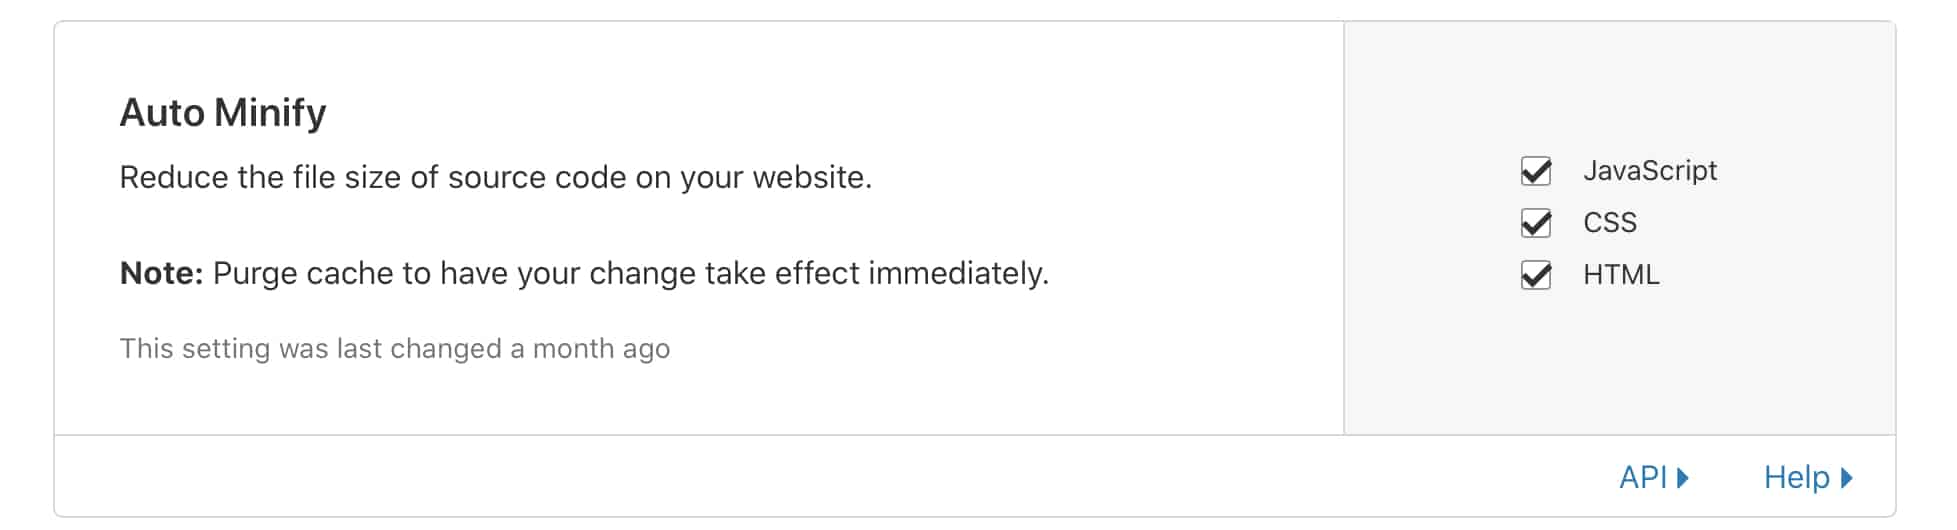
One thing I do recommend doing right now is to make sure your pages are minified. Go to the Speed tab, then select Optimization.
Once you’re there, make sure you check all the boxes in that section.
What it does is it automatically reduce the file size of your code—particularly the three ones you checked: JavaScript, CSS, and HTML.
After a couple of days, feel free to check the Analytics tab so you can see how Cloudflare has helped your site in terms of traffic, security, and performance.
Businesses often forget that increasing your revenues means you also increase your expenses. It’s only natural. As your sales go up, so does your cost of goods sold (COGS). For services, that would be your cost of sales. And that’s only considering the variable expenses. We’re not even talking about fixed expenses. At a certain point, this will also increase. But that’s for another time.
In my previous article, I talked about the only formula you need to run your business — also known as the profitability framework. I showed the relationships between profits, revenues, and expenses. Here, I’ll focus on the revenues.
What Are Revenues or Sales
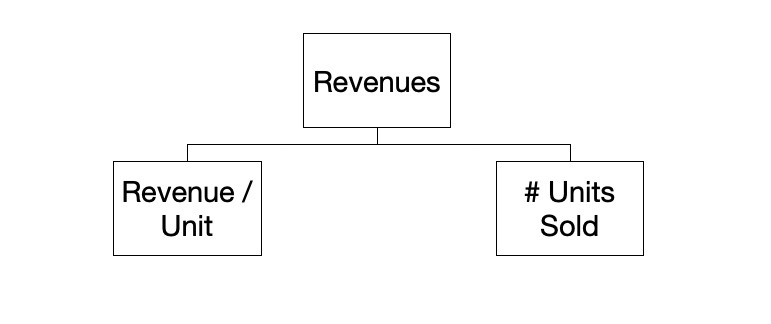
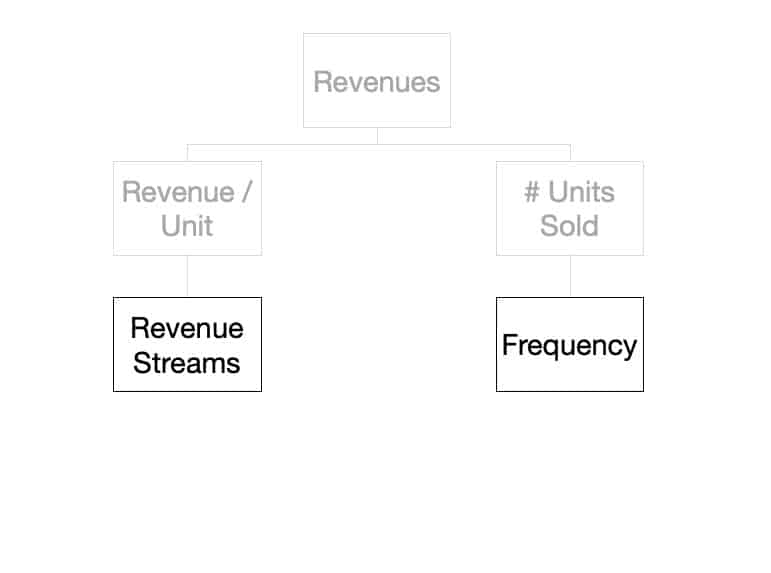
Revenues, or sales, is the product of price and quantity sold over a period of time. Another term for the price is unit price or price/revenue per unit.
Revenues = Price x Quantity
There are only 3 options to increase your sales:
Increase your price
Increase the quantity sold; or
A combination of both
Those are the only 3 ways you can do so. It’s mathematically impossible to increase your revenues unless they don’t fall under these categories.
How to Increase Revenues
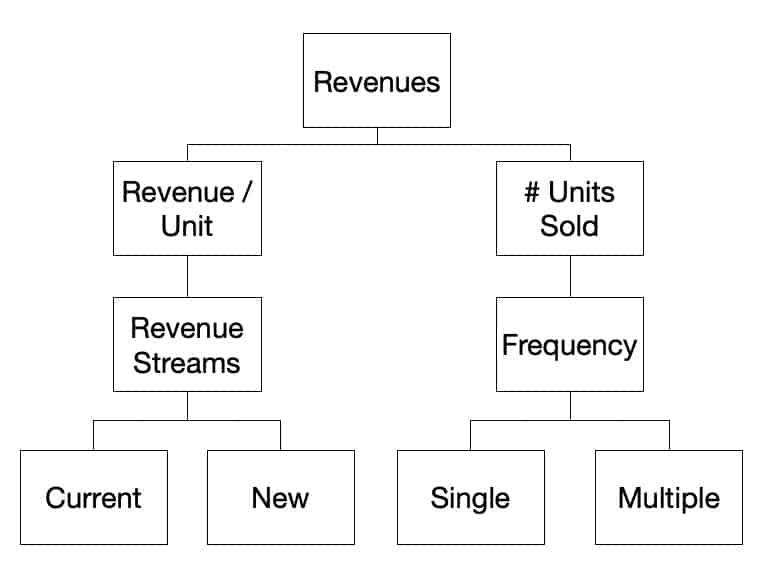
Now, let’s expand the revenue formula further.
On the left side, the primary factor that affects your revenues/sales is your revenue streams. In the previews article, I refer to these as the different segments like customer type, product lines, region/location, etc. On the other side, the primary factor that affects your quantity is the frequency of purchase.
Let’s go through each in detail.
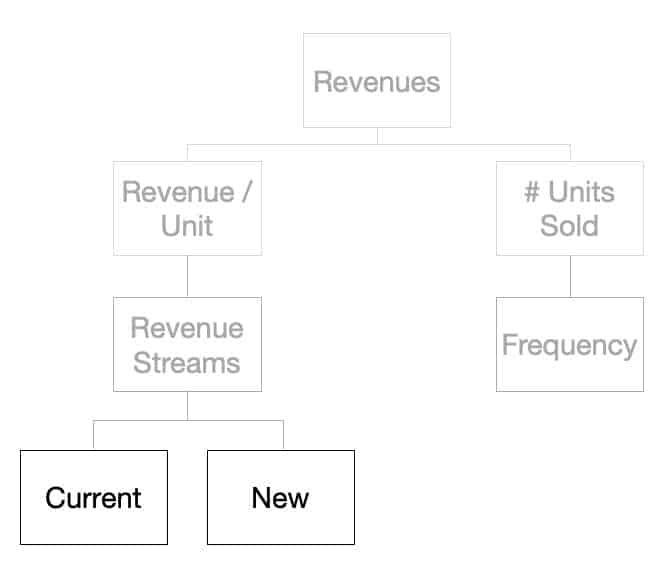
Grow Your Revenues by Having More Revenue Streams
Revenue streams are different channels or areas where you can sell or earn money. Of course, this will be different for every business. Here are a few examples of different revenues streams:
Sale of products
Income from rent
Dividends from investments
In the personal setting, this is oftentimes called income streams.
Answering the question, “where does your income/sales come from?” will help you visualize your revenue streams.
You can further generalize this into two categories:
Current revenue streams
New revenue streams
Your current revenues streams are where you are currently generating sales. This can be your physical store and your website. Maybe you have a sales team and someone who handles partnerships and resellers. Those are your existing or current revenue streams.
Then, of course, new revenue streams are those channels you haven’t earned from or explored at the moment.
Create a New Revenue Stream
One of the easiest way you can increase your revenues is by creating a new revenue streams. Contrary to popular belief, creating new revenue streams is simple and free in most cases.
Here are a few examples:
New Distribution Channels
For businesses selling physical items, the easiest revenue stream to capitalize on is selling on a new distribution channel. One example that comes to mind is the partnership of SM with Lazada.
Teresita Sy-Coson, daughter and vice chairwoman, said in an interview with Bloomberg, “If we can’t bring them into the store, then go to the house and sell to them.”
This move allowed SM to further increase sales without hiring more people and spending on commercial space — meaning, not having to build another mall.
Looking back now, this move makes sense. Instead of waiting for customers to go to their stores, SM can now sell to people who prefer the convenience of shopping online. Plus, if you factor in the worsening traffic condition in the city, it’s a great strategic move.
But 5 years ago, this was controversial news. Most businesses think that opening up new revenue streams will eat up their current one. While that may be true to some extent, that is not the case the majority of the time.
In fact, that’s what publishers have long said about the book industry.
Clothing retailers have long dreaded selling online. They wrongly think, as others, that this will eat up their current revenue streams. If you look at the US market, a lot of clothing retailers have closed down. This phenomenon has been dubbed as the retail apocalypse. But studies have shown that this demise is more a reflection of that particular retailer than reflecting the industry overall.
And this makes a lot of sense.
Oftentimes, companies who have established a presence and a safe market share become complacent. They fail to innovate. That’s why when new players enter the industry with something simple that every customer has already been asking/expecting, and the big players don’t provide it, they cry foul.
And in the Philippines, one of the earliest challenges faced by eCommerce merchants is the payment options. If you wanted to sell online a few years ago, the easiest would have been using PayPal. The problem was there are still a lot of Filipinos who don’t have a bank account, much more a credit card.
According to the latest research, only an estimated 22.5% of Filipinos have bank accounts. Then some estimates that those who have credit cards range only from 5-10% of the population.
That’s why offering COD or cash-on-delivery opened up a separate revenue stream for eCommerce merchants.
Again, looking back, these moves might look trivial. But a few years ago, these things were all expected by consumers but weren’t provided by businesses. But now, offering online purchases and multiple payment options have become the norm.
These are just some examples of how you can create new revenue streams easily. You just have to know your current situation, your industry, and connecting the two dots together would be easy. If you need help in that, don’t hesitate to let reach out and let me know.
The main takeaway is to focus on delivering value to your customers.
Grow Your Revenues By Focusing on Existing Customers
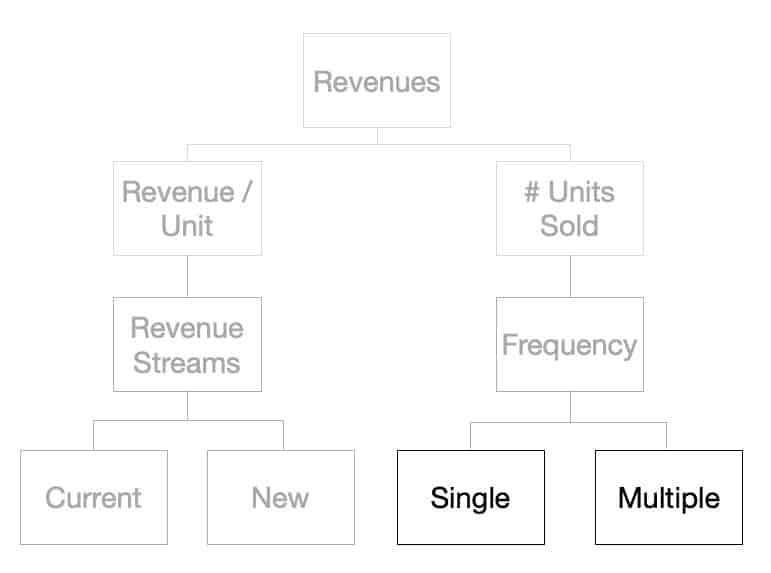
Now, let’s take a look at the right side of the graphic — the number of units sold.
If looking at revenue streams is the primary factor has an effect on your price, the one that affects the number of units sold is frequency.
Frequency is defined as the number of times a person purchases from you. Here are some names you are most probably familiar with:
Once or multiple times
One-off payments or recurring payments
Single purchase or repeat purchases
Stop Looking for New Customers
This is one of the things I am most baffled about. Statistics show over and over again that it is easier to sell to an existing customer than to a new customer. In fact, the probability of selling to an existing customer is 60-70%, while the probability of selling to a new prospect is 5-20%.
However, the behaviors of businesses — its salespeople and decision-makers — constantly look for MORE customers. They forget about their existing customers. And this is reflected by poor onboarding/retention processes of businesses and the lack of metrics against retaining them (vs the obsession on customer acquisition).
Think about this for a second.
How many times have you made repeated purchases? Which providers or businesses? And most importantly, why do you keep buying from them?
Your hairstylist/barber
Uber / Grab
Ecommerce — Lazada, Shoppee, Amazon
Of course, this does not hold true for everyone.
But for the majority of us, and most of the time, we repeatedly use them (and pay for it) because of the value that we get out of it. They are familiar and deliver exactly what we are looking for.
I have been going to the same barber for 7+ years now. I also use Uber/Grab because I don’t need to have cash with me (something that I find valuable because I hate queuing in ATMs) and I get a pretty much consistent experience throughout (greeting and confirmation when I get in, asks for destination, doesn’t complain, uses Waze for directions, and just drive). It’s just so much easier.
Yes, there’s an argument for acquiring new customers. But oftentimes, businesses neglect their existing ones. If you have a great retention rate, and continually increasing your average order value, then, by all means, focus on customer acquisition.
But if your business is only selling one-off purchases, especially if your products/services is something that is meant to be used/re-used again, then there’s something wrong.
Conclusion
Every business wants to grow its revenues. I’m sure you do. And knowing what makes up revenues (price and quantity) will help you know where to focus on.
Low-hanging fruits are opening up new revenues streams, like using another distribution channel and allowing new payment methods and increasing your repeat purchases.
In other words, focus on your customers.
Stop looking at your competitors. Don’t get distracted by internal issues. Stop worrying about whether this new strategy will work or not. Go out and engage with your customers. Continue adding value to their lives. Listen to what they say that way you can provide the best experience for them. You don’t necessarily have to apply them all, but at least, it will give you insights that you never would have if you don’t ask and listen.
Here’s a quick homework for you:
Peter Drucker once said, “What you cannot measure you cannot manage.”
I’ll leave you with something to think about…
To increase the price — create new revenue streams
How much of your sales should come from existing customers?
What about those from new customers?
Are there other markets (location or groups) that your current payment methods are alienating?
To increase quantity — increase frequency
Do you have a metric for customer retention and / or churn?
Do you have dedicated account managers that help your customers find value in your products/services?
How much value should they contribute to up-sell / cross-sell business?
Again, I’d love to hear your thoughts on this. And I do hope you find this valuable. Feel free to reach out if you want to discuss this further.
Writing is something I have incorporated into my daily habit this 2020. I committed myself to a 30-day challenge where I’ll write anything about the four core topics I’m passionate about.
But long before this challenge, I was already writing a lot. I did this for an events company I put up before, then into my first marketing role, and the next, and the next.
It’s actually one of the reasons why I also created this website a couple of years ago. I wanted an outlet to share what’s on my mind, my experiences, and the lessons I’ve learned.
It wasn’t until recently where I’ve taken writing seriously.
And by writing, I’m not talking about articles. I’m talking about content in general. For me, everything starts out in written form — outlines, articles, copy for social media, scripts for videos. Then, once the writing process is done, it undergoes a transformation. That piece of content is then used and repurposed into various types of content and distributed to multiple channels. But I’m getting ahead of myself.
Table of Contents Click on any of these to jump straight to that topic
In late 2018, I was searching for an app that can help me with my writing.
How can I store all the ideas in my head?
What’s the one app or software where I can add all the stuff I am planning to write and have written?
Can it support a custom workflow?
Will it be able to accommodate my particular situation — I have my own projects, write for my own website, and brainstorm other ventures; I also have various clients that I do the same thing.
All these questions start popping into my head.
After some initial research and reading a couple of reviews, I decided on Ulysses. To be honest, the main reason it’s the one I used is It’s one of the apps that had a free trial that offers the full version.
Fast-forward to today, here’s how much I’ve written:
182,500 words
16,160 sentences
10,961 paragraphs
1,033 pages
Over 180,000 words — that’s two whole books!
Using Ulysses to Publish to My WordPress Website
The main reason I was looking for an app to help me with writing is so I can have a place to organize my thoughts, edit-on-the-go, and most importantly, do all these offline.
Before, when I want to write an article, I have to do it on the WordPress editor. That limits me in my ability to take my work anywhere. I have to be online.
But Ulysses was able to solve this problem for me. I can write whenever and wherever I am. And everything syncs seamlessly. For example, I start an outline on my iPhone while waiting in line. Then, when I sit down and open up my laptop, I can continue where I left off.
And finally, when I’m done with the article, I can publish it directly from Ulysses.
I don’t have to go to WordPress and upload all my photos and format everything again. I just set the connection once, and everything just works.
For every post, it gives me the ability to do the following:
Set my title
Set the date — to be published now or scheduled for later
Set the status — public or private
Add the appropriate categories and tags
Add a featured image
Change the URL slug
And many more
For a short while, following the setup process from Ulysses was easy. But after a while, that’s when issues start to creep up.
Your Website Evolves, So Must Your Tools
In a span of a year, I had revamped my entire tech stack. I updated my theme, upgraded WordPress, installed/uninstalled/deleted several plugins.
This is normal. As time goes by, you have to ensure that you’re using the tools that you need, and removing those that you don’t.
But that’s when hell broke loose.
My seamless publishing from Ulysses to WordPress broke. I kept getting various errors. I tried reaching out to Ulysses, WordPress, and my web host directly. But none of them was able to get things back to normal.
The error, according to Ulysses, is about the XMLRPC endpoint being blocked. It’s actually a known issue and Ulysses has a somehow useful knowledge base article about it.
So, I reached out to WordPress. They checked on their end and everything is working. They know so because Jetpack is working properly.
The last place I can look at is my web host, InMotion Hosting. They confirmed limiting the connections to the XMLRPC endpoint because I am on a shared server. If I want to modify it, I have to purchase/upgrade to a dedicated server. In other words, I have to pay more to get this to work.
But it doesn’t make sense.
I was able to use it before without any issues. So, I don’t think that’s the case here. Surely, some workaround is out there.
While all of them have been nice and tried helping me, none of them could make it work. I had to take matters to my own hands.
Enter, Google.
After reading a few dozen articles, going through several forum/community pages, I found the answer.
Resolving the Connection Refused Error in Ulysses Preventing You from Publishing to WordPress
The main error is about the XMLRPC connection being blocked by WordPress. To overcome that, you need to install a plugin that would act as a proxy to the requests. Sounds too complicated? Don’t worry.
Here’s a step-by-step instructions to get Ulysses to publish directly on your WordPress site. It involves two phases and a little bit of courage. You will install one plugin and modify some code.
Let’s get started.
Phase 1: Backup and Preparation
The first thing you need to do is make a backup of your website. Whatever you do, no matter how big or small the changes you are planning to make, it’s a great idea to backup your website.
Done?
Step 1: Login to your FTP or Cpanel
Next, you need to do is login to your cpanel account or FTP. If this is all unfamiliar to you, I suggest taking time to research more about it.
Usually, you can login to your cpanel by entering your domain.com/cpanel. Just replace it with your domain.
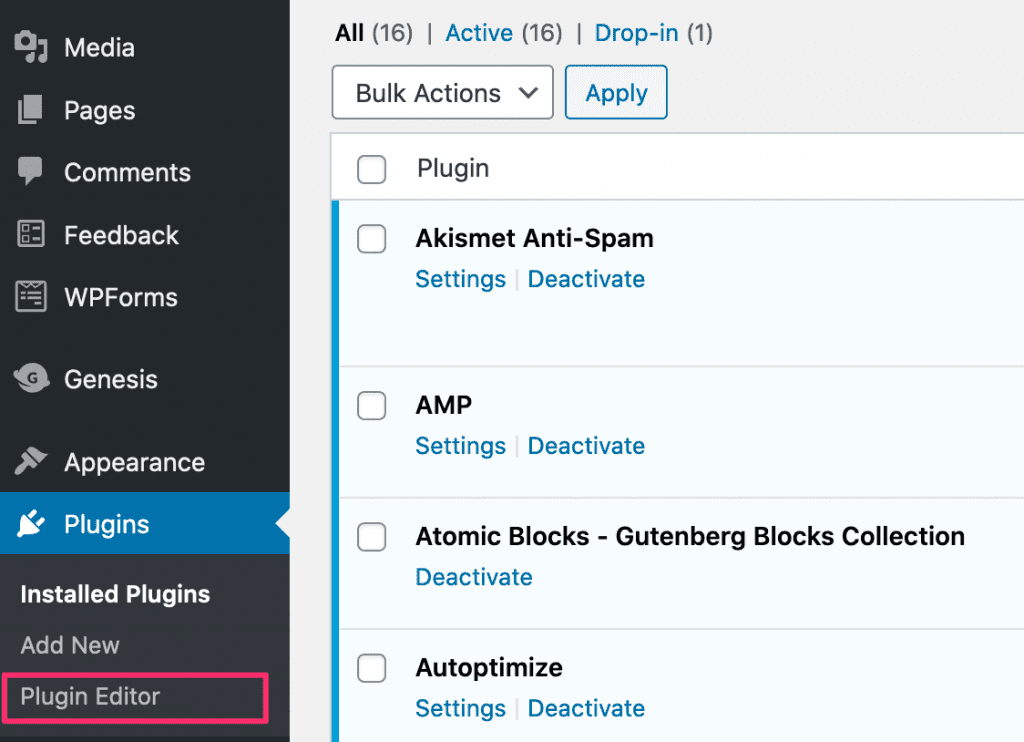
Step 2: Locate your XMLRPC.PHP file
Once you’re in, find your xmlrpc.php file. If you’re using an FTP, you should be able to see it immediately. But if you’re using the file manager in your cpanel, it should be located at the “public_html” folder of your account.
Now, download a copy of the file just in case something goes wrong.
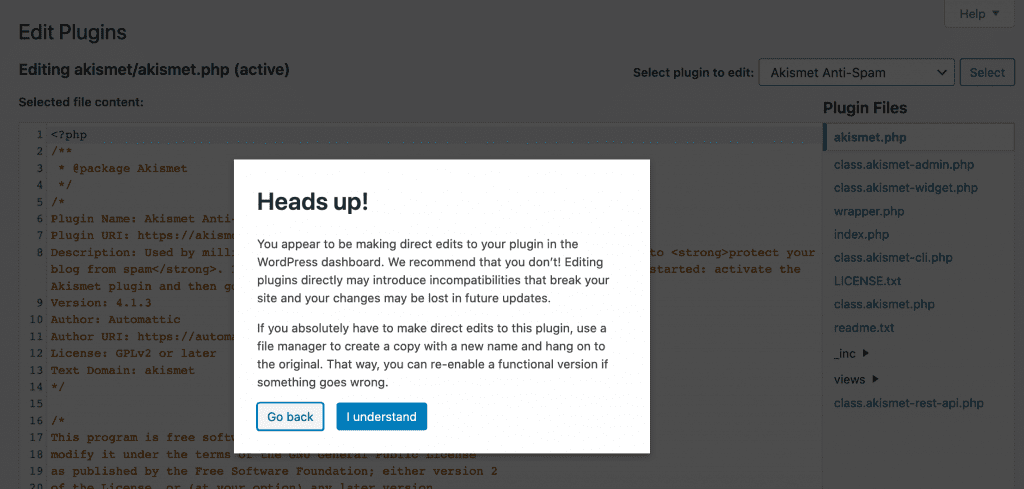
Step 3: Rename it to whatever you like
After downloading a copy of your xmlrpc.php file, rename the original file on your site to whatever you want.
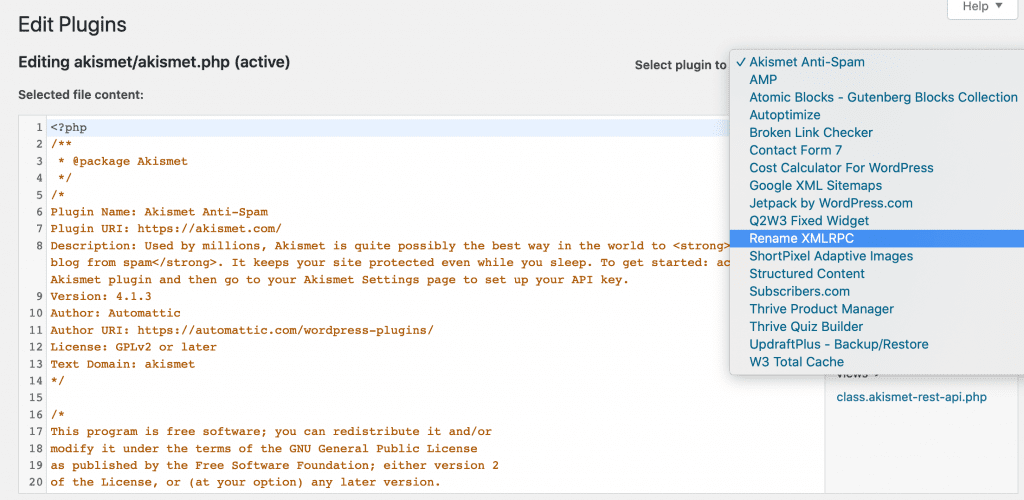
For example, you can change the xmlrpc.php to something like this:
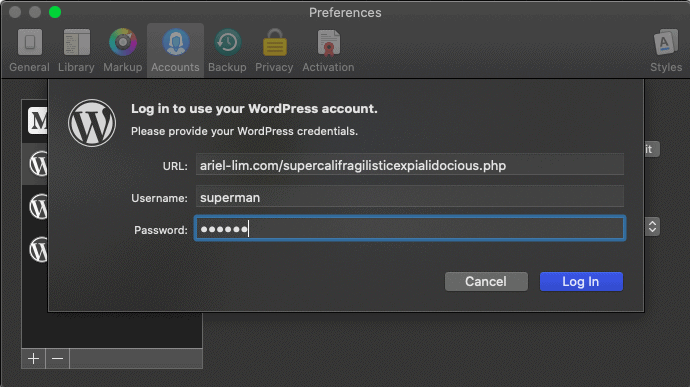
supercalifragilisticexpialidocious.php
im_awesome_and_i_know_it.php
Then, take note of this name. You will need it in the next phase.
Phase 2: Installation and Activation
There are various ways you can proceed here. But the easiest is to login to your WordPress account.
Now, it’s time to test if Ulysses is working properly.
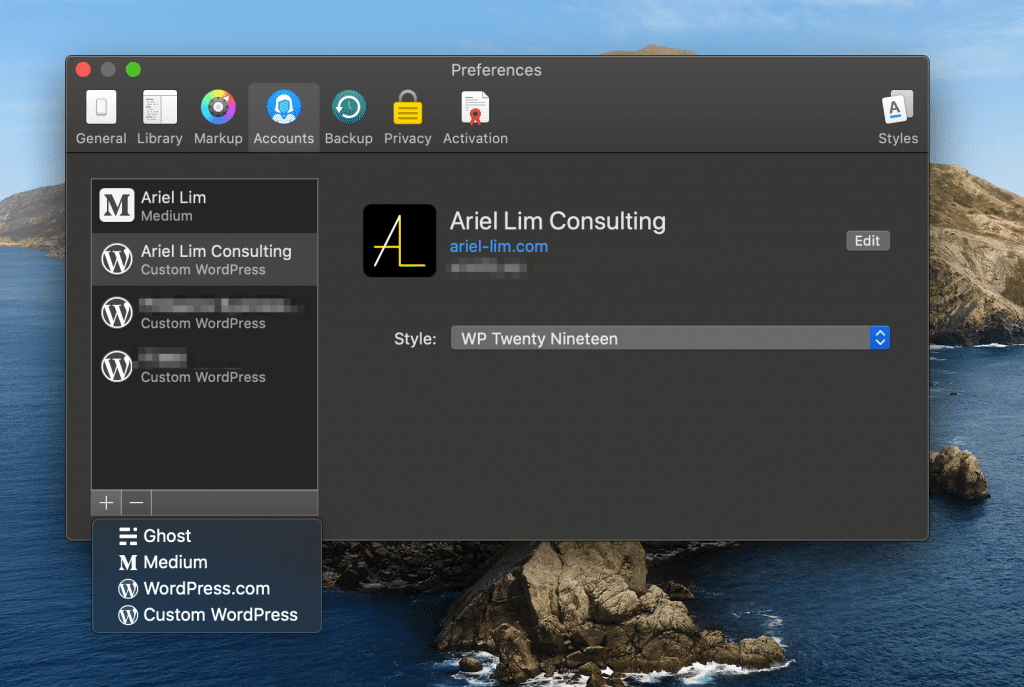
Head on over to your Ulysses account and delete the existing connection, if there’s one. Then, add a new custom WordPress site.
Now, here’s the important part.
When setting the URL, append the renamed file at the end so it looks something like this…
You should now have a working Ulysses-WordPress connection.
And as proof of that, this article was posted using Ulysses straight to this website.
Were you also facing this issue with Ulysses and WordPress? I hope this helped you with that issue.
Side note: After implementing this, my WordPress iOS apps have partially stopped working. I’m coordinating with WordPress about this but haven’t reached a resolution yet. What’s happening is that half of my site stats are updating (weird), and my posts and pages aren’t syncing.
[Update 16 Jan 2020] WordPress support says my site has to use the default xmlrpc in order to get JetPack stats to work.
[Update 20 Jan 2020] My WordPress app is working after logging out of JetPack. I then added my custom WordPress URL using the same convention as in Ulysses (ariel-lim.com/supercali…php) then used my username and password. No errors. Syncing properly. Just no JetPack stats. JetPack still works on the browser though. I guess this is the tradeoff.
Search engine optimization or SEO is the process of making your website rank higher on search engines. There’s a lot of technicality involved in SEO like crawlers and indexing and many more. But that’s not the point of this article.
I’m going to write about two main aspects of search engine optimization: on-page and off-page. Together, they cover different ranking factors that search engines use to determine which websites show up at which positions when you type in a particular query.
No one really knows what these ranking factors are except for a few that search engines like Google disclose themselves. One of the most popular theories is that there are over 200 ranking factors that is being used by Google today. But it’s also being changed daily.
Table of Contents Click on any of these to jump straight to that topic
How to Win in Search Engine Optimization for 2020 and Beyond
There are a lot of experts and veterans in this field. I won’t claim I know everything about this. But there’s one thing I do know more than them.
I know how you can future proof your website from any of these changes even without knowing what to do. What I mean future proof by that is making sure that you don’t get affected by the changes drastically in the future. That way, whatever investments you make now will not be put to waste tomorrow.
Put your customers first.
That’s a very simple, yet very profound sentence in the world of SEO and digital marketing.
Why is this important? Let’s go through a little bit of SEO history first.
Brief History of SEO
The history of SEO goes way back to the 90s. But I’m not going to bore you with the details. HubSpot and Search Engine Journal both provide a detailed history of search engines.
One thing I’d like to highlight though is that the early beginnings of SEO, you can rank well by simply repeating your keywords enough times throughout your pages. Today, this has been widely eradicated, but sometimes people still do them.
The main reason for that is you can rank a page about topic ABC which has a low search volume, but stuff it with keywords about topic XYZ which has a high search volume. In this case, what ended up happening is you get people to see your websites about topic ABC despite them searching for XYZ.
As you can see, this is very frustrating as a user.
Today, this rarely happens anymore thanks for the algorithms used by search engines like Google and Bing. We’ve now entered another era of search engine optimization where its users are the main focus.
The War on Fake News
Fake news has been a problem long before the internet. Rumors and spreading gossips is one other way to look at this.
But the internet has made this even more problematic.
One of the hottest topics in the last decade is the Facebook-Cambridge Analytica data scandal. While not necessarily fake news, it was a widely talked about topic because “personal data of millions of people’s Facebook profiles without their consent and used it for political advertising purposes.”
It’s been said that this data has been used to intentionally sway voters.
This led Facebook (and other big tech companies) to be in scrutiny by the government and the public.
Thus, the war on fake news exploded on the internet.
And this brings us back to how you can future proof your business via SEO — focus on your users by giving them more value, instead of using hype or false advertisements to mislead them. Following this basic rule will help you to make decisions about whether to use a particular strategy or not.
Two Components of Search Engine Optimization (SEO)
If you really want to learn more about the details of SEO, there are two separate components you need to know. These two work together to provide you an idea of how you can best approach optimization your website.
They are on-page ranking factors and off-page ranking factors. The main difference between the two is whether you have direct control over it or not.
As mentioned earlier, there are hundreds of ranking factors for both on-page and off-page. And I’m not going to cover that. Some of it are technical which you don’t need to know.
I’ll just highlight a few basic ones that you need to know so you can get started with search engine optimization the right way.
On-Page Ranking Factors
On-page ranking factors, or search signals, are optimization techniques you have direct control of.
While it has nothing to do with the contents of your website, your domain is the first place Google looks at when it comes to ranking your website. And this is also the reason why I always tell people to start a website right now.
On-page SEO is all about following the rules set by search engines like Google. If you want to rank well, you have to play by their rules. That is why keyword stuffing (the one I mentioned earlier) doesn’t work anymore — and is actually penalized.
There are a lot of things that cover the on-page SEO factors so I’ll just highlight the top 5 you need to do.
Oh, and this shouldn’t come as a surprise anymore — the main theme is to focus on your users and provide them the best experience possible.
In a Google Webmaster video, Maile Ohye, states that “2 seconds is the threshold for e-commerce website acceptability. At Google, we aim for under a half second.”
And this was already a decade ago. 2010.
Before going moving ahead, test out our website speed right now. Head on over to Google PageSpeed Insights and enter your URL.
What’s your score?
If you are like most websites, you’d probably be in the yellow or red zones. Meaning — you have a slow website.
Taking your time to improve website speed gives your users a better experience. After all, if your page doesn’t load, they can’t see it. If they can’t see it, what’s the point of you being online?
Compress your images
The biggest culprit found for slow websites is its images. The solution? Compress them.
There are lots of tools out there like like TinyPNG. But my favorite tool and the one I’m using right now on my website is ShortPixel.
You can use ShortPixel as a plugin on your WordPress website to make image compression done automatically. But you can use their image compressor manually if you want to try them out first.
When you get there, you will be asked to choose from different compression levels. I use the lossy setting. Feel free to experiment on which one is best for your website.
The point is this — make your images smaller so they load faster.
Feel free to create an account on ShortPixel. Use this link so you can get an extra 100 images that you can use to optimize your website. The free account only gives you credits for 100 images/month.
Reduce plugin/third party application usage
If you’ve tested your website speed via Google PageSpeed Insights, one of the items there that might probably show up on yours is to minimize third-party usage, keep request counts low, or eliminate render-blocking resources.
You don’t have to understand what those mean right now. But the most likely culprit is you are using too many tools on your website.
While you may always have used those tools in the past, consider removing them because they may just be there to make your website look pretty; thus, making it load slowly.
Without content, you will never rank on search engines. Let’s go back to the main purpose people search the internet — to find answers to their problems.
If you don’t create content, how will they find you?
Here are a few things to keep in mind.
Cover the topic well enough
Covering a particular topic well is very important if you want to rank on search engines. It’s a bit ambiguous, sure. But it’s difficult to quantify what it really means.
There’s another way to look at this though — word count. Generally, the longer your content is, the higher its chances for ranking.
The most popular research that made long-form content popular is by Backlinkto. Here’s what it has to say:
Based on SERP data from SEMrush, we found that longer content tends to rank higher in Google’s search results. The average Google first page result contains 1,890 words.
How is that? Because long-form content, at an average of 1900 words, you most probably covered the topic well enough. Meaning, you provided users some value on your content.
By now, you sped up your website and started creating content. Great.
Now, it’s time to focus on user experience. Some questions to ask yourself are the following:
Is it easy to find what I’m looking for?
Are there too many ads or popups preventing me from reading what I want to read?
Can I quickly access common pages
About
Contact
Services/Products
Are the articles/content easy to read?
These are just some questions to get started. By focusing on the user, you will know which add value to them and which don’t.
Linking
Covering a topic means you need to reference certain terms/phrases, or even some research backing up statistics or statements.
Now, you don’t want to write content about them in the same article because while it may make your word count higher, it will not be relevant to the user anymore.
For example, this article is about SEO. In the previous section, I mentioned about the study by Backlinkto. If I explained what the study is, their approach, and all their findings, this entire article becomes too long and too technical. And that’s not what I want. Plus, it has already been covered by them extensively.
What did I do?
I just linked to them. That way, in case you wanted to learn more about the study, you can do so by clicking on the link. That’s an example of an external link — a link outside your own domain.
You probably also noticed that I added links in some sections to my own articles. That’s called internal linking. There are specific strategies you can do about internal linking, but the only thing you need to remember right now is to add links wherever they are relevant and can provide additional value.
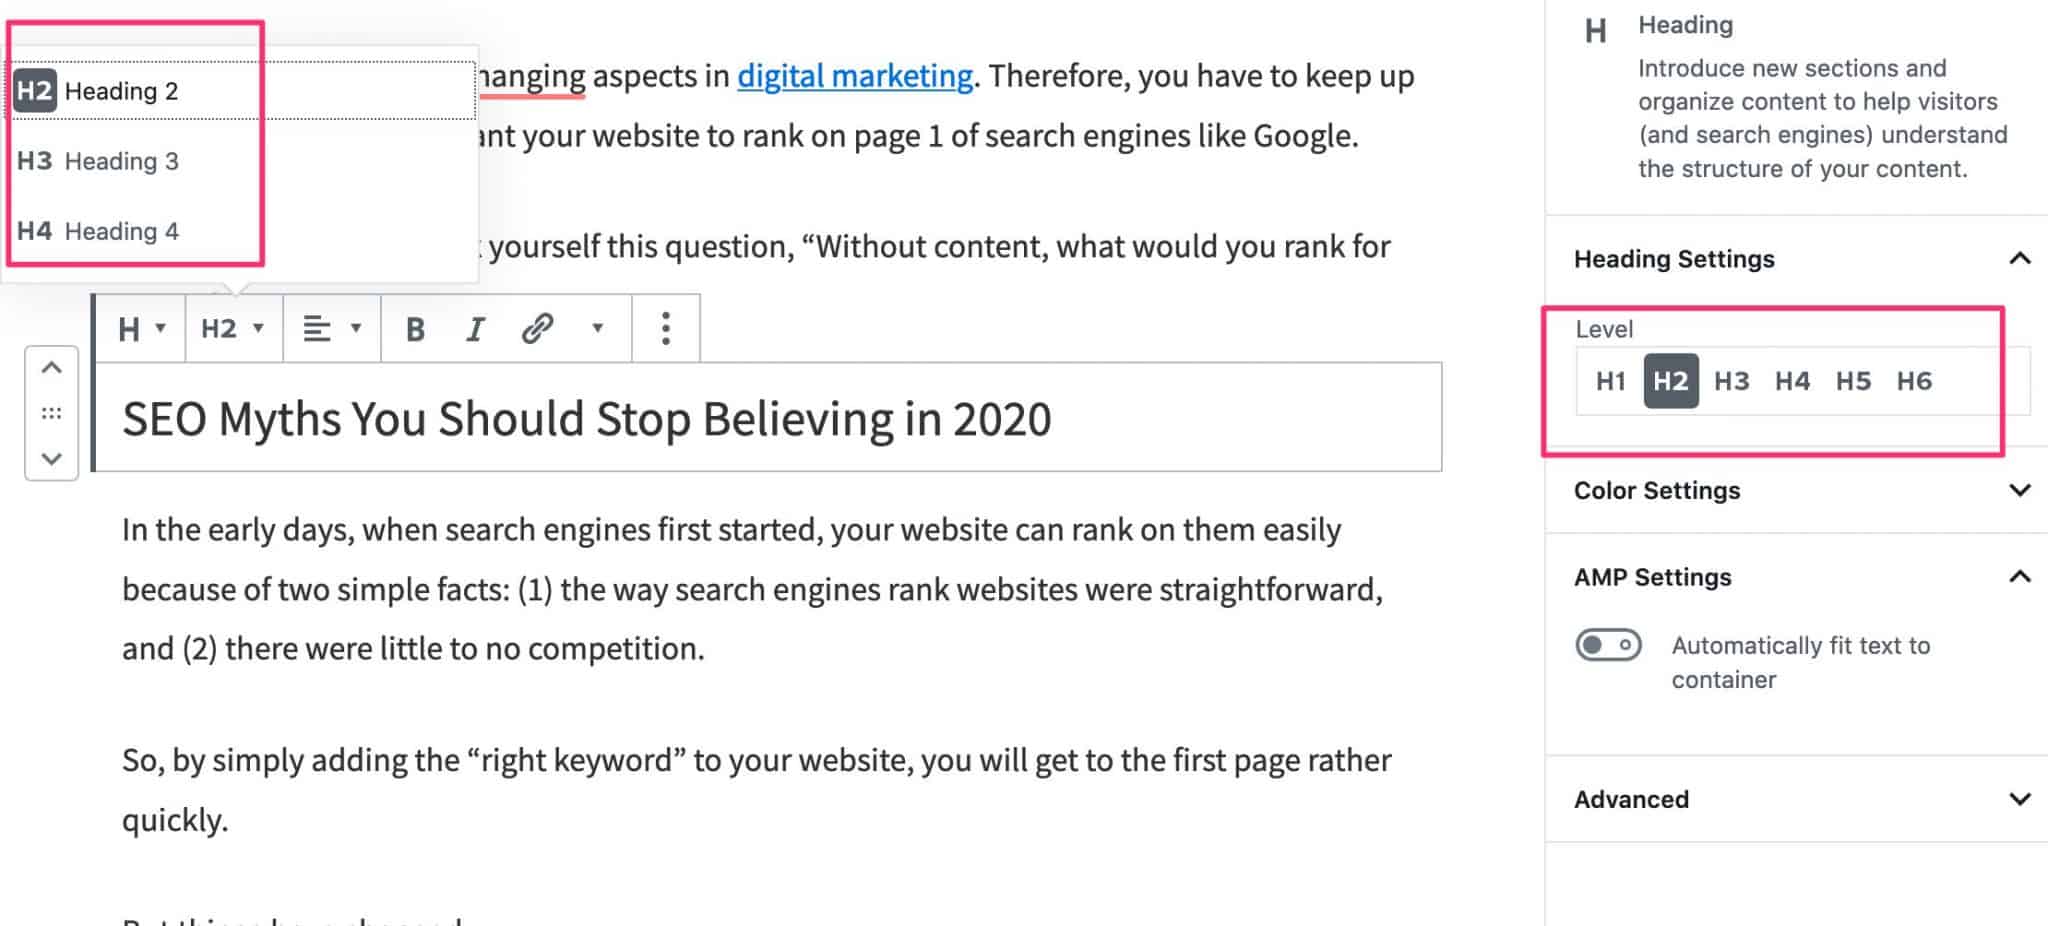
Use of header tags
Have you noticed the different sections I have on this post? Some are bigger, while some are smaller.
I didn’t adjust their font sizes. Those are the use of header tags. If your website is built properly, you can simply assign those tags and it will display properly. Here’s what it looks like for WordPress.
More formatting tips
Another way you can make it easier for your readers to read your content is to use formatting options like the following:
Bullet lists
Numbered lists
Bold text
See what I did there?
It makes it easier to read and understand what you want to highlight. Adding those formatting breaks the monotony of words. And of course, images help too. Together, these make your content more user-friendly.
4. Mobile-first
When was the last time you used your mobile phone to search something on the internet? Truth is, our phones have become so powerful that we use them more often than our computers.
According to Statista, 64% of Google searches are done via mobile devices. So it’s only logical that search engines prioritize ranking website that are mobile-friendly.
Now, remember our website speed test? Here’s another fact — A study by Google says that 53% of mobile site visits will leave a page that takes longer than three seconds to load.
What that means is even if your website is mobile-friendly, if it takes longer than 3 seconds to load, more than half of visitors will abandon your page. And guess where they are going?
To your competitors.
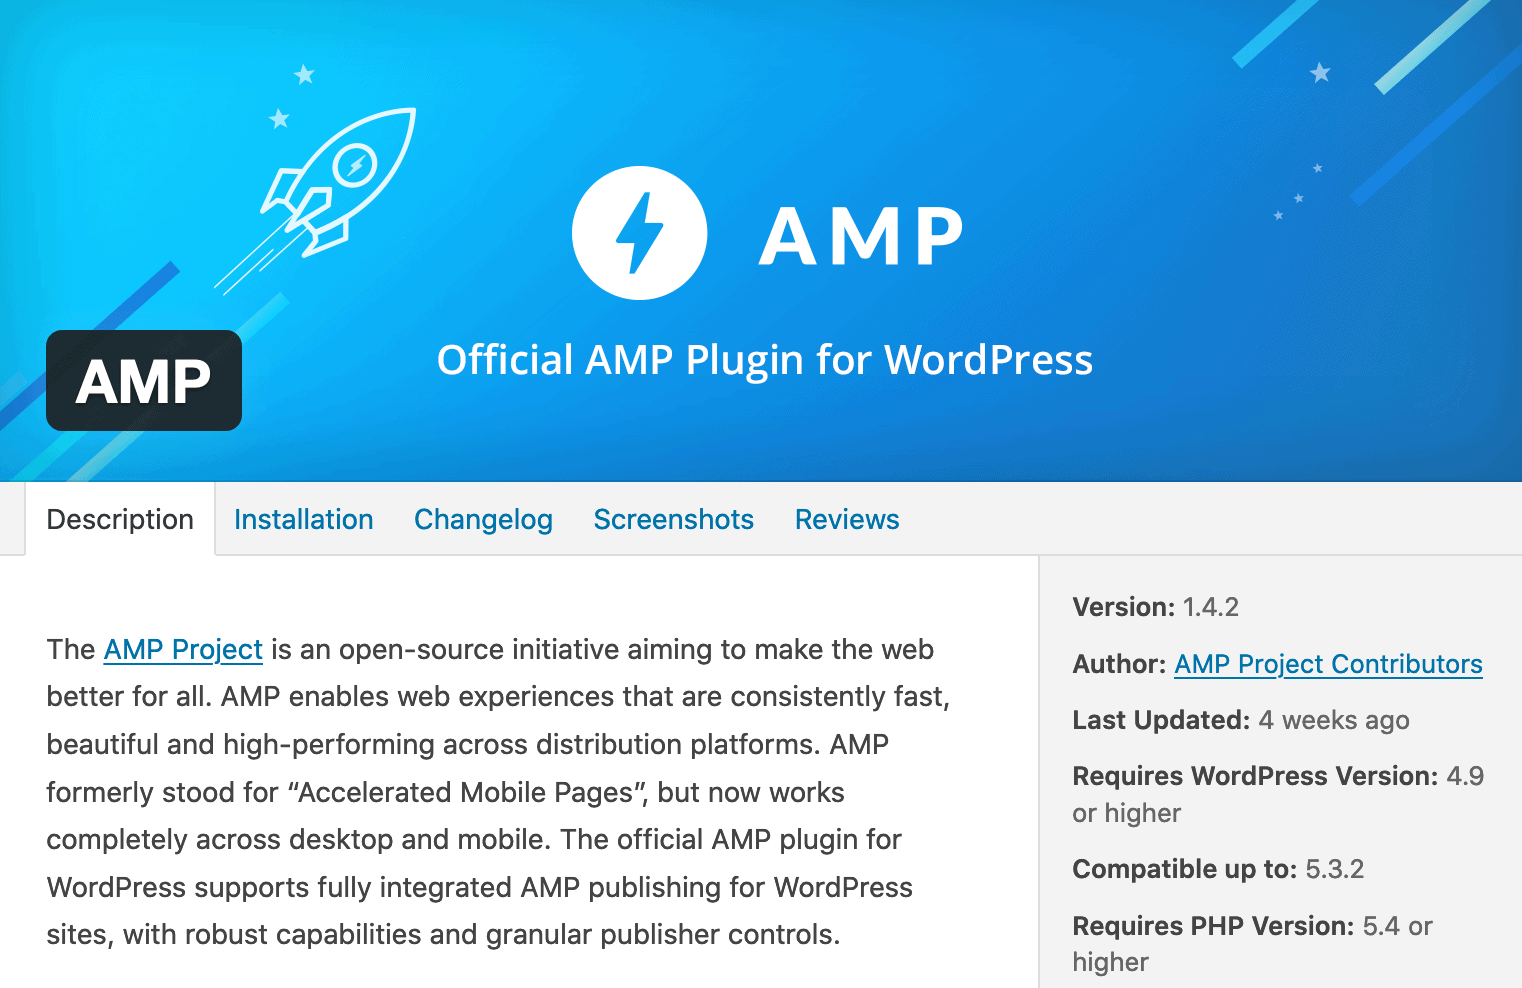
Consider using AMP
I shared earlier how I achieved 90s score on both mobile and desktop on website speed tests. You can certainly follow that especially if you are using WordPress.
Another way you can easily speed up your website is by using AMP pages. It’s a technology developed by Google to “provide a user-first format for web content.”
You can see this when you search on Google via mobile.
If you noticed, there’s a lightning symbol that indicates which are AMP pages. Click on them and the page immediately loads.
If you have a slow website, especially on mobile, consider implementing AMP pages to get quick results while you plan or redesign your entire website.
I am using WordPress. So, I just installed the AMP plugin, configured my posts to be available fo AMP, and I’m done.
For example, if you search for the “stages of awareness” on Google, one of my articles will show up with the AMP lightning icon.
5. Schema
This is the last and probably important thing you need to think about implementing this year — schema markups or structured data.
There are different types of schemas and the easiest way to understand what they are and how useful it is for your website is through examples.
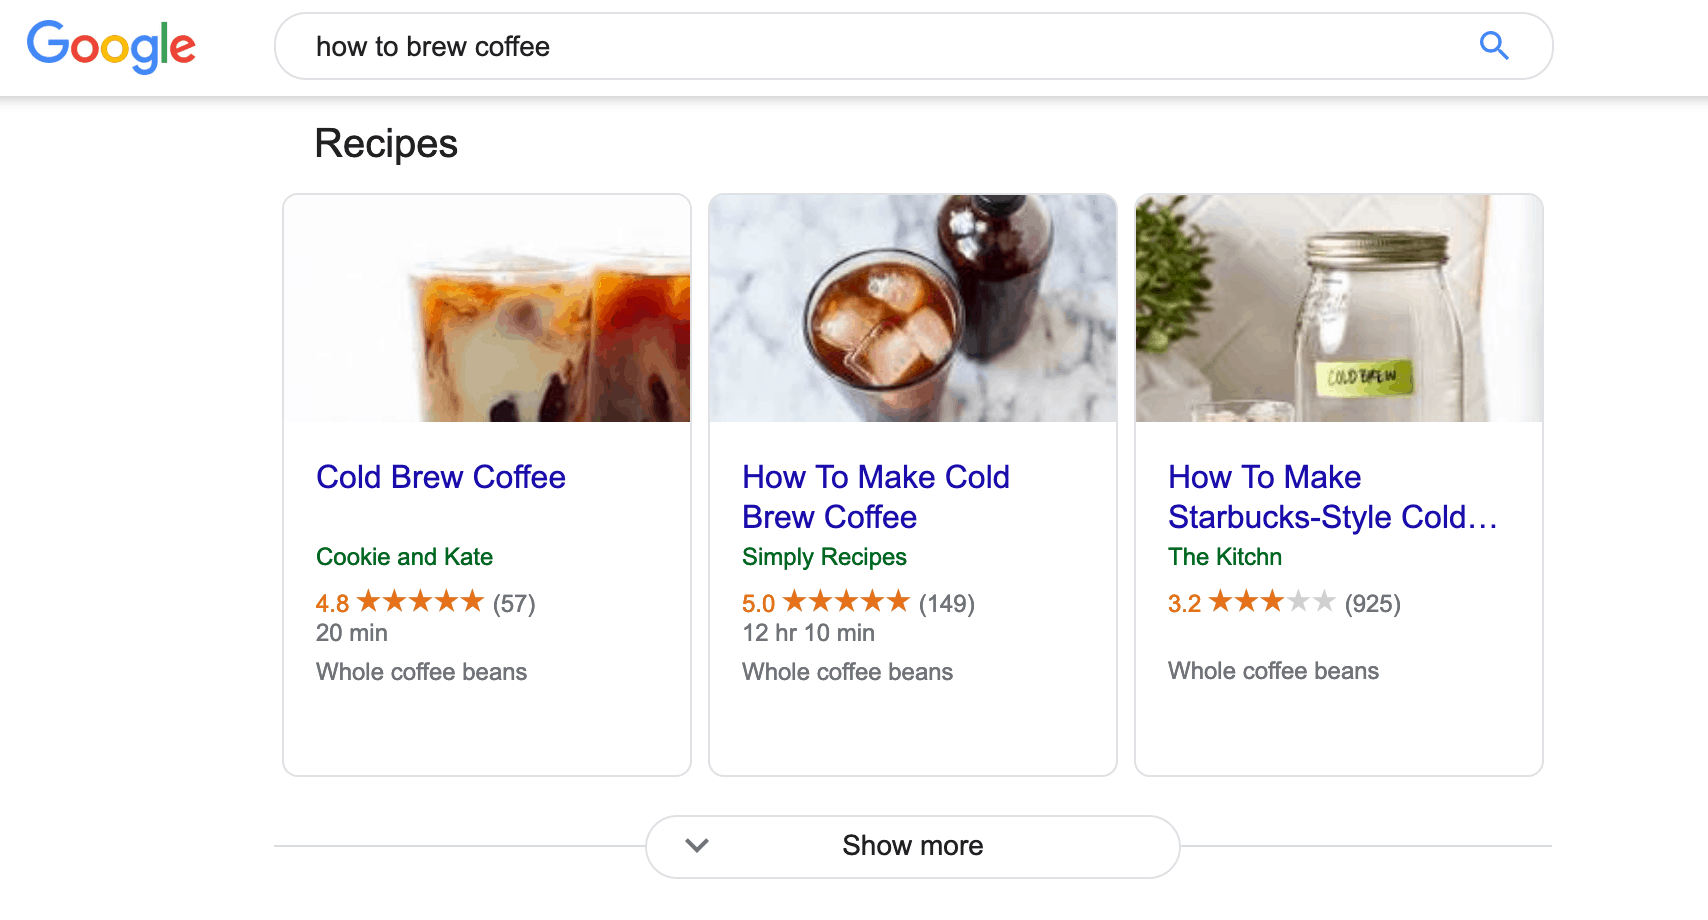
Let’s say you are browsing for instructions or recipes. You will notice that there are some results that show up that looks like this…
Or say you wanted to catch up on the latest news.
This is the biggest trending topic right now is currently happening in my home country.
And a little bit of self-promotion on one of the articles where I have implemented the FAQ Schema.
All these are examples of websites using schema.
As you can see, adding schemas or structured data to your posts will help you rank more on search engines primarily because of two things:
Most websites aren’t using them yet. So, with that logic, if you are using it, your chances for ranking are higher
You gain a bigger search engine real estate. What this simply means is you occupy a big portion of the search engine results page that you have a higher chance of people seeing you and clicking on your website
Combining all these on-page ranking factors will help you show up on search engines. Focus on giving your users the best experience and Google will reward you. And that involves you making these changes:
Make your website load faster
Create helpful and valuable content
That can be read easily
Even on mobile devices
Off-Page Ranking Factors
The second category of SEO is off-page ranking factors. These are things you don’t have direct control over.
Here’s a simple way to look at off-page SEO.
If you think about it, Google’s algorithm was essentially about “if people are talking about you, you must be important.”
What that means is when people are writing about you, in this case, linking to your content, it sends a signal to search engines that your content must be valuable. Therefore, they put it up on their results pages.
The technical term for this are backlinks — links going from one website to your own website.
According to Moz, there are three main types of links, defined by how they were earned: natural links, manually built links, or self-created links.
Natural links are editorially given without any action on the part of a page owner. For example, a food blogger adding a link to a post that points toward their favorite produce farms is a natural link.
Manually built links are acquired through deliberate link-building activities. This includes things like getting customers to link to your website or asking influencers to share your content.
Self-created links are created by practices such as adding a backlink in an online directory, forum, blog comment signature, or a press release with optimized anchor text. Some self-created link building tactics tend toward black hat SEO and are frowned upon by search engines, so tread lightly here.
Now, now all links are created equal. There are domain authority, page authority, anchor text, etc. you have to look into when it comes to backlinks. But I digress. All these are great resources for you to learn about off-page SEO:
Since you don’t have direct control over this so it’s best if you focus on creating high quality content.
Sure, you may invest in the self-created links, but that will only give you so much. The next option you might take is reaching out to people through link-building activities. But in order for you to do that, you need to create high-quality content.
2. Foolish to think you can rank without content
This brings me back to the biggest problem I see most website owners have when it comes to ranking on Google.
They think they can rank on Google by optimizing their website and not create content. By optimizing here I meant adding keywords and other technical stuff.
Sure, that may work. But most likely, it wouldn’t.
One way to look at on-page and off-page ranking factors is the Pareto principle:
20% comes from on-page optimizations,
While 80% comes from off-page.
What this means is links from high authority sites carries more weight when it comes to ranking on search engines. If you have other websites linking back to yours, it sends a signal that what your website contains is valuable.
That’s why link-building outreaches have become popular.
But if the only content you have is your homepage, about page, and contact us, how valuable do you think that is for people who don’t know anything about you? What value would other websites get if they don’t even know what you offer or what you do?
Getting a high authority website to link to you means you have created content that is outstanding enough for them to mention you on their website.
And if you think about it, that actually makes sense. If it’s easy to rank on Google, most websites would already be there. But it’s not.
So, at the end of the day, focus on creating high quality content by putting your users first. Then, when you finally have something worthy, that’s when you spend time building links.
3. Distributing your content
One other thing.
Remember the self-created links? You can do that by distributing your content via different channels.
Social media is probably the first one on your list. And that’s a good start. But there are other places you can do so as well.
Medium and LinkedIn articles are one of the most underutilized distribution channels you can use.
Conclusion
Search engine optimization is a complicated and mostly technical topic. It covers a lot of things from website speed, code, and link building. Also, search engine algorithms change all the time.
The only way to make sure your investments in SEO don’t go to waste is to put your customers first. Focus on creating value for them and you will continue to rank on Google and other search engines for a long time.
One of the primary functions of search engines like Google is to provide answers to users’ questions and problems. That’s why it’s important to create content that is helpful and valuable to them, rather than promote your products and services. And frankly, that’s the best way to future proof your business — by focusing on creating value for other people.
This is also the reason why Google loves fresh content. Fresh content doesn’t necessarily have to be new content. Rather, it can be and “old” content, but updated to reflect certain changes; therefore, making it relevant and useful.
And that’s what we’re going to be talking about in this article.
Let me ask you a question.
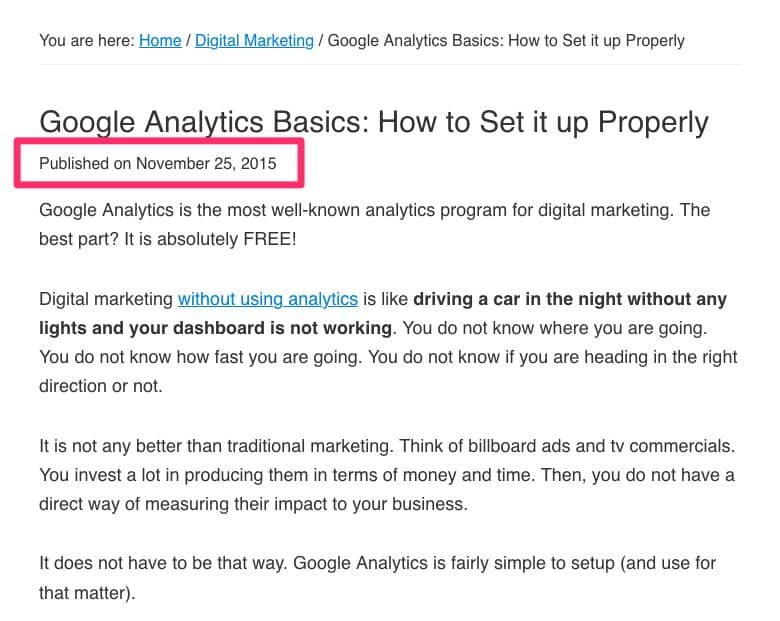
If you were looking for some resources about how you can install Google Analytics to your website and you came across this one I wrote. What comes to mind?
If I saw that, I’d probably take a look, but I’ll search for a more updated one. Because the contents of that page might not be relevant anymore. Depending on the topic, my leeway would probably be between six months to a year. If it’s older than that, unless it’s the only resource out there, I will probably not take it seriously.
And I believe it goes the same for you. You want something relevant and updated. You don’t want to spend your time reading and following some instructions only to find out later that it’s no longer applicable.
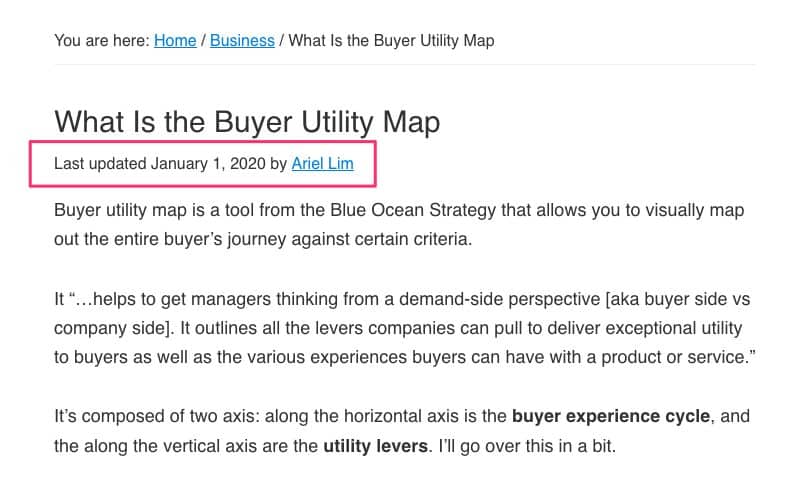
Now, what if you saw the same article and it looks like this…
Now, we’re talking.
Despite it being published a couple of years ago, you see that the date was recently updated.
If you’re using a WordPress website, whether you’re running on the Genesis Framework or another theme, then you can easily make this change yourself. You can do this using a plugin, but I’m biased towards not relying on them, especially if you want to speed up your website and get high 90s score on Google PageSpeed Insights for both mobile and desktop.
Preparatory Points
But before getting into it, I’d like to go through a couple of things.
First, you can simply remove the published date and only show the modified date. In fact, that’s what’s most of the resources out there. They simply tell you how to replace the published date with the modified date. If that’s what you want, there’s absolutely nothing wrong with that approach.
But that’s not what I’m going to here.
As you noticed in the examples above, the dates will be displayed depending on whether or not you actually updated the article. I also included a time element to it.
For example, I published an article on January 1, 2020. The article will display “Published on January 1, 2020.”
A year goes by and I haven’t updated the same article. It will still show the same thing. But if I edited it 6 months after, it will display both dates (or only the modified date which I’ll share below).
But there’s another problem here. Let’s say I noticed a typographical error the day after. I went in and edited the article. The modified date has changed. So, if I don’t include the time element, it will display it both. Again, there’s nothing wrong with that. It’s just weird.
Published on January 1, 2020 • Last Updated January 2, 20120.
Personally, I’d only want to display the modified date only if 30 days or so have passed.
Finally, make sure you make a backup of your site first. While this is relatively simple, a single mistake can make your site inaccessible.
Now that that’s out of the way, let’s dive right in.
How to Show Modified Date Instead of Published Date
There are two variations of this that I will show you.
First, as you saw in the example above, the published date and the modified/last updated date is displayed together.
The other option is to only show the modified/last updated date. Just like this one.
This is actually how it looks like on my website right now. This is option two below.
I’ll show you the code you need to add to your functions.php file for each, then I’ll explain parts of the code in case you want to modify it yourself.
First, login to your WordPress website. Go to Appearance then Theme Editor. Click on the functions.php file then scroll all the way down.
Where to Find the functions.php File on Your WordPress Website
Option 1: Display BOTH Original Published Date and Modified Date
Add this code at the bottom of your functions.php file if you want both the published date and modified date to appear on your posts.
You can edit the text you want by changing the “published on” and “last updated” to whichever you want. Hit save. Then check a post you recently updated but have been originally published a month ago.
Option 2: Display ONLY Modified Date
Add this code at the bottom of your functions.php file if you want only the modified date to appear on your posts.
Same as above, you can edit the text you want by changing the “published on” and “last updated” to whichever you want. Hit save. Then check a post you recently updated but have been originally published a month ago.
How the Code Works
The code is pretty simple to understand.
For option 1 — display both dates — here’s how to read the code:
Show original published date
If the updated date is greater than the original published date + 30, show last updated date.
For option 2 — display only modified date:
If the updated date is greater than the original published date + 30, show last updated date.
Else, show original published date
It’s that simple.
Over to You
By displaying the last modified date instead or together with the original published date, you show to your visitors (and Google) that you value them.
You avoid giving them a poor experience by showing them outdated content.
Did you find this helpful? Let me know in the comments below!