5 Google Analytics Settings for Accurate Data and Reporting

Basic Google Analytics Settings for Accurate Data and Reporting

Google Analytics (GA) is a very powerful analytics tool that can help you grow your business. It allows you to track your website traffic, as well as integrate with eCommerce purchases. GA allows you to analyze your users’ interaction on your website, tell you which pages are driving traffic, and let you see which channels are generating more conversions and revenues for your business.

Unfortunately, a lot of Google Analytics accounts aren’t configured properly. This results to bad data. And using bad data in your analysis can have negative consequences.

But don’t take my word for it. Data scientists all face this problem and it’s always the first thing they tackle—making sure the data you’re using is accurate.

So, let’s make sure the inputs you get from Google Analytics are accurate.

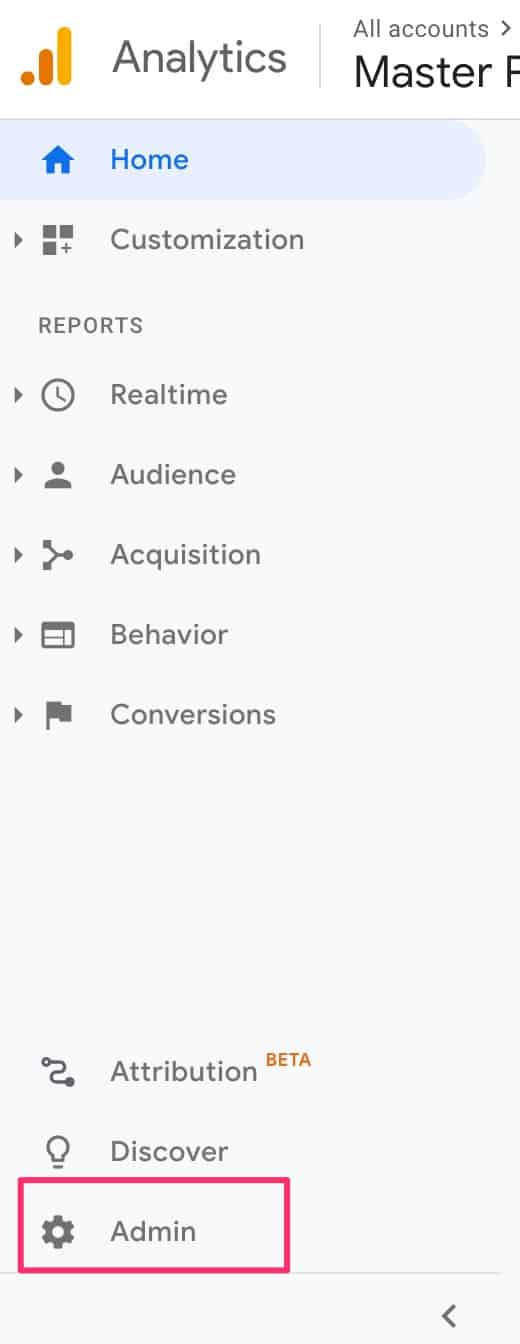
Start by logging in to your Google Analytics account. Then head on over to the admin section of your account.
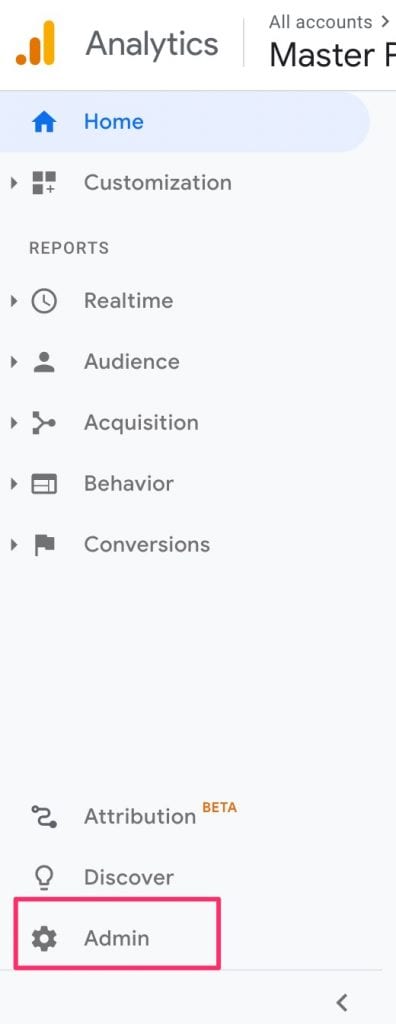
Google Analytics Admin Button

PS: If you don’t have a GA account, you can learn how to create and install Google Analytics on your website here.

Preparatory Points

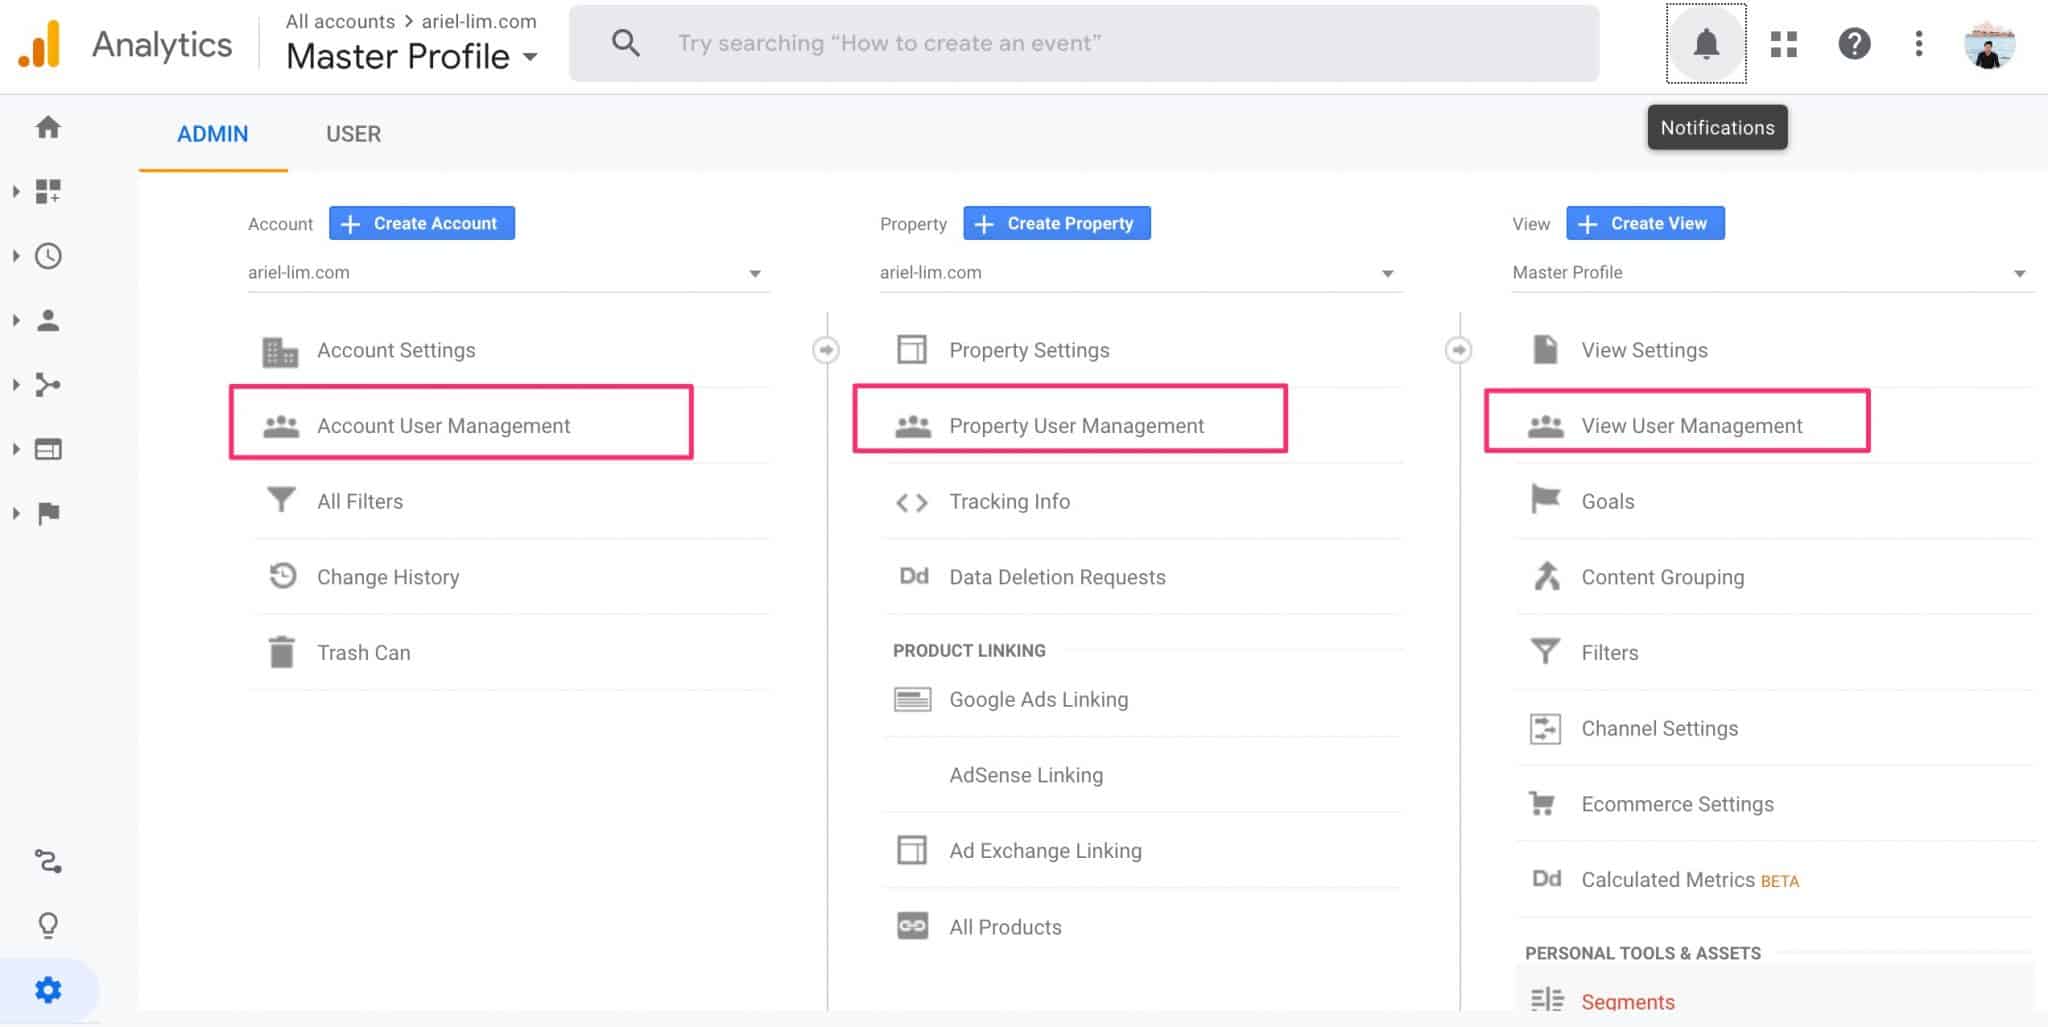
Once you get to the admin section, you will see a screen with three columns. Here’s a quick overview starting from the left:
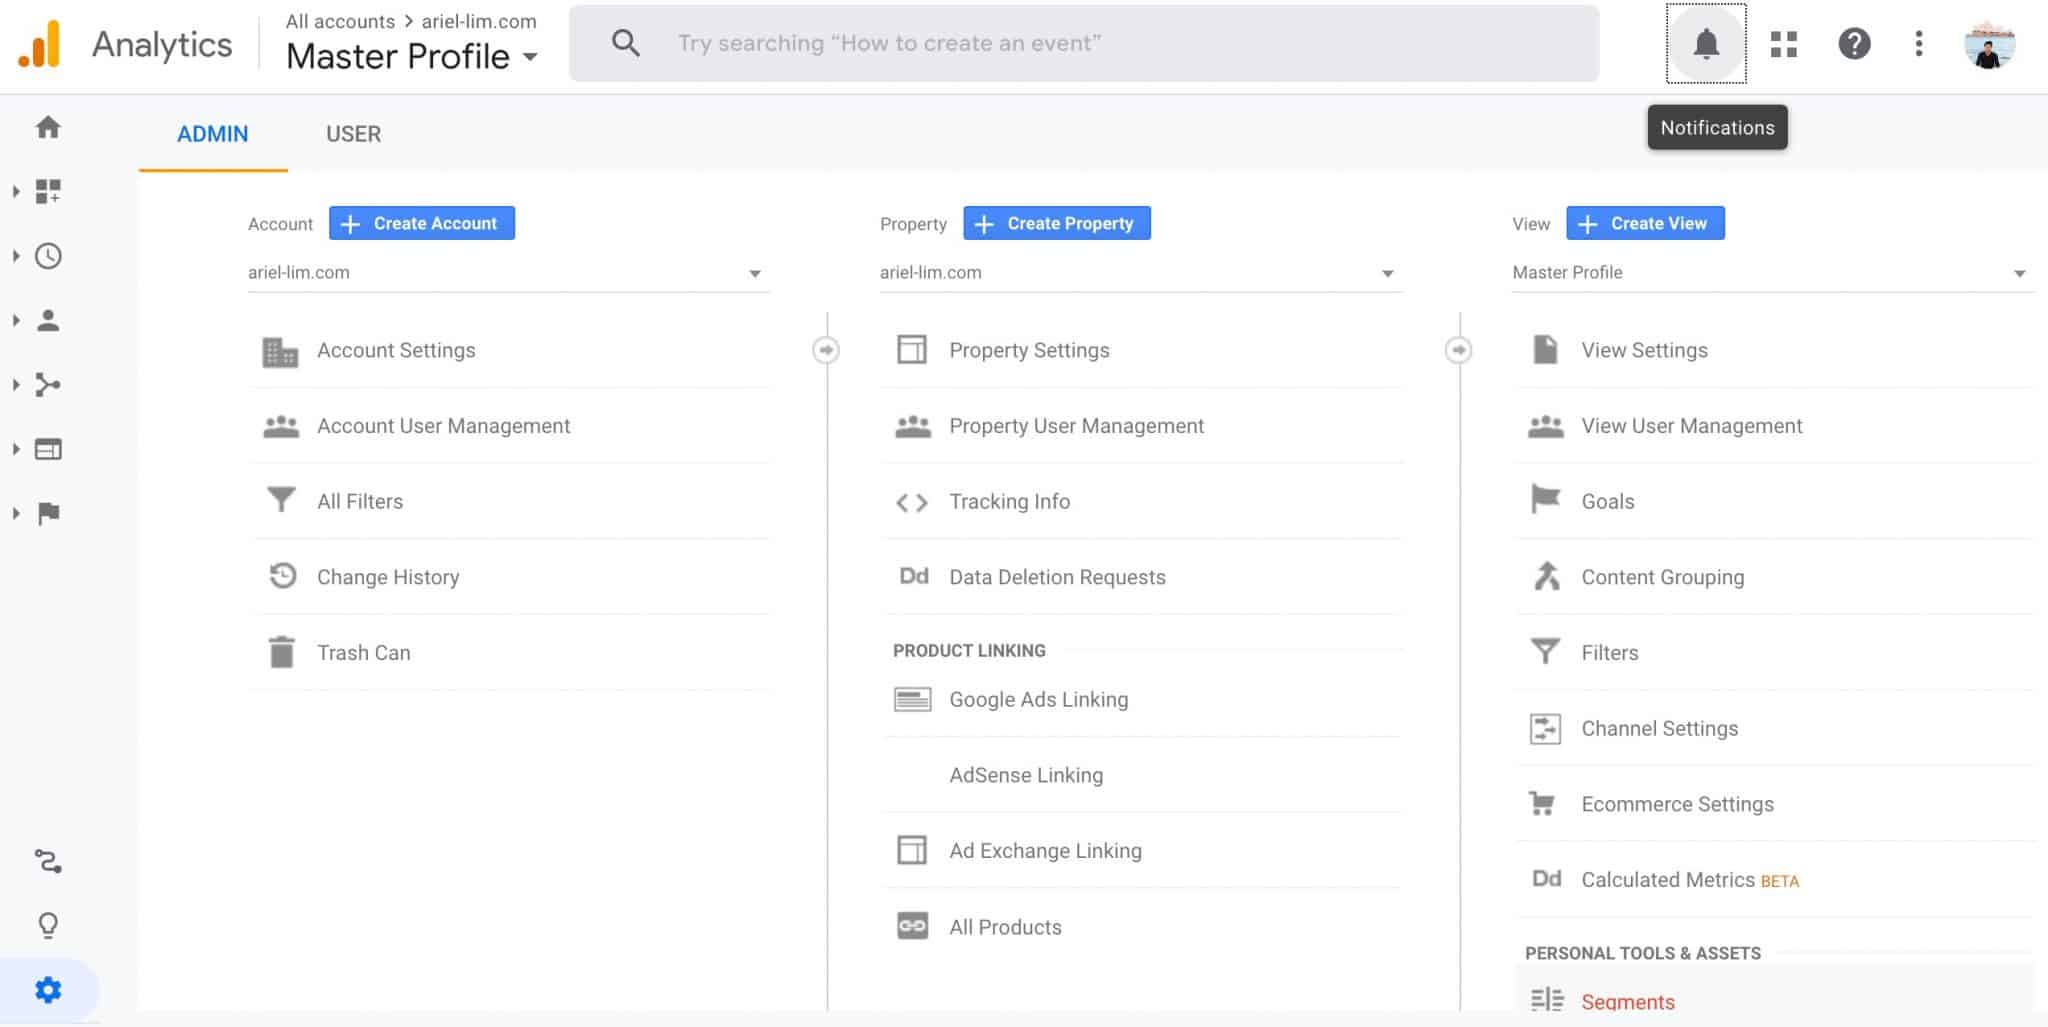
Google Analytics admin section
  1. Account —> this section handles the settings for your entire account. Usually, that’s associated with your email.
  2. Property —> this is where you’ll find the different online properties that you want to track (website and/or apps). E.g. in a single account, you can have multiple websites.
  3. Views —> this area controls the settings of a particular property. E.g. in one website (property), you can have multiple views.

Here’s how it looks like to help you understand how the three work together.
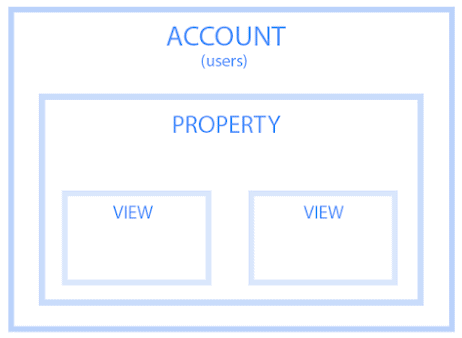
how accounts, properties, and views work together

You can learn more about this hierarchy from Google Analytics.

Basic Google Analytics Settings Every Website Must Have/Follow

1. Create 3 Views or Profiles

The first thing you’d want to do is create multiple views. Google Analytics creates only one when you create an account. This will be named All Web Site Data by default.

Since I’m demonstrating from my account, you will see that I changed the name to something else which I explained further below.

The main reason you create three views is two-fold:

  1. Prevent you from using inaccurate data in your reports
  2. Capture all data just in case something happens

Let me elaborate on that.

Why Creating Multiple Views in Google Analytics Is Important

When you visit your own website, that is recorded in Google Analytics. If you keep on visiting your site multiple times a day, all those are recorded too. If anyone else in your business do that, they are also recorded in GA.

This naturally skews your data. It won’t reflect how actual users are behaving.

If you add some filters or special configurations (which we’ll get to below), the view which you applied those settings will be irreversible. Meaning, if you accidentally filter out your own traffic, nothing will get recorded in that view.

That said, if you only have one view in your GA account and add these filters/change their settings, you risk losing valuable data. On the other hand, if you don’t add these configurations, you might end up with bad data.

The solution? Create multiple views.

The end goal is to have at least these 3 views in your property. Here’s how it looks like on my own GA account:
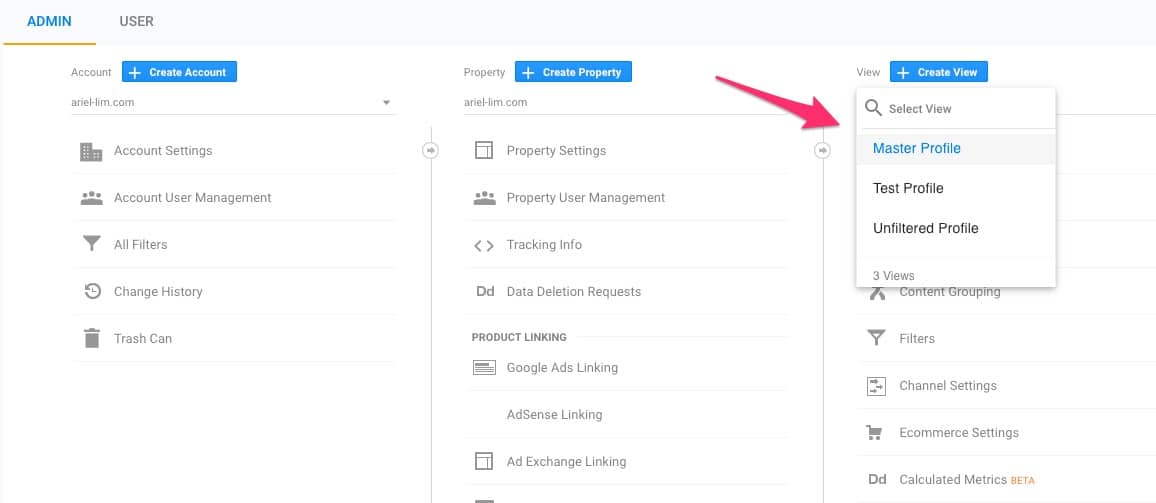
Best Practice: 3 Views in Google Analytics
  1. Unfiltered —> This is the original view that Google Analytics created. No filters, no special configurations. All data is recorded here. By default, it’s called All Web Site Data. I used to called this the Raw View.
  2. Test —> As the name suggests, this is a view where you apply initial configurations to test if they are working properly or not. If whatever you did is working properly, that’s when you apply it to the next view.
  3. Master —> This is the main view where you make your decisions and analysis. Because you tested the configurations in the test view and not here, you are guaranteed that all data here are accurate.

You can use your own naming convention, of course. For example, you can leave the All Website Data view instead of renaming it to Unfiltered. Just make sure it’s meaningful and easily understood. Using View 1, View 2, etc. is a terrible idea.

Step 1: Click the view settings in the default view

To get started, click on View Settings.
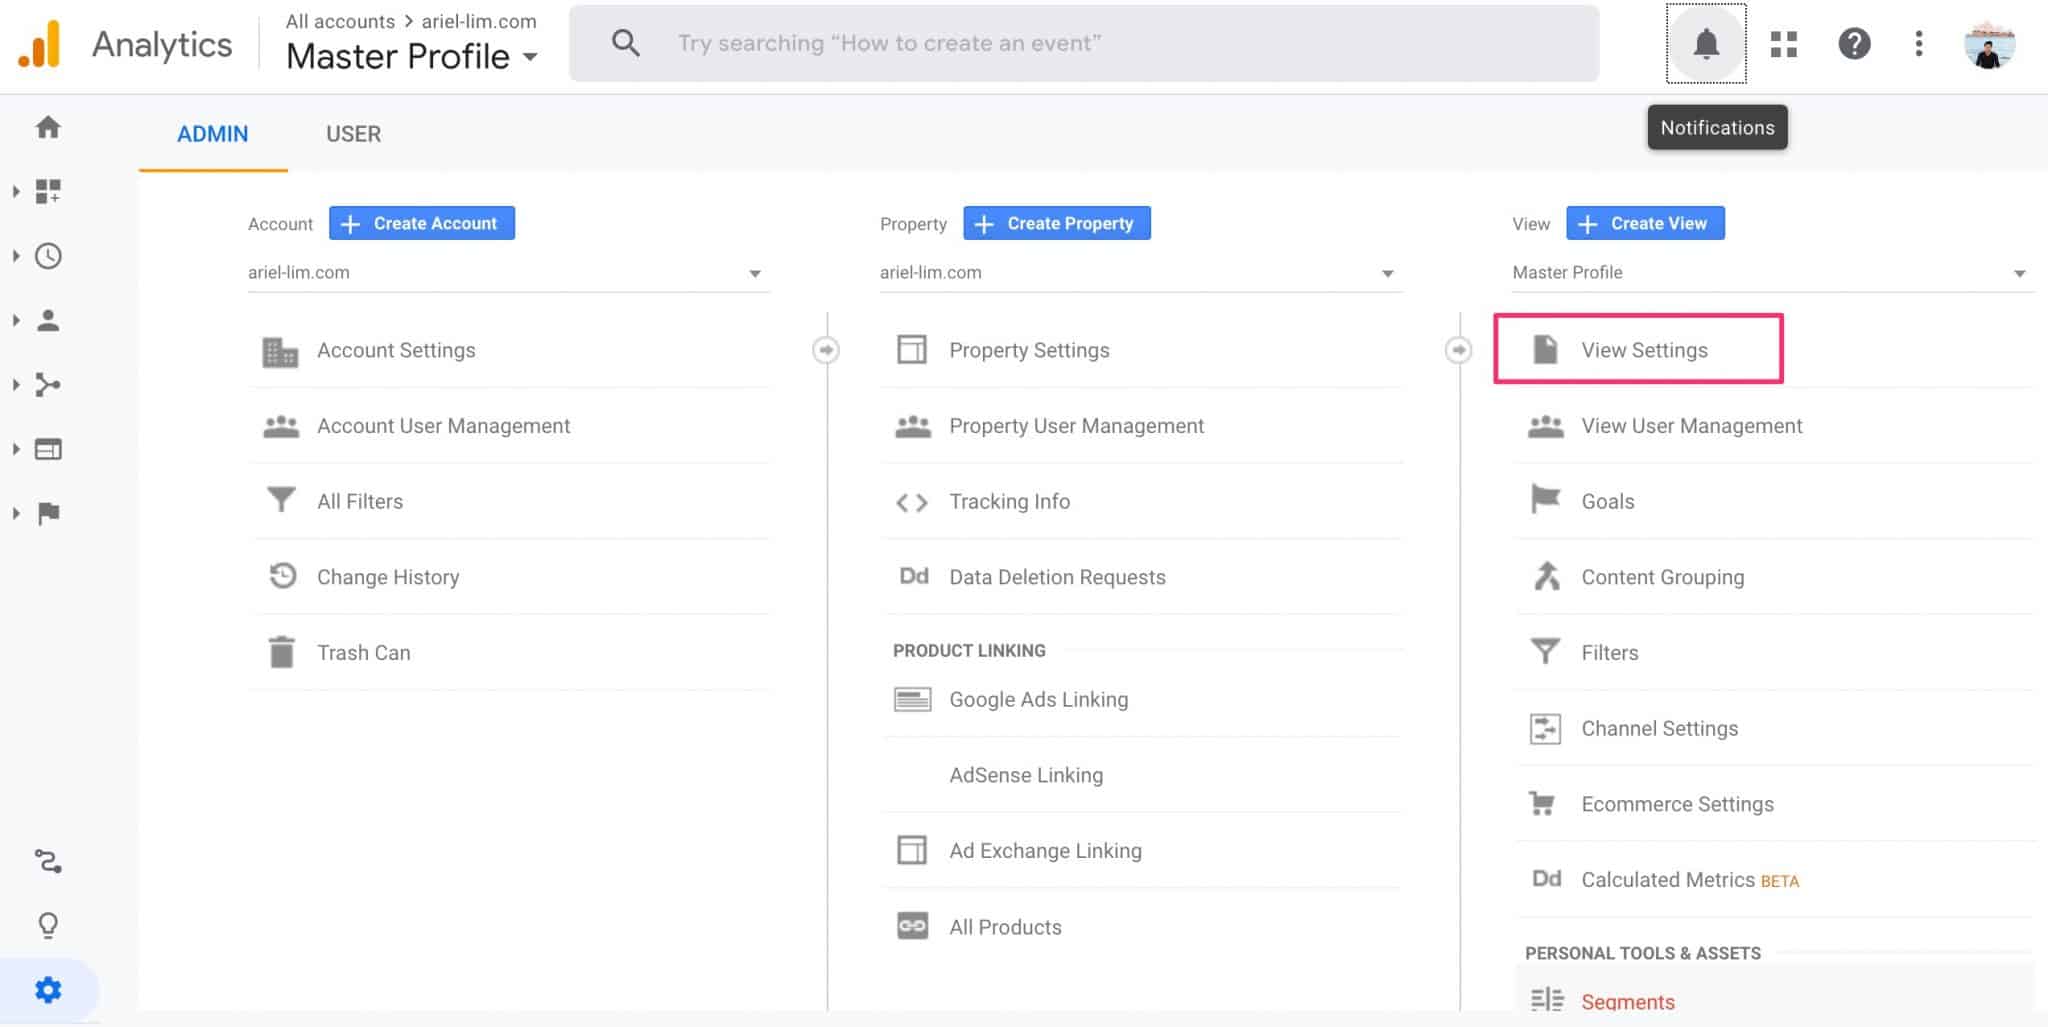
Google Analytics admin section

Step 2: Duplicate the View

Once you’re inside, you duplicate it by clicking on Copy View.
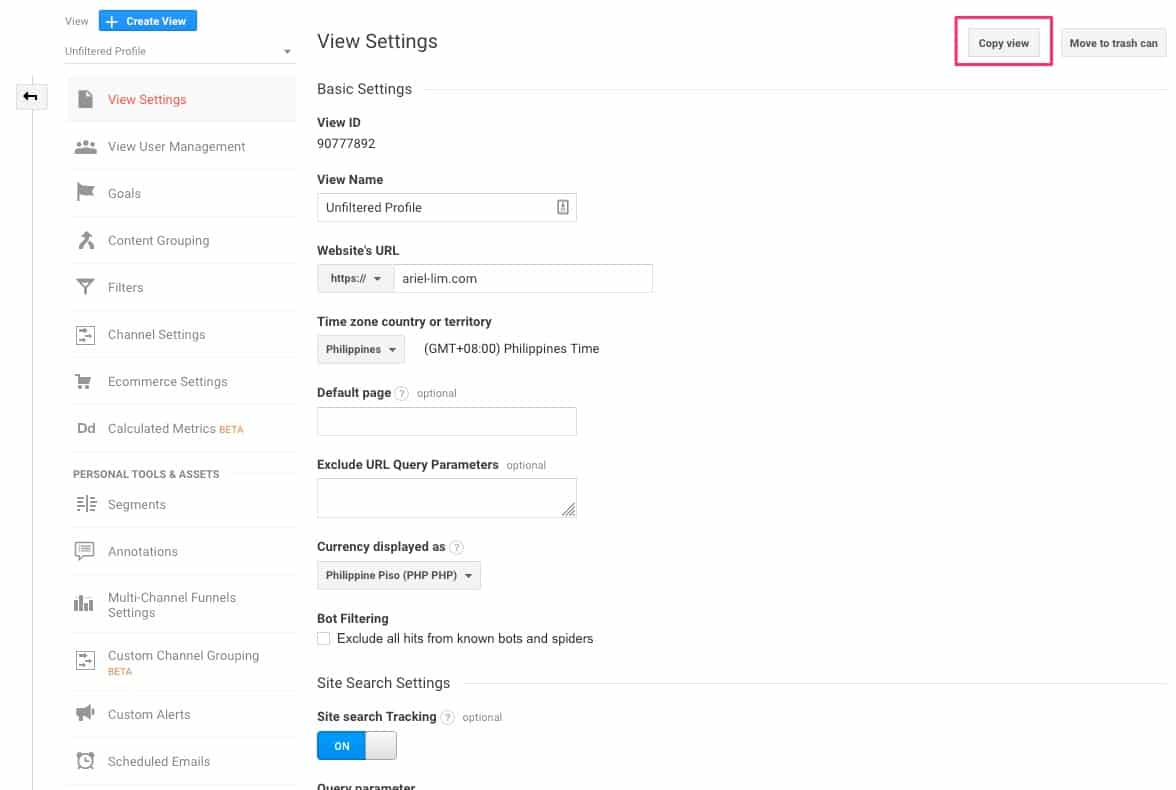
View settings in Google Analytics

Step 3: Rename to Main Profile

You’ll be prompted to rename the view. Again, feel free to use any naming convention here. In my case, I use Master View so there’s no confusion. Then, click on Copy View.
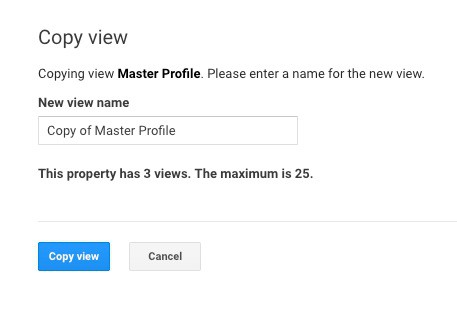
Duplicate view

Step 4: Filter out known bots

You’ll be taken back to the admin page again. Enter the settings again by clicking on View Settings of your newly created view.

Now, scroll a bit down and tick the box for Bot Filtering.
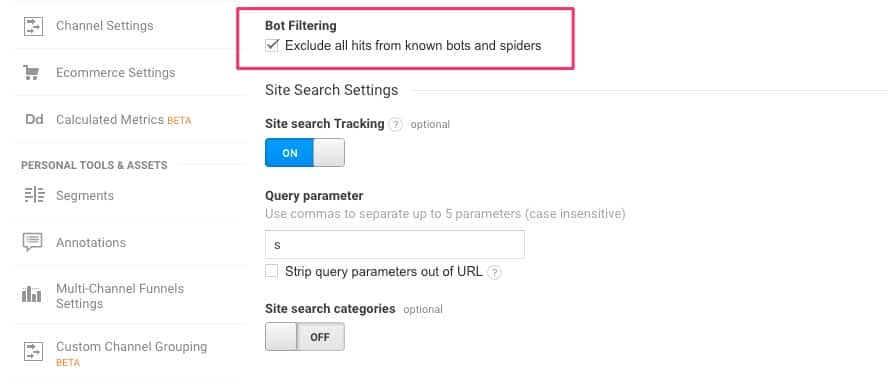
exclude bot hits in Google Analytics

This is important so that you don’t get inflated views and inaccurate data.

Step 5: Save

Once you’re done, hit Save at the bottom of the page.

Step 6: Repeat for Test Profile/View

Then, repeat the same process and create another view for your Test View/Profile.

At the end of this, you should have three different views. You’ll use the main view for your reporting. If you want to apply certain filters and configurations, use the test view first. Once you are confident everything is working properly, you then apply that to the main view. Use the unfiltered view as a backup so that all traffic is still recorded.

2. Exclude Internal Traffic: Filter Out Internal Traffic

Now that you have three different views, as you get traffic on your website, what will happen is all data will be tracked/recorded in your Unfiltered View. But when you look at your Test or Main View, you should see a smaller number because it filters out known bots/crawlers and whatever filters you add to them.

Here’s an example comparing the Unfiltered View with the Master View:
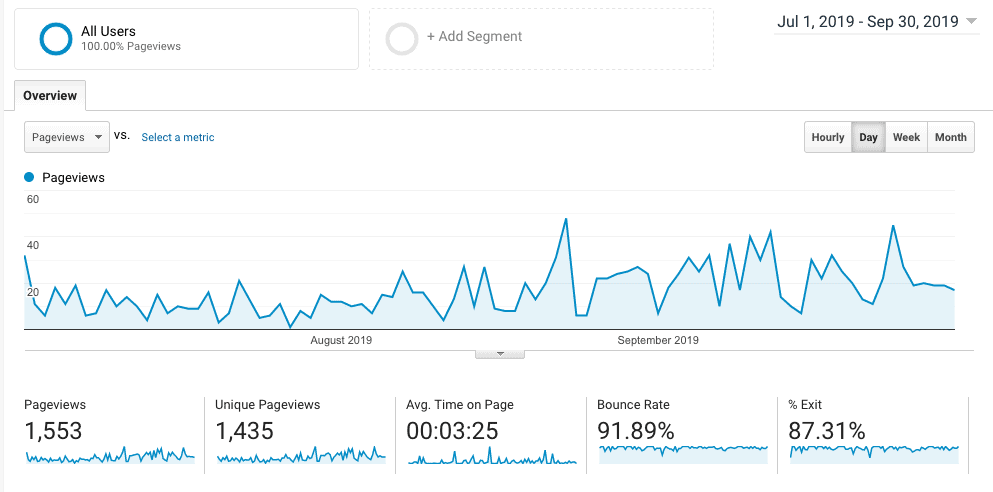
Unfiltered view with more pageviews
Unfiltered View – Q3
Main view with less pageviews
Main View – Q3

You’ll notice that the Unfiltered View has more page views than the Main View. I explained more about this in another post where I noticed stats from JetPack spiked, but my traffic in Google Analytics remained relatively low. This traffic most likely came from website crawlers.

And this is something you want to do because those inflated traffic might give you misleading insights later on.

Having said that, if you (or anyone from your company) visits your website, Google Analytics counts that towards your traffic. Do this enough, you would end up skewing your data.

The solution? Filter out your internal traffic.

Step 1: Go to the Test View

Head on over to the admin section again and select the Test View (or whatever you named it).
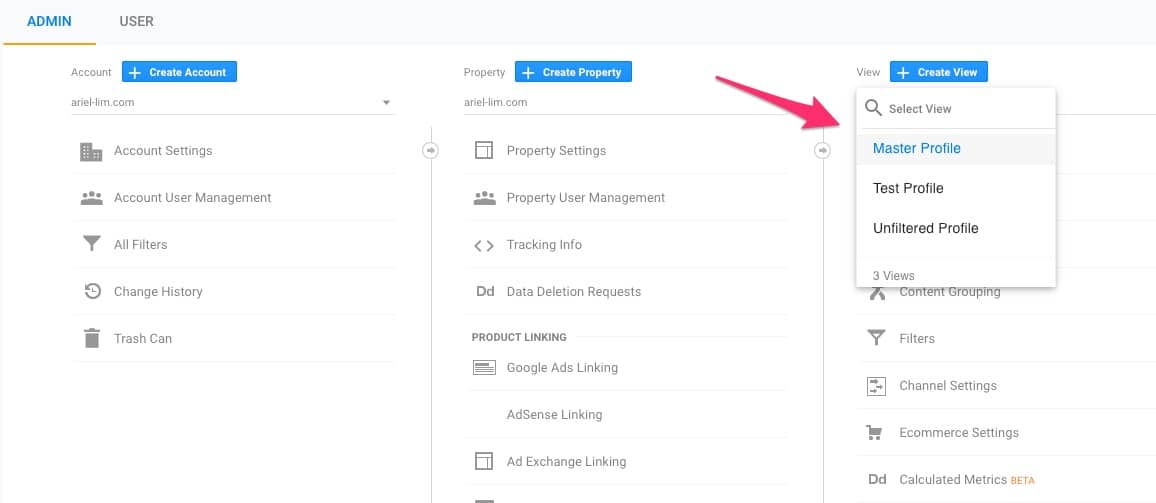
Make sure you're editing the proper view

Step 2: Enter the Filters Settings

Next, click on Filters. You should see something like this.

Add a filter in Google Analytics

Note that if you (or someone else) have created filters before, they will show up here.

Step 3: Add an IP Exclude Filter

Click on the red button to add a new filter. Then, just follow what’s on this image:
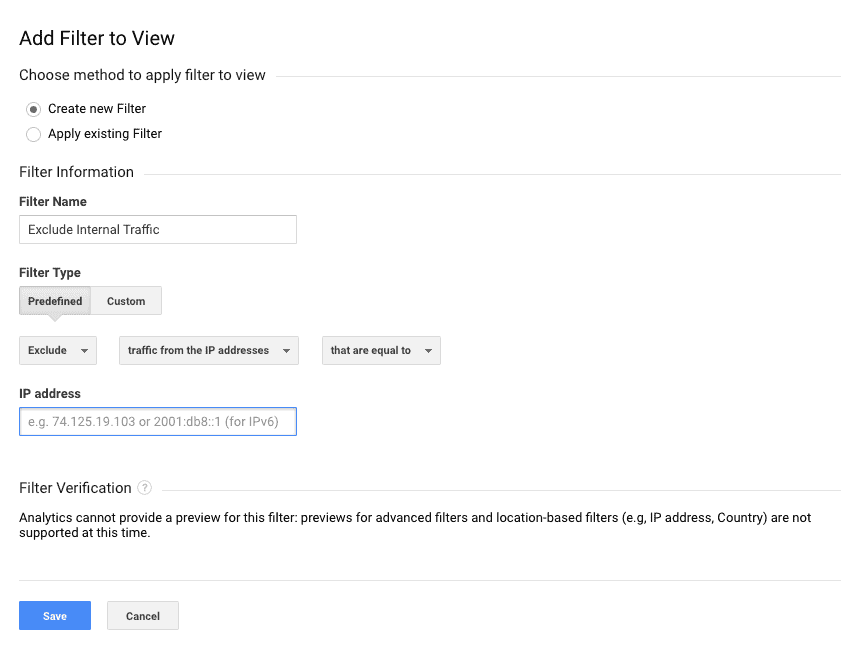
Add IP exclude filter in Google Analytics
Get Your IP address

To get your IP address, you can type “what is my ip” in Google, or head on over here to get your IP address. Then, add that to the field above.

Important Notes About this IP Filter

This only works for static IP addresses. You may have a certain range of IP addresses if you’re working in the office or at home. You can ask your ISP about it. If that’s the case, you can configure the settings to look like this…
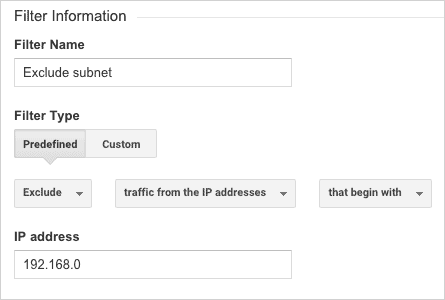
Exclude subnet of IP in Google Analytics

For more information about this, you can refer to Google Analytics Help Center.

Step 4: Test your data

After applying your filter, you have to make sure it works properly before you add it to your Main View. To do that, head to the reporting section of Google Analytics.
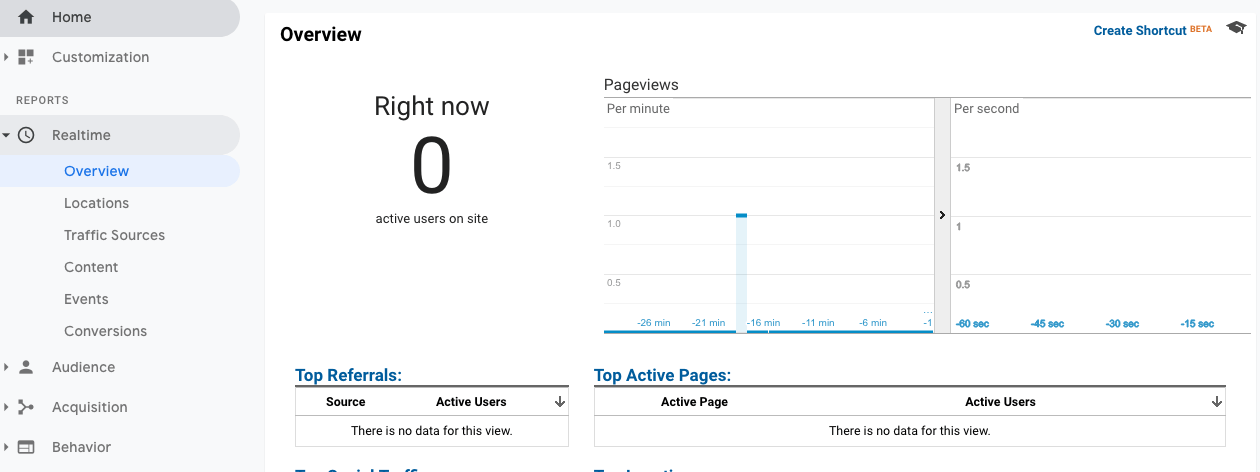
Realtime reporting in Google Analytics
Reports > Realtime > Overview

Then, open a new tab or window. Visit any page on your website.

If you don’t see any movements or hits on real-time reporting, you have configured this properly. Of course, if you have existing traffic, this might not be the case. What you can do to make sure you configured your filter properly is visit a page that is not often visited, say the terms and conditions page, or a privacy page. If it gets recorded, then you didn’t configure this filter properly.

Step 5: Apply the settings to your Main View

If, on the other hand, the filter is working properly, switch to your Main View and apply the filter.

Select theapply existing filter and all filters you created will be listed here.
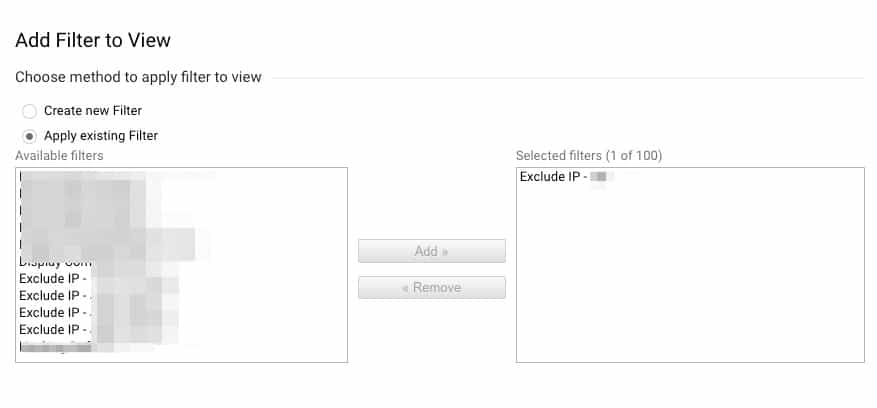
List of Filters in Google Analytics

Select the filter you want to apply, click Add, then hit Save.

Noticed how I walked you through the process of applying configurations on your Test View first. Then, once you verified that the data is behaving properly, that’s the only time you apply it your Main View. Depending on the settings you apply, it might take a few minutes to verify the accuracy (like above), or it might take days. Follow this process always to ensure the quality of data in your Main View.

3. Add Goals to Track Important Business Metrics

Next, head on over to the Goals section. Again, try this out on your Test View first, before applying it to the Main View.

Creating goals in your Google Analytics account is the single, biggest action you can take to make your GA reporting relevant. Why? Because you have just linked it to important business metrics.

You would then be able to find out which pages are more important than others. Instead of simply looking at which pages/channels are driving you more traffic, you can proceed to the next level— which pages/channels are driving more conversions.
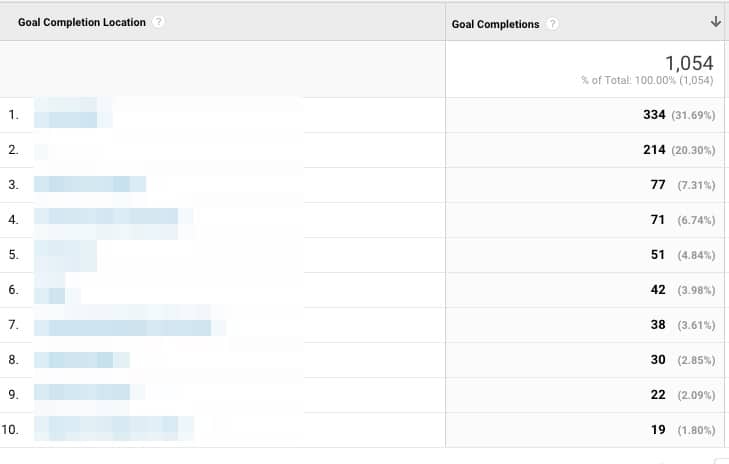
Know which pages are driving conversions

Now, you have something more meaningful. Now, you can analyze those pages and optimize them further.

4. Link Google Analytics to Google Search Console

Head back to the admin section of Google analytics then click on Property Settings. That would be the middle column.
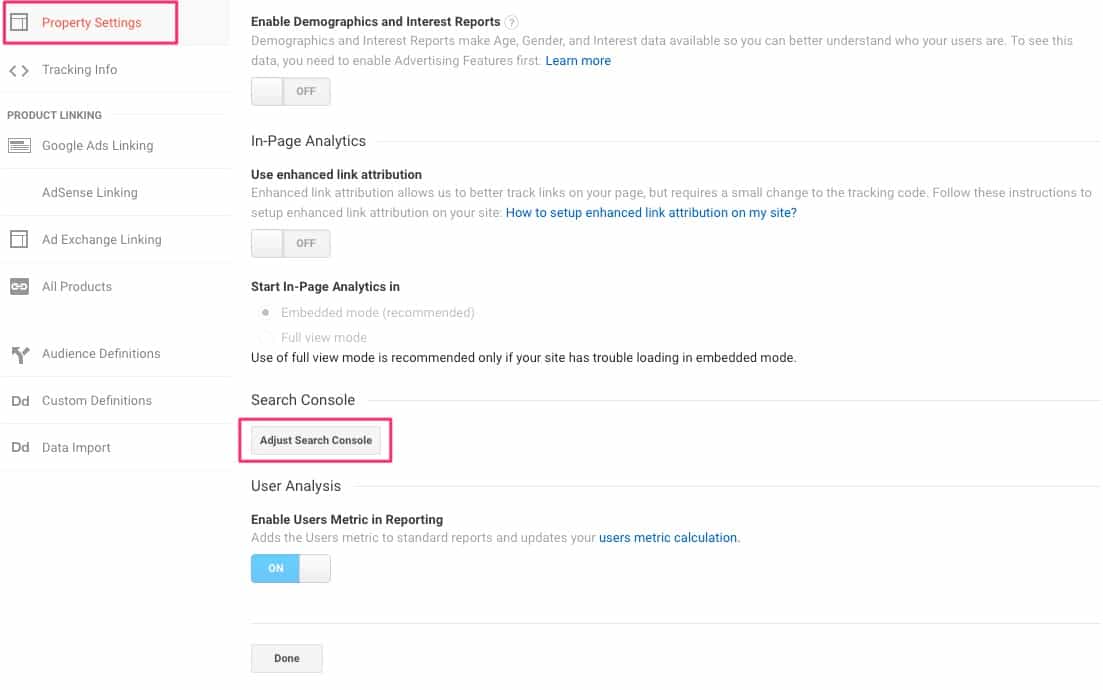
Link Google Analytics to Google Search Console

Scroll a bit further down and look for Search Console. Click on the button there and link your Google Search Console (GSC) account. If you aren’t familiar with GSC, I recommend reading more about it here. Think of it as a power-up to Google Analytics.

Here’s what you have to do.

Step 1: Add Google Search Console

Once you’re inside the Property settings, click on the Adjust Search Console and you should see something like this. Click Add. This will open up a new window/tab and into your Google Search Console account.
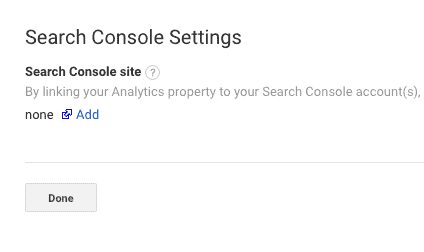
Add Google Search Console to Google Analytics

Step 2: Choose the correct account

If you have multiple accounts connected, you will see something like this. Just make sure you are connected it to the correct one. Hit save.
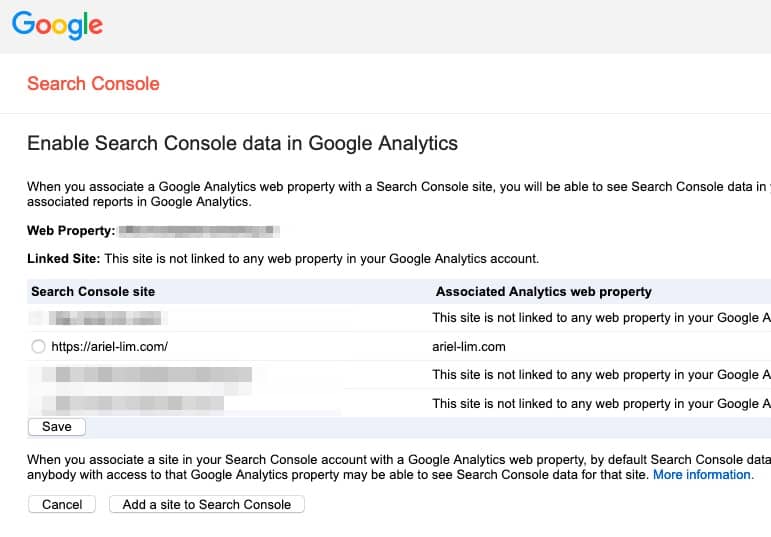
Choose the correct account in Google Search Console

Step 3: Confirm settings

Go back to Google Analytics and check the settings again. It should say that it’s connected to your account just like the image below.
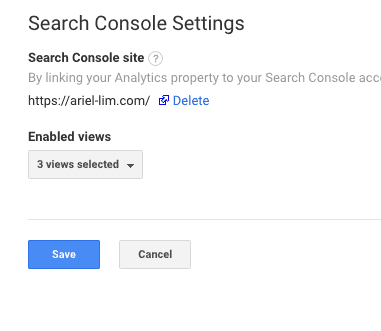
Successfully linked Google Search Console with Google Analytics

I’ll explain more about how you can use GSC with GA in some other post. But if you don’t know what it is or don’t have one, create one immediately.

5. [Special Mention] Filter Out Known Bots

I mentioned this in the first configuration because I included it in another step. But for the sake of being thorough, I’ll repeat this again here.

In your Test and Main Views, you should filter out known bots and spiders.
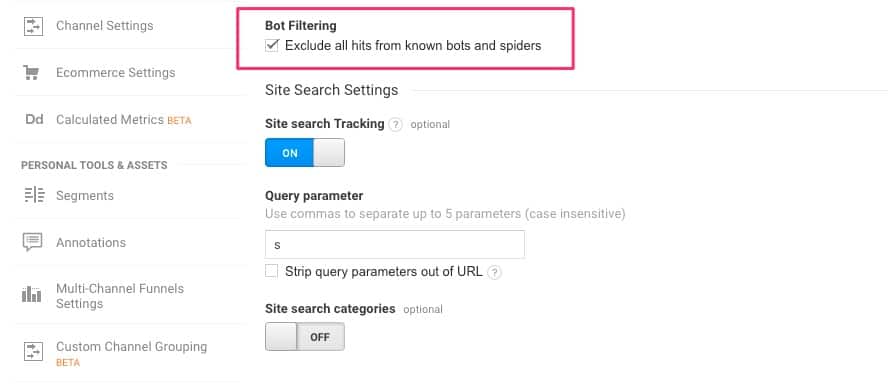
GA Bot Filtering Enabled

If you don’t, you might end up inflating your numbers. Unfortunately, by default, Google Analytics tracks the traffic coming from them. So, if you test your website speed using Google PageSpeed Insights or some other tools, each time you check your speed, it gets counted to your traffic.

Again, you don’t want that to happen.

Conclusion

Congratulations! You have now configured your Google Analytics properly. Your account is ready for more insightful analysis because the data that is coming in is clean and accurate.

I’ll write more about how you can analyze your data inside Google Analytics. For now, give yourself a pat in the back because starting today, you’ll be in a position to really learn about your users and how they behave on your website.

Of course, that’s just the first part of the battle. You have to maintain the quality of the data coming in — like when adding more filters and goals, you do that in the test view before applying the main view, etc.

You can then proceed with adding custom dimensions, add more goals, experiment with events, and perform A/B tests. You can also look into attribution reports and analyzing funnels.

There’s a lot of exciting things you can do and it all boils down to the work you did today—ensuring your GA account is setup properly and your data is accurate.

Have you configured your Google Analytics properly? If you have questions, or need help, please don’t hesitate to reach out.

What Are UTM Tags and How to Use Them Effectively (+Examples)

reports

UTM tags are a string of text added to a website URL that gives you the ability to track your website traffic and where it’s coming from exactly.

It’s also known as UTM tags, UTM parameters, or simply UTM.

In this article, I’ll discuss the main use of UTM tags, the benefits and downsides of using it. I’ll also tackle how to create them, and more importantly, show you examples.

Before that, allow me to answer some of the most frequently asked questions about UTM tags.

FAQs About UTM Tags

What Do UTM Tags Look Like

A link with UTM tags looks just like any ordinary link, except they are usually longer.

Here’s an example of what a normal URL or link looks like…

https://ariel-lim.com/email-marketing/

Then, once I add UTM tags to my link, it will look like this…

https://ariel-lim.com/email-marketing/?utm_source=facebook&utm_medium=social&utm_campaign=lead-nurturing

If you look at the URL above with UTM parameters, you can somehow read and understand them. Let’s say I posted something on Facebook with and used that link. It reads like this:

  • The URL is about email marketing.
  • The source is coming from Facebook
  • Medium is social media
  • It’s about a lead nurturing campaign

As you can see, it’s easy to understand what UTM tags are and how it’s used.

Primary Use of UTM Tags

But its usage goes beyond that. There are actually 5 different parameters of UTM tags that you can set, which I’ll go over in detail below.

The primary use of UTM tags really helps you understand in granular detail which parts of your campaign are performing better than the rest.

Let’s continue with the Lead Nurturing Campaign example. As you already know, it’s best to distribute that content across different marketing channels. You go to where your potential customers and users are, instead of waiting for them to find you.

So, your distribution strategy might look something like this:

  • Website
  • Social Media
    • Facebook
    • Twitter
    • Instagram
  • Email
  • Ads
    • Facebook
    • Google Ads

If you simply go through the motions — wrote 5 different articles, posted them on your website, social media accounts, email, and run some ads — how will you be able to analyze the performance and ROI of your campaign?

Assuming you have proper goal tracking setup in Google Analytics and you use UTM tags properly, you will see which campaigns are working and which aren’t.

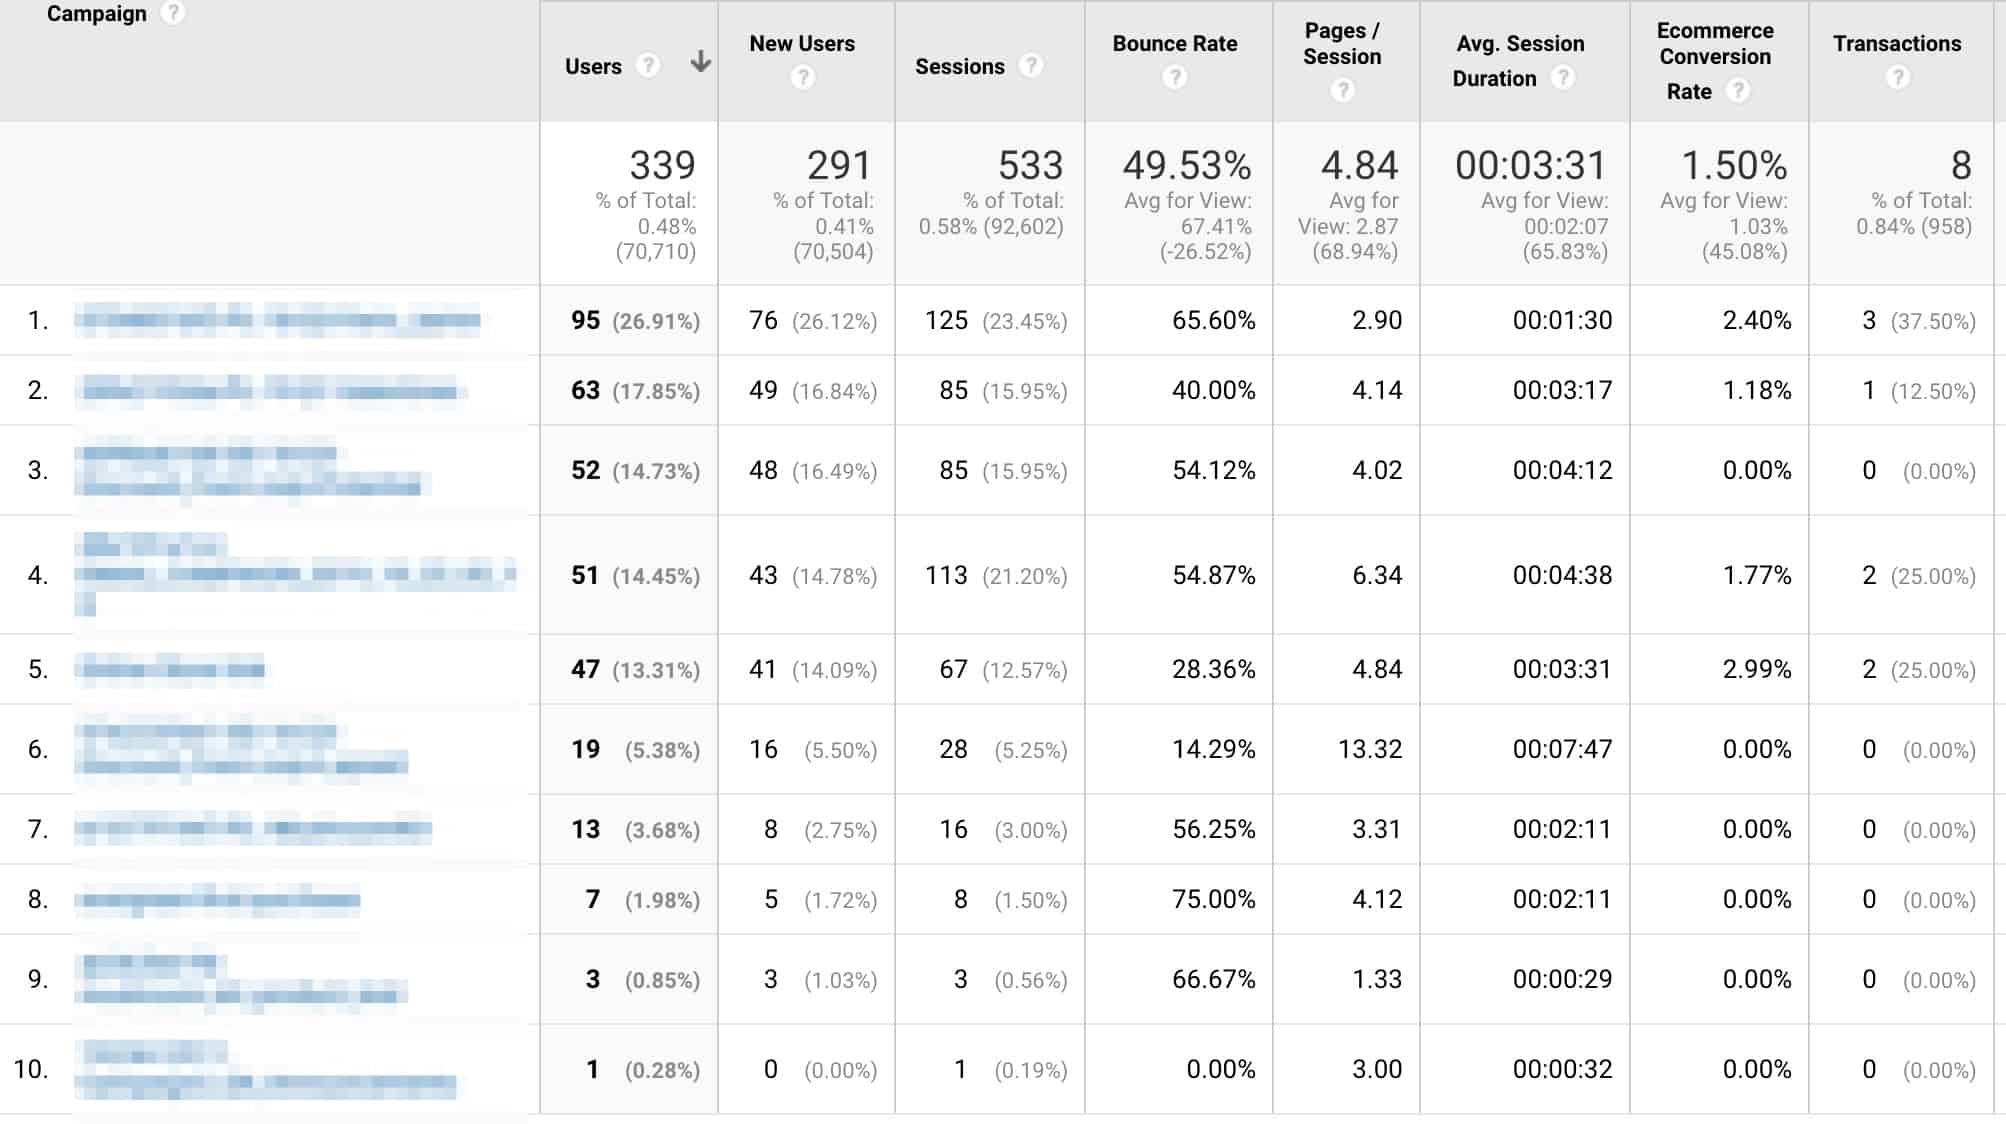
See which campaigns perform better in Google Analytics
Acquisitions > Campaigns > All Campaigns

Then, if you want to drill down further, you can see which parts of the campaign are doing well.

Drill-down which source/medium is performing better within your campaigns
Acquisitions > Campaigns > All Campaigns: Use Source as Primary Dimension, Add Medium as Secondary Dimension

All that granularity is done by UTM tags.

In the example above, you can see that inside a particular campaign, email, messenger, ads, and the generic social posting are used. If you look to the right, you would notice that for the period, email resulted to more transactions — sales.

This is just a very simple example of how powerful UTM tags are. If you advertise heavily, for example on Facebook, you can even differentiate which ads are running on the news feed, stories, instant articles, etc. If you advertise on Google, you can also determine which exact keywords are driving you traffic and conversions.

I know those will show up on those specific platforms, but wouldn’t it be great (and easier for you) if all those data show up in one place— in this case, in Google Analytics?

Parameters of UTM Tags

As mentioned earlier, UTM tags have multiple parameters that you can use. The first 3 of them are required, while the rest are optional.

The first requirement is the link. This is the URL that you will be using. It’s not included in the list because, well, it’s a link not a UTM parameter.

Example URL: https://ariel-lim.com/email-marketing/

The way this works is a question mark ? is appended to the end of the URL. This signifies that the UTM parameters will start after. Then, the ampersand & is used to separate the different UTM parameters. You’ll see this in action below. I just want to highlight this here because this sometimes cause errors in reporting.

1. Campaign Source

Source means the referrer or where you will share the link. This is used to identify a search engine, newsletter name, or other sources (like another website).

The naming convention for the source is utm_source.

Here’s what it looks like: https://ariel-lim.com/email-marketing/?utm_source=facebook

2. Campaign Medium

The medium parameter its used to identify a specific marketing medium. I discussed this in the default channel groupings in Google Analytics. To get started, I strongly recommend following that instead of creating your own. This will make analysis easier later on.

The naming convention for the source is utm_medium.

Here’s what it looks like: https://ariel-lim.com/email-marketing/?utm_source=facebook&utm_medium=social

Take note of the question mark ? placement. It’s only used once—to separate the URL from the UTM parameters. You will also notice the ampersand & is used to separate the different UTM parameters.

In the example above, I used social as the medium because I’m posting on Facebook, which is a social network. I want it to appear on my default channel groupings so I can easily see if social is paying off. Otherwise, it will show up in a group called (Other) and will make your reports a little bit more difficult to understand.

Default Channel Groupings inside Google Analytics

If you send email marketing campaigns, I recommend setting the medium as email that way it will show up under email traffic in Google Analytics, not in the Other area. After all, email marketing falls under email, right?

If you don’t add UTM tags to your email blasts and haven’t integrated Google Analytics with your email marketing provider, visits to your website from that email will show up under the direct traffic instead. I discussed the importance of this in my article on email traffic.

3. Campaign Name

Now, the campaign name is obviously the name of your campaign. This can be anything you want. But it’s best to follow these additional guidelines (plus the ones I listed down below) to make it easy to find and analyze your campaigns later:

  • Make it easy to understand what the campaign is about
  • if you use dates, use year-month instead of month-year
    • 2019-Q4-brand-awareness, or 2019_december_newsletter; instead of the following:
    • Q4-2019-brand-awareness, or december_2019_newsletter
  • Decide on a pattern and use that throughout

The naming convention for the campaign name is utm_campaign.

Here’s how it looks like: https://ariel-lim.com/email-marketing/?utm_source=facebook&utm_medium=social&utm_campaign=lead-nurturing

Again, note the use of ? and & in the links.

These three UTM parameters are the required fields. The next two are optional and used for additional granularity.

4. Campaign Term (or Keyword)

The term or keyword is primarily used for which keywords you used for the ad. Let’s say you use Google Ads where you will need to bid on certain keywords. This is where this comes in.

The naming convention for the source is utm_term.

Here’s how it looks like: https://ariel-lim.com/email-marketing/?utm_source=google&utm_medium=ppc&utm_campaign=lead-nurturing&utm_term=email+marketing

Notice I changed my source and medium in this example to match how the link would look like if I were to advertise in Google Ads. But you actually don’t have to do this manually. Google Ads has a feature called Auto-tagging.

5. Campaign Content

The last parameter is the campaign content. This is used for A/B testing and determining which ad/link is performing better.

A good example of this is using Facebook Ads.

On Facebook, you have options to display your ads to the Facebook news feed, Instagram news feed, Facebook right column, etc. For each ad placement, you can use a different content. That way, when you analyze them on Google Analytics, you will determine which are driving you traffic or conversions, and which ones are just wasting your money.

The naming convention for the source is utm_content.

Here’s how it looks like for ads I want to display primarily on the Facebook newsfeed: https://ariel-lim.com/email-marketing/?utm_source=facebook&utm_medium=social&utm_campaign=lead-nurturing&utm_term=email+marketing&utm_content=fb_news_feed

Then if I want to run that same ad on the right column, here’s how that may look like: https://ariel-lim.com/email-marketing/?utm_source=facebook&utm_medium=social&utm_campaign=lead-nurturing&utm_term=email+marketing&utm_content=fb_column

As you can see, from the examples above, you can find a lot of use for UTM tags. While UTM tags are very flexible, if you want to make your analysis easier (which is the whole point of adding UTM parameters) you have to understand how it works.

In the example above, I warned about using the medium email or social. If you don’t it will still show up on your GA reports, but you will need to do some extra clicking to find what you’re looking for.

Good thing you don’t have to remember all these conventions. It’s good to know, but there are tools that can help you generate links with UTM tags. The most popular, of course, comes from Google.

How to Create UTM Tags

You can find all these information including how to create them on Google’s Campaign URL Builder. Here’s how it looks like…

Google's Campaign URL Builder

All you have to do is enter the URL you want to share, then fill-out the rest of the fields. Again, the required fields are the URL itself, the source, medium, and campaign name. The rest are optional.

Important Notes to Remember When Creating UTM Tags

1. UTM tags are case sensitive

UTM tags are case sensitive. If you noticed in the examples I used, I stick with lower case. It’s easier to remember because you don’t have to do anything else. Just start typing.

Using ‘CamelCase’ or ‘Capitalizing the first word’ is an extra effort and you or someone else might forget to follow that. Then, you will end up with complicated results on your Google Analytics account.

All the following examples will show up differently on Google Analytics:

  • utm_campaign=LeadNurturing
  • utm_campaign=Leadnurturing
  • utm_campaign=Lead_Nurturing
  • utm_campaign=leadnurturing
  • utm_campaign=lead_nurturing

So, in order to avoid confusion, just use small letters in everything.

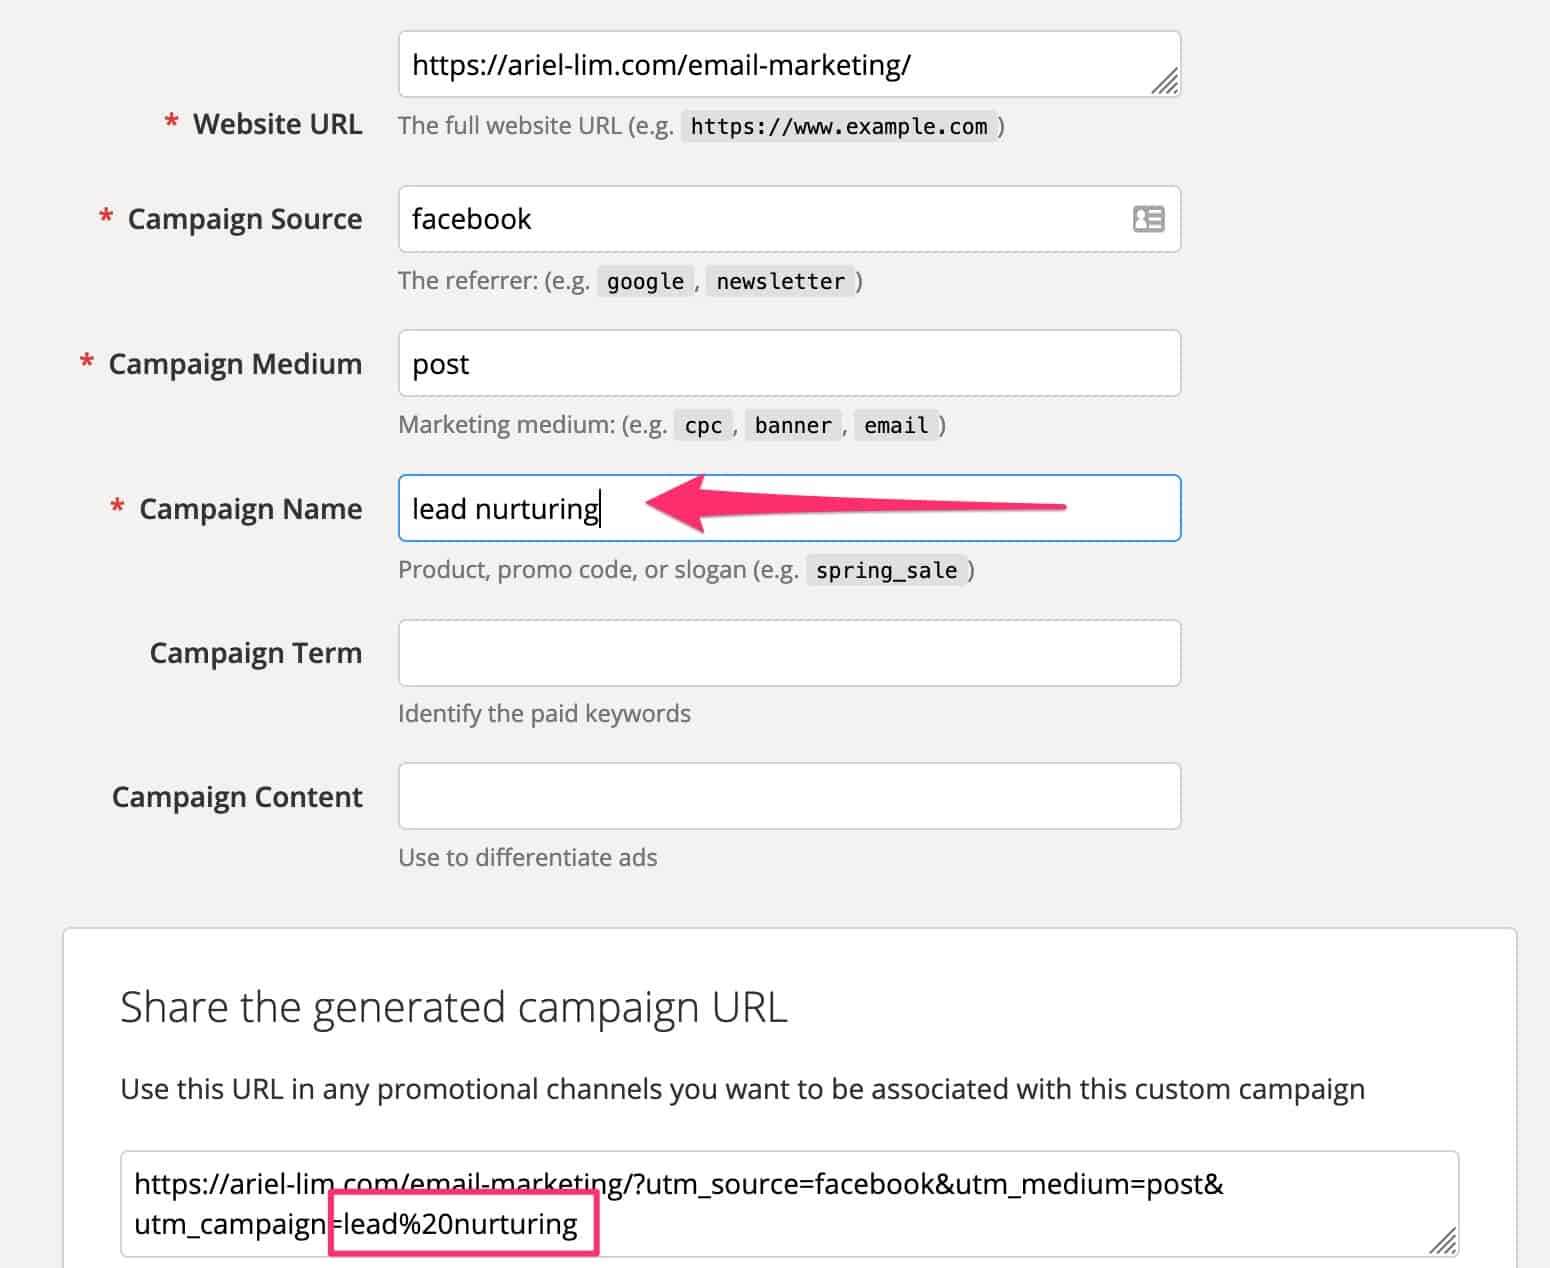
2. Spaces also affect the result

You might also notice that I used underscores _ or plus sign + above. There’s a reason for that. If you use spaces, Google will automatically convert that into %20 on your links. Again, this will only make your analysis later on complicated.

URL Builder with spaces

You can use underscores or dashes to simplify everything. Add them after every word, like in the example I used earlier: lead_nurturing.

Pick one. Stick with it.

3. Don’t use UTM tags on internal links (links on your own website)

One common mistake I find people do after discovering UTM tags is they want to know which links on their own website are people clicking on.

If you want to track which links people are clicking on, there are other ways to do that. But the one thing that you should never do is use UTM tags on your internal links.

4. Persistent across social share/emails

One last note on UTM links.

When people re-share links to another social network or another platform, people typically copy-paste the URL. When that happens, you get attributed to whatever UTM tags were used.

For example, in the link https://ariel-lim.com/email-marketing/?utm_source=facebook&utm_medium=social&utm_campaign=lead-nurturing, someone saw that post, found it valuable and wanted to share it to her colleague via Messenger. When the other person opens that, it gets tracked using the original parameters of my post.

If the person decided to share that to Twitter and Pinterest, or send it via email, the same thing would happen. Unless they sanitize the URL themselves, traffic coming from those re-shared links will get attributed to Facebook.

Conclusion

Using UTM tags to track your campaigns is a great way to determine their effectiveness and measure their ROI. It allows you to know in detail which parts of your marketing are working, and which ones you need to improve on.

There are a couple of considerations you need to remember when using UTM parameters on your links, though. Make sure you don’t use them on internal links and follow the same naming conventions throughout in order to avoid complications in reporting later on.

Following these guidelines will help you analyze your digital marketing efforts faster and easier.

Do you use UTM tags on your campaigns? How are you using it to analyze your campaigns? Let me know in the comments below!

How to Give Someone Access to Your Digital Marketing Accounts

doors open

Outsourcing your digital marketing, or parts of it, to someone is the norm today. As a business owner, you can’t possibly know everything about digital marketing, nor have time to learn them to the level that takes years of practice. You have limited time. And that time is best spent on managing and growing your business.

So, what’s your option? Outsource your digital marketing.

Why You Should Quantify Your Outsourced Digital Marketing Projects

If this is the first time you’re outsourcing your digital marketing, I strongly recommended that you start small but project that’s easily quantifiable. That way, you’d know if they did a great job or not.

A website redesign might seem like a subjective project. But in the eyes of any digital marketing expert, this can be quantified easily. A website can’t just be pretty and nice to look at. It has to help you in any of the following:

  • Increase your traffic
  • Get your more leads
  • Have more paying customers
  • More revenues

A website redesign project should not be measured by how fast it was completed, nor if it was according to your specifications. It has to contribute to something tangible.

I discussed more about this in a white paper I put together— 9 Things Business Owners Need to Know Before Hiring a Digital Marketing Agency or Consultant. Feel free to check it out!

Biggest Mistake Business Owners Make When Outsourcing Their Digital Marketing

Once you have chosen the agency or individual who will handle your digital marketing, the first thing they will need to get started with their work is access to your online marketing assets.

These are accounts to whatever tools you are currently using, or plan to use in order to accomplish your business objectives.

From my experience working with dozens of businesses across the globe, this is the biggest mistake I often see owners do— they give their usernames and passwords to the people working on their accounts.

While it’s a great idea to trust them, it doesn’t mean that you have to give them full control of your online assets.

Just imagine the repercussions of this:

  • They can steal your data and use that for themselves
    • This is different depending on what data you have, but if you handle customer information like emails, credit card numbers, etc. This is a huge risk. How do you think your customer would feel if the received an email or a call pitching for services from your agency?
  • Or even use the tools for themselves that you paid for yourself
  • An even bigger risk, they can easily change the passwords and you will immediately lose access to them yourself.
    • Or someone from the agency’s staff will do that
    • This is especially true if you ended the relationship on negative terms

The solution? Give them (limited) access to your accounts.

How to Give Someone Access to Your Digital Marketing Tools

I’ll go over the most basic digital marketing tools here first and how you can give an outsourced agency or individual the proper access to your accounts.

Table of Contents
Click on any of these to jump straight to that topic
  1. Google Analytics
  2. Google Search Console
  3. Google Tag Manager
  4. WordPress

I’ll be adding more to this list in the future.

The goal of granting access to your accounts is to allow other people to view the data, configure it properly, and create reports. Obviously, you don’t want them to have the ability to run away with the entire account where you end up losing access to everything. So, that’s what this article is all about—teaching you the step-by-step process on how you can give someone access to your online marketing tools and reducing the risk that you lose access to them yourself.

How to Give Access to Google Analytics to an Outsourced Agency or Consultant

The first tool that you need to to give your chosen outsourced digital marketing firm is Google Analytics. If you haven’t already created one, do so now. Here’s a step-by-step instruction on how you can create an account and install Google Analytics.

Step 1: Log in to Google Analytics

First, head on over to analytics.google.com and log in. Once you’re there, you will see your default account.

Step 2: Go to the Admin Section

Next, click on the admin section on the left-hand menu.

Admin section of Google Analytics

Step 3: Determine the Level of User Access Needed

Google Analytics provides 3 levels of access:

  1. Account
  2. Property
  3. View
Different user management settings in Google Analytics

I’m not going to dive in and discuss each of those three. But oftentimes, you would not want to give someone else access to your Google Analytics in the account level. In most cases, you would choose the property or view level and give access to those.

I typically request access at the property level because (1) most Google Analytics accounts aren’t setup properly, so I would need to gain access to info that’s only available at that level; and (2) you can create multiple views in one property. And it’s a best practice to have at least three different views for different purposes. I’ll discuss this more in some other post.

Step 4: Give the Appropriate User Permission

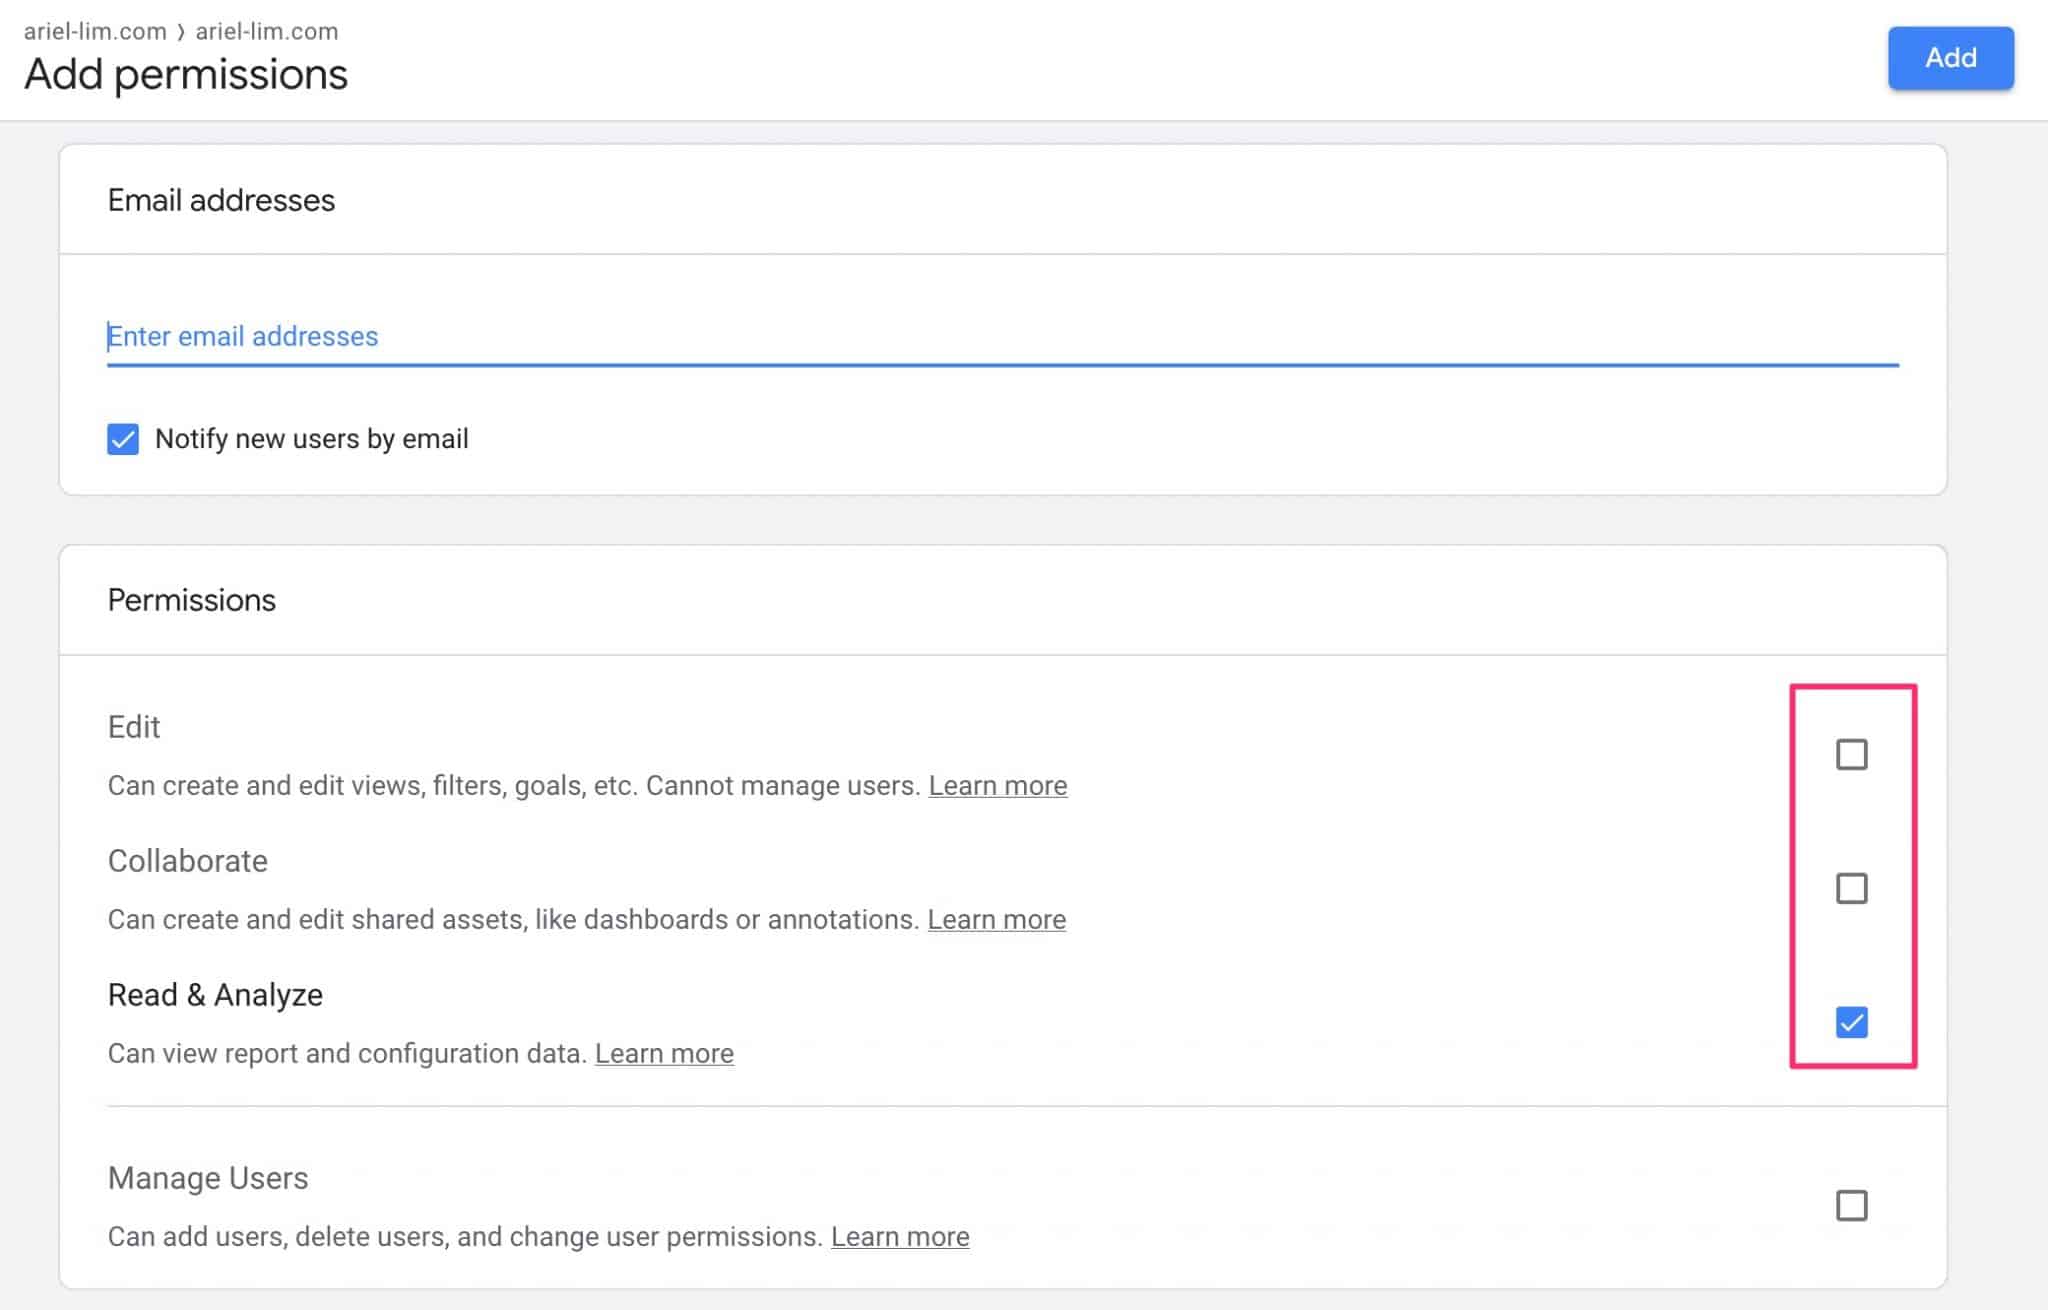
Once you’ve selected which level to grant your outsourced help the credentials, you would need to enter an email and determine which permissions they actually have.

Add permissions to user in Google Analytics

In most cases, you would check the three boxes I highlighted:

  • Edit
  • Collaborate
  • Read & Analyze

This will give them the ability to create separate views, add filters, and goals. They will also be able to create custom reports and be able to help link Google Ads or Google Search Console.

If you only give them the Read & Analyze permission, most of the time, they will ask you to do a couple of things for them because their account is so limited that they can’t do anything.

If they have multiple people working, you can also allow them to manage other users. Going back to lowering your risks, this will only allow them to modify stuff related to your property and views, but not your account.

You can learn more about user permission in Google Analytics here.

The next tool you should be using is Google Search Console. If you are not using this, you’re missing out on a lot of analytics and data. To add a new user to your account, follow these steps.

Step 1: Go to Settings

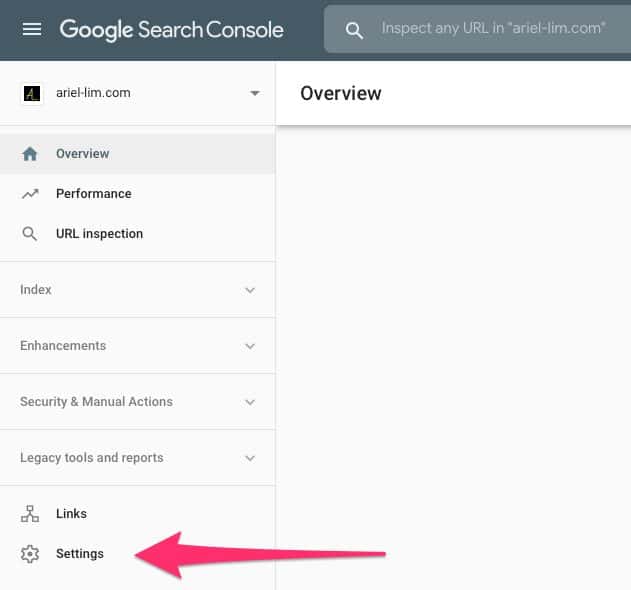
Of course, you have to make sure you are in the right account. Then, once you’re in, head to the lower-left section an click on settings.

google search console add user step 1

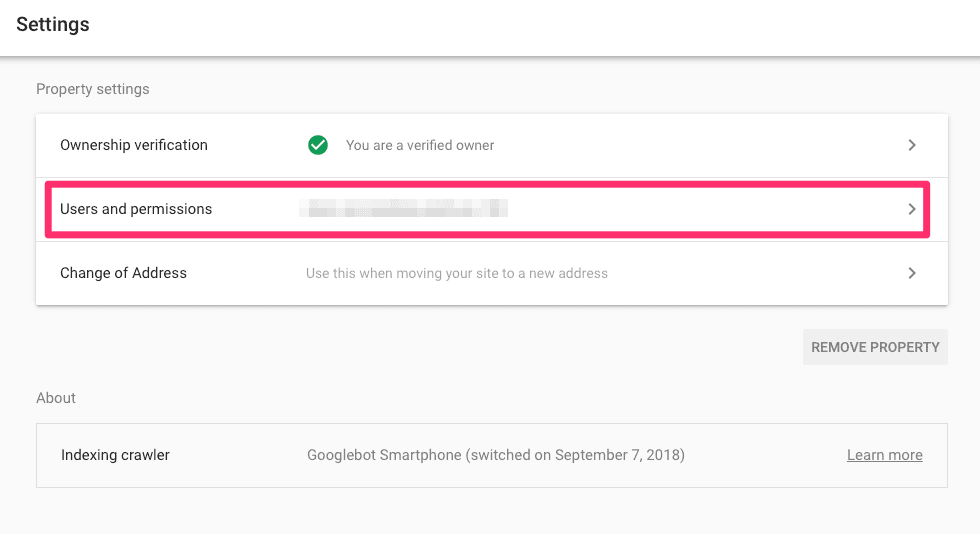
Step 2: Click on User Permissions

How to Add a User to Google Search Console Step 2

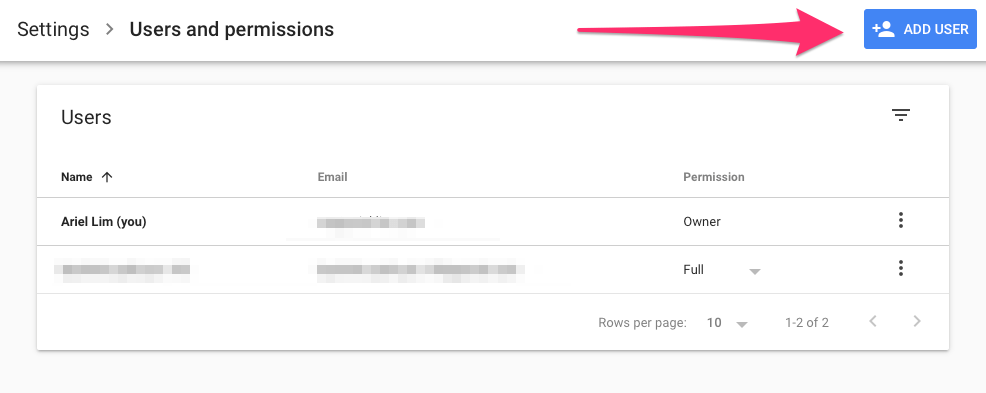
Step 3: Click on Add User

Here, you should see all accounts who have access to your Google Search Console. I couldn’t stress this enough, but you should never share your email credentials. Instead, add new users like the examples in this article.

How to Add a User to Google Search Console Step 3

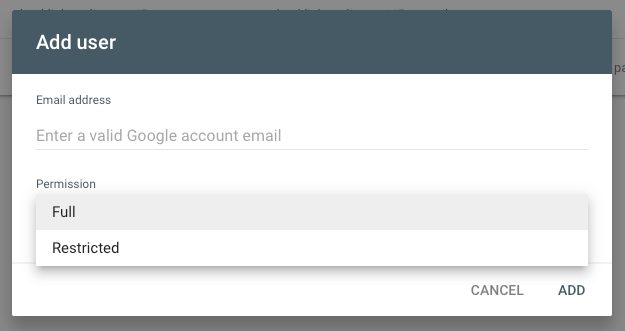
Step 4: Complete the Form

Simply enter the email address and the permission type.

Here’s a quick and dirty difference between the two:

  • Full user: Has view rights to all data and can take some actions.
  • Restricted user: Has simple view rights on most data.
How to Add a User to Google Search Console Step 4

How to Give Access to Google Tag Manager to an Outsourced Agency or Consultant

This process is similar to Google Analytics. Of course, the only way this works is if you already have a Google Tag Manager account and installed properly on your website.

Step 1: Log in to Google Tag Manager

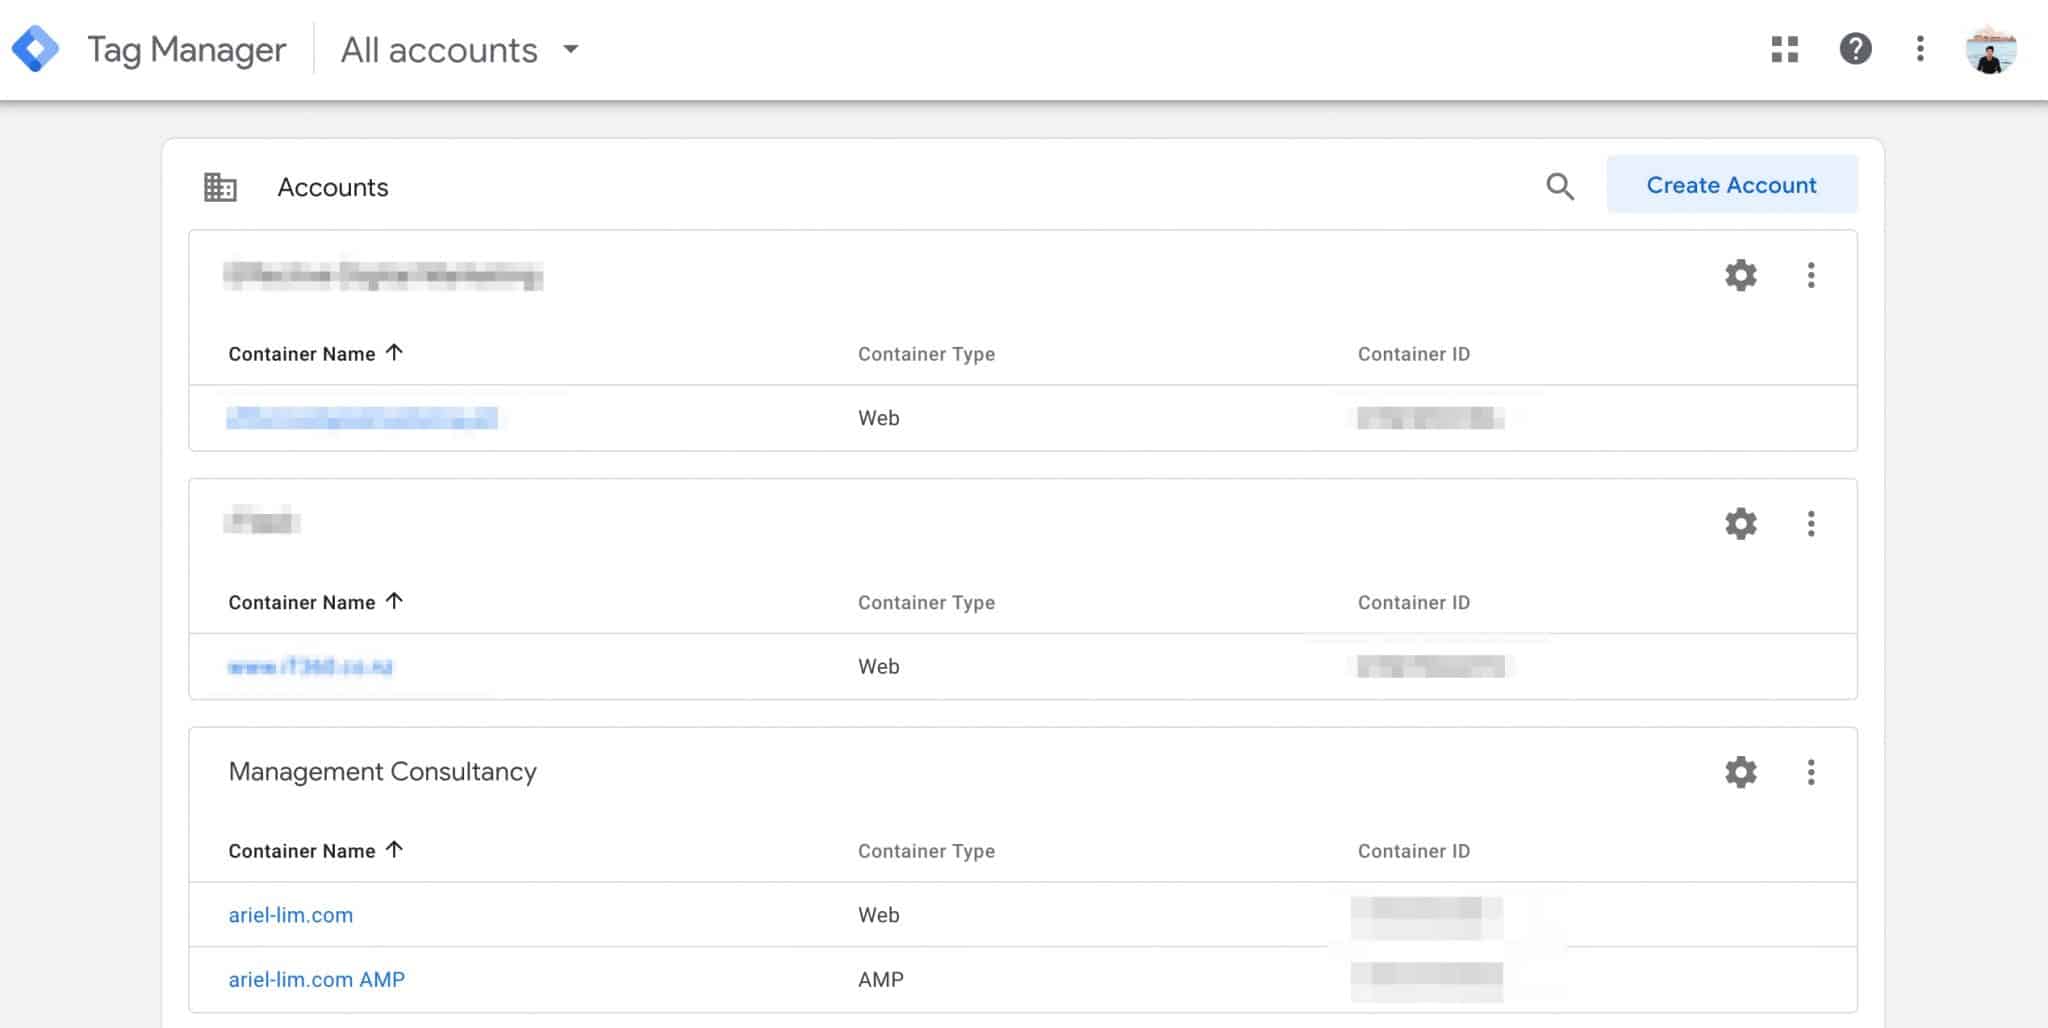
Head on over to tagmanager.google.com and log in to your account. You should see something like this (if you have multiple accounts in your account).

Choose account in Google Tag Manager

Choose the one you want to give permissions to.

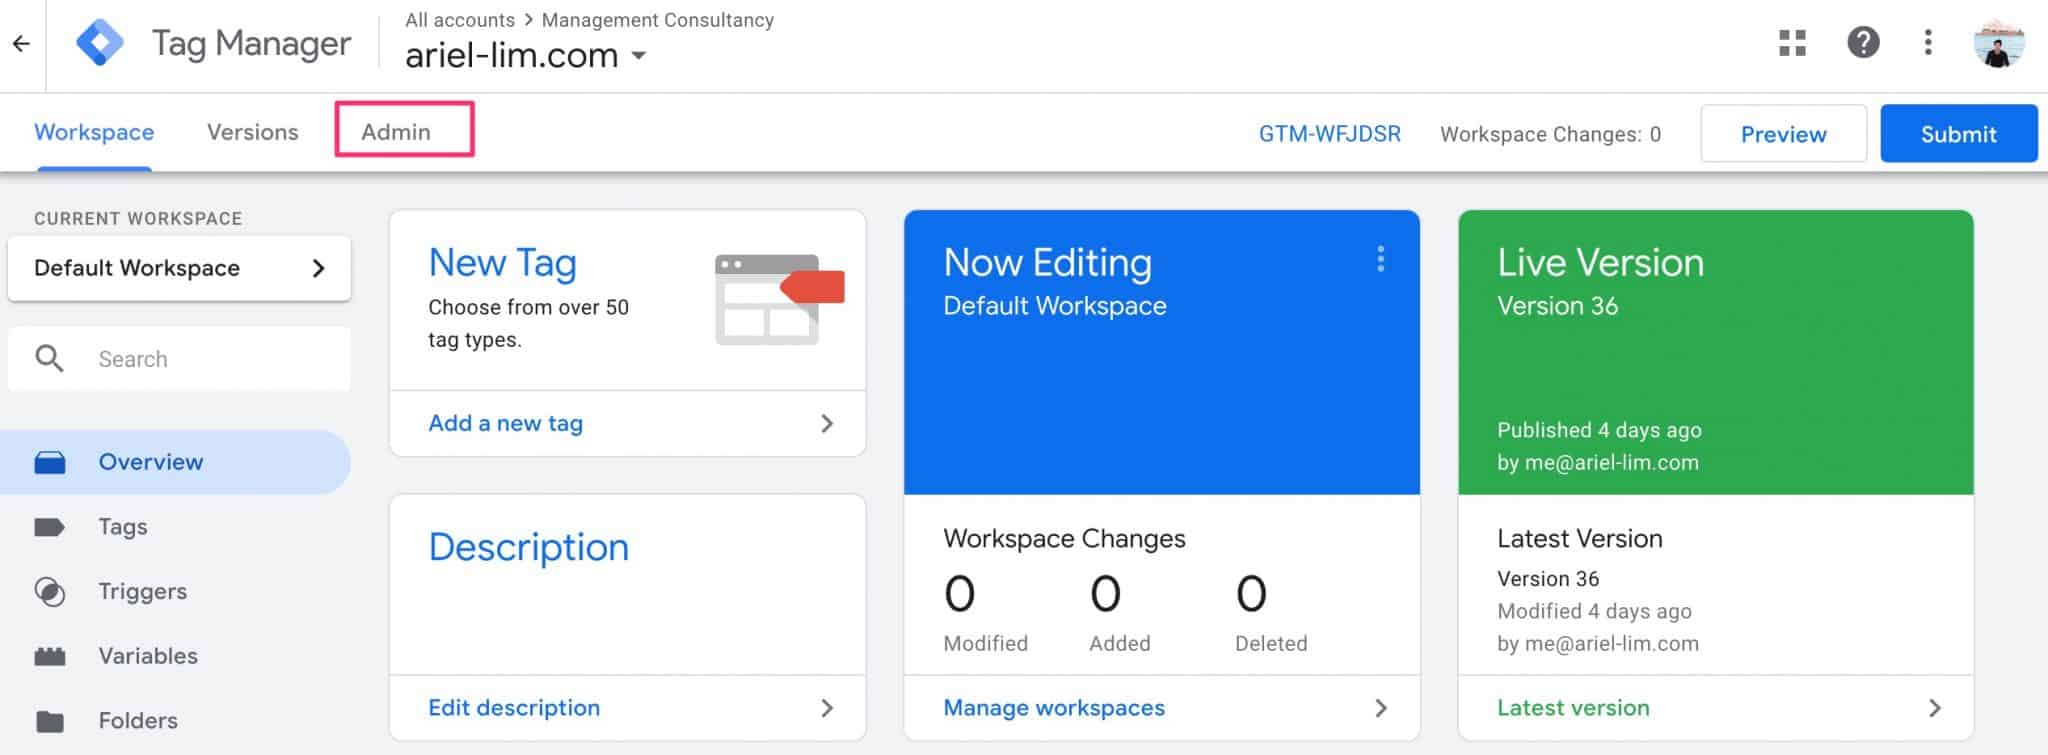
Step 2: Go to the Admin Section

Next, click on the admin tab at the top.

Go to admin section of Google Tag Manager

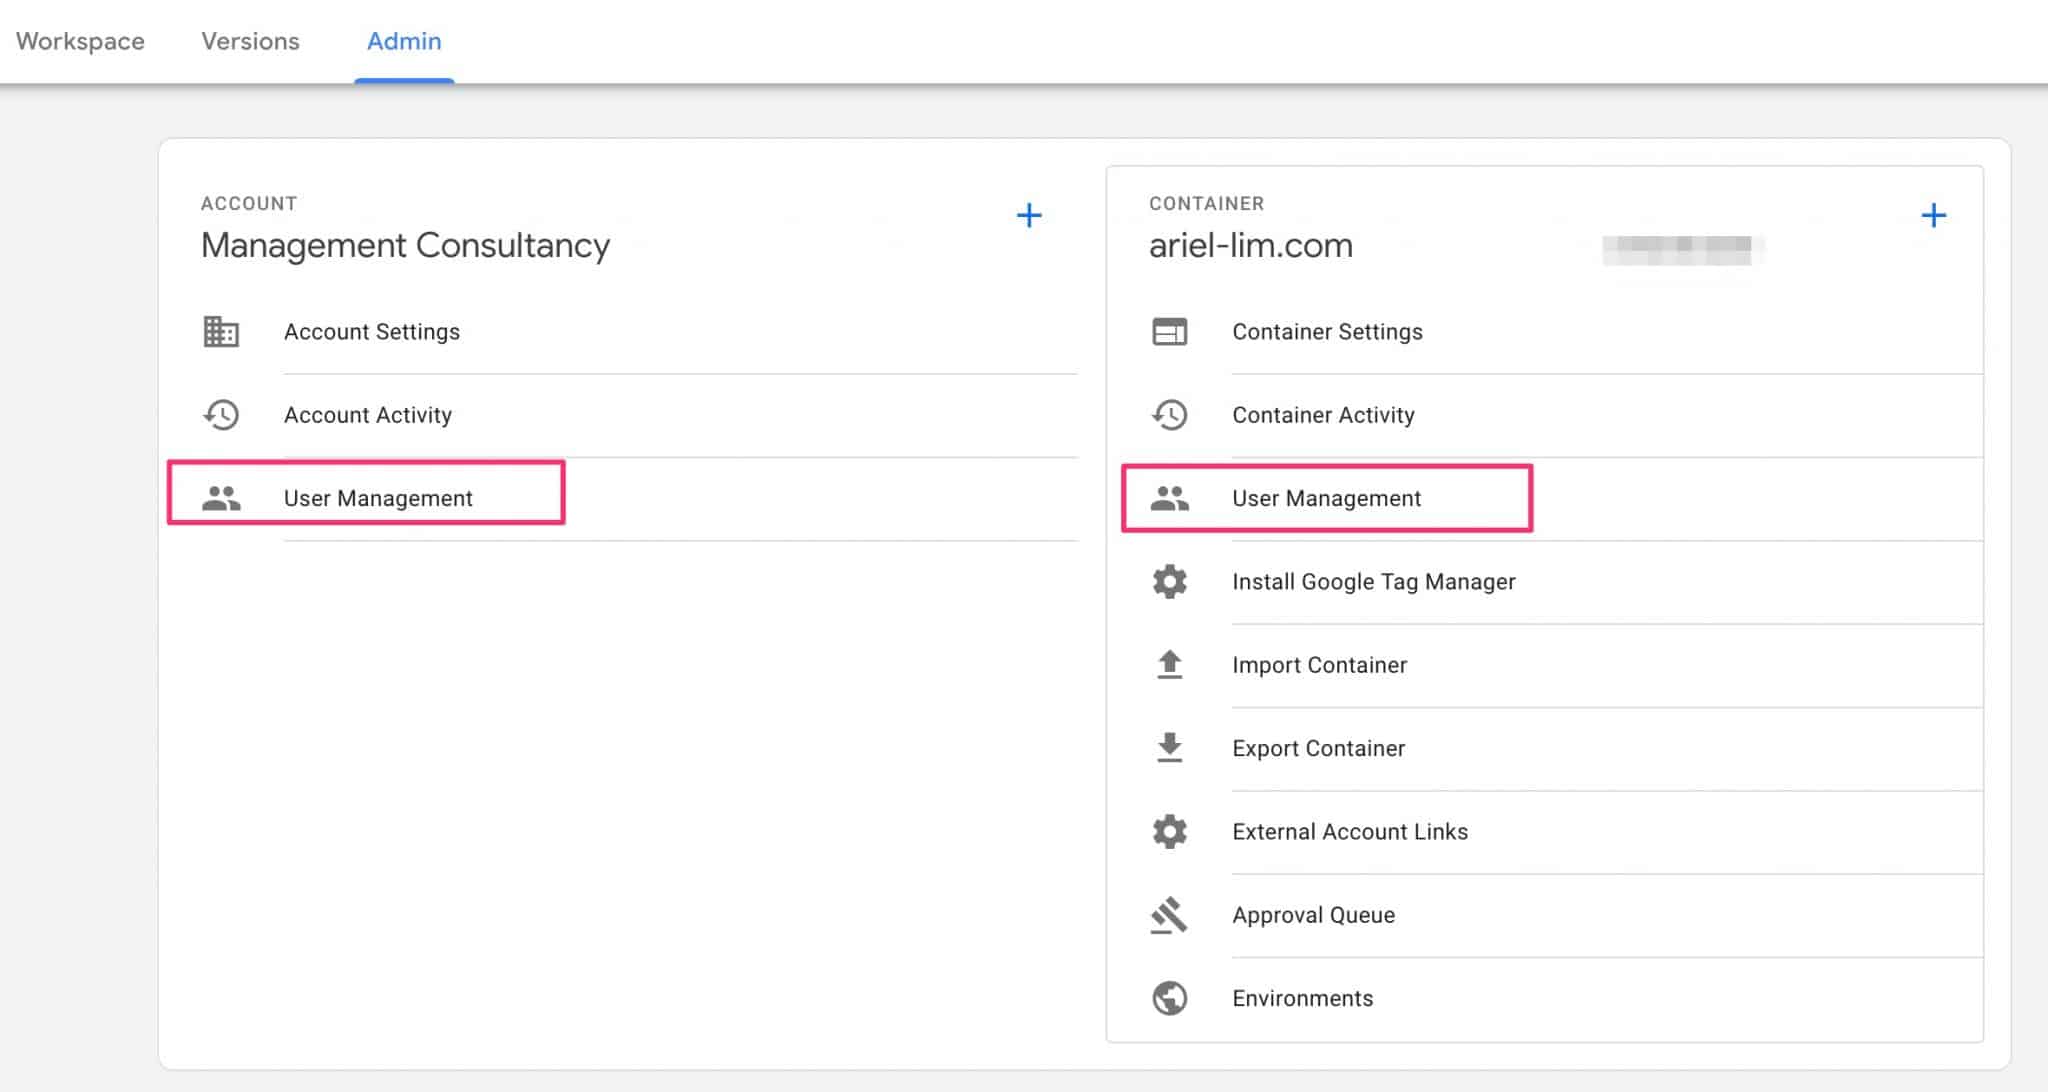
Step 3: Determine the Level of User Access Needed

This part is similar to Google Analytics, but GTM only has two levels:

  1. Account
  2. Container
User management settings in Google Tag Manager

Just like in GA, you’d most likely not give access to someone else at the account level. So, in this case, click on the User Management under the container section.

Step 4: Give the Appropriate User Permission

Next, you’ll see the current users with access to your container.

Add a user to your GTM account

Click on the plus (+) sign to add a new user.

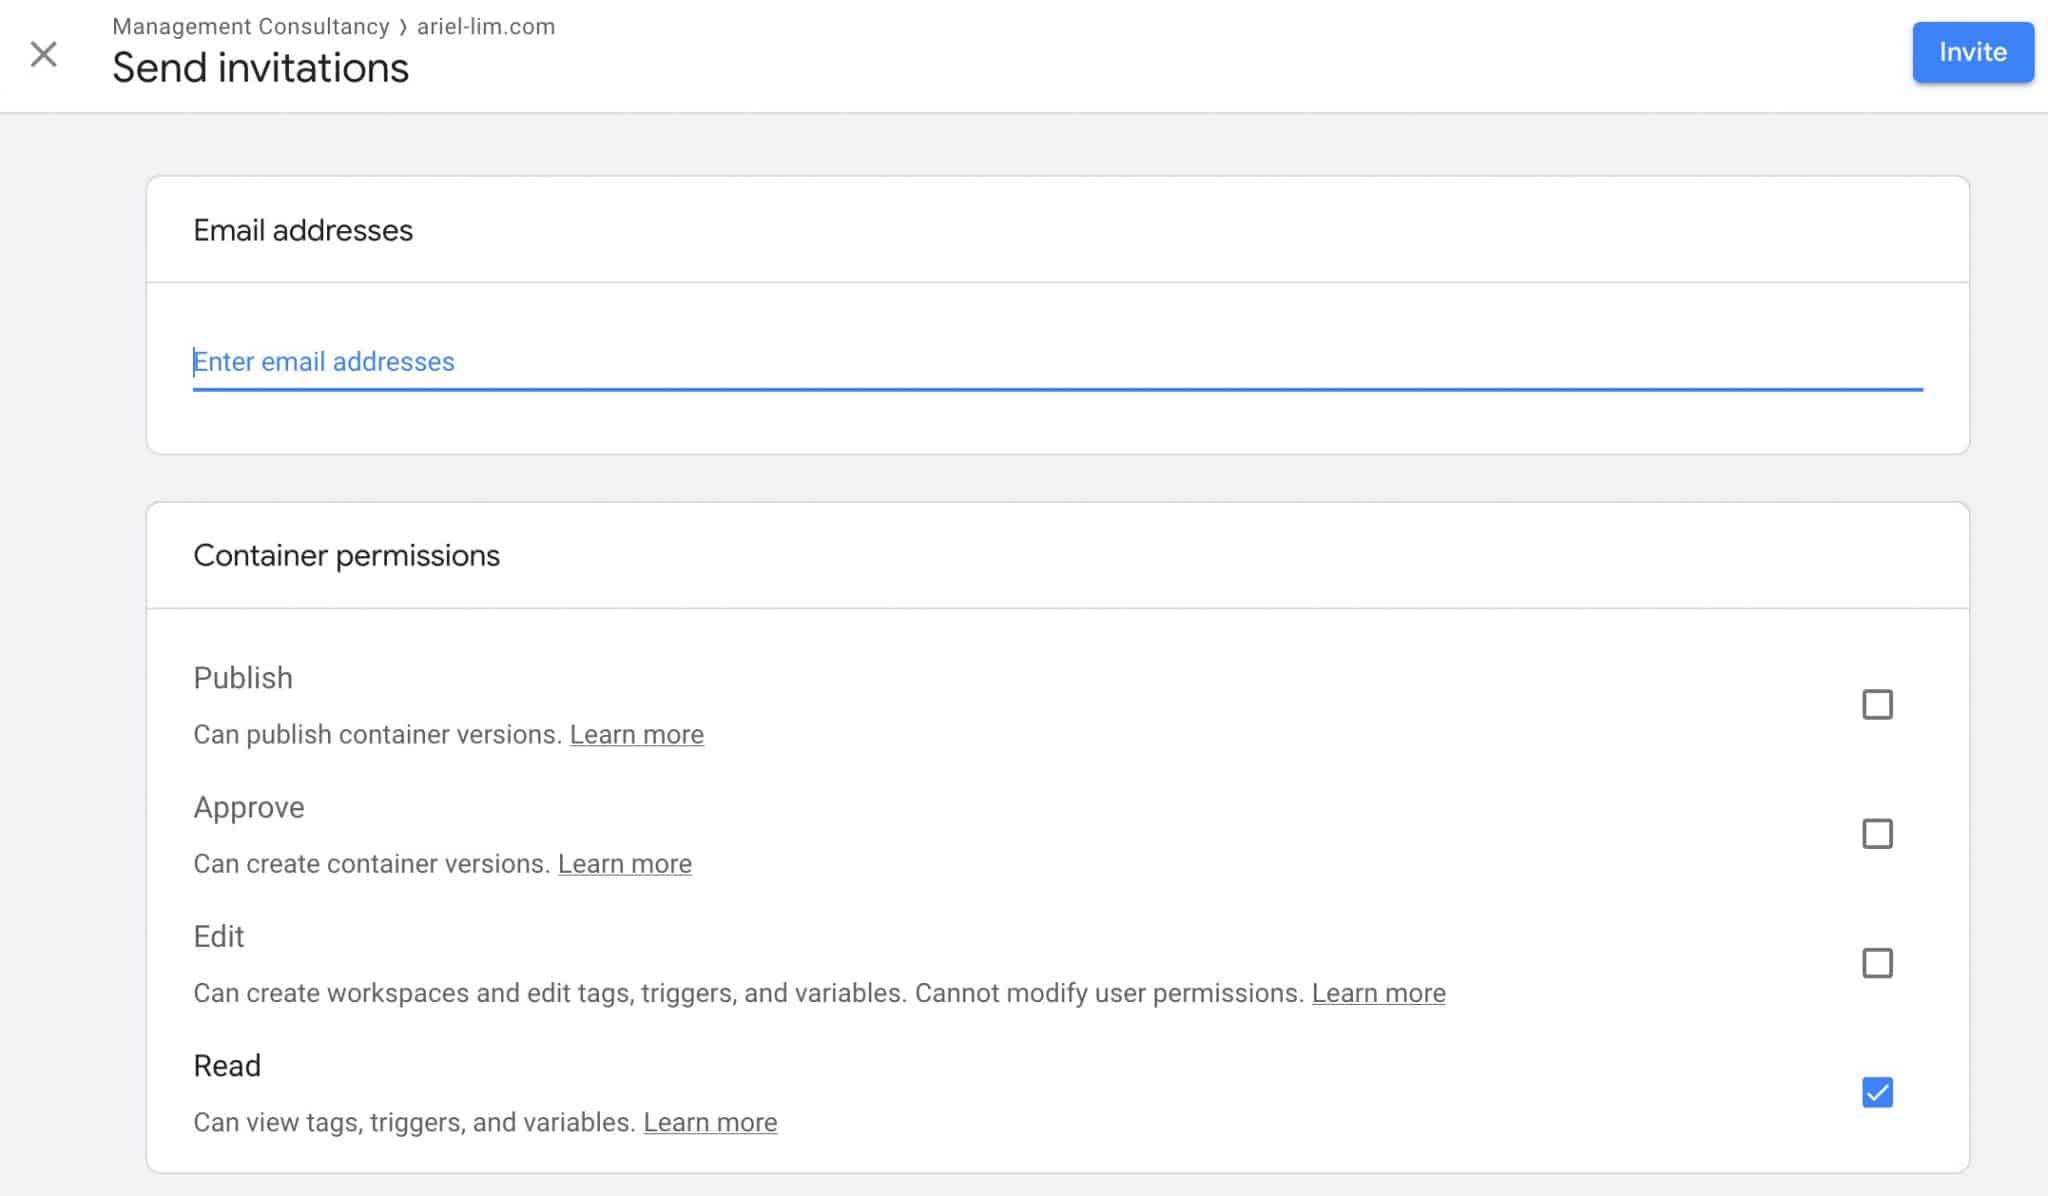
Container permissions inside Google Tag Manager

Now, selecting the permissions here will differ depending on a lot of factors and how you want to be involved.

Remember, Google Tag Manager allows you to deploy and install code directly to your website. For example, you want to try a messenger bot, you install the code via GTM by adding a tag, then publish the container. That messenger bot is now live on your website.

Take those factors into consideration when giving user access.

For me, I always request publish permission at the container level. The reason for this is I often implement new tech for my clients. For example, I configured Facebook Pixel, Google Ads, LinkedIn Ads for this one client. I also installed some heat mapping and A/B testing software. So, imagine how much time this would take if I can only set it up but can’t get them live (approve or edit).

If you want to be hands-on and only give them edit access, you would have to be the one to review and approve the changes yourself. This means you need to spend time and understand what the changes are all about. Otherwise, you will just end up causing more delays in getting your projects implemented.

Consider what your needs are and make sure you also stay on top of this because everything that you publish is automatically live on your website.

How to Give Access to Your WordPress Website to an Outsourced Agency or Consultant

The next thing you should learn is to give someone access to your website. Here are the steps you need to take.

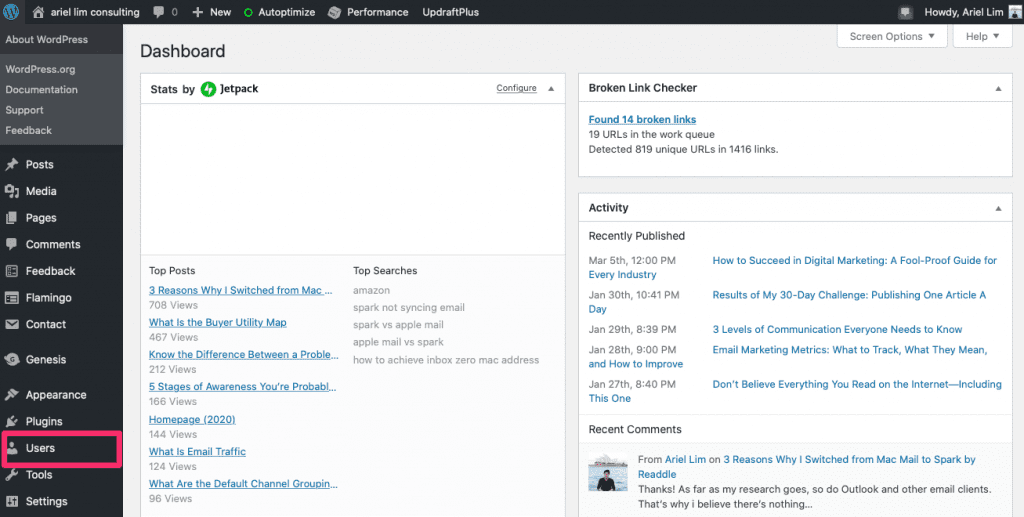
Step 1: Login to WordPress and Click on Users

How to Add a User to Your WordPress Website Step 1

Step 2: Click on Add New

How to Add a User to Your WordPress Website Step 2

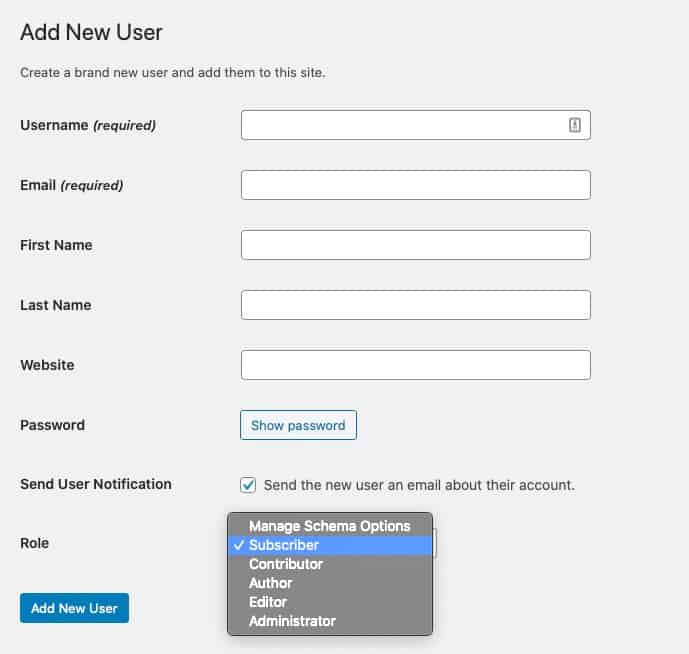
Step 3: Enter the Details

At this stage, all you need to do is enter the required information and you’re all set.

The most important detail I’d like to highlight here is the role settings.

How to Add a User to Your WordPress Website Step 3

I always request for an administrator role. That way, I can make modifications and edits easily. But that is not always the best practice.

Before you give someone admin access, make sure you trust the person because with that type of access, they can steal data or shut down your website. They can even remove you from the list of admins in some cases.

So, limit the number of administrators on your WordPress website. The other roles here are for different uses. For example, you have several writers. You can give them author or contributor access. You won’t have to worry about them messing up with your site. In most cases, they can only access the posts section. To learn more about the different roles, feel free to read WordPress’ documentation.

Over to You

Giving access to a 3rd party doesn’t have to be difficult. You just need to know what you are giving them access to.

Giving them your username and password is a terrible idea and can be used against you. If you give them your email address and password, which you use on all your accounts, people with malicious intent can easily change that password and extort you for money.

The same thing can happen when you grant outsourced digital marketing agencies and consultants with access to your account. The best way to prevent this is to give them limited access but doesn’t hinder them in their work. Just like what I discussed above.

I’ll be adding more to this list as time goes by. Do you have any tools that you want me to cover here? Let me know in the comments below.

Ready to Grow Your Business with Digital Marketing? Use These 3 Free Tools

Free Digital Marketing Tools You Need to Use

Digital marketing is essential if you want your business to grow. It gives you more reach than you could ever have. It also removes the guesswork from the equation, that way, you don’t have to waste any of your limited resources.

If you want to grow your business, you have to use digital marketing. Period.

Sadly, a lot of businesses just create a Facebook account, sometimes a website, start posting pictures of their products, then call it a day. To the more tech-savvy ones, they have a nice-looking website that has a signup form that collects emails for them. Some dabble in advertising like Google Ads or Facebook. But that’s pretty much it. That’s what they call digital marketing.

While all these things fall under the realm of digital marketing, I’m sure you know that that approach is not effective. This is the biggest reason why they typically do not see any return on their investment nor see their business grow sustainably. And they blame digital marketing for this.

And that’s why they say, “Digital marketing won’t work for my business.”

Over the years, I’ve learned not to respond to this emotionally. I’ve learned that I can’t force people to believe in something they don’t want to believe in. As the saying goes, “when the student is ready, the teacher appears.”

If you’re serious about digital marketing and how it can help you grow your business sustainably, you have got to use these three FREE tools. And all you need is a Gmail account.

3 Digital Marketing Tools to Help You Grow Your Business

Google Analytics

You’ve no doubt have heard of Google Analytics (GA). It’s one of the most-used analytics/tracking software all around the world.

If you don’t have this installed on your website, you are wasting a lot of opportunities.

One of the most common excuses I hear from business owners on why they don’t have Google Analytics installed on their website is they just created a website. They don’t have much traffic anyway.

Well, how would you know you don’t have traffic in the first place?

Why Other Free Tools Don’t Match Up

Other software will give you basic analytics. But they are not as comprehensive as the one provided by GA. In fact, if you’re on the WordPress platform, you might have used or considered using JetPack. It offers site analytics plus some other cool features.

Unfortunately, it doesn’t give you an accurate report in terms of traffic.

I noticed this last month when I was optimizing my website for speed. I noticed that there are certain days where my traffic in JetPack spiked but remained low in Google Analytics.

JetPack statistics

When I asked WordPress support on this, they verified that they don’t block, nor have a way to block bots and crawlers.

To give you some background, what happened was every time I checked my speed on Google PageSpeed Insights or Pingdom, that traffic was counted by JetPack.

Using Bad Data Can Lead to Bad Results

Inaccurate data is misleading. If I use the data in JetPack to guide my plans and campaigns, that would have been disastrous. Granted, my current traffic isn’t that high, so it might not have an effect.

But imagine if you are getting 30k visits or more and when you dig in, more than half of that is coming from your own visits to your website. That’s definitely not something you want.

Google Analytics with 30k Pageviews

Regardless if your website is new or old, installing Google Analytics will only benefit you. Plus, if you install GA today and you only do very little digital marketing, in a year’s time, you would have gained a lot of data already from people visiting your website.

That data is priceless.

You can’t backtrack your data, meaning, if you only installed GA a year from now, you would only be able to capture data moving forward. All the data for the past year would have been lost. And that’s just an opportunity wasted.

Google Tag Manager

Google Tag Manager (GTM) is another free tool that allows you to implement new technologies on your website (or app). What I mean by that is you can easily add, remove, and modify code or tags without the need to learn how to code.

Allow me to explain.

If you want to add a chatbot on your website, you would only need to install a piece of code. Then, it will be live on your website. Or, let’s say you want to add a tracking software like Google Analytics…

<! – Global site tag (gtag.js) - Google Analytics -->
<script async src="https://www.googletagmanager.com/gtag/js?id=UA-12345678-9"></script>
<script>
  window.dataLayer = window.dataLayer || [];
  function gtag(){dataLayer.push(arguments);}
  gtag('js', new Date());

  gtag('config', 'UA-12345678-9');
</script>

You’d need to add that tracking tag on all your pages.

Why You Need to Use Google Tag Manager

Without GTM, the only way to add tags is to add them manually, or through plugins.

This presents a couple of issues I discussed in another article:

  1. You’ll have to add them one-by-one to your website; or,
  2. Have someone else (developer/programmer) add it for you
  3. Which will take some time, especially, if you don’t have one in-house; so,
  4. You’d have to coordinate with multiple people, instead of doing the work; and
  5. That will inevitably lead to delays

But, if you’re using GTM, you only have to deal with that process once. Heck, you can even do it yourself. I’ve provided a step-by-step tutorial on how to add GTM to your website.

Once you added Google Tag Manager, you can now add/implement new and cool stuff on your website without the need to rely on other people. It’s faster and simpler. You get to test if something is working or not right away.

Assuming you have someone who can tweak and add the codes for you, it’s still better to add them via GTM because it automatically loads them asynchronously—which is very important if you want to make your website load faster.

Google Search Console

The last tool in your digital marketing arsenal should be Google Search Console (GSC), formerly called Google Webmaster Tools. It’s also one of the least known and, consequently, the least-used tool.

Google Search Console

But it offers a lot that Google Analytics can’t provide:

  1. It tells you which pages are the most popular (which you can find in GA), but
  2. It also tells you the exact keywords/phrases that people used to find you
  3. Which among these keywords they clicked on; and
  4. Its position on Google

When you combine this with Google Analytics, you get a very powerful combination at your disposal.

How to Use Google Search Console with Google Analytics

Let’s use this example of an eCommerce client. Obviously, they want to earn more revenues. But they don’t want to just keep selling. They want to provide educational materials for their customers.

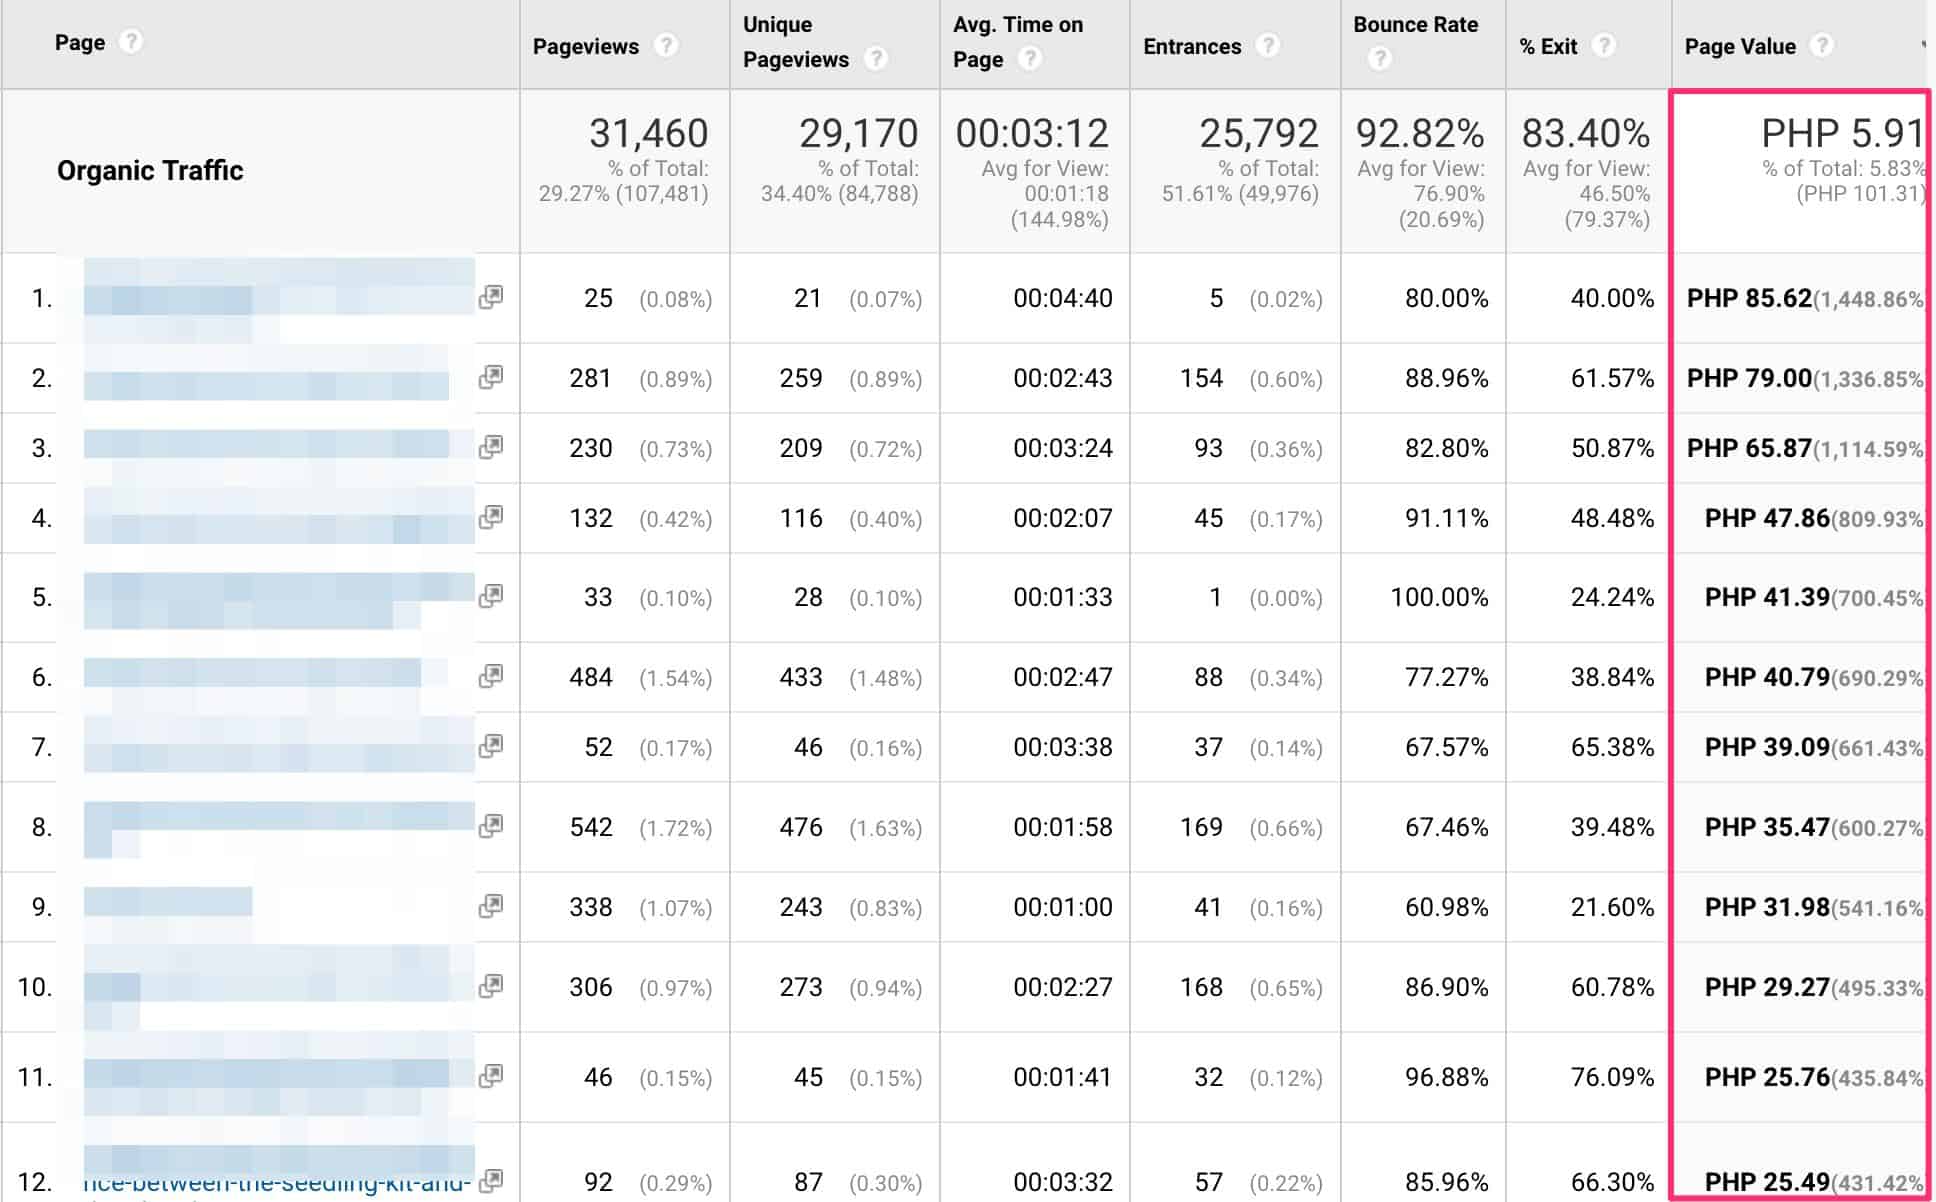
So, the first thing I did (which I won’t cover here in detail) is to setup goals in Google Analytics. These goals have a corresponding value. What happens is when people convert on those goals you set up, the pages the contributed to that conversion gets some value. Since this is an eCommerce client, the goal is an actual conversion or purchase.

Here’s what the reports looks like in Google Analytics that shows the page values—how much each page is worth.

Google Analytics Top Pages Report with Page Values


You can then filter which pages contributed more to the conversion then optimize that further so you can get more conversions.

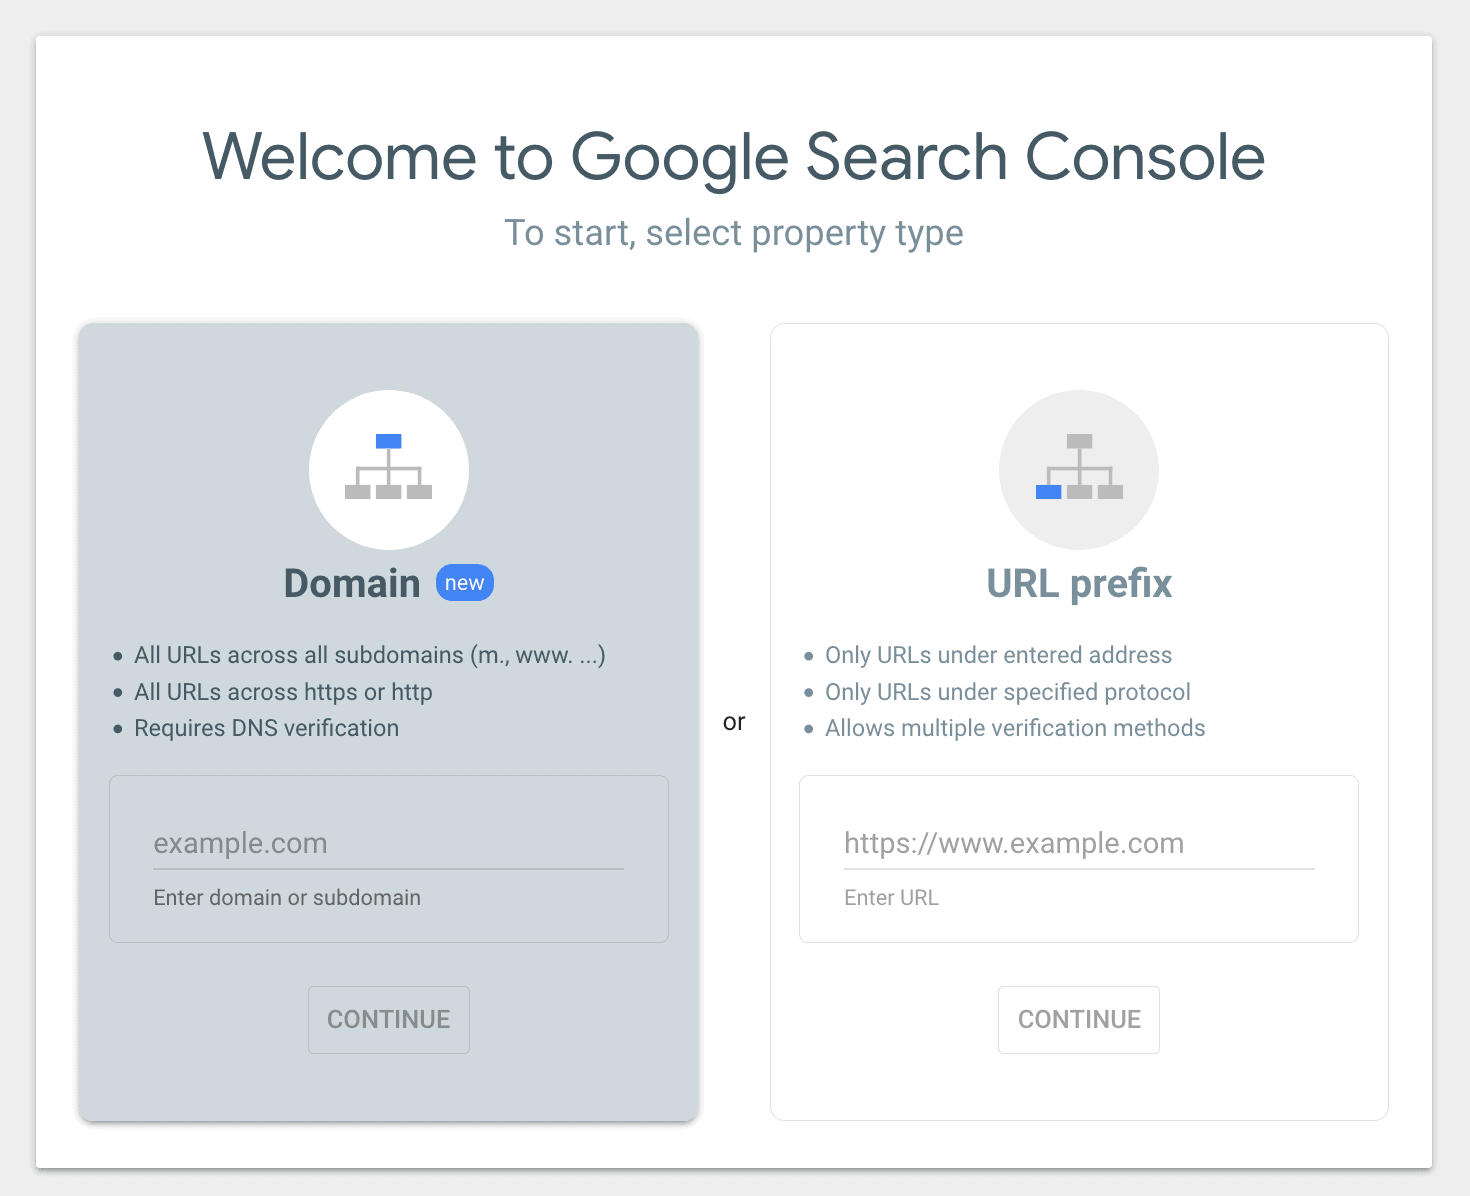
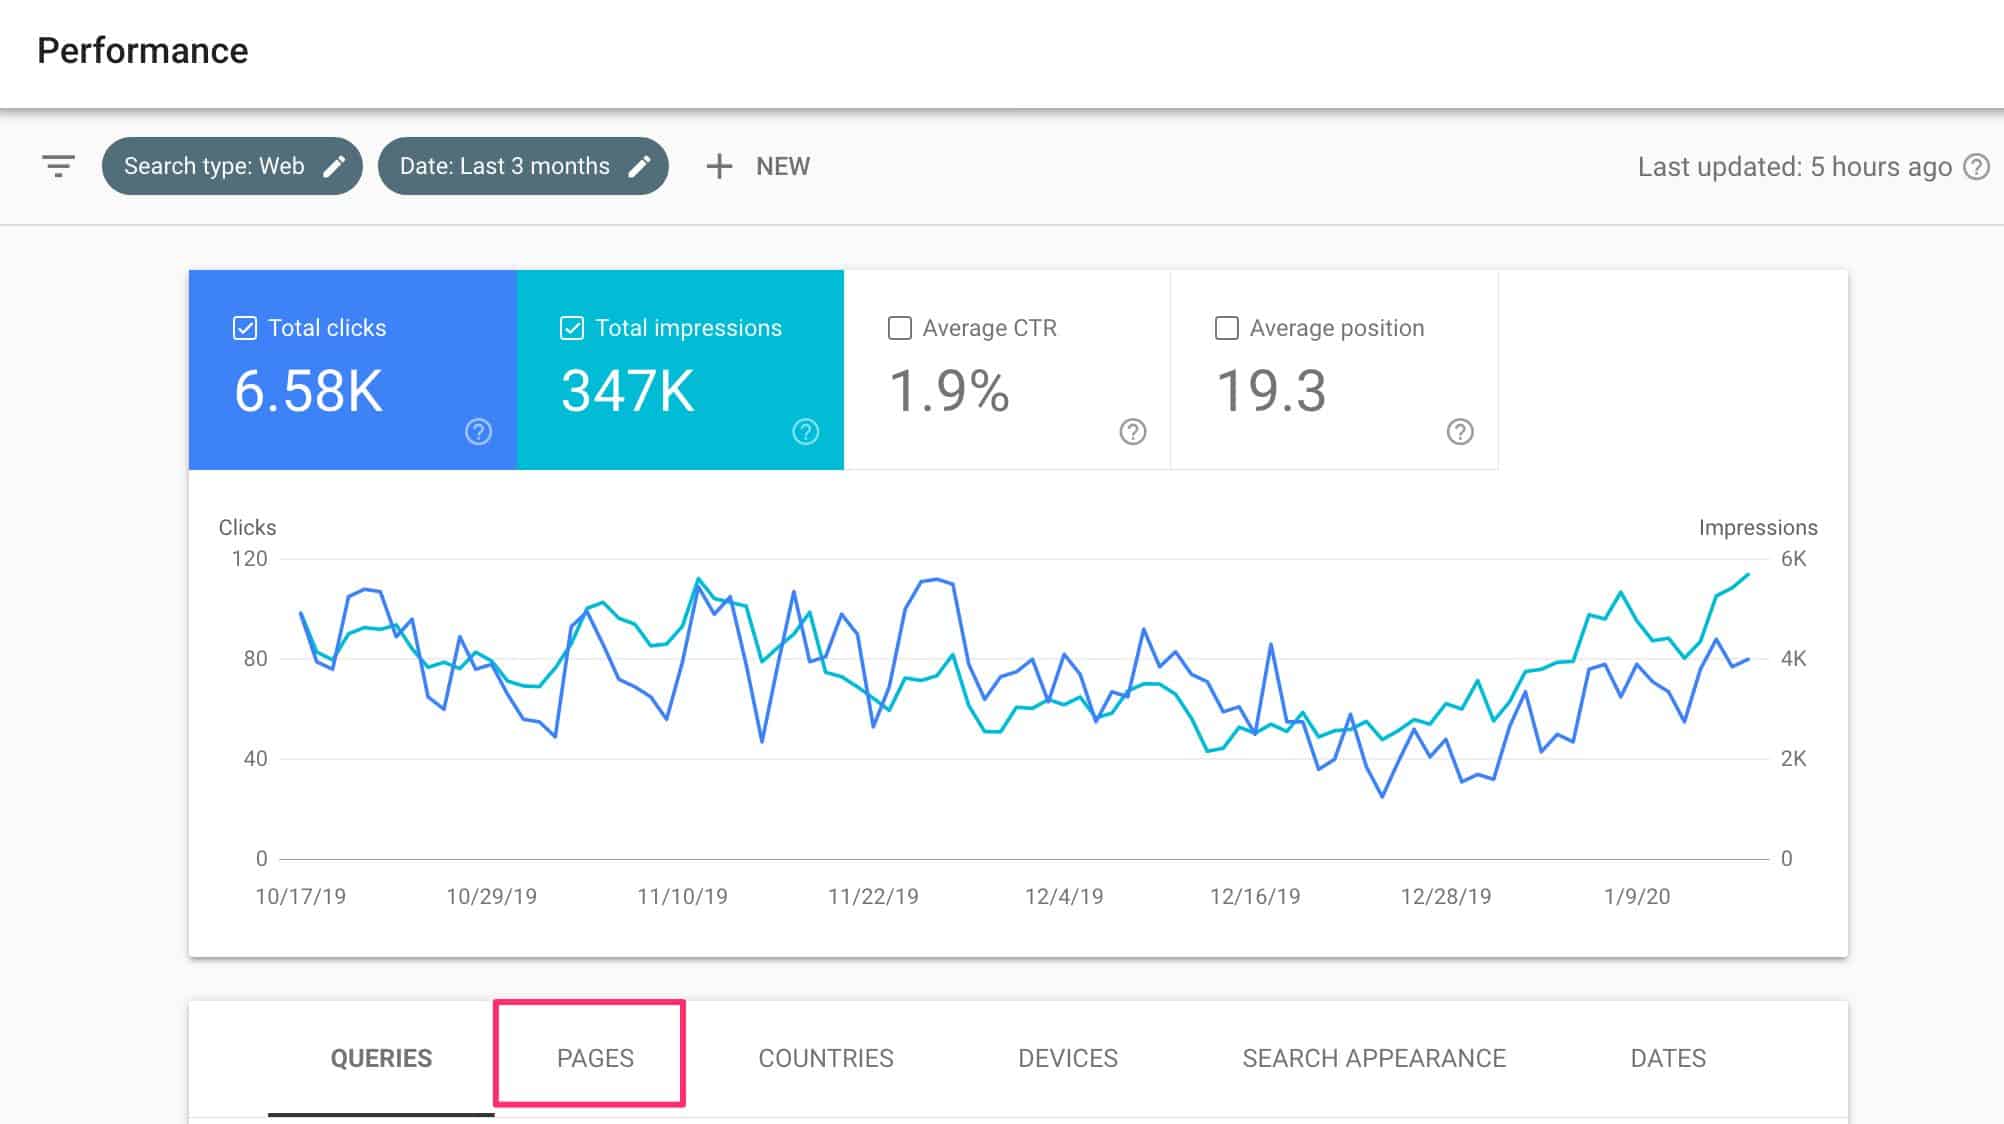
So, what I can do is take the highest converting page and look for that in Google Search Console. You can do that by logging in your account, then head over to the pages tab.

Google Search Console Pages

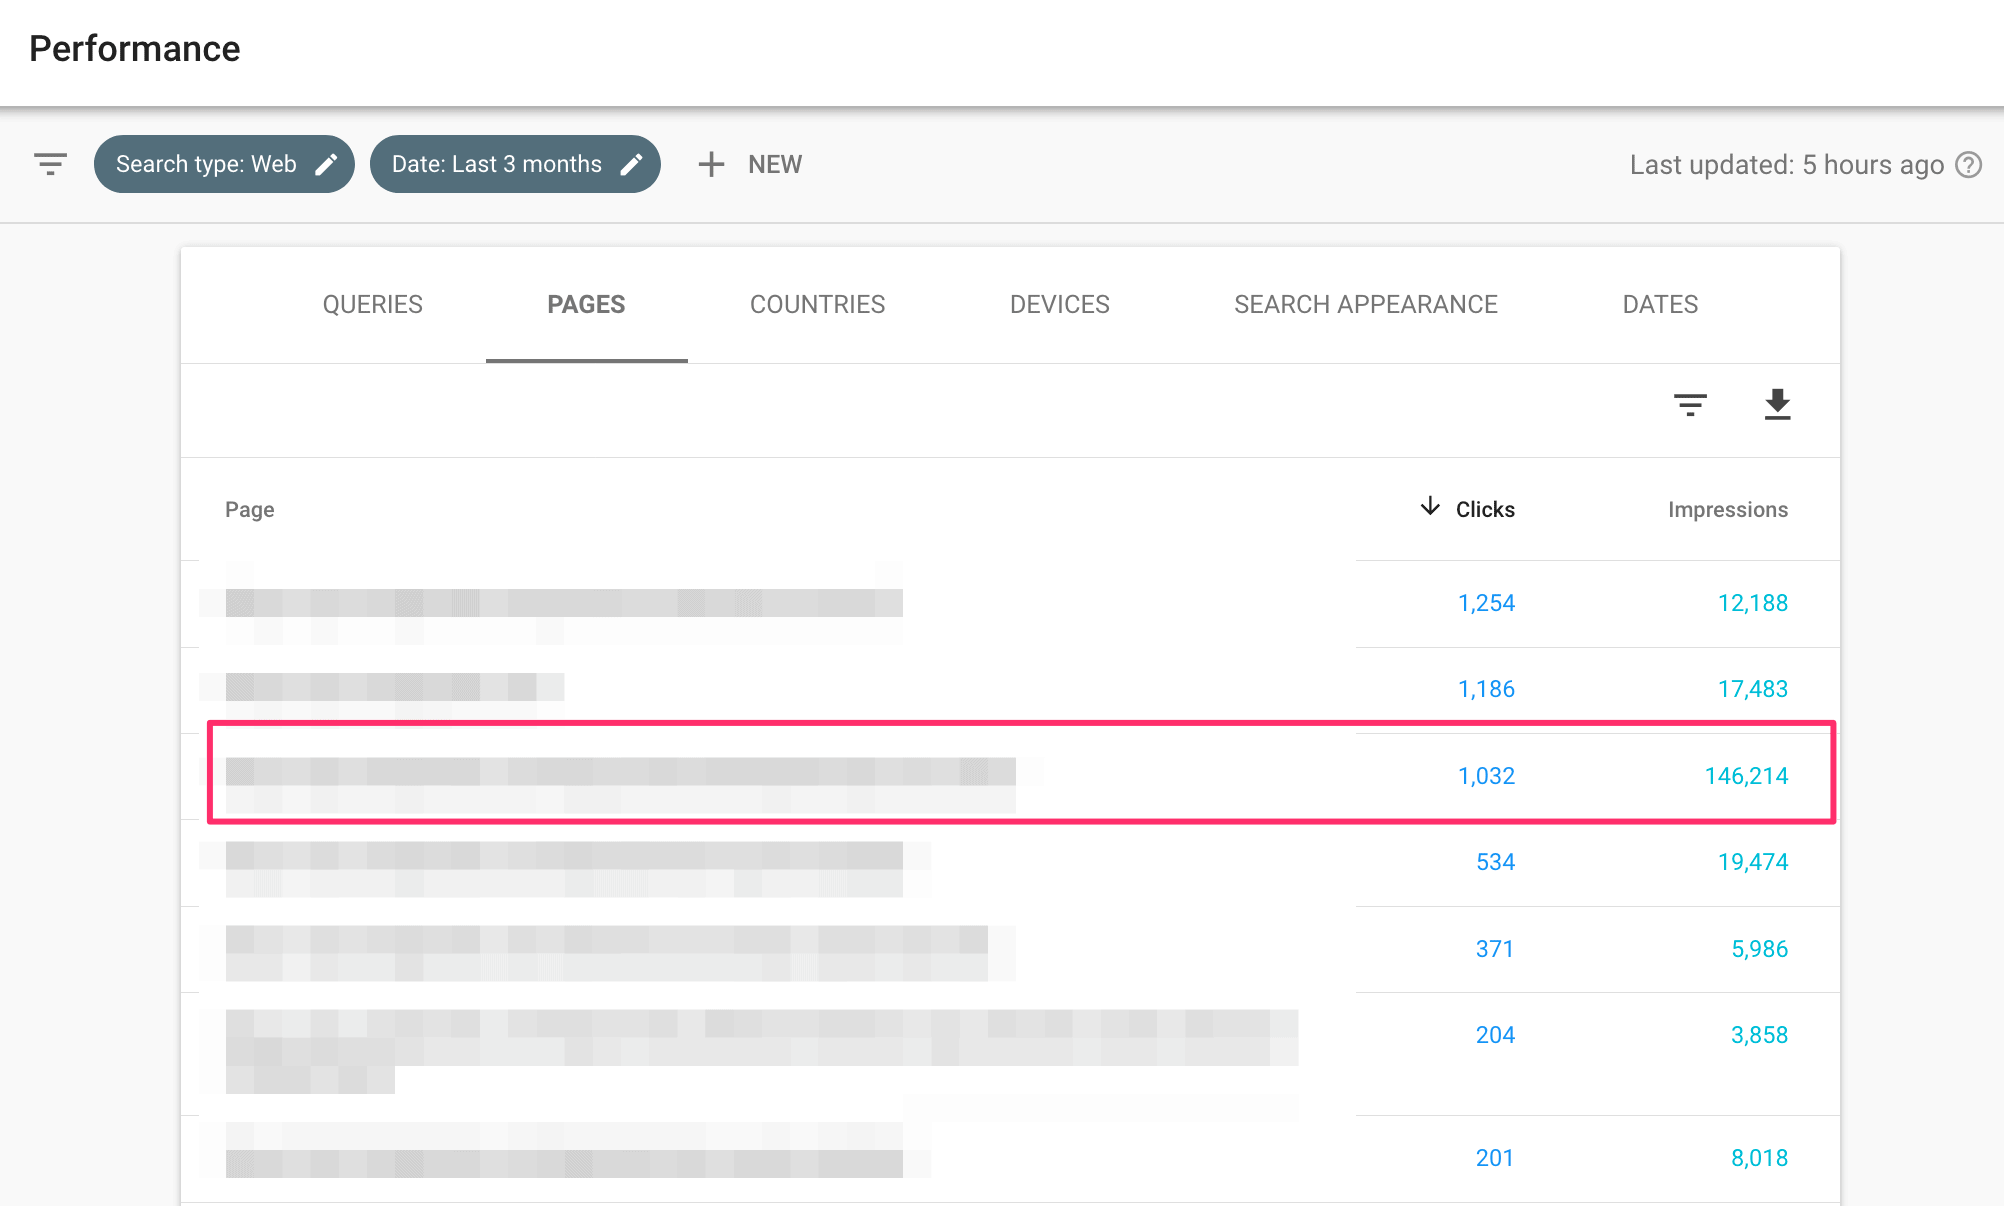
Then, you’ll see all the pages on your site. What you’ll want to do is look for that top-performing page (or any other page you’d like to optimize) and click on it.

Top Pages in Google Search Console

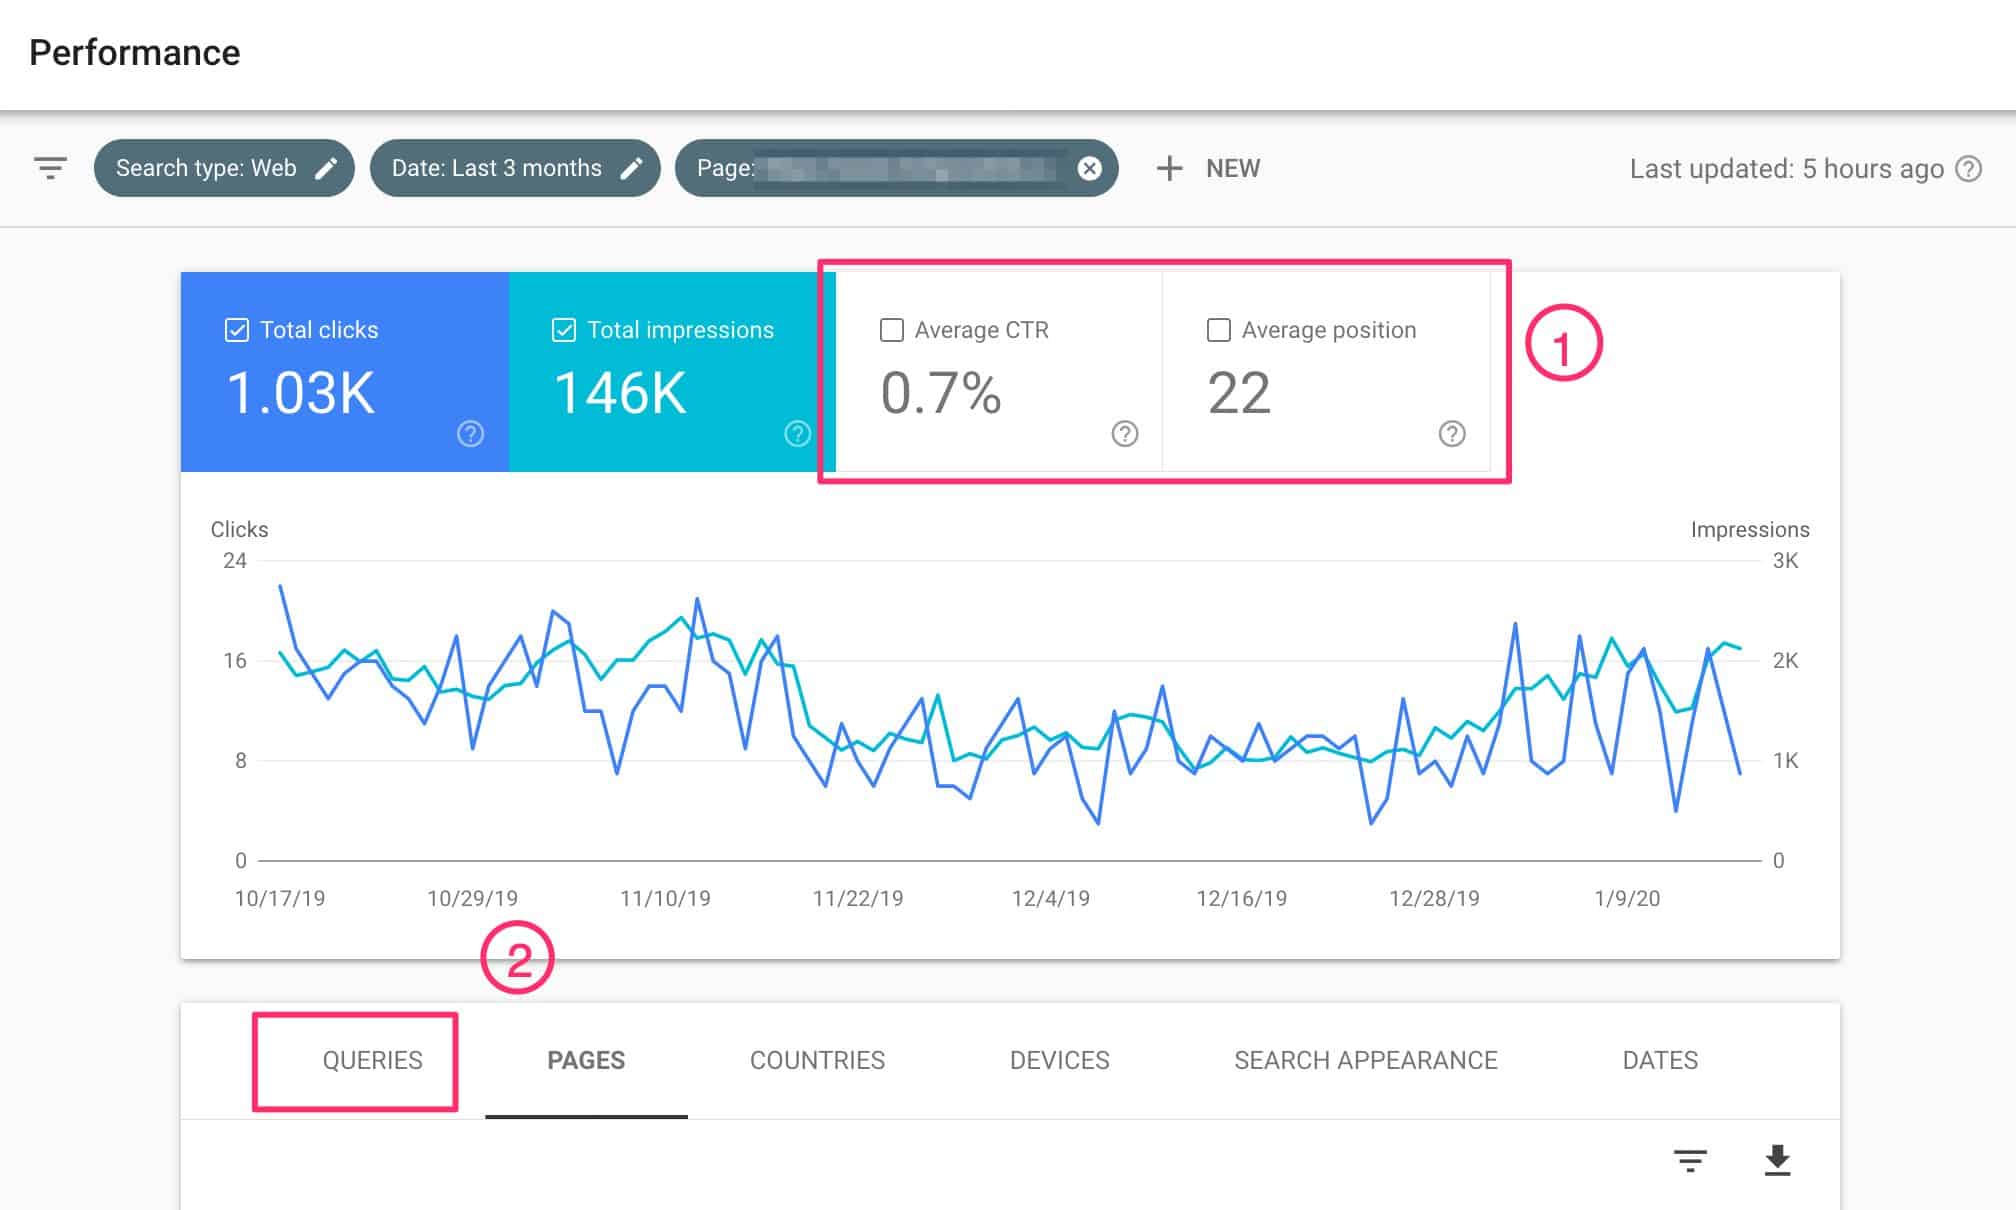
Once you selected that particular page, GSC will refresh to only show data for that particular page.

Look for Queries/Keywords in Google Search Console

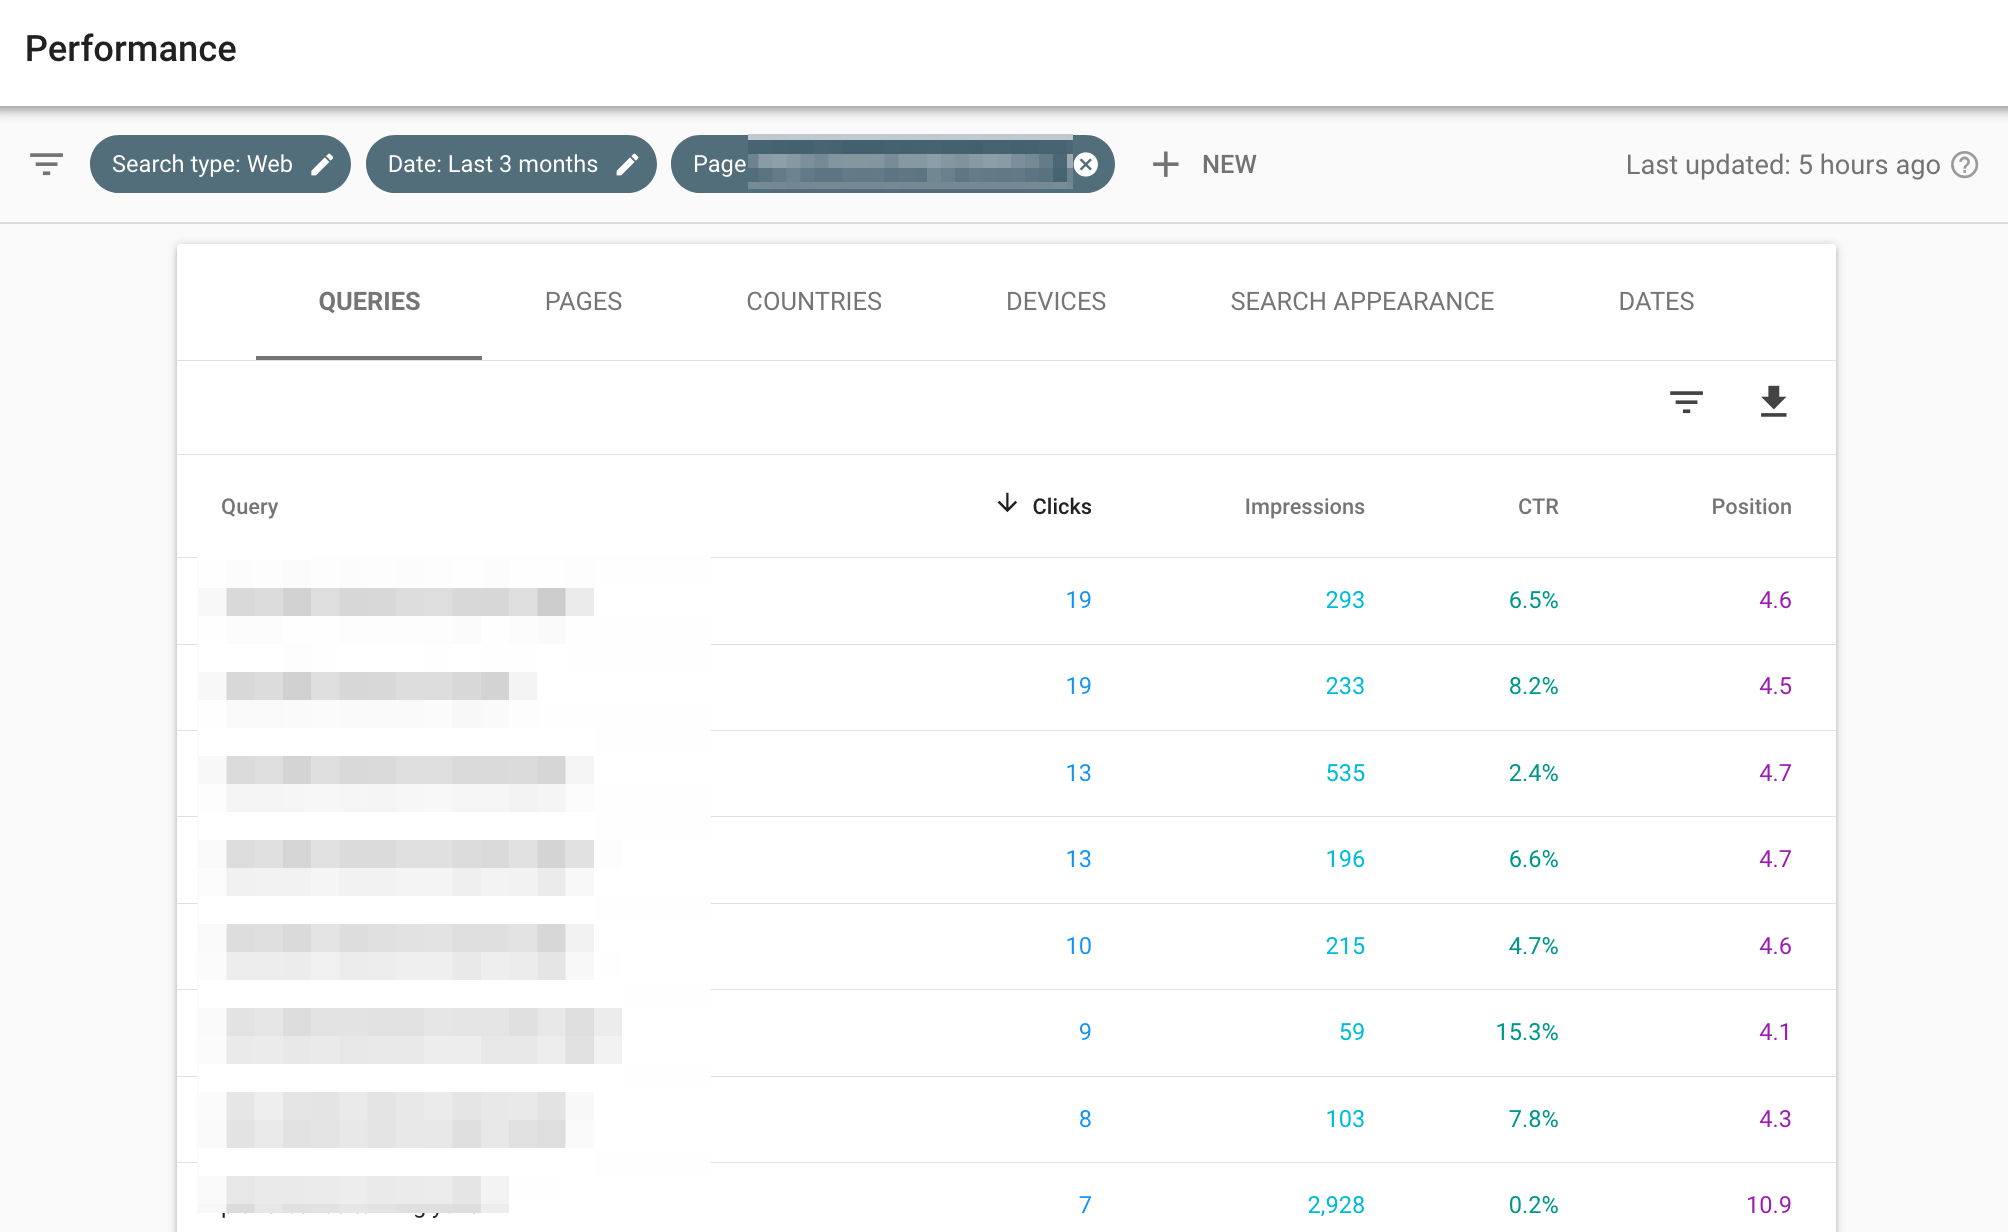
Next, you’ll want to click on the CTR and average position at the top, then click on the queries to find out exactly which keywords people used to search for you and which ones they clicked on. You’d find something that looks like this…

Use Data on Google Search Console to Optimize Your Website Pages

With that, you now know exactly which keywords and phrases people used to find your site. One thing you can do with this data is to find the keywords that have high impressions but low click-through rates (CTR). What that means is people are finding your content, but they aren’t clicking on them.

That might mean they don’t find it relevant or it’s not comprehensive enough. So, what you do is add these keywords and phrases to your page’s headers and content. You also add it to your title and meta description.

Do this for your top-performing pages and they will continue to rise, get more traffic, and perform better.

Over to You

These three tools are all free. So, it doesn’t make sense that you don’t take advantage of them. You don’t need to be an expert in everything, nor have to spend so much just to compete in the digital marketing arena.

In order to succeed and grow your business, you only need to have the right tools to guide you in your decision-making process. That way, you won’t make the wrong assumptions, nor use inaccurate data in your plans.

If you need help setting up these tools on your website, feel free to reach out in the comments below.

Email Traffic: Why It’s Important (+9 Tips)

what is email traffic and how to increase email traffic

Email traffic in digital marketing is the kind of traffic that comes from your email marketing campaigns. It’s one of the most valuable sources of traffic to your website because it comes from existing leads and customers.

Take note that not all links in your emails go to this traffic. To make sure it appears properly under this channel grouping, you have to integrate your email marketing software with Google Analytics or manually tag your links with UTM parameters — and make sure the medium parameter is exactly “email.”

If neither one of those two options is met, the link will be tagged under direct traffic. Also, UTM tags are case-sensitive. So use “email” without the quotes as small case.

Importance of Email Traffic

Traffic coming from your email campaigns is one of the most valuable traffic you can get.

Why?

Because this traffic comes from your existing leads and/or customers. After all, they would’t receive any emails from you if they didn’t opt in your email list, right?

These people behave differently than cold traffic primarily because they are further along the buyer’s journey.

They are more invested in you and your company. They know you more than people who are hearing from you for the first time.

This is the main reason why email marketing remains the favorite channel among marketers — it brings the highest ROI across different channels.

Uses of Email Traffic

Email traffic tells you how engaged your current leads and customers are.

It’s a great indication of which messaging is working in your email marketing.

If you are using different marketing emails and tracking them properly, you can see the performance of them in your Google Analytics account.

As you already know, there are two primary metrics to look at when it comes to email marketing: open rate and click-through rate (CTR).

Open rate indicates your subject line convinced your reader to open it; while CTR tells whether your copy/messaging itself is relevant and compelling for the reader to take action — click the link and do whatever you want them to do.

How to Increase Email Traffic

Below are some tips to increase your email traffic. While this list is not exhaustive, these should be enough to get you started.

1. Continuously build your email list

Email lists naturally decay at ~22.5% per year. What that means is a contact in your email list will be practically useless in 4 years.

This could be for a number of reasons. People change jobs and with that change, their email addresses. Your content might become irrelevant to them for no fault of your own. And many more.

Make sure that you continuously generate new leads so you replenish your email list. Here’s a simple 7-step process to generate leads online.

2. Don’t rely on newsletter signups as your lead generation

First, email marketing is not limited to newsletters.

Newsletters are the worst kind of lead generation tactic you can use on your website.

Why?

Because it doesn’t add any value to your readers. They don’t benefit from it. Most businesses only use this to continuously send discounts and promos.

Sample marketing offer to increase email traffic

Instead, create marketing offers. Distribute them on social media and use them in ads to reach a wider audience (like the image above).

3. Use a lead management strategy

As part of the 3 pillars of email marketing, a lead management strategy allows you to segment your email list allowing you to personalize your messaging later on.

Segmentation is what separates successful marketers from the annoying ones.

4. Send relevant email

This builds on the lead management strategy above. What this means is once you are able to segment people coming in your list, send only relevant email to those people.

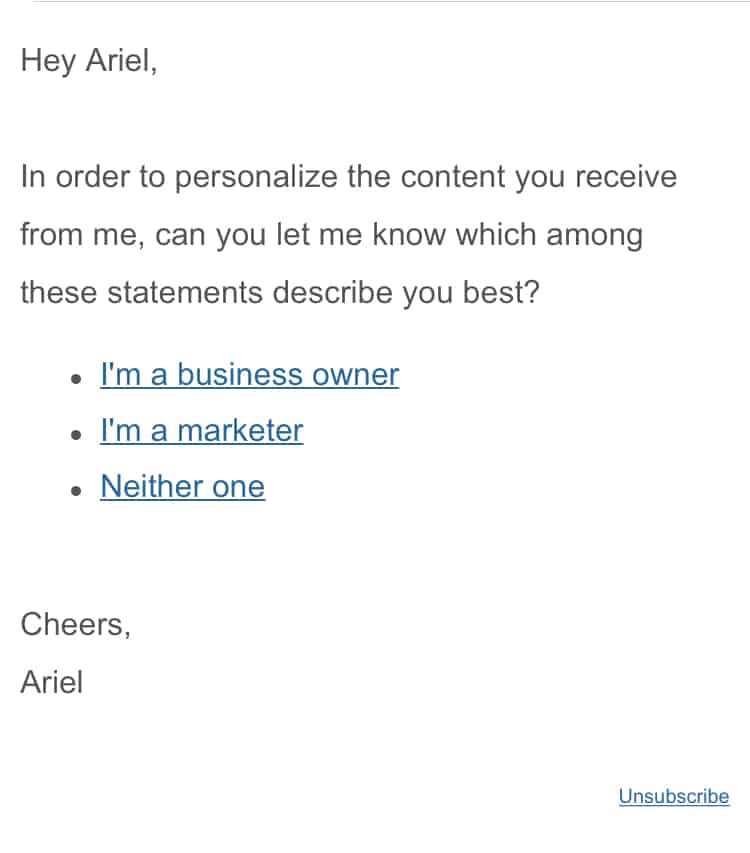
For example, in my own lead management strategy, I determine if the person coming in my email list is a business owner, a marketer, or others.

Sample email for persona segmentation

Once I know who they are, they follow the next tip…

5. Create lead nurturing campaigns per segment

I create lead nurturing campaigns per segment. This way, I only send them relevant emails.

Let’s go back to my example in the previous point.

When people tell me they are a business owner, they are enrolled in a ‘business owner nurturing campaign’ and if they tell me they are a marketer, they enter a ‘marketer nurturing campaign.’

This can be as simple or as complicated you like. You can start with only one lead nurturing campaign. Then, once you build that out, create another one. This way, future leads will then enter nurturing campaign A and some will enter nurturing campaign B.

lead management and segmentation

I wrote a step-by-step guide on how to create your own lead nurturing campaign here.

Feel free to bookmark that page as I’m sure you’re going to go back to it a couple of times.

6. Don’t forget to add UTM tags

As I mentioned above, don’t forget to add the proper UTM tags in the links in your email. Otherwise, when people click on links to it, they will not be tracked under email traffic.

If your email marketing software has an integration with Google Analytics, use that. This ensures all links you are using are tagged automatically.

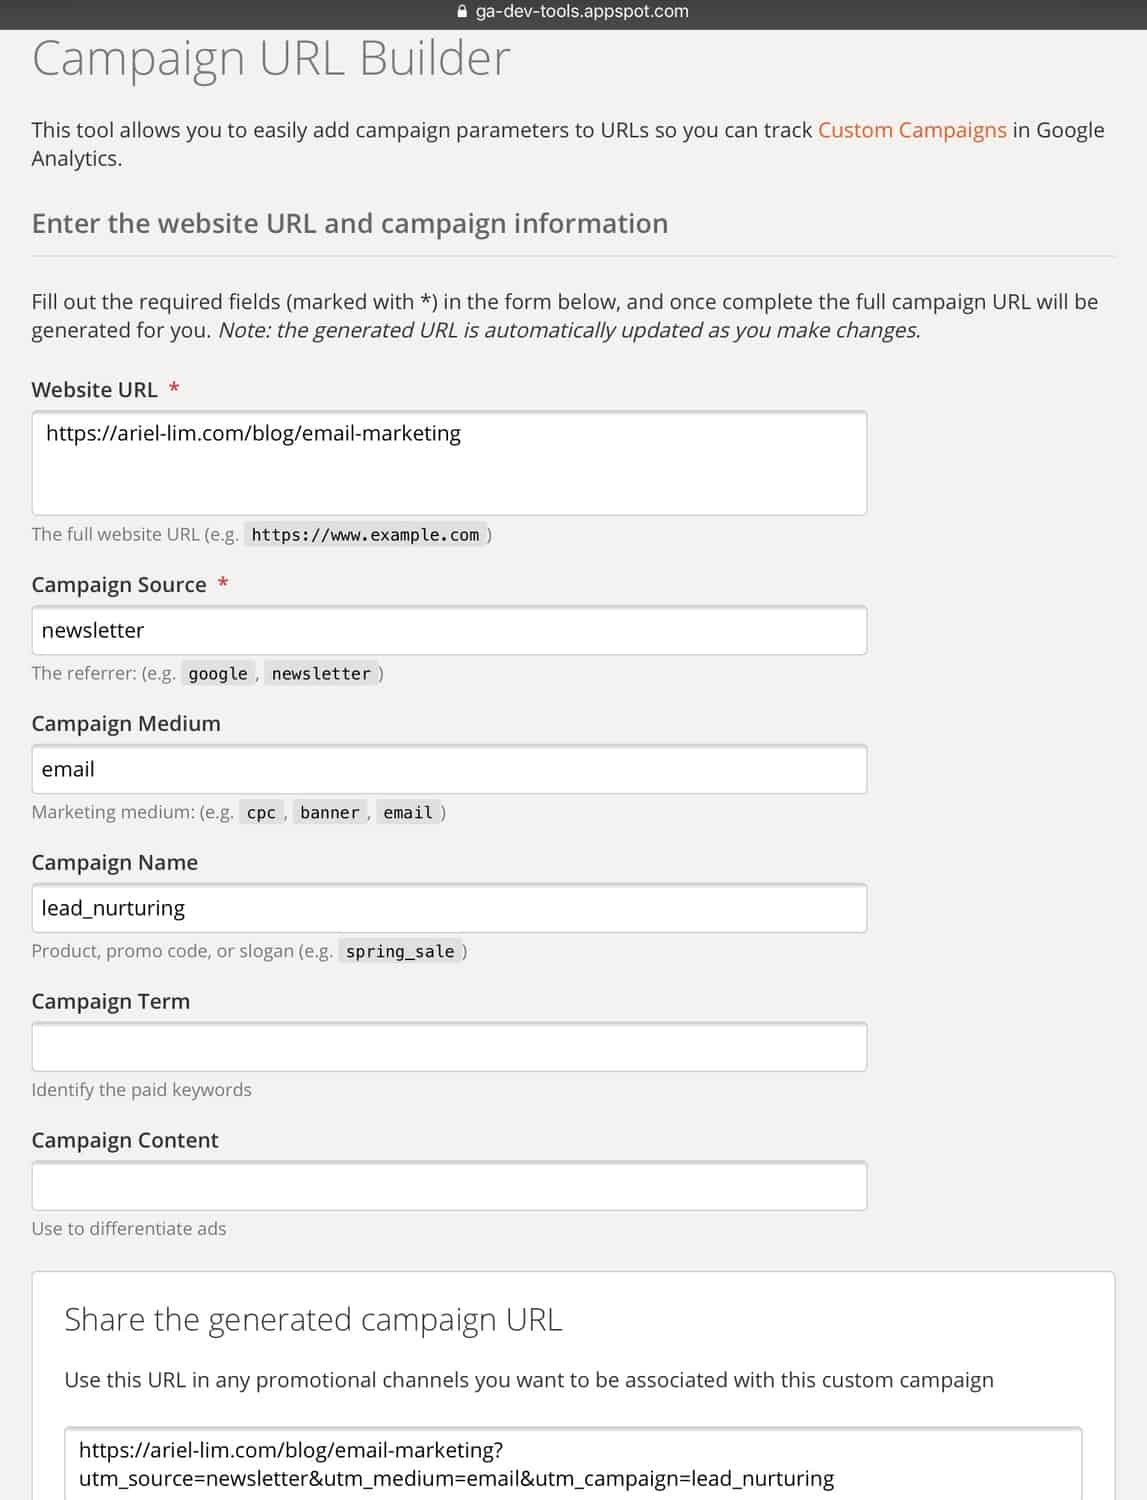
But if not, you can use the URL Campaign Builder by Google. You fill out the fields then copy the link it provides.

Google's Campaign URL Builder

7. Add links to your email

While this may seem natural, there are some people I’ve spoken with who don’t include links in their email.

And make sure they are working, too!

If you’re sending a simple blog article summary/roundup, that email usually has two things: copy and an image.

For example, here’s Pocket’s daily digest email…

Pocket Email with Links

For each blog article, there are 3 links to it: the image, the title, and the save to pocket.

Bottomline: Add links wherever you can.

8. Include links to your articles in your email signature

One other tactic you can use is to add the links to your website in the email signature.

If your marketing and sales teams are aligned, this can be the campaign priority for the quarter. Or maybe a big event coming up soon.

What will happen is all your marketing and sales team’s email signature use the same copy and link to the registration page.

Just make sure you add the proper UTM tags so they get tagged under Email Traffic in Google Analytics. Of course, this can be easily done through an email signature manager, but if you don’t have one, it’s best to create a template then send it out to the rest of the team. That way, they just copy and paste it instead of re-creating it themselves.

9. Link to your articles in 1:1 email conversations

You use email every day to communicate with your customers, vendors and suppliers, contractors, and many more.

If your company is truly creating helpful content, you shouldn’t hesitate to link to them and include them in your email communications.

It’s as simple as, “hey, we recently published a an article on lead nurturing. I remember that you mentioned you were having trouble creating a lead nurturing campaign a few weeks ago. Hope this helps. (Insert link here)

So, What Are You Going to Do Next

Your email list is one of your most valuable assets. It’s the only one you actually own (vs Facebook or any other social media).

Increasing your email traffic gives you a high chance of succeeding because it’s an indication of a highly engaged audience.

A highly engaged audience is more likely to buy from you. And that means sales for you so you can grow, expand, and deliver more value for them.

Are you using any of these tips? Let me know in the comments below.

Default Channel Groupings in Google Analytics: Technical Definition Plus Sample Use Cases

What are the Default Channel Groupings in Google Analytics

Default channel groupings in Google Analytics is what you call the different traffic sources in your Google Analytics account. They are comprised of the following:

  • Organic Traffic
  • Direct Traffic
  • Social Traffic
  • Referral Traffic
  • Email Traffic
  • Paid Traffic
  • Display Traffic, and the
  • Others Traffic

Google Analytics Channel Groupings Technical Definition

Some of the default channel groupings are self-explanatory like email and social, but there are nuances as to how Google Analytics categorizes them.

If you want to be technical, Google defines these as…

ChannelDescription
DirectSource exactly matches direct AND Medium exactly matches (not set)OR Medium exactly matches (none)
Organic SearchMedium exactly matches organic
SocialSocial Source Referral exactly matches Yes OR Medium matches regex ^(social|social-network|social-media|sm|social network|social media)$
EmailMedium exactly matches email
AffiliatesMedium exactly matches affiliate
ReferralMedium exactly matches referral
Paid SearchMedium matches regex ^(cpc|ppc|paidsearch)$ANDAd Distribution Network does not exactly match Content
Other AdvertisingMedium matches regex ^(cpv|cpa|cpp|content-text)$
DisplayMedium matches regex ^(display|cpm|banner)$ORAd Distribution Network exactly matches Content
(unavailable) or (other)Sessions don’t match any channel description

You can find more about them from Google’s Help Center.

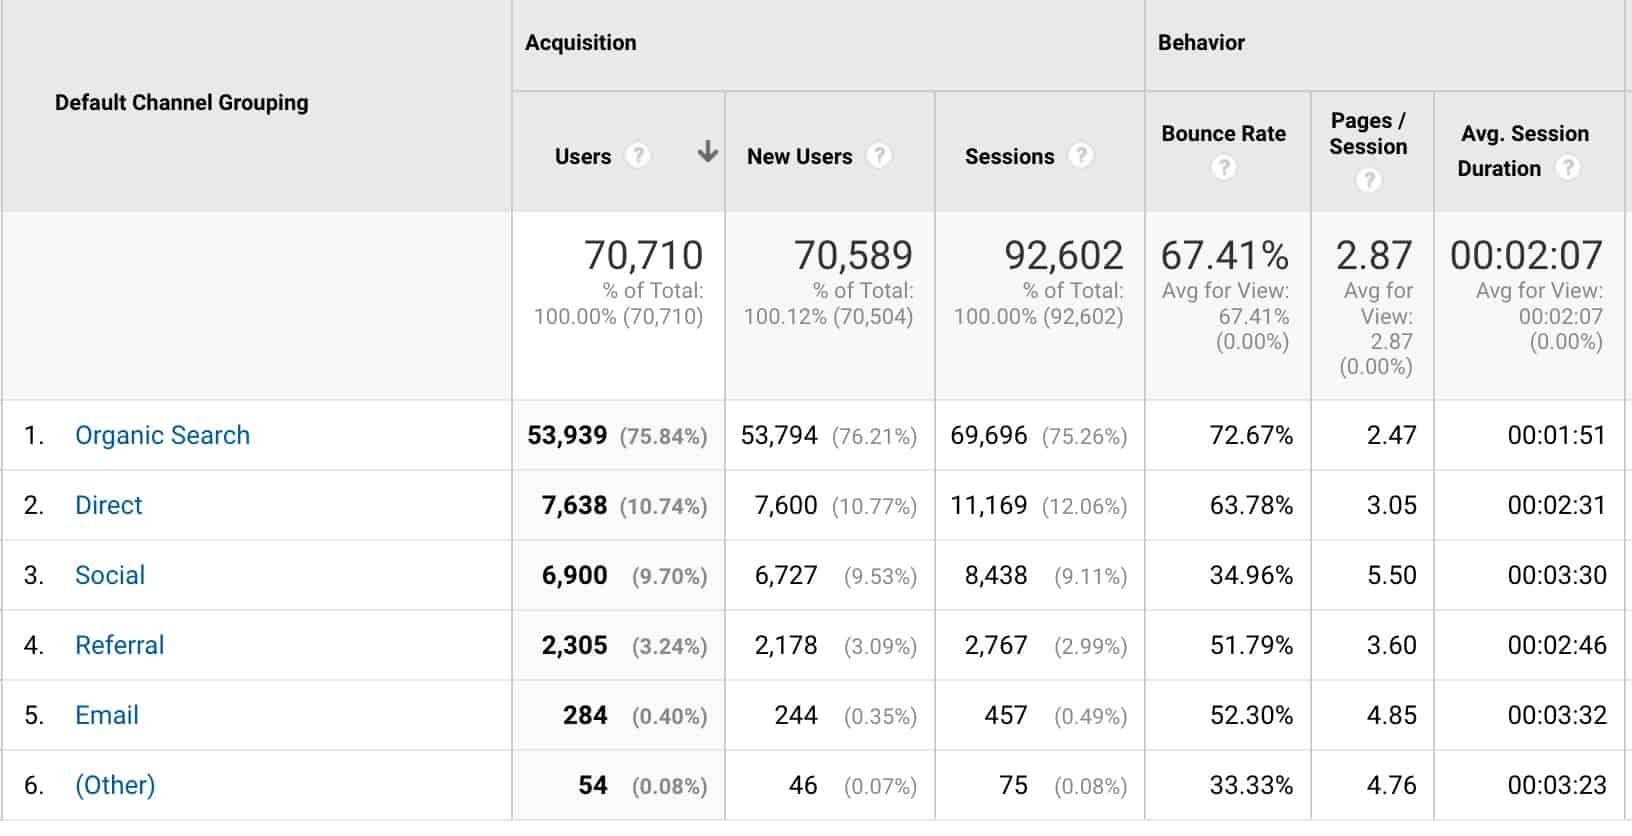
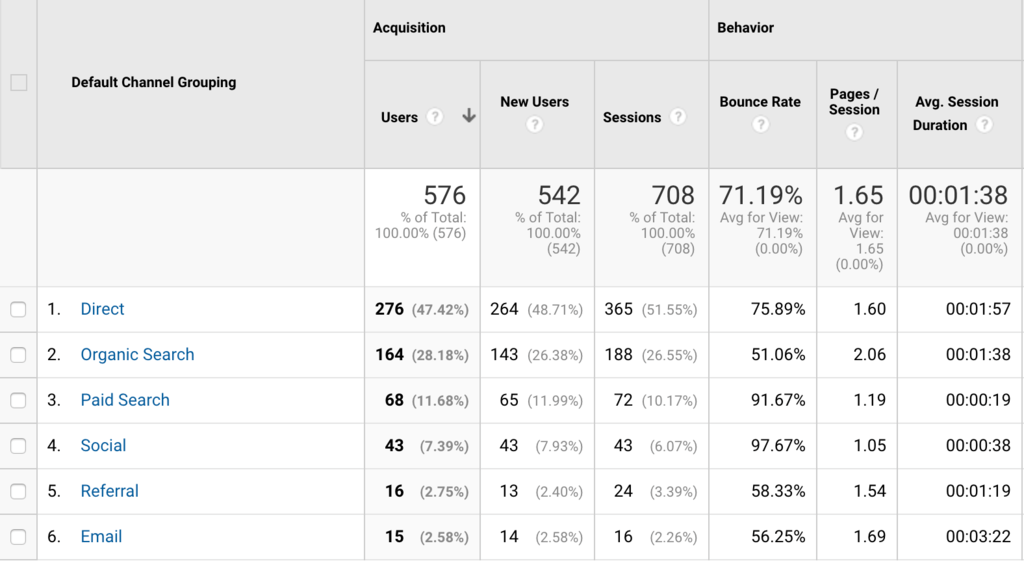
Depending on your website’s traffic, these default channel groupings might not appear in your reports. For example, here’s a screenshot for one Google Analytics account I’m managing.

Default Channel Groupings Inside a Google Analytics Account

You’ll notice that there is no Display Traffic or the other channel groupings from Google.

This simplifies what you see in the reports so you can focus on the things that matter the most — the kind of traffic that you already have instead of what you don’t have.

Most Common Default Channel Groupings in Google Analytics Explained

1. Organic Traffic

Organic traffic is the kind of traffic that comes from search engines. When people search for something on Google (or Bing, or any other search engine), a list of websites shows up. This page is called a search engine results page (or SERPs). When people click on one of these results, that visit is counted in the organic traffic of that website.

It is the best, most sought-after traffic by marketers. It’s the main reason why content marketing is on the rise today. The results of organic traffic are exponential.

Organic Traffic Growth in 1 Year

When marketers talk about SEO, it’s all about increasing the website’s organic traffic. Just remember that SEO is not static. Changes happen. A lot.

No matter how optimized your website is, if you don’t create and distribute content, you will never rank high on Google and other search engines.

Example: Jon searches in Google for the keyword “email marketing statistics 2020.” He sees the results of his search. He clicks on one of the results and your website page on Email Marketing Statistics 2020 loads.

2. Direct Traffic

Direct traffic is the kind of traffic that comes from people directly typing or entering your website’s URL on their browsers. If someone bookmarks your page, then later goes back and open it, that’s counted as direct traffic.

It’s usually an indication of brand awareness or repeat visits. After all, it’s highly unlikely that you visit a website by typing a URL if you haven’t heard of the brand somewhere else, or know it’s URL for that matter.

From the user’s perspective, direct traffic usually comes from bookmarks or autocomplete in the URL — which is similar to typing it directly. The only difference is that you had a little help from your browser.

Example: Jon realizes that Christmas is around the corner. He opens up Safari and starts typing “amaz” then the browser autocompletes the URL to amazon.com. He hits enter and Amazon’s website shows up.

Caveat: see email traffic below

There’s also another instance where direct traffic might increase without being the result of people typing directly your website. It involves the transfer of traffic from a secured site (https) to an unsecured site (http).

Example: Jon is browsing this particular page. Then he clicks on a link to http://domain.com. Since my website is secured and the target site is not, GA will count Jon’s visit as direct traffic instead of referral (see referral traffic below).

3. Social Traffic

Social traffic is the kind of traffic that comes from social networks. This happens when people share a link on Facebook, Twitter, Instagram, etc. and you click on it.

Quora, Reddit, and other similar sites also fall under here. But it depends on how Google categorizes the site. In short, it depends on the document referrer field and matches the value there to a list of known social networks. If it doesn’t have a match, it will fall under referral Traffic.

Example: Jon is scrolling on Facebook and sees a Tasty video about pasta cooked 4 ways. He sees how it’s made and thinks to himself, “I can do that.” He clicks on the link in the post to see the full recipe. Tasty’s website loads with the specific recipe for that video.

Caveat: See others traffic and UTM tags

4. Referral Traffic

Referral traffic is the kind of traffic that comes from other websites.

If done right, this is the result of effective content marketing. What happens is other people/organizations write about you/your products/services on their own websites.

Since they have their own audience, when they click on that link, they land on your own website.

Google Analytics counts that as referral traffic. The website that links to your site is called the referring website/domain.

Example: Jon is reading an article from wistia.com. He reads an interesting statistics saying that by 2019, video content will comprise of 80% of all consumer internet traffic. He noticed the link, so he clicks on this and lands on another website (smallbiztrends.com). From smallbiztrends.com’s analytics account, Jon’s visit is counted in their referral traffic. The referring website/URL/domain is wistia.com.

5. Email Traffic

Email traffic is the kind of traffic that comes from your email campaigns.

Take note that not all links in your emails go to this traffic. To make sure it appears properly under this channel grouping, you have to integrate your email marketing software with Google Analytics or manually tag (UTM parameters) your links — and make sure the medium parameter is exactly “email.”

If neither one of those two options is met, GA will count that link click (visit to your website) under direct traffic. This skews your data because you might think that your email campaigns aren’t working.

Example: Jon received two emails from an eCommerce website. Email 1 contains an announcement for a sale coming up. It is sent via their email marketing software. Jon clicks on the link and lands on the website. GA counts this as email traffic. Email 2 was sent by a customer representative about a complaint he had. The email linked to the terms and conditions page. Since the email was manually sent and no UTM parameters were added, this traffic is counted as direct traffic.

6. Paid Traffic

Paid traffic is the kind of traffic that comes from paid advertisements. These are ads from Google Ads or Bing Ads. To be more specific, links with the medium “ppc” or “cpc” (or the ones indicated in the table above) are the ones tracked.

You can customize this, along with other settings, in the admin settings of your Google Analytics account. You can find out more information about how to do this in my previous post about paid traffic.

7. Display Traffic

Display traffic is the kind of traffic that comes from paid advertisements as well. Unlike Paid Traffic, this kind of traffic requires the medium parameter to be equal to “display.”

I’m sure you’ve visited sites that are showing you ads. If you click on one of those banner ads, most of the time, your visit which leads to another website will be counted as display traffic.

You’d often find ads on news or media outlets, bloggers or affiliate sites. If it involves a form of pretty graphics, those are display ads.

Refer to the table above to see which parameters direct traffic is counted in your GA account.

8. Others Traffic

Others traffic is the kind of traffic that comes from traffic that doesn’t fall under the default channel grouping definitions. This usually happens when you use custom parameters (UTM tags) in the links that you share.

Remember that UTM parameters require some fields to work. Items 1-4 are required; while 5-6 are optional:

  1. Link/URL
  2. Source
  3. Medium
  4. Campaign
  5. Content
  6. Keyword

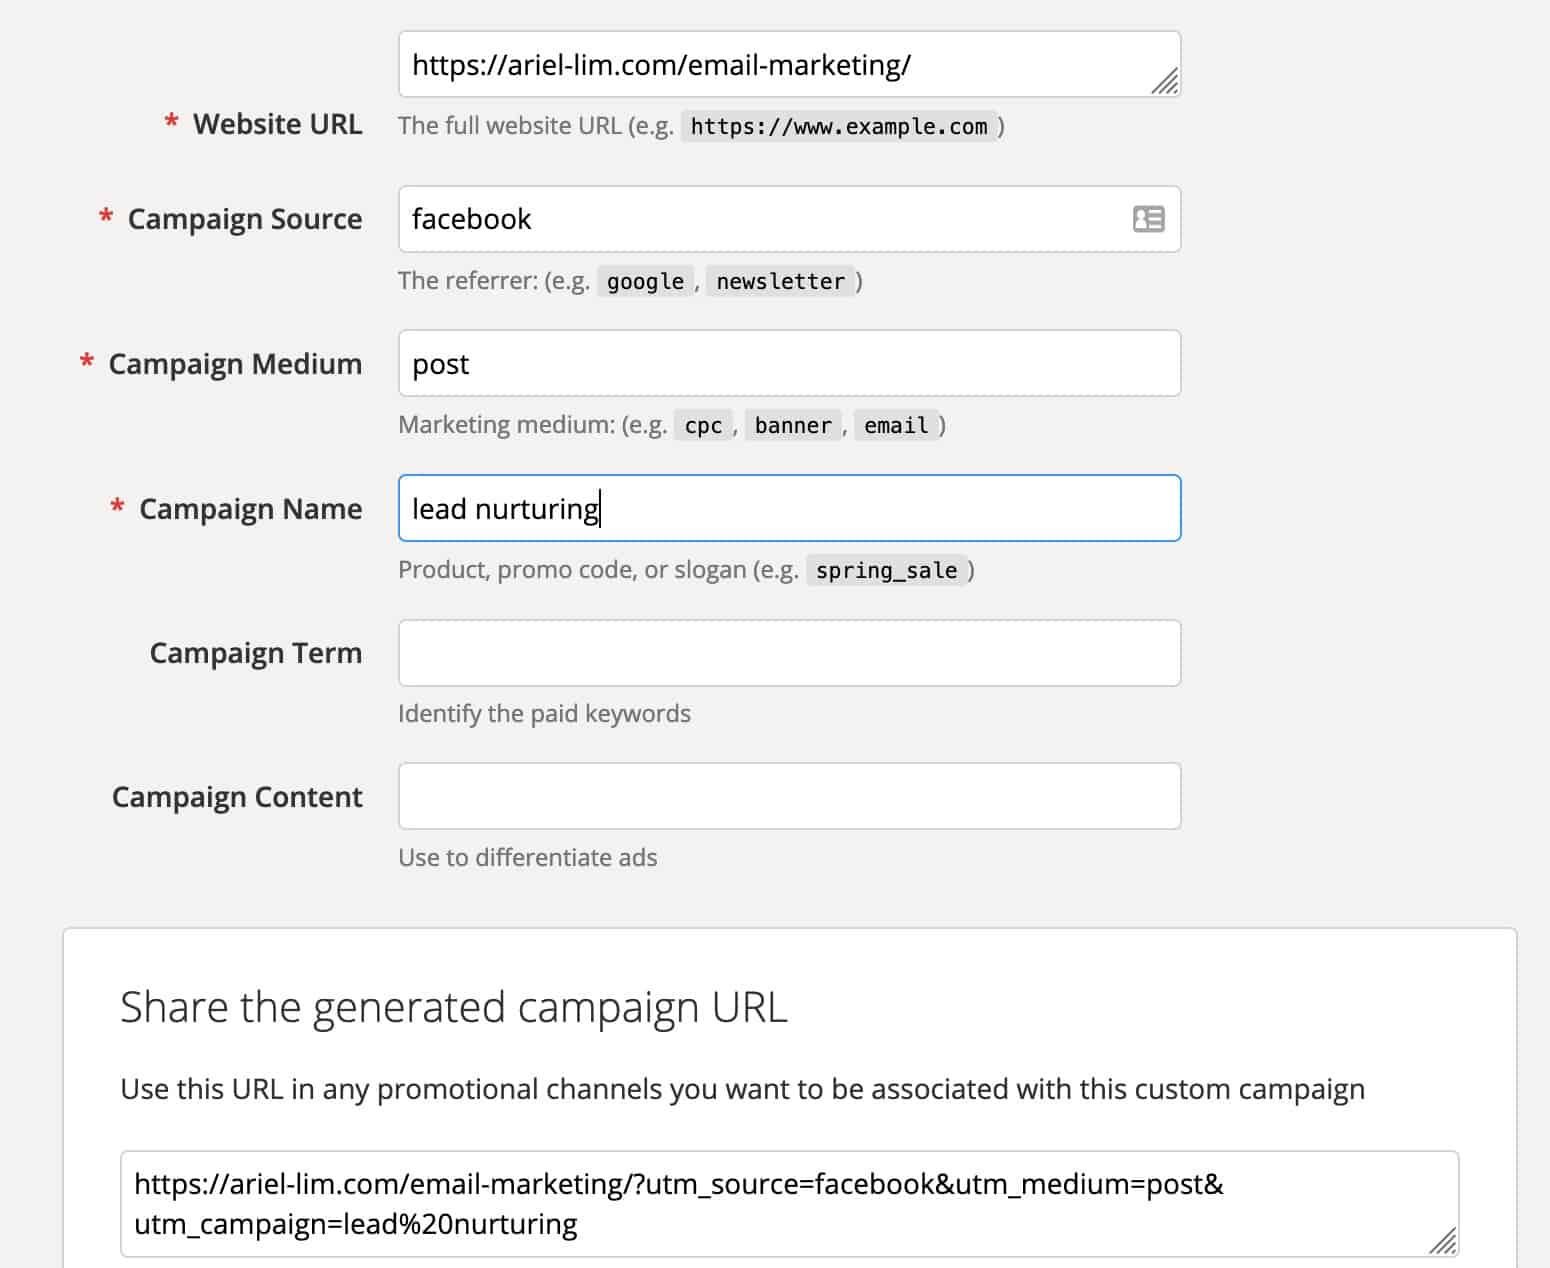
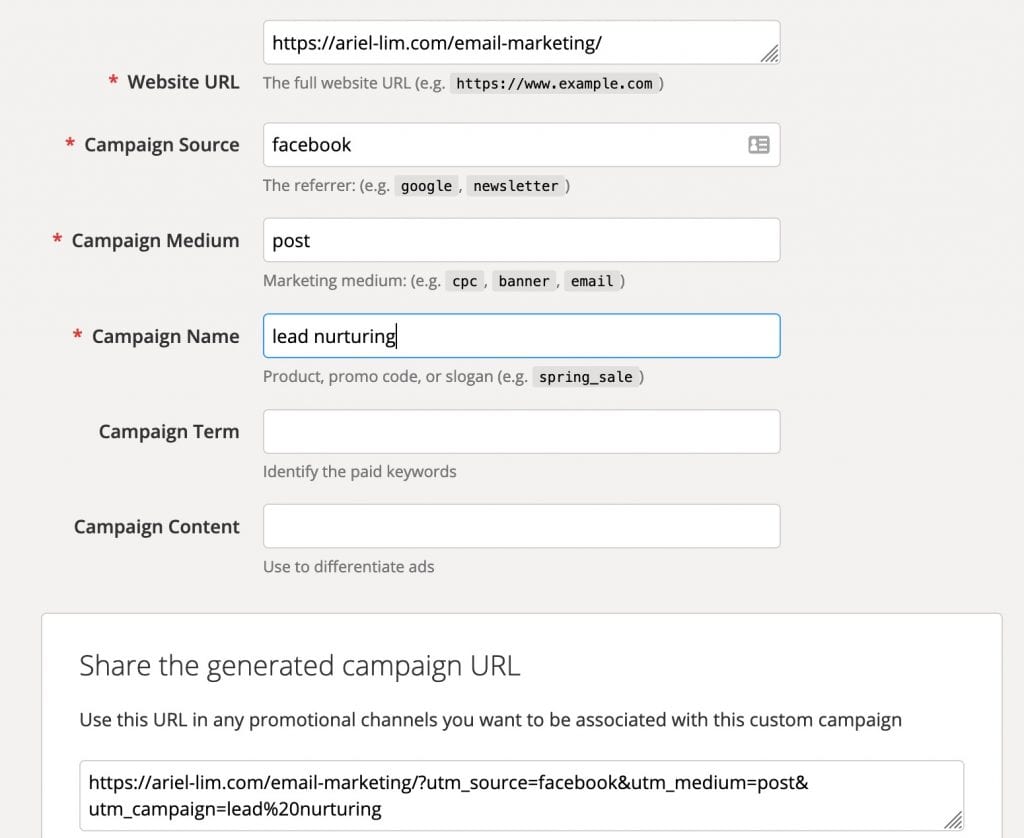
For example, if you added “facebook” in the source parameter and used “post” in the medium parameter, this will show up in the Others traffic. For it to appear under Social traffic, you either have to add the value of “social” in the medium parameter.

Google's URL Campaign Builder Example

You can learn more about UTM tags here.

Here’s a final note the default channel grouping in Google Analytics. You can change the rules that govern the way traffic is grouped into these buckets in the admin section of your Google Analytics account.

One popular use case for changing the default channel groupings is to separate the traffic coming from advertisements on social from the traffic coming from ads via search. You’d need to create a custom channel groupings in your Google Analytics account.

Do you have questions about the default channel groupings? Are you using custom rules to modify how your reporting looks like? Let me know in the comments below!

Frequently Asked Questions

What are Google Analytics Default Channel Grouping Definitions?

The default channel groupings in Google Analytics are defined by a set of rules using the ‘medium’ parameter. A click or visit with an “email” as the medium parameter will fall under the Email default channel grouping. If you used “Email,” it will fall under the Other channel grouping. For more examples, check this table to find out which visit falls under which channel grouping.

What is not considered a default “medium” in Google Analytics?

There is a lot “medium” that’s not considered as a default value in Google Analytics. Take a look at this table to see which mediums are recognized by GA. If it’s not there, it’s not a default medium.

Why aren’t the default channel groupings showing in my account?

The reason why the default channel groupings are not showing up on your channel acquisition report is you do not have data that falls under it. If you don’t have ‘display’ data, you won’t see it there because there are zero values there anyway.

Why are my ads and social media campaigns showing in the Others channel?

If your campaign traffic are being categorized in the Others channel, you are most likely using custom parameters that are not the same as the default settings in Google Analytics. For example, using a “Email” as medium is different from “email.” The former will show up under the Others channel while the latter will be tagged under email traffic.