There are various ways to use Google Tag Manager (GTM) on your WordPress website. The easiest and most popular way is to use a plugin. But, as I mentioned before, it’s generally better to not rely on plugins.
So, the other way to do it is by adding some code to your website. And that’s what I’m going to share in this article.
Table of Contents Click on any of these to jump straight to that topic
Why You Should Use Google Tag Manager on Your Website
There are various reasons for using Google Tag Manager on your website. Here are the three most important ones.
1. Faster Implementation of New Technologies
The biggest benefit of using GTM on your website is it allows you to implement new technologies faster.
As I’m sure you already know, the tools and apps available today that allow you to do awesome things on your website is done by adding some code on your website. Let’s say you want to track your website visits and performance, you would have to install Google Analytics.
If you want to track your Facebook ads performance properly, you would have to install the Facebook Pixel. This goes the same for Google Ads. You also do this for your live chat software, email marketing, CRM, and the list goes on.
As you can imagine, that is a lot of code to be added on your website. If you are not technically-savvy, you wouldn’t want to keep editing your website’s code and hope nothing will get messed up.
By using Google Tag Manager to manage your code implementation, it will be easier to implement and test new technologies for your business.
2. Eliminate Down Time
The traditional way to add code to your website is by sending it over to programmers/developers. That would mean you would send them the code and the instructions.
This usually takes a couple of days to a couple of weeks, depending on how they do their work. Unless you have someone on standby, that would mean you won’t be able to move forward with your testing or implementation until this part is done.
And as you already know, the ability to move fast in today’s markets is important. If you use GTM, you can add new code to your website in just 5 minutes.
3. Potentially Avoid Slowing Down Your Website
The other solution for implementing new technology or functionality on your website is through the use of a plugin. While there’s nothing wrong with using them, it’s generally advisable to avoid using too much plugins.
Also, all tags/code added via Google Tag Manager loads asynchronously. In simpler terms, it means load at the same time. This is very important because when you do website speed tests, you will often see a portion called eliminate render-blocking resources. The way to overcome that is to remove what is causing it. If you can’t, load it later or load it asynchronously.
Poorly coded plugins are usually the main culprit. They make your website load slowly and affects user experience. This is something you don’t want to happen. That’s why it’s important to speed up your website.
Preparatory Points
This is for you if you meet the following criteria:
You want to speed up your website
You are running on WordPress
And using the Genesis Framework
How to Install Google Tag Manager on Your Website
Adding GTM to your Genesis theme involves three steps:
Step 1: Prepare Your WordPress Account
The first thing you need to do is log in to your WordPress dashboard. Then, go to your theme editor.
Appearance > Theme Editor
On the right-hand side, click on the Theme Functions (functions.php). Scroll to the bottom and paste this code.
// Add Google Tag Manager code in <head>
add_action( 'wp_head', 'google_tag_manager_head' );
function google_tag_manager_head() { ?>

//Replace this entire line with the first part of the code <head>

<?php }


// Add Google Tag Manager code immediately below opening <body> tag
add_action( 'genesis_before', 'google_tag_manager_body' );
function google_tag_manager_body() { ?>

//Replace this entire line with the second part of the code <body>

<?php }
Step 2: Get Your Google Tag Manager Installation Code
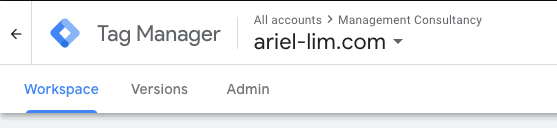
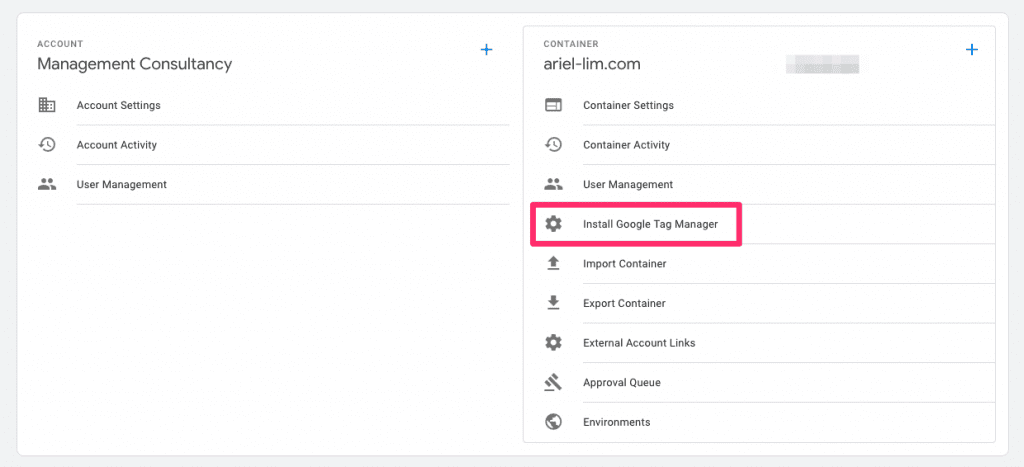
Next, head on over to Google Tag Manager and get the installation code. If you haven’t created an account, it’s easy to do so. All you need is a Gmail account.
Once you’re in, go to the admin section.
Next, click on install google tag manager.
You should see two sets of code. One to include at the <head> section, while the other at the <body> section. Copy the first part, then move to the next step.
Step 3: Add the GTM Code to WordPress
Now, go back to WordPress and replace the line where it says to replace it.
You should now end up with something that looks like this.
// Add Google Tag Manager code in <head>
add_action( 'wp_head', 'google_tag_manager_head' );
function google_tag_manager_head() { ?>

    <! – Google Tag Manager -->
<script>(function(w,d,s,l,i){w[l]=w[l]||[];w[l].push({'gtm.start':
new Date().getTime(),event:'gtm.js'});var f=d.getElementsByTagName(s)[0],
j=d.createElement(s),dl=l!='dataLayer'?'&l='+l:'';j.async=true;j.src=
'https://www.googletagmanager.com/gtm.js?id='+i+dl;f.parentNode.insertBefore(j,f);
})(window,document,'script','dataLayer','GTM-ABCDEF');</script>
<! – End Google Tag Manager -->

<?php }


// Add Google Tag Manager code immediately below opening <body> tag
add_action( 'genesis_before', 'google_tag_manager_body' );
function google_tag_manager_body() { ?>

<! – Google Tag Manager (noscript) -->
<noscript><iframe src="https://www.googletagmanager.com/ns.html?id=GTM-ABCDEF"
height="0" width="0" style="display:none;visibility:hidden"></iframe></noscript>
<! – End Google Tag Manager (noscript) -->

<?php }
Over to You
Now, whenever you need to add, test, or implement new technology, you only have to do that within Google Tag Manager. I’ll write more about this in the future.
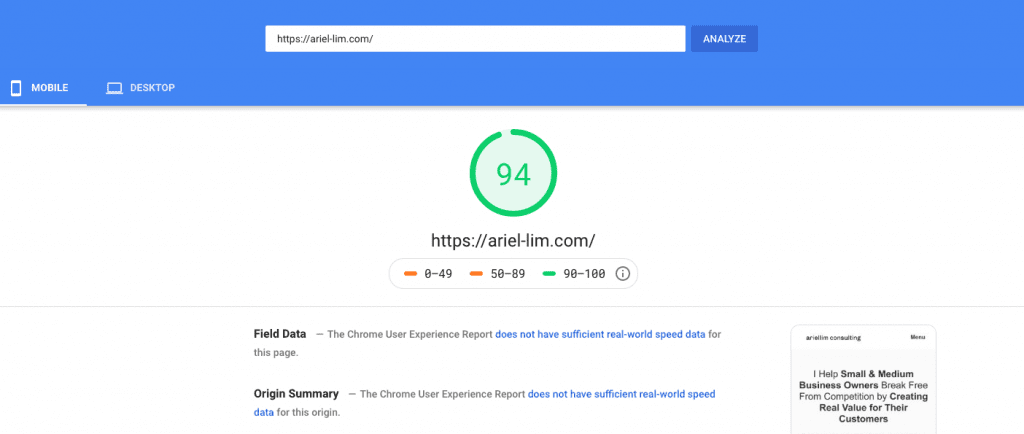
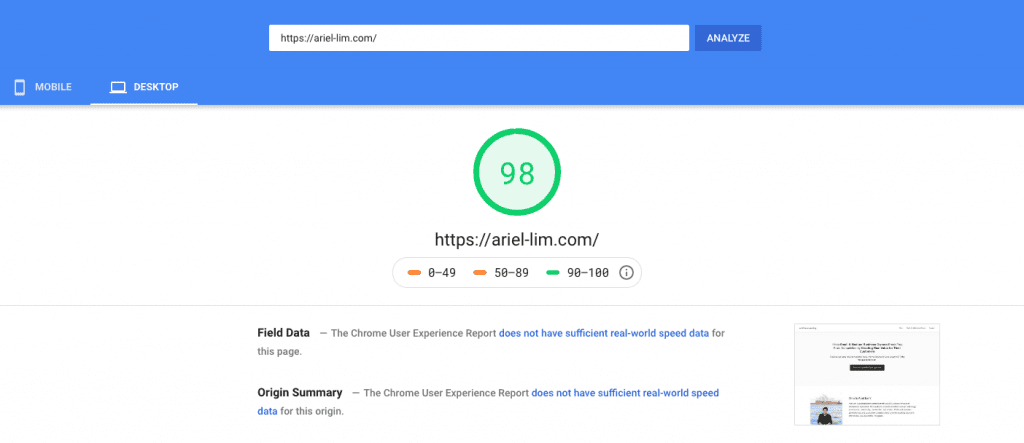
Over the holidays, I have spent countless hours trying to speed up my website. And that experience was very challenging. But right now, it was well worth it. Take a look at the Google PageSpeed Insights scores of my website — mobile AND desktop.
After spending a lot of time (possibly 100+ hours) tweaking my site to improve user experience, I finally made it. I saw the green light. 90+ scores on both mobile and desktop version in the Google PageSpeed Insights. And my optimizations haven’t even finished yet.
Table of Contents Click on any of these to jump straight to that topic
I started this website in 2014. I was working in corporate doing digital marketing. I was already writing articles and managing the website for the company. I also previously started a website in 2011 for a company I started but had to close down. So I somehow knew what I was doing.
Over the years, I wrote about different topics. Finally, in mid-2019 I decided what I wanted to do.
The problem was I was spending a lot of time working with clients so I didn’t have spare time to work on my own website. Of course, this was not ideal. But in my case, it still works. I get my clients from a different channel so even if I neglected it for a while, I can still make it work.
But during the holidays, I had some downtime. I sat down, visualized what I wanted, thought about how to execute, and just did it.
This led me to this version of my website. If I remember it correctly, this is the 4th iteration already. So that would make it like I change my website once every year.
The one thing I didn’t pay attention to back then is website speed and how it affected user experience.
Working primarily from the Philippines, my internet speed sucks. Not only is it slow, but it’s also unstable. So, I really didn’t know how fast looks like. Plus, I’m only writing stuff about my own experiences and not getting any traffic, why bother right?
But after some research on the topic, I’m convinced that speed plays a very important factor, especially if you want to grow your traffic and rank your website higher.
And that’s what I’ll be sharing in this article.
Prerequisites and Warnings
A word of caution.
I am not a developer. I’m just someone who knows a little bit of code because it is essential to know them for my line of work.
Also, what I’m sharing are my experiences only. So, it might not work for your specific circumstance.
Lastly, before making any changes, make sure you perform a backup of your website. Sometimes technology fails us. So, if you’re making tweaks to your website, especially with the code and plugins, it’s best to create a backup before making the changes. That way, if something got messed up and you can’t fix it, you can quickly restore that backup.
Technology Stack
With that out of the way, I’d like to share my entire tech stack. And no, these are not affiliate links.
1. Domain
I bought my domain using GoDaddy. They don’t need any introduction on domain names.
If you’re getting a new one, I suggest going for the longer-term (2+ years instead of 1 year) to get a better rate.
I also recommend including a private registration in your purchase to protect your privacy.
2. Web Host
I’ve been using InMotion Hosting as my web host from the beginning. I’m also on the shared hosting plan and have just moved up from the most basic plan (called Launch) to the current Pro plan.
This is important to get it right because your web host is where your website is stored. What that means is how fast your website depends largely on them.
3. WordPress
I’m currently using the latest WordPress version 5.3.2.
It’s also worth noting that i’m using the self-hosted WordPress setup, more specifically the WordPress.org version. This is entirely different from the WordPress.com version.
As a quick explanation, your WordPress website needs a theme. This theme dictates how your website looks like. That is your main theme or the parent theme.
But sometimes, you want to tweak the design of your website. You want to add a certain functionality or make it brand-specific. That’s where child themes come in. You make the changes in the child theme instead of the parent theme. Why? Because if you update the parent theme, most often, your customizations won’t transfer over.
Here’s a great resource to help you understand this topic more.
Speed Up Your Website with These Optimization Tweaks
Generally speaking, the best way to make your website fast is to focus on the must-have’s rather than the nice-to-have’s. Most people obsess about the graphics — or how the website looks like —but sacrifice the functionality of the site.
Oftentimes, when you add pretty things like animation, custom fonts, and all those stuff, your website takes longer to load. And if you want to add these functionalities yourself to a WordPress website, that’s usually done through a plugin.
Unless you can hire an awesome developer, or want to spend a lot of time tweaking and testing, follow these tweaks and let’s make slow websites a thing of the past.
Which two plugins to install that will immediately make your website fast
Showed you the comparison between another popular set of optimization plugins and their results
And yes, the new ones I recommended are faster and easier to install
The settings for the new plugins
I highly recommend you start there and follow the step-by-step process I outlined. Once you’re done there, come back here.
And now for the ironic part…
Reduce Plugin Usage
As much as possible avoid using plugins. Why?
Because they make your website load slow. Generally.
Now, there are hundreds of thousands of plugins you can use. And they have different functionalities. Some load the front-end (like page builders) while some are focused on the back-end (like automatic backups).
But it really depends on your business. The most important part is you take the time to really assess if you need it.
Unless it’s absolutely necessary, don’t add or use one. And don’t just deactivate them. Delete them.
Finally, if there is a way to add several lines of code to achieve the same functionality as a plugin, I recommend you do that instead.
And that’s what’s going to be the focus below—to help each of your web pages load faster.
Install Google Tag Manager on Your Website
Adding Google Tag Manager to your website is one of the first things you need to do on your website. You can do this via a plugin, but if it’s relatively easy to add the code than to rely on a plugin. Go that route instead.
Before anything else, this actually won’t directly speed up your website. Rather, it will help later on once you add several software to your site by making them load asynchronously. This is very important because when you do website speed tests, you will often see a portion called eliminate render-blocking resources. The way to overcome that is to remove what is causing it. If you can’t, load it later or load it asynchronously.
The tools and apps available today that allow you to do awesome things on your website is done by adding a tracking code (or code snippet) on your website. Here’s a list of the popular software used on websites today:
Analytics and Performance Tracking
Google Analytics
Facebook Pixel
Ads and Remarketing
Facebook Pixel
Google Ads
A/B Optimization
HotJar
CrazyEgg
Google Optimize
VWO
CRM and Email Marketing
HubSpot
MailChimp
Autopilot
Live Chat and Chat Bots
ManyChat
Intercom
Mobile Monkey
And a whole lot more.
If you are not technically-savvy, you wouldn’t want to keep editing your website’s code and hope nothing will get messed up. Of course, you can have a developer/programmer do it for you, but it might take time and cost you money. Just follow these 3 simple steps to adding GTM to your website and you’ll be on your way.
If you know what you’re doing, just copy-paste the code below on your functions.php file, then replace the GTM-ABCDEF with your own GTM ID. If you need specific step-by-step instructions, check out the article above.
// Add Google Tag Manager code in <head>
add_action( 'wp_head', 'google_tag_manager_head' );
function google_tag_manager_head() { ?>

    <! – Google Tag Manager -->
<script>(function(w,d,s,l,i){w[l]=w[l]||[];w[l].push({'gtm.start':
new Date().getTime(),event:'gtm.js'});var f=d.getElementsByTagName(s)[0],
j=d.createElement(s),dl=l!='dataLayer'?'&l='+l:'';j.async=true;j.src=
'https://www.googletagmanager.com/gtm.js?id='+i+dl;f.parentNode.insertBefore(j,f);
})(window,document,'script','dataLayer','GTM-ABCDEF');</script>
<! – End Google Tag Manager -->

<?php }


// Add Google Tag Manager code immediately below opening <body> tag
add_action( 'genesis_before', 'google_tag_manager_body' );
function google_tag_manager_body() { ?>

<! – Google Tag Manager (noscript) -->
<noscript><iframe src="https://www.googletagmanager.com/ns.html?id=GTM-ABCDEF"
height="0" width="0" style="display:none;visibility:hidden"></iframe></noscript>
<! – End Google Tag Manager (noscript) -->

<?php }
Remove Emojis if You’re Not Using Them
Unless you are using emojis on your website, you don’t need them.
But if you’re not using them, there’s nothing to remove, right?
Not necessarily.
Every website is made up of three parts: html, css, and javascript. You don’t need to know these things, but it’s helpful if you do. A very simple explanation for what they are is this: html makes up the text, css determines how they are displayed, and javascript controls the special effects.
If you are using WordPress, some of those files loaded automatically, including emoji support. And that adds up to your load time. In order to prevent them from loading, login to your WordPress account and disable them via Autoptimize. If you followed the article I shared about getting the 98 score initially on desktop, you should already have this plugin installed.
Go to Settings > Autoptimize > Extra.
Then, just check the box for remove emojis.
Remove Query Strings from Static Resources
And while you’re in there, check the box for remove query strings for static resources too. While it may not affect your website speed directly, sometimes it affects website speed scores.
Hit save and clear your cache.
Using Google Fonts?
Lastly, are you using custom Google fonts? If not, prevent them from loading too.
All these small changes can help your site load faster.
Prevent Dashicons from Loading on Your Website’s Front End
Dashicons are similar to the emojis. These are the icons you see when you login to your WordPress site. Here’s what they look like…
Some websites use them to add some styling on the front-end, like this one.
Again, this goes back to my earlier point. Do you absolutely need it?
If you are not displaying them to your website visitors and only using it on the backend, you should also prevent them from loading.
Go to your themes editor and add this code in the functions.php file.
Go to Appearance > Theme Editor
On the right-hand side, click on the Theme Functions (functions.php). Scroll to the bottom and paste this code. Once you’re done, hit save.
// Disable dash icons on front end

function wpdocs_dequeue_dashicon() {
        if (current_user_can( 'update_core' )) {
            return;
        }
        wp_deregister_style('dashicons');
}
add_action( 'wp_enqueue_scripts', 'wpdocs_dequeue_dashicon' );
This will remove dashicons from the front-end of your website.
Use a CDN
I’m sure you’ve encountered CDNs in your quest to make your website faster. CDN stands for Content Delivery Network. There’s a lot of technicality involved here. But the only thing you need to understand is that it makes your site load faster.
One of the most well-known CDN providers is Cloudflare.
Just follow these 5 simple steps:
Sign up for a free account at Cloudflare
Add your website domain
Choose the free plan
Change your nameservers (from your domain provider)
Check if it’s working
I went through this process of setting up Cloudflare as your CDN here step-by-step with images. Feel free to check it out if you feel a bit lost.
But don’t exit Cloudflare yet. Now that you’ve enabled CDN, and you are also using ShortPixel Adaptive Images (SPAI), follow the instructions below.
Configure ShortPixel Adaptive Images with Cloudflare
Inside your Cloudflare account, click on the DNS tag from the menu. Then, add a new record. Here’s what mine looks like.
Step 2: Change the API URL inside WordPress
Go back to your WordPress account. Then, make the following change to the API URL but change it to your actual domain name. You can find it in Settings > ShortPixel AI > Advanced.
Feel free to create an account on ShortPixel. Use this link so you can get an extra 100 images that you can use to optimize your website. The free account only gives you credits for 100 images/month.
Additional Configurations in Autoptimize
If you followed along and tried testing your website speed along the way, you should see some improvements in your score already.
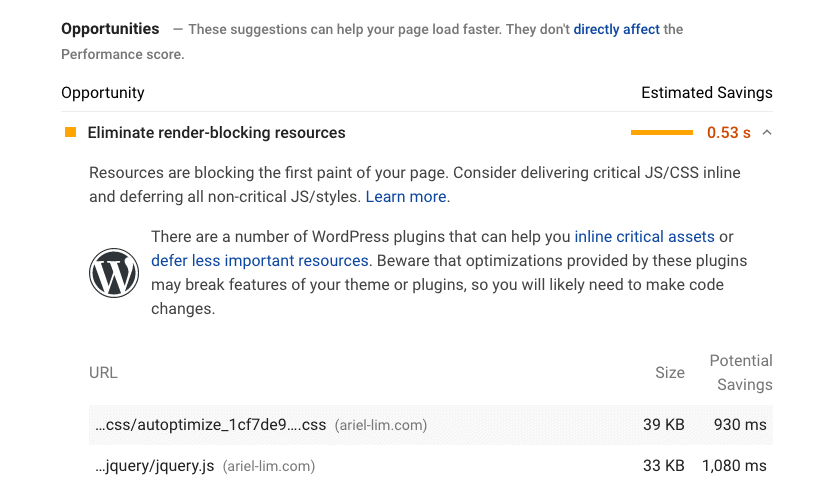
One of the last few things that affected my scores negatively during the Google PageSpeed Insights test was that the aggregated CSS from Autoptimize is “render-blocking.” You will also notice that another file called jquery will also be present as render-blocking.
To resolve both of these, follow these steps.
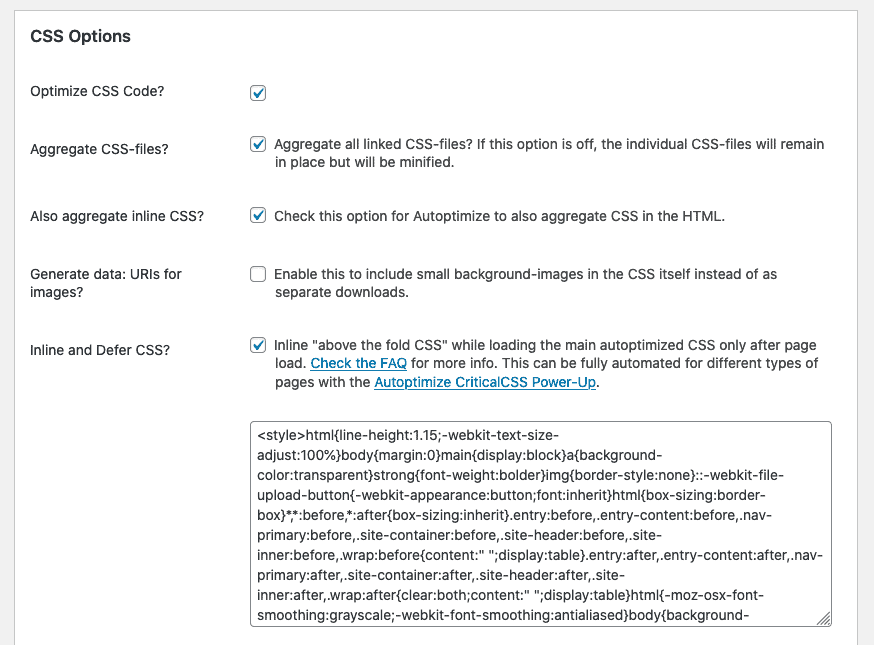
Step 1: Check the box for Inline and Defer CSS
You can find this in Settings > Autoptimize > JS, CSS & HTML tab.
Scroll down and you should see a section that looks like this.
Step 2: Generate your CSS critical path
Head on over to this website and generate your critical path CSS. Enter your domain name and copy the code generated.
Step 3: Paste the code inside the text box inside Autoptimize
Paste the critical path CSS in the section provided inside Autoptimize.
Scroll all the way down. Click the button for Save changes and empty cache.
This should help remove the CSS from being render-blocking.
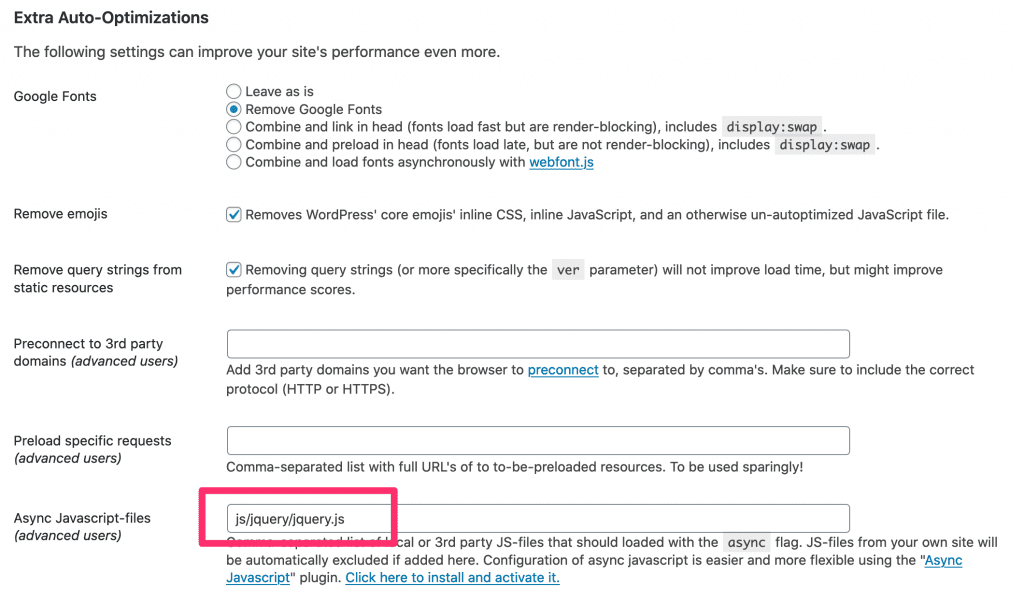
Now, the final step…
Step 4: Make the jquery load asynchronously
You can do this by going to the Extra tab. Scroll down a bit until you find the Async Javascript-files section.
Paste this code then hit save.
js/jquery/jquery.js
Over to You
After following everything, hit save. Clear your cache.
Run the Google PageSpeed Insights test again and you should see the results in the 90s just like mine.
I hope that these instructions will help you speed up your website without spending too much time nor spend money to achieve it.
If not, then there’s probably some special configuration on your site. Let me know in the comments below and I’ll try to help to the best of my ability.
Creating content (or content creation) is the only proven way to rank on search engines like Google and Bing. The only thing you should be wary of is that the content you create has to be helpful to your customers, not self-serving.
And if there’s one thing I want you to take away from this article, it’s that — your content has to provide value to your customers, not yourself.
Content is not limited to articles. It’s the most common misconception business leaders often have and why they hesitate to get into create content. Content can be in any form that is seen — written or visual. This includes articles and infographics and banners. It can also be heard. Music and podcasts fall under this category. Content can also be a combination of both — seen and heard. This is where videos come in.
There are lots of resources already on this topic. They range from great ones — where you can actually use them and follow it step-by-step — to the useless ones — where they keep talking about the same thing without adding any value.
Even I have written several articles about this. From the basics covering the concepts and theories, like these:
And I’ll continue to create more content about content. Why? Because it’s a prerequisite in today’s digital world.
Just take a look at the growth of content marketing in the past decade.
But enough about that.
I want to share with you a content creation framework I use for myself and my clients. I call it the two-pronged content creation framework.
Two-Pronged Content Creation Framework
The two-pronged content creation framework allows you to create content that will benefit you both in the short- and long-term. By creating content that gives you some quick wins now, you set yourself up for more success later on.
This two-pronged approach also helps you and others see the value in creating content. You get to show results sooner, rather than later.
1. Create content and distribute it
I can’t stress this enough. You have to start creating content that is helpful and valuable to your customers.
There are many channels where you can use the content. I find that most businesses (particularly B2C) only use Facebook and Instagram (social media) to post their content. They post products and announcements of promos and new arrivals and discounts.
While it’s something, it’s not helpful nor valuable to your customers.
Remember that people are going online for a reason. They have problems to solve and questions they want answers to. I explained this further in the 5 stages of awareness. If you only post about your discounts and promos and talk about your products, you are alienating a majority of people who have never even heard about you and what you offer. The biggest reason being those types of content fall under stages 4 and 5 — which make up a small number compared to stages 1 to 3.
Create content for people in the earlier stages. These are people who are asking about those FAQs. Once you have them, post them on your website.
And if you don’t have a website, find someone who can make you one. Here’s a list of 4 must-have capabilities of your website. Otherwise, you’re fighting a losing battle.
2. Answer Frequently Asked Questions (FAQs)
When people search on Google and they click on one of the results there, that website gains traffic. This is the first thing digital marketers often track and optimize for. After all, you can’t generate sales if no one visits your website because they haven’t heard about you.
The fastest way to get that traffic? Answer FAQs.
They are a great place to start because people are already asking them. That’s beneficial in two ways:
You don’t have to guess. You know you’re being asked the questions, so might as well give them the answer.
It gives you qualified traffic. People who are asking these questions are more or less interested in what you have to offer. These are what you call “high intent searches.” Remember, not all people who visits your website will convert. So, the more you can provide value now, the more likely they will buy from you later on.
This addresses the short-term aspect. You create content about the frequently asked questions and you get immediate results. Your customers don’t have to wait for 48 hours before finding out the answer to a yes/no question. In addition, you also get to benefit from organic traffic because people are already asking these questions. Now that you have content to answer it, your website will show up more on search engines.
Don’t know where to get started?
If you have no idea what questions your customers ask, then you are in a terrible position. As a business leader, you have to know these things. That’s simply what being in business means. You provide solutions to their problems. By them using your products/services, you are solving issues in their lives. If you’re not doing that, then might as well close down your business because you’re not providing any value.
On the other hand, if you have some idea and want to know more, here are some steps you can do:
Talk to your customers. Ask them their primary concerns. Why are they using your products/services.
Visit the stores/offices. Listen to the conversations happening. You’ll get an idea of what really matters to people.
Ask people on the frontlines. These are your customer support, sales team, store staff. Basically everyone in your team who has a direct line of communication/engagement with prospects and customers.
By asking these questions, you will gain a better understanding of your business. You will learn what frustrates your customers the most. And the best part is you also get to learn about your own shortcomings.
3. Document your journey
The concept of documenting was popularized by Gary Vaynerchuk. At its core, you document whatever is happening right now instead of creating something.
Putting it in another way, when people think of creating content, it has to be perfect. It has to be beautiful. It has to pass all these high standards. And that’s what makes it difficult for people to get started.
While it’s true there has to be some form of quality checks, it doesn’t matter in the long-run. What matters is this.
Those who show up get rewarded. You may have all the best ideas in the world, but if you don’t execute or implement them, nothing will happen.
I’m sure you’ve heard this quote before a lot of times.
Eighty percent of success is showing up.
Woody Allen
That’s basically the main principle behind Gary Vee’s “document, don’t create” mantra. You don’t need beautiful graphics and design and perfect grammar and everything in that checklist you downloaded over the internet.
What matters is you actually do something. Once you have something, that’s when you improve.
Don’t know where to get started?
To make it simple, choose one platform. That can be any of the following:
Website
Medium
Facebook
Twitter
Instagram
YouTube
Podcast
Whatever that channel you choose, focus on that single one. Create an account or set it up. Then, share any or all of the following topics:
Successes and failures
Insights into the industry you’re in
What you think will happen next year, in the next 5 years
Talk about your passion
Why did you get into that line of business
All these allow you to put a face behind the business. It makes the business look more human. This works for various reasons. But the biggest reason is that it makes you more authentic.
It helps you become a brand. And a brand stands for something else beyond just products and services and revenues.
Again, you are not limited to articles. You can share podcasts and videos on your website too. If you want to start with written content, then do so. Again, the most important takeaway is you do something.
This addresses both the short- and long-term aspects. It makes you more human, authentic, and relatable. This is why stories about Jeff Bezos, Steve Jobs, and all other iconic figures are all loved by us. It’s not because they are simply geniuses. Yes, they may well be. But the most part is that their stories are told. Shared. Their successes and failures are highlighted. You can’t wait for the media to do that for you. That’s why you have to build your own brand and share those things with your customers.
Over to You
The sad truth about most businesses is they don’t want to put in the work to grow their business. They expect to grow by simply being in business. Sure, that may happen. Maybe after 30 years of being in operation, you get to be a household name. But, that’s highly unlikely. 96% of businesses fail within 10 years.
Today’s business environment has changed a lot.
You have to do more because your customers expect more. Your competition is doing more, you have to be different and better.
Creating content is the biggest differentiator you can do today because a lot of businesses are not willing to do it.
Share your life. Both ups and downs. Help solve other people’s problems first. Give, give, give. Over time, you’ll notice that people will follow you, buy from you even without asking.
Running a business is hard. Whether you’re a 1-man team or running a 10,000-organization, it can get pretty complicated.
As an employee, you didn’t have to worry too much about other stuff other than your job. But as a business, you have to deal with them even if you don’t like it — financials, taxes, efficiency, tools and apps, and other decisions you just weren’t exposed to before.
But did you know there is a very simple way to manage your entire business? This magic formula that I’m going to share will allow you to look at the health of your business objectively.
Ready now? Here it is…
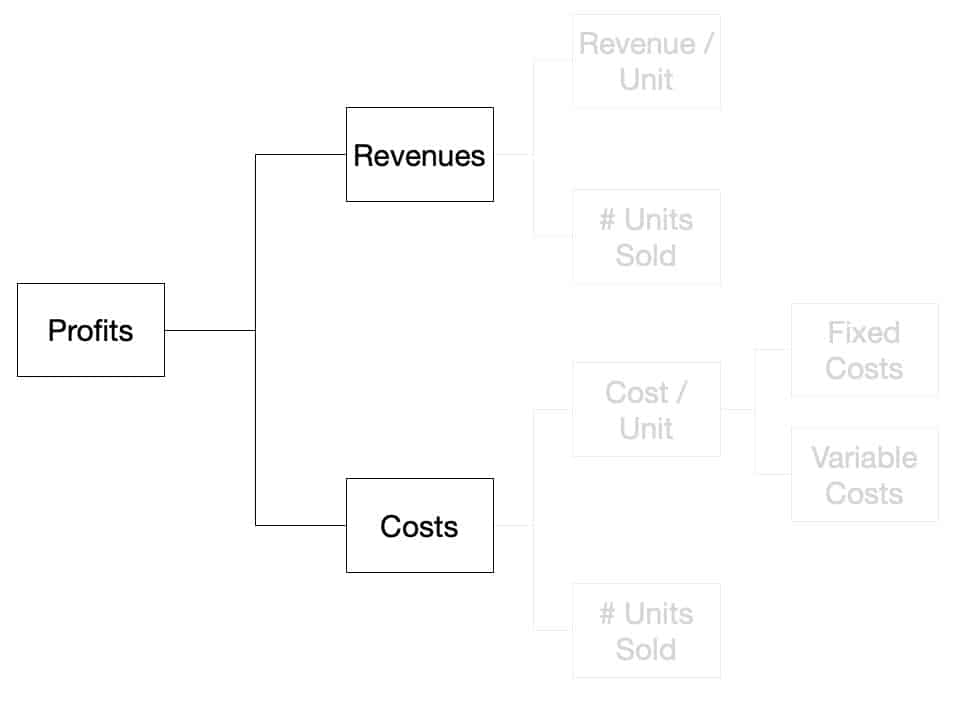
Profits equal revenues minus costs.
Profits = Revenues – Costs
Preparatory Points
But first, I recommend reading the real purpose of businesses. Why? Because what I will share here is a result of delivering value to your customers. What that means is before we talk about sales or revenues, you have to understand where it comes from and why customers buy.
Without that understanding, it’s easy to get lost in the world of business and its complexities.
So, go on and take a few minutes to read the article. You can always go back to this one anyway.
Done? Great.
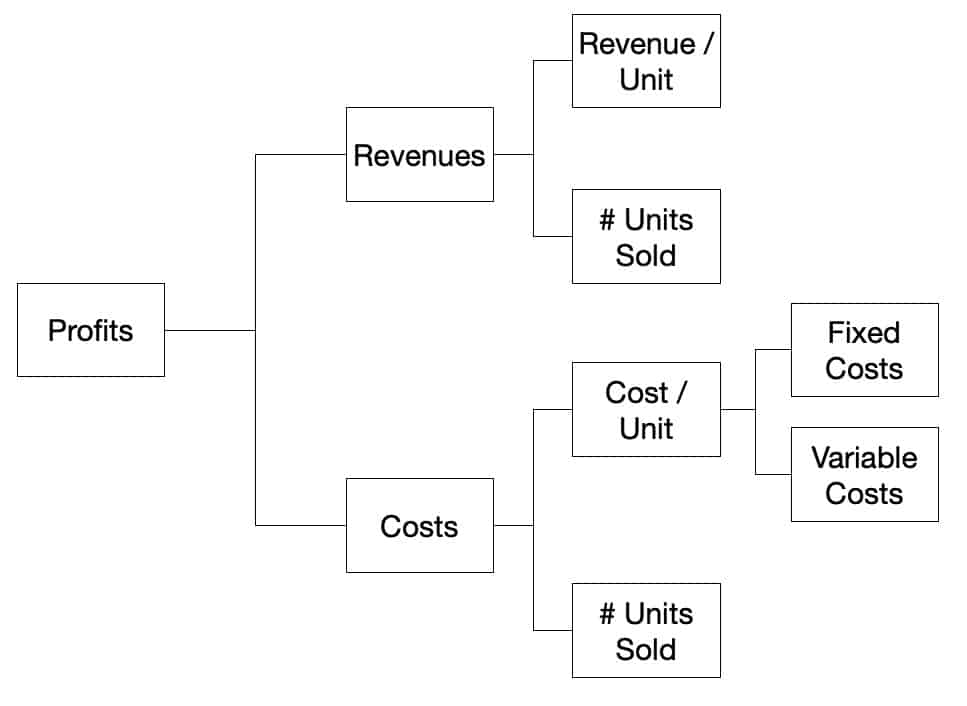
The Profitability Framework
Let me share a very simplified approach to business that will weed out all distractions. Let’s go back to our magic formula:
Profits = Revenues – Costs
In consulting, this formula is called the profitability framework. It’s pretty self-explanatory but a very powerful tool when used correctly — which I’ll share later below.
For now, let’s define each part first:
Profits are what’s left after you deduct all your expenses from the revenues you earned in any given period.
Revenues are the sales from your customers. It’s the sum of all payments made to your at ay given period.
Costs are the total expenses your business incurred during a period. This includes salaries, rent, etc.
Simple, right?
Now, let’s look at the profitability framework from another perspective.
This is an expanded version of the profitability framework. Don’t worry if it looks a bit confusing. This will all make sense in a minute.
Let’s break it down.
Big picture thinking using the profitability framework
One of the key benefits of using the profitability framework is figuring out why something happened. Oftentimes, we are so busy running the business that you don’t take time to analyze what’s really going on and what’s causing it. This simple, magic formula will help you with that.
By looking at your profits and its components (revenues and costs), you would know how your business is doing. No complications.
If it’s positive, then you’re doing okay. If it’s negative, then you’re not doing okay.
At least at first glance.
By just using these metrics, you would have an idea of what you should keep doing, and what changes you need to make.
But let’s take it further.
We now know the what, but we don’t know the why.
You can segment your data and compare it with other time frames. For example, you want to look at this month’s performance versus last month. Did profits this month went up or down? Is that good or not? Why did it change?
(I also shared more about the three most common segmentation techniques you can use with the profitability framework below.)
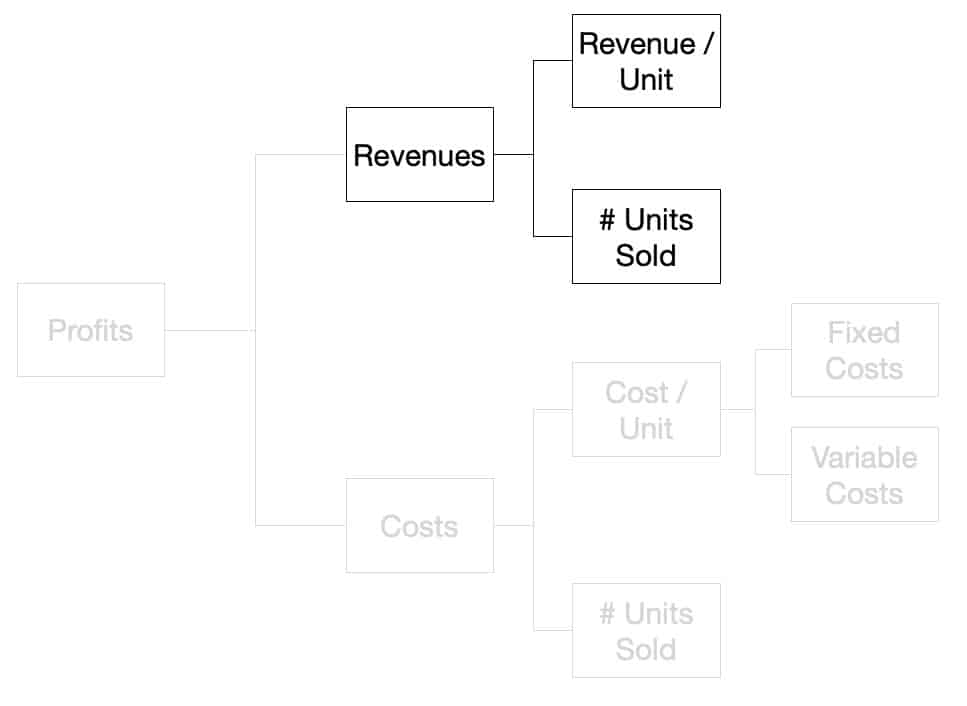
Let’s take a look at the components that contribute to the revenues and costs. This will give you an answer to the why.
Analyzing the revenue side for the formula
Revenues are made up of two factors:
Unit price
Quantity sold
Looking at this mathematically, revenues is the product of the unit price and the number of items sold.
Revenues = Unit Price x Quantity Sold
Let’s take a look at Apple. Let’s assume they only sell the iPhone 11 and only one model. They sell it for $699. Last month, they sold 500,000 pieces.
That would make Apple’s total revenues last month at $349,500,000.
(Again, I’m making this simple by using only one number. An advanced way to analyze this is to look at the unit price and quantity sold per channel, per item, and look at different time periods so you see trends.)
In reality, Apple has multiple product lines like Macs, iPads, and other accessories. Within each product line, they have different models/versions like in the iPhone example, they have the 64Gb/128Gb/256Gb models. Each of those models, you have different color offerings as well.
Segmenting each part of the revenue formula gives you a better understanding of what’s really causing the what.
In our example, Apple sold $350m last month. Is that a good thing?
You might say, “If revenues went up, that should always be a good thing right? I made more sales. How can that be a bad thing?”
Not so fast.
The revenue side is just one part of the equation. You also have to understand the cost side. Allow me to explain.
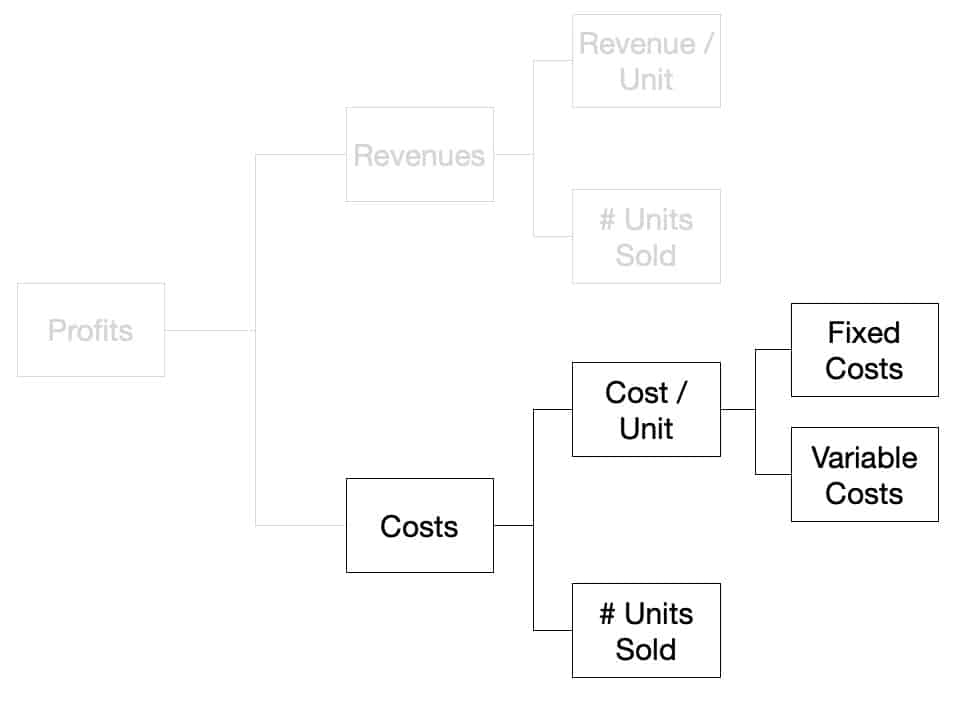
Analyzing the cost side for the formula
Costs are your total expenses for the same period. It’s made up of two factors as well:
Unit cost
Quantity
Unit cost can also be broken down into fixed and variable costs.
Fixed costs are incurred whether or not you made the sale.
Variable costs are those expenses associated directly with the sale.
Let me explain these two concepts quickly:
You sell fruit shakes at a kiosk stand at the mall. Your fixed costs would be rent and salaries because even if you don’t make a single sale, you still have to pay them. Then, your variable costs would be the cost of the ingredients you used. If you advertise, then that’s a fixed cost too.
Again, when you apply some segmentation here, you would get a richer analysis. But that’s not what this article is about.
Analyzing performance using the profitability framework
In our Apple example, we left a question about whether or not the increase in revenue to ~$350m by Apple is a good thing.
The first thing to do is to look at the formula as a whole and ask these questions:
Did costs increase, decrease, or stayed the same?
Did profits went up, down, remained flat?
What caused the changes? Which product line? Which version? Which model contributed the most?
As you can see, using the profitability framework allows you to do all kinds of analysis. Knowing this formula by heart allows you to identify what is happening in your business.
Let’s take a look at another example below…
Profits declined by 20% this year. What caused it? Why did it happen?
If your sales decreased by 20%, that’s the answer.
But which part of sales?
Did you sell less this year than last year?
Or did your selling price went down?
But what if your sales increased 10%, yet profits went down 20%?
If it increased, then your expenses would have skyrocketed by at least 30%.
Again, which part of expenses?
Is it your fixed costs or your variable costs?
Segmentation Analysis
Now, if you use this framework with segmentation or “slicing and dicing” of data, you will gain huge insights like I alluded earlier.
There are multiple ways to segment, but the most common are these:
Time (daily, weekly, monthly, quarterly, yearly, etc.)
Location (branches, regions, countries, etc.)
Channels (walk-ins, phone, online, etc.)
Product line (desktops, laptops, phones, accessories, etc.)
Models/SKUs (64Gb, 128Gb, 256Gb, etc.)
Using the example in the previous section, your profits declined 20% and yet sales increased by 10%. After you segment the numbers further, you found out the Branch A’s sales remained steady. Branch B grew by 10%.
Now you know what’s causing the sales increase.
But that doesn’t solve what caused profits to decline.
When you apply the same principle on the costs side, you found out that Branch B’s expenses grew by 40%. Now, you have a more informed decision that Branch A is performing well despite the steady sales, while Branch B, despite contributing to increased revenues, is actually the one causing the decline in profitability.
Why Is This the Only Formula You Need to Master?
The single, biggest reason why this is the only formula you need to master is this: any organization will cease to exist if its profits are below zero for an extended period of time.
By looking at this formula alone clears all distractions.
Today, too many businesses are focused on shiny and exciting things that they often forget the basics. They are focused on getting investments, exits, IPOs, and all the other things you hear in the news. While nothing is wrong with those, you have to understand this in the original context of business — are you driving value to your customers?
Instead of spending your resources on those things, focus on this single formula and what it means for your business. It will give you an objective perspective of where you are right now and what you need to do.
At the end of the day, the only number that matters is profits. If you have profits as a business, it means you created value for your business and for your customers.
If for a prolonged period of time, your profits are below zero, you will close up shop. You are not creating customers. That means you are not delivering value.
If you are so down in the weeds monitoring the hundreds of metrics in your organization, yet fail to look at this very important number, it might be too late to pivot or to change your strategies.
If you are in this situation right now (which I certainly hope not), it’s time to rethink how your business delivers value to your customers. Whether your profits are positive or negative, take time to compare it with historical data. Segment it. Know which segment of the business is helping you create more value and which ones aren’t. Decide whether to continue with this strategy or not.
One tool I recommend using is the buyer utility map. It helps you find opportunities across the buying experience cycle that you and your competitors might have overlooked.
Don’t get lost in the complexities of running a business. Focus on a the basics first.
Now that we admitted that we’re just lying to each other, let’s get down to the real deal. But first, I have to tell you something.
I have used busyness as an excuse numerous times. Sometimes, I really am busy. But often, I say it to get out of something like hanging out with (toxic) people; or telling myself that I’m doing something worthwhile; or simply have something to say.
I recently came across this video on Twitter. I’m not really sure if it’s true or just a meme or something. But it made me think back to all the times I have used the words “I’m busy” to someone — my boss, my client, my family, and my friends.
But the truth us, busyness shouldn’t stop us from doing what needs to be done. We all have commitments. And regardless of how much time it takes or activity we do, what matters is that we fulfill those obligations — at work, our family and friends, and even our community.
What that means is if you don’t keep up, you will eventually get left behind. And this has happened to me lots of times.
I wrote an article about how to use Buffer and IFTTT together to overcome a specific challenge for me — which I later found out that many people are having as well. After ~6 months, Buffer discontinued the feature that I used in that post.
Because I didn’t keep up with the news that time, it took me 3-4 more month before I found out about it. In that time, a lot of people have seen that article. Unfortunately, it was not updated and no longer working.
I kept saying I was busy. Frankly, that’s partly true. At that time, I recently started with a new client. So I’m spending my available time reading up on the industry and learning about the business.
Looking back, I know if I kept up with my reading, it would only take me less than 5 minutes to fix the article. That’s not even a fifth of a show in Netflix — which I have been binge-watching with my wife every night.
Fortunately for me, it’s just an article. I’m not selling anything. So, it didn’t affect me directly. But what if it’s something that is relevant to your business? What if it’s something your customers use frequently with your app/product but because you didn’t update it, you received tons of complaints.
How to Dedicate Time for Learning and Growth
First, let’s get one thing out of the way — you don’t know everything. That is why it is necessary to keep learning no matter what.
You circumstances also aren’t an excuse:
You’re just a fresh graduate
Just had a baby
An entry-level person
have multiple businesses
Have debt
Learning is free. And while I’m advocating using technology to automate your learning, you can do this without spending anything.
All you need is your time and commitment.
I recommend at least an hour a day. That’s 60 minutes. Sometimes you spend more time, sometimes less. And that’s okay. The most important takeaway is that you allocate time to learn new things.
Here are 5 tips to help you do that.
Use technology to your advantage
Automation helps you do the mundane things so you can spend your limited energy to do the more important things.
I use two apps for my learning and growth session:
While I can combine the two apps, I decided to keep them separate. Feedly allows me to glance stories (from the websites I added) very fast. By browsing through the headline titles, I get updated on what’s happening. Some topics I included are the following:
Local news
Digital marketing
Advertising
Design
Business
Economy
Technology
If I find something that interests me, I click on the title then read it further. If it’s longer or needs a dedicated time to read and understand it, I save it to Pocket.
Pocket is an app where you can store articles and videos for later. This is the app I use if I want to really dive in the articles and process it.
As you can see, they serve two different needs. That’s why I kept them separate.
Setting up Feedly is very simple. After you create an account, you can simply press the + button to add new content. You can browse the categories or add specific websites you want.
I recommend browsing through the different topics that interest you. Then, add in 2-3 websites of reputable local news. Then you’re all set.
Now that you’ve configured the tools to help you with learning, you have to actually do it.
For most people, their calendars are only used for meetings. That’s an ineffective use of calendars, but that’s for another time.
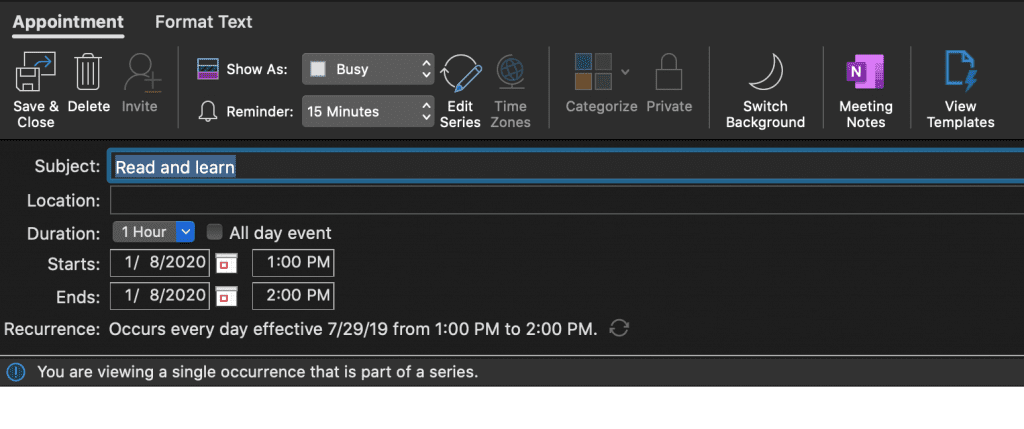
What I want you to do is set a recurring meeting for yourself to read and learn. Here’s how mine looks like:
It’s an hour every single day. Occurs after lunch. Sometimes I don’t read. Sometimes I move it earlier or later. But because it’s on my calendar, I typically do it.
Incorporate learning into another habit
If that’s difficult (which I highly doubt), or you really are busy, another recommendation is to add the task fo learning into another habit that you already do.
For example, you have a daily routine of making coffee before you start your day (like I do). Once you start that process, start your learning time too. Open up the Pocket app on your phone and click on the headphones icon to have it speak/say out loud. That way you don’t have to read and can still do your morning coffee routine.
You can add this to any activity you do:
While eating or cooking breakfast
Doing the laundry
Stuck in traffic
Back when I was still working in corporate, I used to ride the train to and from the office. I use this time to listen to podcasts or the articles I have on Pocket.
This way, I don’t “take away” from my day. Rather, I make full use of my commute time.
Diversify
The next tip I highly recommend is to diversify your reading. Just like what I shared earlier, I read about stuff not related to my industry or work.
If you watched the Decoding Bills Brain series on Netflix, you’d have noticed that Bill Gates also does this. He reads stuff outside Microsoft and technology. This helps him take the insights and learnings from others and apply it to his life. This process will also help you develop critical thinking. And the best part is it gives you a wider perspective.
Allocate a budget
Lastly, I recommend allocating a budget to your learning and growth. Investing in yourself is one of the best investment you can make.
Two years ago, I decided I’ll spend up to 10% of my income to my personal learning and growth. Looking back, I spent less than that. But that decision gave me the peace of mind to spend on those things.
Usually, I hesitate to buy books because they are expensive. I always tell my self it’s not within my budget. I can learn those online from other articles.
But oftentimes, books offer something more in-depth that articles, even the 2000+ words I often read, don’t cover.
The mindset is if it’s within the budget, just go buy it.
This includes books, subscription, tools, etc.
Right now, I’m subscribed to Kindle Unlimited. I received an offer from Amazon for a $0.99 for 3 months (vs the 1-month trial). So, since the amount is so low and really within my budget, I immediately subscribed.
I also bought two online courses last year: one about python basics (programming) and about photography.
Over to You
As you can see, my learning isn’t limited to my industry nor what I do. Yes, the majority of it is. But that doesn’t stop me from learning something from others.
Bottom line: you should dedicate time to learn new things every day.
You can start with the free ones until you get the habit going.
One of the sad truths of life is that we all have a limited amount of energy per day. Humans aren’t designed to be operating at 100% capacity for 24 hours. And because of that, we have learn to prioritize what must be done today and what can wait until tomorrow.
We all face constant distractions every day. The biggest culprit we don’t notice is multitasking.
Studies have shown that multitasking can reduce productivity by as much as 40%. So, instead of trying to multitask, which only 2% of the population are actually capable of doing, stick to one task and finish it first.
But what about the other stuff?
The answer is to automate it.
Table of Contents Click on any of these to jump straight to that topic
3 Automation Apps You Should Use in Your Daily Life
The three apps I’m going to mention are very popular and. You’ll find a lot of articles written about them already describing their history and their capabilities. I’m not going to do that. Instead, I’ll share with you the actual automations I use them for to save me a couple of seconds here and there.
Shortcuts is one of the tools I use every day. Or, put it in another way, it runs by itself without me doing anything. Once I set it up, it does the job for me.
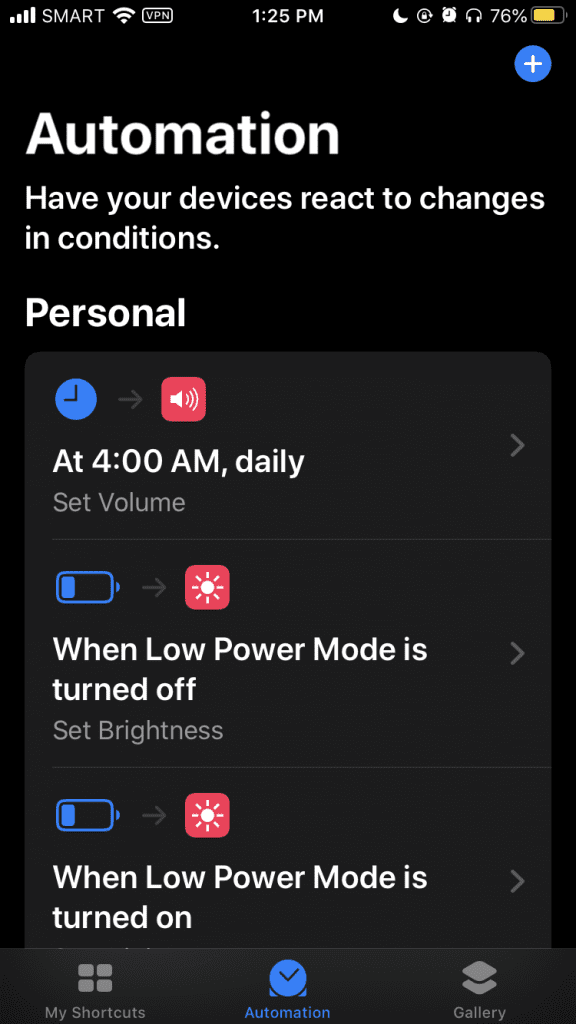
Of course, things would be different for your particular needs. But for me, the most used automations in Shortcuts are the following:
Reduce screen brightness when low power mode is on (automation)
Increase screen brightness when low power mode is off (automation)
At 4 AM, set my phone’s volume to 100% (automation)
Deep Work (shortcut)
The first 3 are self-explanatory; while the last one is more personal for me. Let me explain.
First, download the app if you haven’t already. Then, once you open the app, you’ll notice three separate tabs at the bottom:
My Shortcuts
Automation
Gallery
Automations
This is the second/middle tab in the Shortcuts app. Automations make your device react to changes in conditions.
For example, whenever I turn the low power mode on, my goal is to save up on battery. Naturally, to help with that, I’ll also lower my screen brightness. Instead of doing two tasks that take up an additional 2-3 seconds, I just do one and it automatically does it for me.
Have you ever set an alarm only to wake up not hearing the alarm? That has definitely happened to me a lot of time. The culprit? It’s not because I hit snooze and can’t remember it. It’s because the alarm is tied to your phone’s volume. So, if during the night, you were watching Netflix or listening to some music, naturally, your volume would be set to around 20%. But then you fall asleep. Then your alarm goes off at 20% volume. If you are very tired the night before, you will most likely sleep through this. But if the volume was set to 100%, there’s a higher chance you’ll hear the alarm and wake up.
My Shortcuts
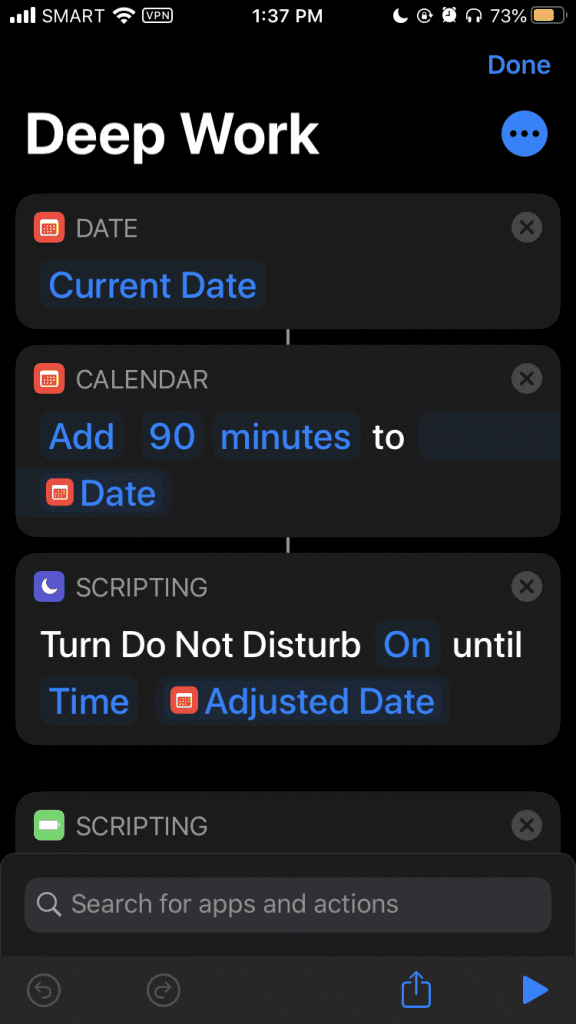
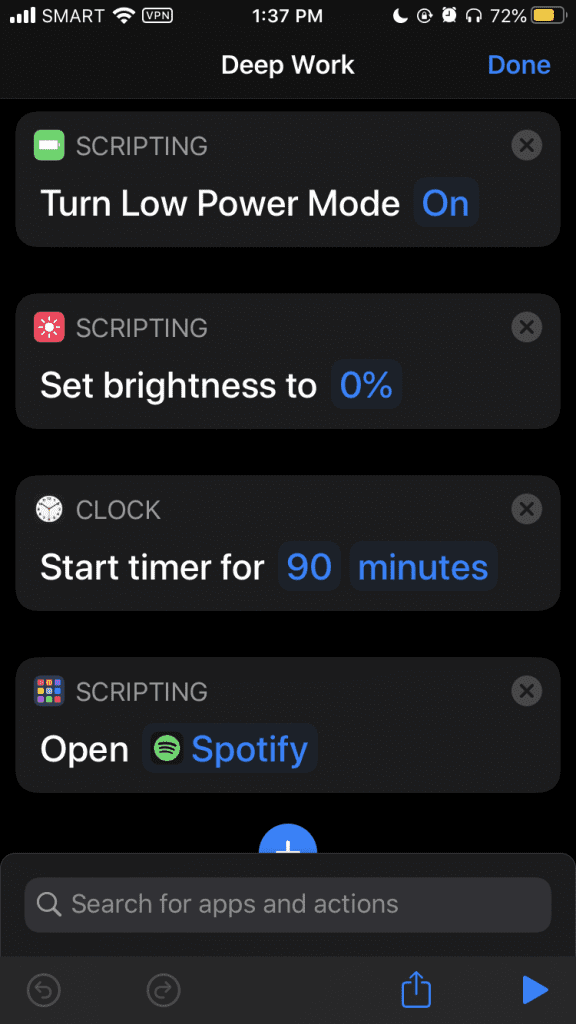
I have multiple shortcuts here, but I’ll only share one of them and what I call Deep Work. At its core, what this shortcut does is whenever I want to do some deep work, I click on it and the magic begins:
A timer of 90 minutes starts
Do Not Disturb is turned on for that 90 minutes
Low Power Mode is turned on
My phone’s brightness goes dim
My music player (Spotify) opens
I then manually select my Deep Focus playlist
If you’re using Apple Music, you can do the same. That means you don’t have to manually select a playlist and just have it automatically played for you.
There are tons of ways you can use Shortcuts to automate things that you do frequently. For example, you can have it automatically send an SMS to your spouse when you get arrive at work, or automatically play a playlist when you connect to your home Wi-Fi network.
Take a couple of minutes to think about what you do daily that you can pass on the work to your phone.
For more inspiration, feel free to check the Gallery to find out how others are using the Shortcuts app. One of the automations I plan to create once I upgrade my phone is the use of NFC tags.
2. IFTTT
IFTTT is one of the oldest automation tools on this list. It stands for “if this, then that.” And it’s pretty self-explanatory. Most automations are actually configured like that. It contains two parts: a trigger and an action.
The Shortcuts app is limited to the iOS ecosystem, or more specifically, my device (iPhone or iPad).
I use IFTTT for various things. But one of the most used automations I have in IFTTT is to automate social sharing of new articles I published on my website.
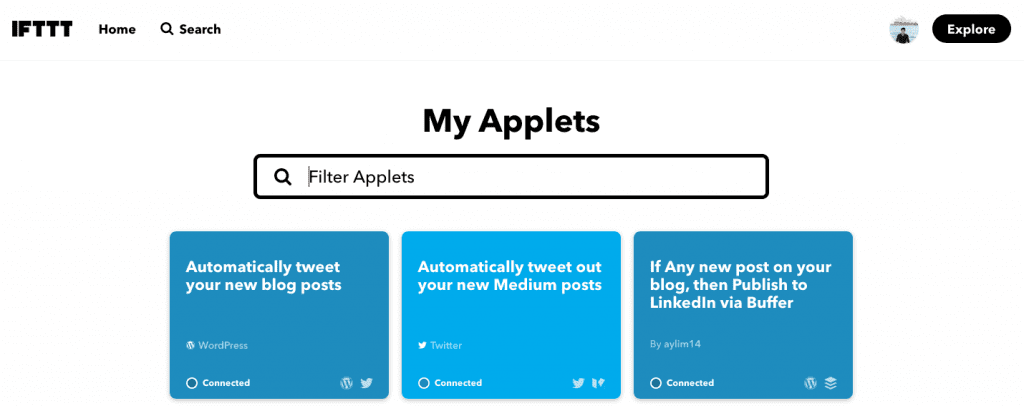
IFTTT Example Applet Recipe: Automatically tweet new blog posts to Twitter
The interface has changed recently. Honestly, I don’t like it. It looks more complicated to me than before.
But to set this up, you can download the app on your phone or create an account online. Once you get inside, you will see the “applets” you have. These are your automation recipes.
If this is the first time your using IFTTT, head on over to the Explore section. You can find some inspiration there or start creating your own applet from scratch.
Depending on what you want to automate, you can simply “connect” an existing applet so you don’t have to configure anything else. Alternately, if you want to create one, you will go through something like this…
How the Magnet App for Mac Works
In the video, I already connected my WordPress website and my Twitter account. But if you haven’t done so, you will be asked to do it on that screen itself. Just like with the Shortcuts app, you can do a lot of automations here.
For example, I setup various Applets that do something like this: if website ABC publishes a new article, add it to my Pocket account. That way, my Pocket always has something new I can read.
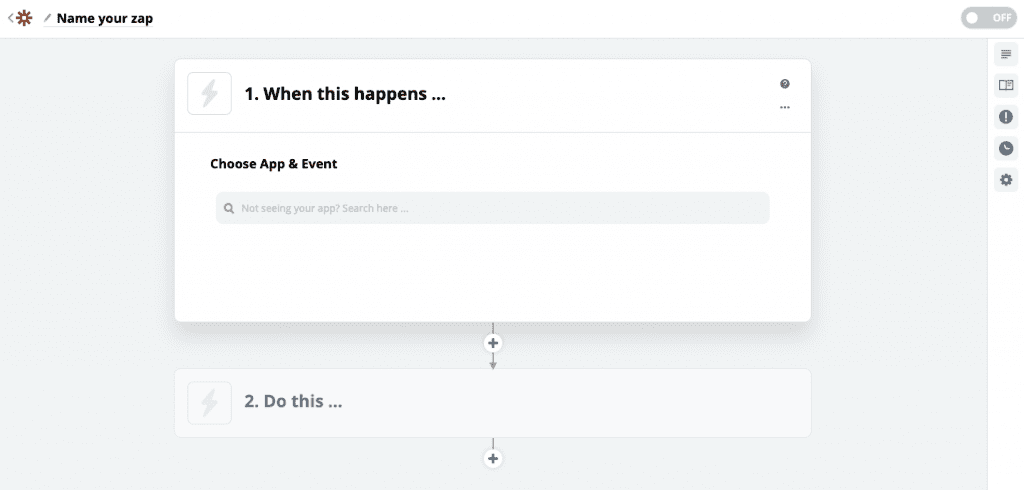
3. Zapier
Zapier is one of the most popular and powerful automation tool out there. It allows for multiple conditions and logic branches, unlike Shortcuts and IFTTT. It also boasts of having the ability to integrate more than 1,500 apps. But, it comes with a price. You can create a free account but would be limited by its use to 5 running zaps (this is what you call the automation itself).
Just like with IFTTT, you can do the same thing with Zapier. For example, if you publish a new blog post, have it automatically posted on Twitter, LinkedIn, or any other social media tool. But since the free version can only run 5 zaps and I can do the same tasks inside IFTTT, I limit what I do inside Zapier to more complex tasks.
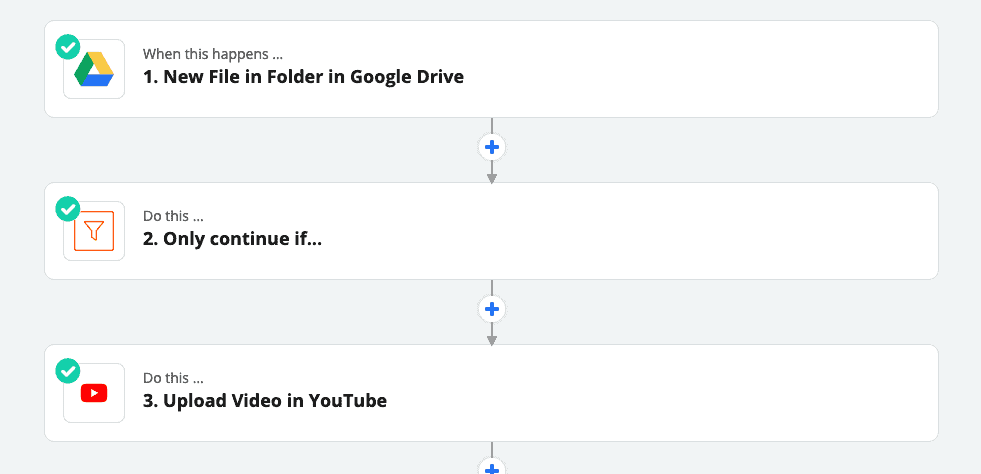
Zap Example: Automatically post hi-resolution video to YouTube
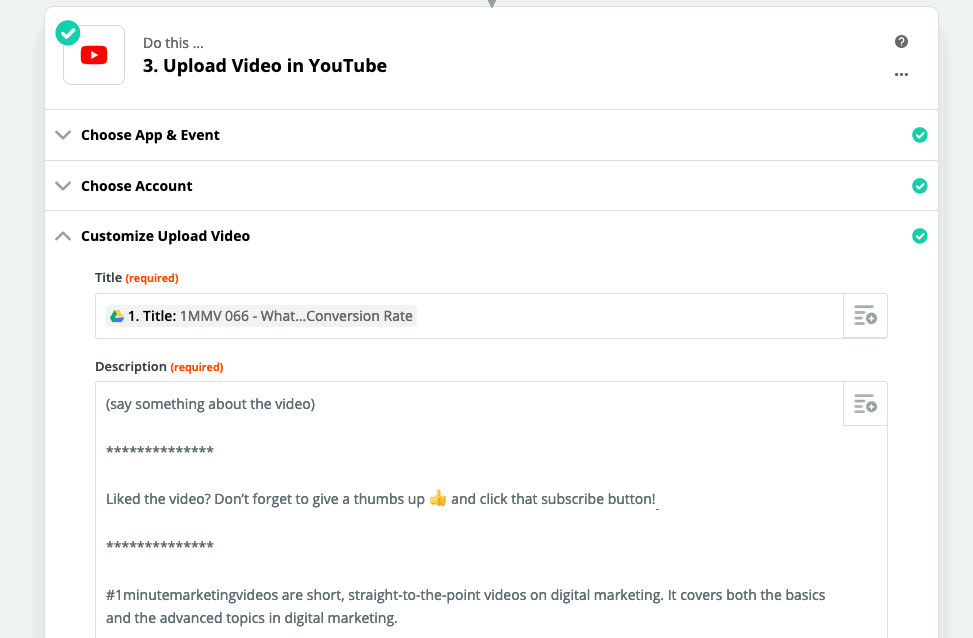
One part of this process is to distribute the finished video on YouTube. Since I use Google Drive to store all my files, I created a Zap to upload new video to my YouTube channel with some pre-defined data. The video on YouTube is set to draft first. I then go in and edit the description, then schedule or publish it.
The main benefit of this setup is I eliminate the need to pre-fill the required data by YouTube and I don’t have to wait for it to upload as well. Once I move my final video to a specific folder in my Google Drive account, it does its magic.
Here’s how that looks like inside Zapier. First, make a new Zap. You’ll see a screen like this…
Next, populate it with the apps/services you want to do. The formula is similar to IFTTT: “when this happens…do this…” You will also get asked to connect the app if you haven’t done so in the past.
The final output of the Zap will look like this:
Let me break it down step-by-step…
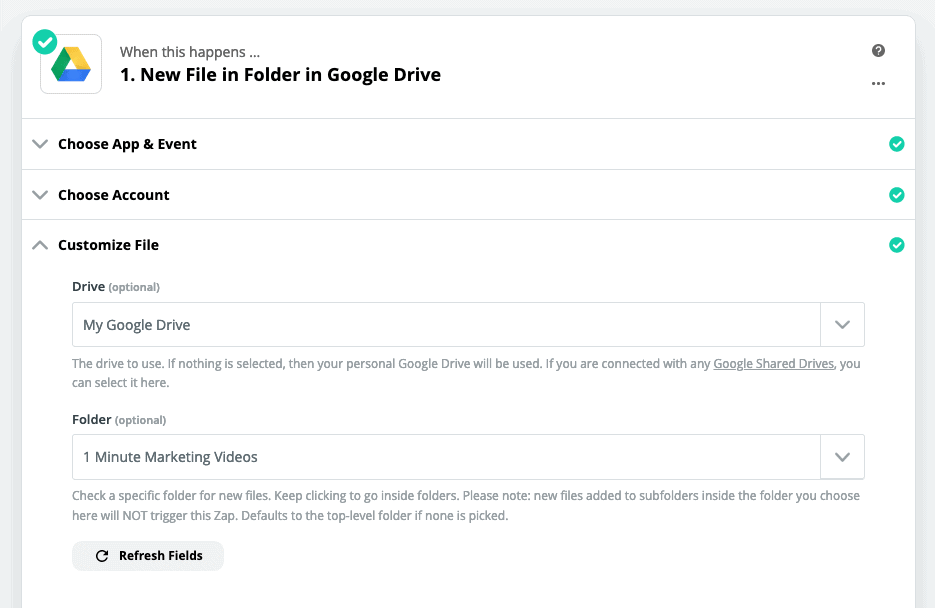
1. When there is a new file in Google Drive inside a particular folder
I created a specific folder inside my Google Drive account so that it only triggers when there is a new file in that folder.
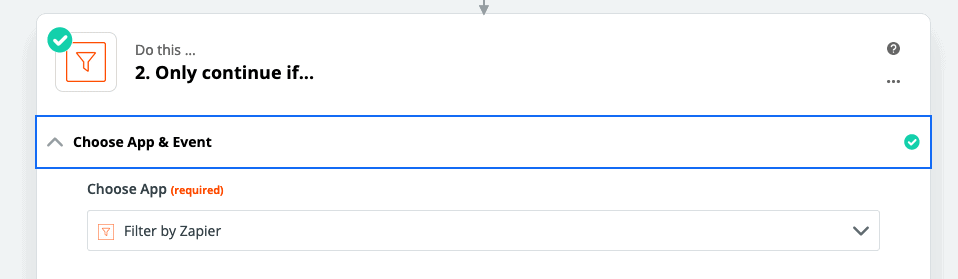
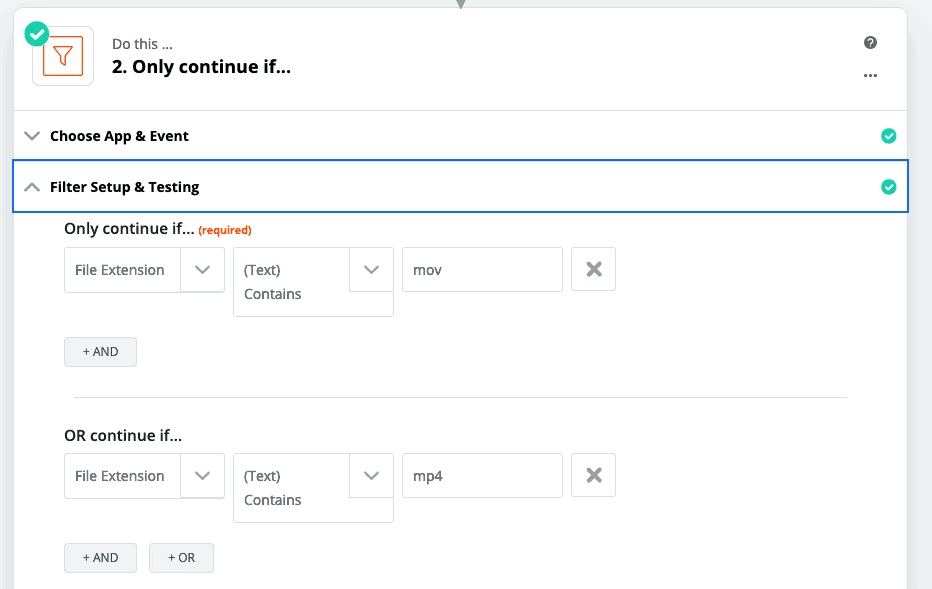
2. Add a filter so it only looks for videos
If you don’t add this, the zap will trigger every time a new file is added. For my purpose, I also add the cover photos (jpg) inside the same folder.
I don’t want to receive errors for my zap for them because I have to manually check them one-by-one to see if they are valid or not. That’s why I added this filter to only continue if the file extension is an mp4 or mov file.
3. Populate default fields in YouTube
The final step is to add the default/required fields in YouTube. In my case, I have a specific naming convention. So that works great on the title field. I also have a default text/copy that I use in the YouTube description.
Just go over the required fields and you’re on your way.
The last step in the automation process is to test out if the zap is working. Add a new video (with file extension of .mov or .mp4) then it will automatically get posted on YouTube as a draft.
I have to tell you, this saved me a ton of time back when I was working on this project. In a country with terrible internet connection, this zap was a life-saver. I don’t know if I continued with it if it took me 45 minutes to upload the video to YouTube.
Over to You
Technology is only useful if it helps you become more productive and do more things in less time. If it drags out your day, then that’s definitely something worth cutting out from your life.
I hope you find these examples useful. I’ll be sharing more examples of automations in the future. Do you have any repetitive or administrative task that you have automated, or would like to automate? Let me know in the comments below.